D.I.Y Beauty Dish Tutorial

Messages
3,980
Name
Tomas
Edit My Images
No
That's right, time for a bit of destruct it yourself! I know this should be in the tutorials section but theres a wee bit o maintenance going on and in the excitement I posted it here instead of the lighting section. All in all I'm a bit of a mess, sorry!

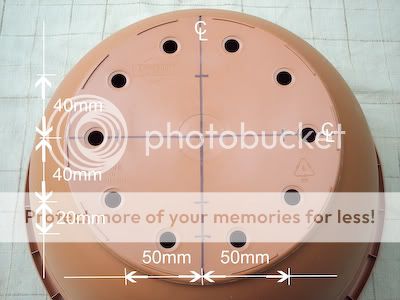
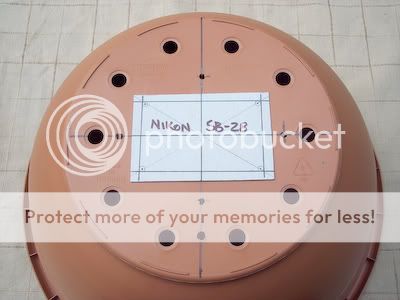
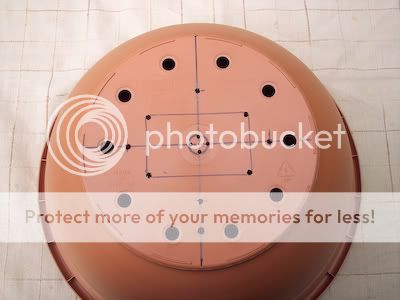
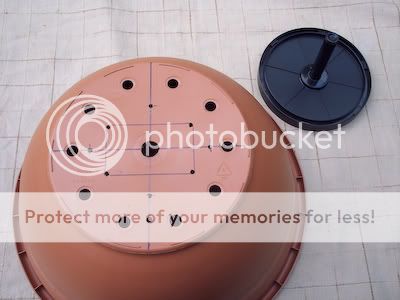
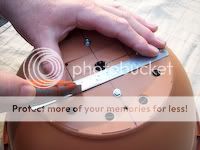
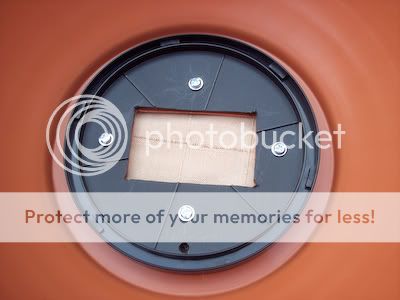
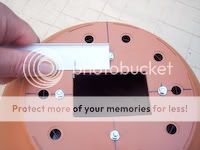
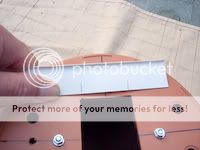
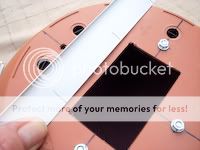
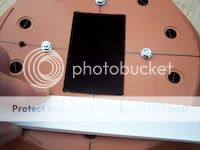
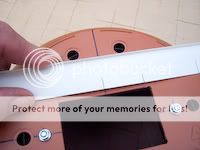
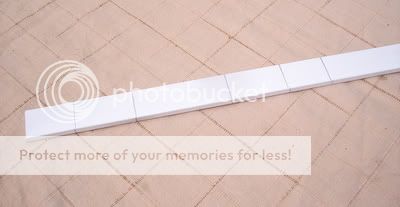
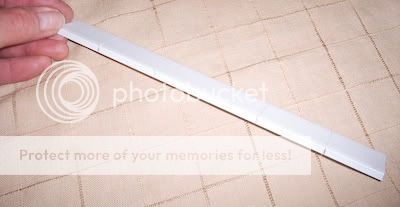
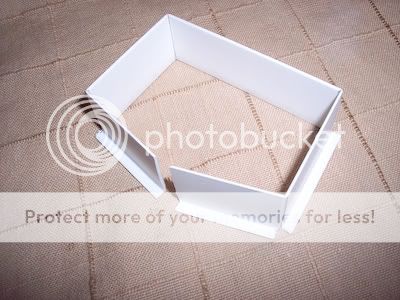
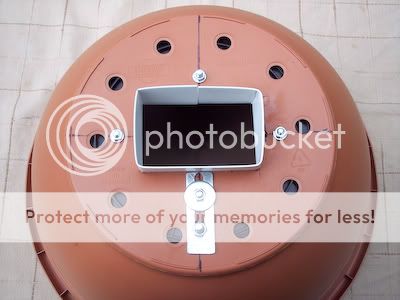
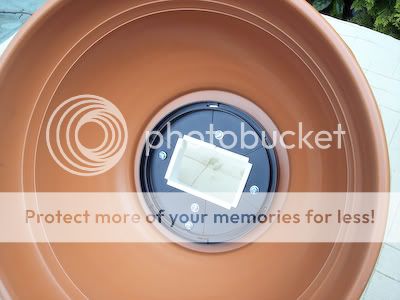
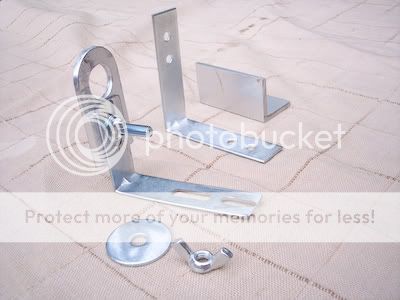
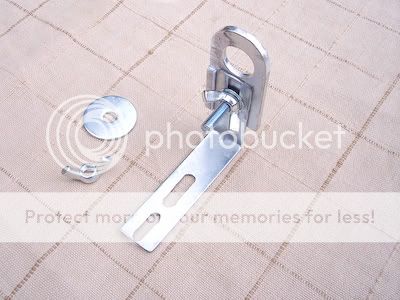
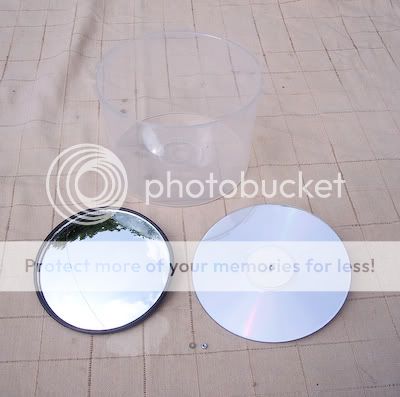
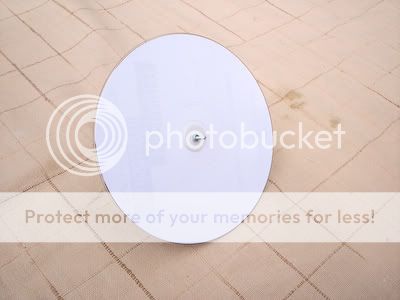
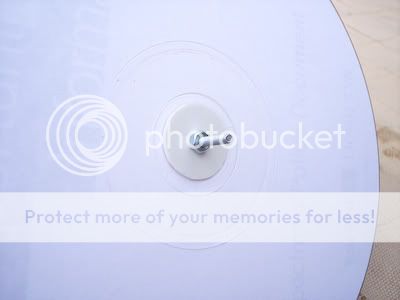
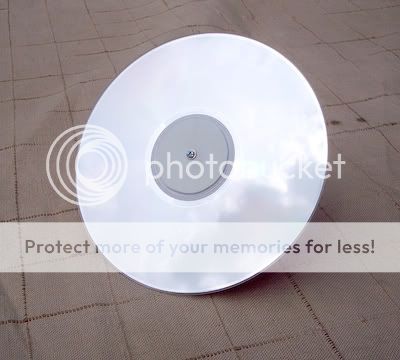
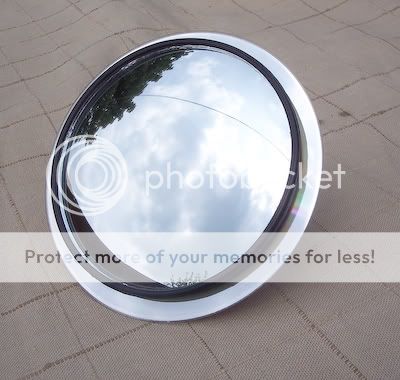
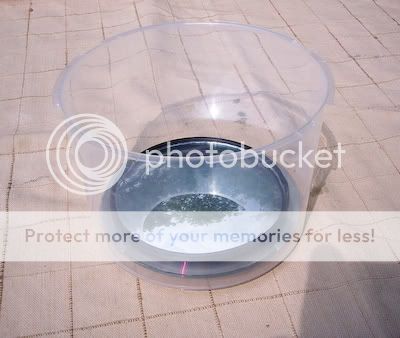
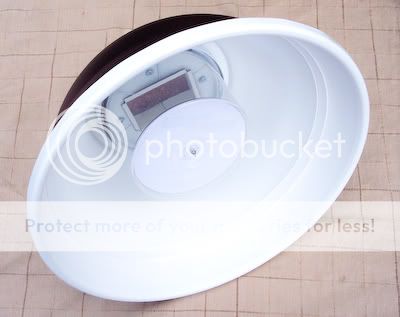
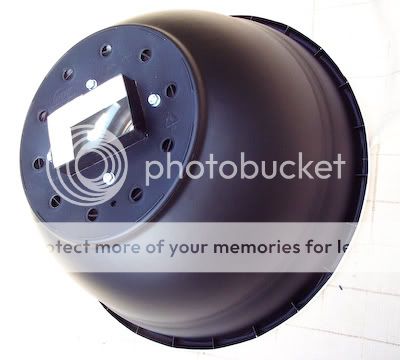
This following tutorial on this home made beauty dish for flashguns has been fashioned up by my Dad, a wizard with making gadgets, gizmo's and the like.
I apologise if this is a bit all over the shop but I live in Helsinki and my Paps lives in the West Midlands and were both pretty busy so the layout and coherence of this is a little mad, but hopefully it still makes sense!

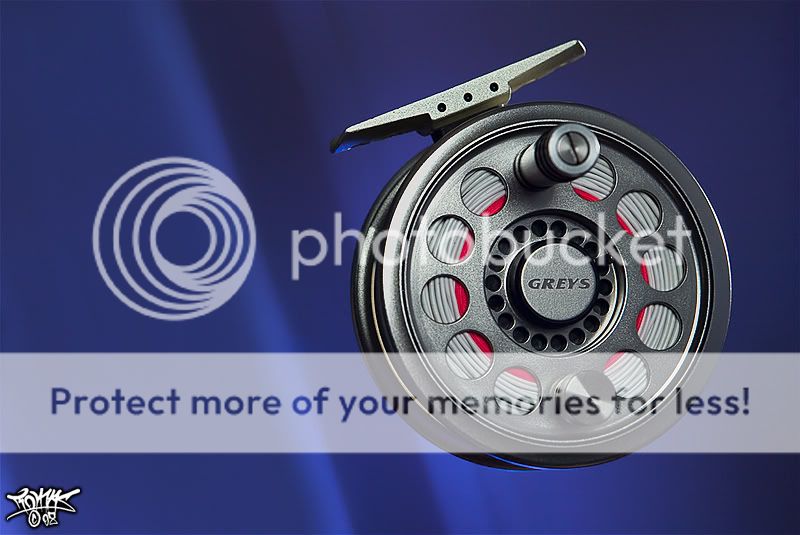
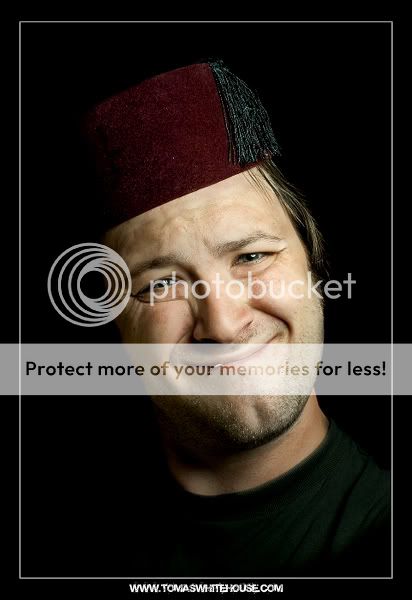
Before the tutorial, here are a few shots taken using the D.I.Y Beauty Dish:

1: Greys Fly Reel. (Backlight shot through a cookie with blue gel).
DBFD4468.jpg


2: A rather handsome self portrait!
Cooper.jpg


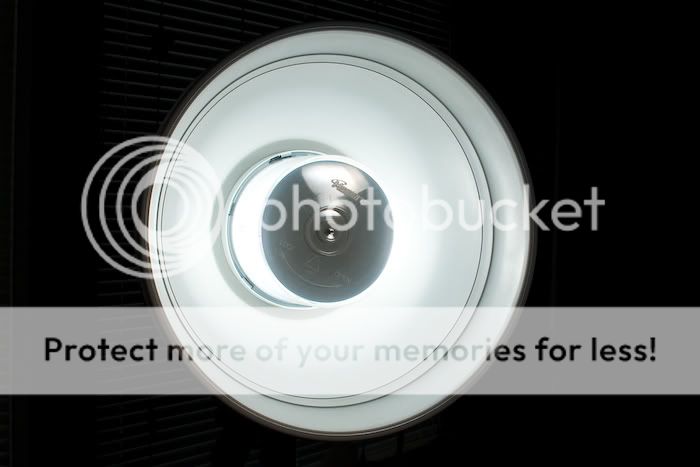
3: The dish in action:
_MG_3110.jpg


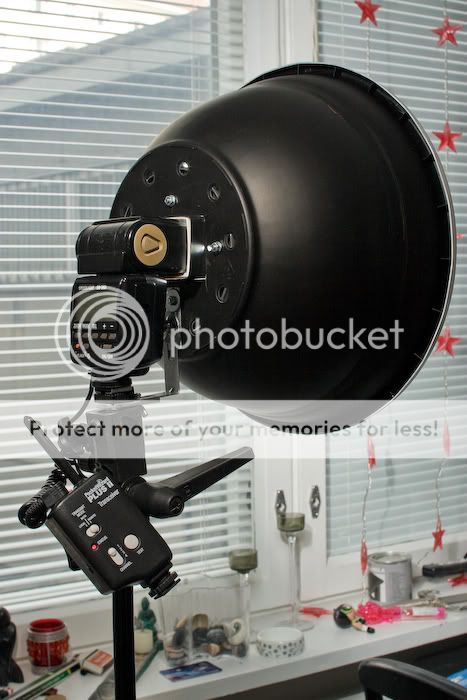
4: My basic set up for use:
_MG_3099.jpg


Ok, on with the tutorial!

Continued >
 
HOME MADE BEAUTY DISH PART 1

By David Whitehouse

Materials:
33 cm shallow bowl
Convex Mirror
50 CD/DVD Spindle case
Unwanted CD/DVD [ or the unsolicited ones that come through the Post ]
One length of 26x5mm white plastic angle strip, obtainable from Homebase.
If you intend to make the Mounting Bracket, you will need to obtain one 63mm or 75mm [
better option ] metal cabinet angle bracket.
Homebase do the 63mm ones. You will also need a short length of 25x25x2mm aluminium
angle. This more likely a little more difficult to find, although Hombase do a similar size, but
thinner gauge.
One simpler option to my Mounting Bracket would be to get a 75mm cabinet bracket but
at least 25mm wide. This would have to have precise location holes drilled to fit the secur-
ing points on your Beauty Dish and Flash stand. I live in the UK but my son, who is the re-
cipient of my Beauty Dish lives in Finland and has the Flash and stand, so hence my ad-
justable Bracket to allow for dimensional discrepancies, [ or cockups ].

PICTURE 0
Begin by marking out the Dish
base as shown. It is important
that the North/South axis is
drawn between the drain
holes, to accommodate
enough space for the Mount-
ing Bracket securing bolt,
which goes through the south-
ern most hole.

0:
Picture00a_.jpg


PICTURE 01
Measure the front face of your
Flashgun, and mark these di-
mensions down onto a piece of
scrap card, [ cereal packets
are good for this ] which will
act as a Template. Allow an
extra 1mm all round to allow for
the Opening Liner to be fitted
later. Ensure to extend your
marking out centre lines up to
the edge of the Template. Lay
over the Flash Template, lining
up the centre lines with the Dish
Base centre lines, and with a
Bradawl or scriber mark the
corner holes through onto the
Dish Base.

1:
Picture01a.jpg


PICTURE 02
Drill 3mm holes in the positions
shown and an additional 4mm hole
in the Southernmost position [
Bracket Mounting ].To enable an
accurate positioning of the CD
Case Diffuser, I devised a method
to first provide a 15mm hole in the
centre to first locate the spindle of
the CD Case. I drilled out 4 x 3mm
holes the used my drill bit to ‘saw’
around to each hole. It doesn’t mat-
ter if the hole is a little rough but
this only a temporary measure.


2:
Picture02.jpg


PICTURE 03/04
This shows the centre hole and the
CD Base Spindle pushed in. This
ensures that it locates centre of the
Dish Base. On my CD Base I had
six moulded vanes which I wanted
to avoid drilling through. By rotat-
ing the CD Base you can offset
these vanes from the centre lines
marked on the Dish base.

3:
Picture03b.jpg


4:
Picture04.jpg


PICTURE 05/06
Turn over the Dish and drill the 3mm holes
as shown. I recommend drilling one hole
then putting in a bolt as you go round. This
helps to keep the CD Base secure and less
likely to move out of place whilst drilling.
When this is done, remove the bolts and re-
site the CD Base inside the Dish then re-fix
the bolts.

5:
Picture06.jpg


6:
Picture07.jpg


PICTURE 07/08/09/10
To cut out the Flash opening, I recommend using a ‘Stan-
ley’ type craft knife and a metal ruler. Be very careful here,
I still bear the scars of previous projects. Using slow, light
cutting strokes, cut along
each line until eventually
cutting through both the
Dish Base and the CD
Base

7:
Picture08.jpg


8:
Picture09.jpg


9:
Picture010.jpg


Continued >
 
Continued>
10:
Picture011.jpg


PICTURE 11/12/13/14/15
Take the plastic Angle Strip and mark
around the Flash opening. Measure
slightly inside or less than the actual
opening, about 1mm to allow for the
bend radius when fabricating the Open-
ing Insert.

11:
Picture012.jpg


12:
Picture013.jpg


13:
Picture014.jpg


14:
Picture015.jpg


15:
Picture016.jpg


PICTURE 16/17
To make the Opening Liner, mark up,
on both sides and cut off an overall
length. Turn the strip to the side as
shown and score a slight groove along
each line on the outside edge of the
strip. I use a mini saw then a light nee-
dle file to accomplish this. This is to
enable the plastic to be bent accurately
without breaking. Lastly make a cut
down the short side of the angle.

16:
Picture017.jpg


17:
Picture018.jpg


PICTURE 18
Bend the strip to form the Insert shape.
This should be a push fit into the Flash
Opening., but can be glued with epoxy
or silicone adhesive in the final stage
of completion.

18:
Picture020a.jpg


PICTURE 19/20
This shows the Opening Liner in
place. It is worth pointing out that
when all the bolts are tightened, the
Dish Base tends to depress inward.
This can be overcome by simply bend-
ing the Mounting Bracket slightly to
compensate. Note the flat plate used as
a base for the Mounting Bracket. This
was an ‘offcut’ of a bracket that went
wrong.

19:
Picture021a.jpg


Continued >
 
Continued>

20:
Picture022a.jpg


PICTURE 21/22
The mounting Bracket I made had to
be adjustable. I used materials I had
to hand, one 63mm metal angle
bracket and a small piece of
25x25x2mm aluminium angle,
shown in the background of the Pic-
ture. The measurements can be var-
ied, according to your Flash gun and
Stand attachments. I was given some
basic sizes and drew them out on a
piece of scrap card, to represent the
Flash gun, the Stand mounting
point, and the distance of how far
into the Beauty Dish the Flash
would project.
It would be possible to make a more
simple Mounting Bracket with
something like a 75x75xmm angle
bracket 25mm wide, that could be
drilled to exact fixed dimensions if
you have all the actual components
to hand.

21:
Picture023b.jpg


22:
Picture024b.jpg


PICTURE 23
Here are the basic components of
the Dish Reflector.
Picture026a.jpg


23:
Picture027-1.jpg


PICTURE 24/25
I used an unwanted CD as a
mounting for the convex mirror.
To enable this to be de-mountable
if any damage occurred to the clear
outer case, I started by cutting out
two plastic circles, one 34mm di-
ameter and the other 15mm diame-
ter. You can take these from any
scrap plastic container, preferably
white. These were to provide a
centre fixing for the CD. I used a
blank CD label to mask the legend
on the CD, and drilled a 2mm hole
in the plastic circles and the centre
of the clear plastic CD case. I fixed
a 14x2mm bolt through and se-
cured it with a nut, as shown in
Picture 24.

24:
Picture028-1.jpg


25:
Picture029b.jpg


PICTURE 25
This shows the reverse side of the
CD.

PICTURE 26
I stripped of the backing sheet of the
Convex Mirror and held it carefully
over, but off the surface of the CD,
to position it as central as possible,
then pressed down to secure it in
place.

26:
Picture030a.jpg


PICTURE 27
The Reflector component is ready to
mount into the clear CD Case. This
is then secured with a small nut and
washer, completing the assembly.

27:
Picture031a.jpg


Continued >
 
Continued >

PAINTING
The Dish was stripped of all components. I recommend rubbing the whole Dish down with some medium wet and dry abrasive paper [used wet]. This will remove most greasy finger marks and the like and ‘key’ the surface prior to painting.
Rinse this off with clean water and leave to dry.
I bought a 500ml can of Halfords white matt primer and matt black. I
sprayed the white first, let to dry for 3 or 4 days , then masked the outside edges and inside base with paper and a low tack masking tape. I would suggest you rub the adhesive side of the tape with your thumb to remove
some of the stickiness otherwise you are liable to pull off some of the paint on removal, as I did. You can then put on the final
coat of black. In retrospect you may wish to investigate better grades of spray paint [suitable for plastic] as I found the Halfords paint a little
thin, and liable to flake. I eventually recoated the Dish with ‘Monster’ colours from
www.monstercolors.com who have various suppliers in the
UK, but I got mine from In-a-city arts, York Road, Kings Heath Birmingham, 0121 443 2209.[don’t forget to ask for the spray caps]. This paint is also Acrylic, much thicker and seems to adhere better, although it dries a satin finish. Anyway leave it all to dry for a week. It just remains to re-assemble all components and you are ready to go. Good luck.

28:
Picture033c.jpg


29:
Picture034c.jpg


So there we hopefully have it (y)
 
wow - that is pretty cool! You ever thought about taking orders for people severely lacking in DIY skills & Tools? :p
 
wow - that is pretty cool! You ever thought about taking orders for people severely lacking in DIY skills & Tools? :p

Cheers Jimmy, I did mention that to Paps haha, he's just finished making a reflector version with a chrome inner dish! That's on it's way to me as we speak! Can't wait to get me mitts on that! (y) My Dad is FAB!
 
Absolutely brilliant!

I've got the bowens one for my studio lights and it's my absolute favourite. (Cost an absolute blooming forture though!)Now I've seen this I'm afraid it might have to be a day off work and a trip to Homebase.

Thanks to both you and Papa, tell him I'm on my way round! :)
 
Awesome! If I hadn't read the instructions I would have continued thinking it's was a shop bought item! Hats off to you for making this.
 
That is absolutely superb and I just wish my DIY skills were up to it but I might give it a go anyway. Your Dad is very talented! :clap:

Lovely shot of the reel as well.

(y)
 
Absolutely brilliant!

I've got the bowens one for my studio lights and it's my absolute favourite. (Cost an absolute blooming forture though!)Now I've seen this I'm afraid it might have to be a day off work and a trip to Homebase.

Thanks to both you and Papa, tell him I'm on my way round! :)

I was really considering a Bowens but I had just exhausted my budget on good glass, that's where Dad steps in and saves the day!
I don't know for certain how the D.I.Y version stands up to a shop bought jobbie as I have never had the pleasure of using one before, but I'm very happy with the results ;)

Awesome! If I hadn't read the instructions I would have continued thinking it's was a shop bought item! Hats off to you for making this.

Cheers Dave!(y)

That is absolutely superb and I just wish my DIY skills were up to it but I might give it a go anyway. Your Dad is very talented! :clap:

Lovely shot of the reel as well.

(y)

Thanks muchly mate! Give it a go, you won't be disappointed!

I'll let you know how the chrome reflector version fairs out, it should be with me by tomorrow! woo hoo!

T.
 
Such a neat idea! I'm gonna try to find a white plastic salad or serving bowl to avoid the need for too much painting!

Thanks for posting
:D
 
Such a neat idea! I'm gonna try to find a white plastic salad or serving bowl to avoid the need for too much painting!

Thanks for posting
:D

No worries Mart, make sure that you find a 'dish' though as opposed to a 'bowl', bowls don't work too well at all, they are too deep and cause the reflector component to be positioned incorrectly. Good luck (y)
 
Just finished the DIY dish - gonna put it to the test soon!

I've not painted the back of the bowl black. Did you do this for aesthetics or does it help prevent the light from going out the back of the dish?

Here's a shot of my cat with the DIY dish:
PogleTreatFramed-1.jpg
 
Just finished the DIY dish - gonna put it to the test soon!

I've not painted the back of the bowl black. Did you do this for aesthetics or does it help prevent the light from going out the back of the dish?

Purely cosmetics mate with regads to the black paint job.
Well done with the photo! (y)

This was on the Strobist site?!?!

I made one of these from there, works quite well

There are plenty of versions on the net, yes, but as My Pap was taking photo's of it to send me anyway I thought it would be a nice idea to post it here as this one is far more descriptive/informative, has the English material links and overall clearer descriptions of the materials used. (The gutter bit thingy)
Also the bracket which Pap made, none of the other tutorials have or describe how to make one, So I thought it was worth it and judging by folks reponse they do too.
 
I may well do the black paint too.

So far I've not made the bracket. I used a craft foam around the flash cut-out and it hangs onto my SB-600 nicely. As such I'm not needing to use a bracket. Mind you, when the foam gets loose, I may well build the bracket then...

Thanks for the instructions - I've seen a few sets around but none so clear and concise as yours.

Here's one of my teddy taken with the dish:
MyTeddyFramed-1.jpg
 
I may well do the black paint too.

So far I've not made the bracket. I used a craft foam around the flash cut-out and it hangs onto my SB-600 nicely. As such I'm not needing to use a bracket. Mind you, when the foam gets loose, I may well build the bracket then...

Thanks for the instructions - I've seen a few sets around but none so clear and concise as yours.

Class shot!!! Real, real nice!
Thanks mate, I'll pass your thanks on to my Dad.

My Dad's views on the bracket are that it can be done much more efficiently, he just used materials that were at hand as opposed to hunting around for more worthy components.
It takes the weight of the flash and puts it onto the umbrella swivel so you get a much more durable connection. I've just received the reflector version in the post so I'll post some photo's of that too soon.

T.
 
Please do thank your dad - he did a good job.

I hope you don't mind - I put a link to this thread on Nikon Cafe (another forum I frequent) such that they can benefit from your efforts too.

If that's a problem I'll pull it.

The link is: http://www.nikoncafe.com/vforums/showthread.php?p=2010424#post2010424

I look forward to the reflector version too.
 
Perhaps you should consider a production line? I reckon if you bought a bunch of the raw materials, made some jigs etc for the cut-outs, you could knock them off pretty quickly and charge for them. :D

In the end I used a white melamine dish that's about 30cm in diameter. It was a little too shallow to use the 50 CD container so I'm using the 25 CD version but have both to test them out later.
 
Good work with the tutorial, now if only I was any good at DIY I may make myself one :)
 
Wow that is great!!

If you ever start taking orders please let me know and I will purchase one - I cant do D.I.Y because I am useless at it lol :)
 
Great but...how much do all the bits cost...Bessel do an 18" version with a grid and diffuser for £55...so three different looks available...

http://www.bessel.co.uk/info/46cmBeautyDishSFITwithCover.html

STEVIER

Cheer for the links Steve.

I buggered about with making this dish a fair few years ago now, before they were available for hotshoe flashes or the brackets to mount a hotshoe flash to a regular dish. It's an old thread.

Walimex do a great dish for a hotshoe ;)
 
Aha...never checked the date...thats what happens when its the morning after the night before...I tried a few before I got the Bessel as well good fun...but the prices are more reasonable now...especially with a grid...

But your is oone of the best Ive seen made...

STEVIER
 
Aha...never checked the date...thats what happens when its the morning after the night before...I tried a few before I got the Bessel as well good fun...but the prices are more reasonable now...especially with a grid...

But your is oone of the best Ive seen made...

STEVIER

Ney bother mate, it's the morning after the night before for me too today :)

I can't really take any credit for the above dish, it's all my Dad's doin, he's a wizard with all things DIY.

I got a real good dish from fotowalser in Germany in the end, they do a great little 45cm bobbie for small flashes.

T.
 
Back
Top