First pics with new lens... need a lot of help!

Messages
283
Edit My Images
Yes
I'm still a beginner and have only ever used a kit lens that came with my camera! I bought a new lens and tried it out today briefly in the garden and then when my boys were in the bath.

I just couldn't get a clear picture :shrug: They looked fine on the camera and then I put them on the computer and it turns out they are actually seriously out of focus.

I tried both manual and auto focus.

Maybe it's just trying to get used to using a non-zoomy lens :shrug:

Oh well here's a couple of pictures, please give any advise/criticism you can and hopefully it will help me improve...


So this is what they were mainly coming out like..

Blurry by Chazsucks, on Flickr


But some were are blurry as this (and they definitely didn't look it at the time) :wacky:

Very blurry by Chazsucks, on Flickr

I did get one actually in focus though... not sure how?
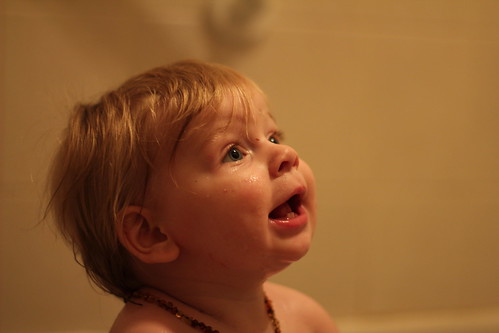
Clearer by Chazsucks, on Flickr
 
What lens is it?

I am no pro but it looks like it was relatively poor lit which maybe why it struggled to focus, the last one looks well focused, you might need to adjust the white balance a little as the skin tones look a little orange.

Other than that they look like fun shots.
 
Heres a quick white balance adjust I did.

6661646325_ccd7256d4c.jpg
 
I use LighRoom, I just toned down the colours using the white balance slider. Very simple.
 
Hi,

You might want to up the ISO on your camera if shooting in real low light situations.

Exposure 0.017 sec (1/60)
Aperture f/1.4
Focal Length 50 mm
ISO Speed 320

Try ISO 1600 and it will increase your shutter speed to get it 'less blurry'. :)

Increasing the ISO will increase noise, but a noisy picture is better than an blurry picture.

Hope this helps,
Chris.
 
Shooting moving kids at f1.4 is VERY difficult. You'll get more OOF shots than in focus. I would recommend stopping down to around F2 and increasing your ISO until you can get a shutter speed of at least 1/100th second.

Alternatively wait til they fall asleep :)
 
Btw - thanks to the PC brigade and far too much negative press I thought it was almost a hanging offence to take pictures of children in the bath. It's lovely to see and reminds me of many of the photos of me as a toddler. Ah, memories....
 
Thanks for the tips everyone and thank you for your comments too Ryan, as I hadn't responded the other night - very helpful and just so ya know I don't care about the pc brigade ;) lol!

I took some more pictures tonight using the tips above and I have to say I did find it quite a bit easier though still got quite a few blurry pics, Ryan could you explain more about the ISO? sorry.

The colour also seems to look less orange tonight!
 
Hi Penguin,

Right, ISO is a control which enables you to increase the sensitivity to light of your sensor. So by increasing the ISO you basically make your camera more sensitive to light - the bonus being you can shoot at faster shutter speeds in lower light.

Initially we control the exposure by two controls - shutter speed and F-stop. But the third ingredient is ISO which comes to the rescue when you can't/don't want to open up your aperture anymore and your shutter speed is already spot on for the exposure you want.

For example

At ISO 200 and F4 we may get a shuuter speed of 1/50th sec.
At ISO 400 and F4 we may get a shuuter speed of 1/100th sec.

F0r example - in your first picture your ISO was 320, shutter speed 1/60th and Aperture was at F1.4.

If you had increased your ISO to 800 your shutter speed would have come up to around 1/160th of a sec. Much faster and easier to avoid any motion blur. You could then have stopped down to F2 and still had a shutter speed of around 1/80th. The smaller aperture giving you a better chance of keeping the eye in sharp focus.

Of course it feels like it's all maths. But as long as you understand that if your shutter is too slow then either choose a wider aperture or increase your ISO.

And one last thing - I noticed you were shooting on Program mode. My advice is to shoot on Aperture Priority mode - AV on Canon. In the long run it'll give you more control. And AV allows you to control the most important thing in portraiture - Depth of Field.

HTH
 
Last edited:
Thank you! You're extremely helpful Ryan. Since I've had the camera (and my last - you can tell I've never been good at this ;)) I've always used P as the pictures have come out better than when I try other settings. Tonight I tried with M. In the past the AV and TV settings have come out with bad pictures and I guess it's just because I'm not very good. I try all the settings and just play around with the dials until something looks half decent but this year I've decided to actually use it PROPERLY. So I really appreciate all the help
 
Good point - on Av mode - you MUST get used to used the EXPOSURE COMPENSATION button - it looks a little like a chess board.

Here's a very basic workflow.

1) Choose what you want to shoot.
2) Decide if you want lots of the picture to be in focus (small aperture i.e F11) or just a small part of the picture (larger aperture i.e F2)
3) Take picture.
4) Look at the image on the back of the camera - is it too bright - if so press the exposure compensation button and rotate the dial. Is it too dark - again - if so press the exposure compensation button and rotate the dial. As you rotate the dial you will notice the cameras light metre is changing to reflect you have either dialled in plus or minus exposure. As you look through the viewfinder adjust the exposure using the exposure compensation button - you can the see the adjustments in the meter at the bottom of the viewfinder.

Once you get the hand of this your photography will move on a good bit. Then you just need to get used to increasing ISO for those times when your required exposure is leaving you with a shutter speed that's either too slow to hand hold or too slow to freeze the movement of the kids.

Job done :D
 
Great bit of advice from Ryan.

Also you could try practicing outside in the daytime or near a window where its lighter.

Shooting in a bathroom which are normally low lit, or has a small window can make things difficult at the best of times.
Still the edit by mattchewone looks good.

Spence
 
As Ryan said too, at f1.4 you will have the shallowest depth of field, your canon software should be able to tell you the focus point, if the child moves, that point (say the eye for example) will move away from the focus point thus putting another part of the picture in focus (the near cheek, far cheek, nose or whatever) hence throwing the intended focus point out of focus.
With a smaller aperture and bigger depth of field the margin to allow for such movement is bigger.
As spencer says, try shooting in daylight, i'm sure you will be suitably impressed,
Best wishes
Cliff
 
Great bit of advice from Ryan.

Also you could try practicing outside in the daytime or near a window where its lighter.

Shooting in a bathroom which are normally low lit, or has a small window can make things difficult at the best of times.
Still the edit by mattchewone looks good.

Spence

It's the only time they are clean? :shrug:, no seriously - I'm not getting out much at the moment due to work, uni, revising and writing essays...
 
Back
Top