
- Messages
- 3,413
- Name
- Mark
- Edit My Images
- Yes
Apologies for the cluttered background, there's no such thing as "uncluttered" in our house!


How stable is the flash on that arm ? Im thinking about getting one fro Speedgraphic.

Apologies for the cluttered background, there's no such thing as "uncluttered" in our house!
Hi.
A few months ago I showed you my complex diffuser. Things have changed since then.

If you interested, feel free to visit http://flash-adapter.com. I'm curious what do you think about it, I would be grateful for every comment.
Cheers
Only issue I see how it copes with various lens sizes does it extend?
 (after using my 70-200mm or 400mm f/2.8 most of the time to get dragonfly shots and anything that I could get close to! ) I got the Sigma 150mm f/2.8 as advised from some TP members on here, Only tried in briefly in the Garden but has surprised me how close you can focus with these beast! & IQ is stunning and can crop lots! Looking forward to using it as I have a day planned out tomorrow so hopefully will be able to get some decent shots with it!
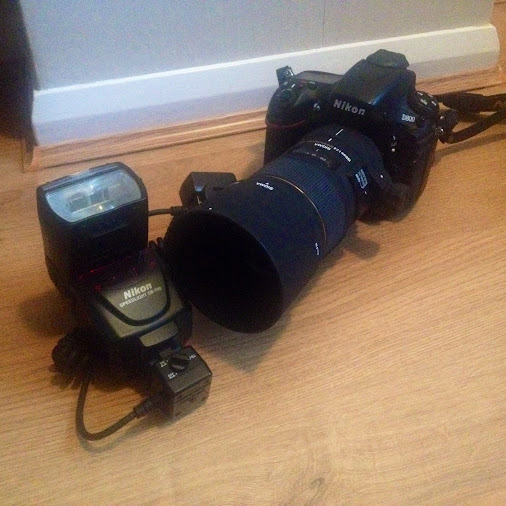
Nice one. Looking forward to seeing some pics.Finally got around to getting myself a Macro setup
Heres a pic of my setup now :
Nikon D800 + Sigma 150mm f/2.8
SB-700 on SB-29 TTL Cord
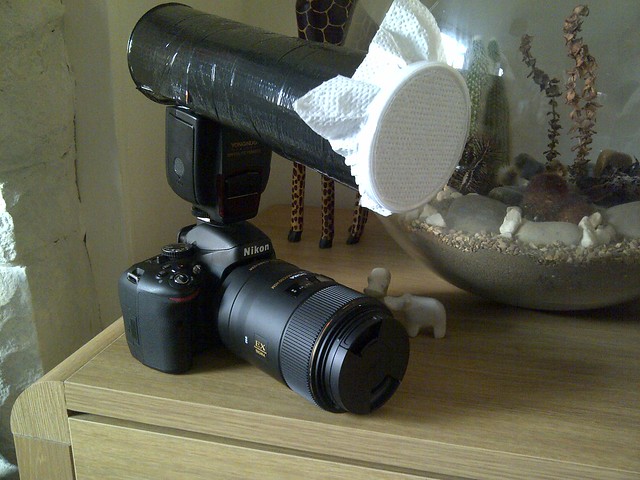
 EM1 sigma 105 Mk11 by alf.branch, on Flickr
 Without adapter lighting setup. by bthomas124, on Flickr
Can I ask what is the white material you guys use as a diffuser on your set up and where to buy it please?
One of these is a standard hotshot so you can only use your flash in manual so if that is how you use your flash then yes it will be fine. The other has no contacts at all from what I can see so you cant just pop your flash on it and expect it to trigger.I am building my own diffuser ( hopefully ) and just looking for some advise. I want to get the light angled down to focus more on where the action is. I would still like to have the flash mounted on the hot shoe therefore eliminating the need for a heavy bracket. I feel the best route for me is to adjust the flash unit down towards the lens I.E. tilt it down as my unit cant be adjusted below horizontal and this would make building the diffuser alot easier.
I have come across these two adapters.
http://www.bhphotovideo.com/bnh/controller/home?O=productlist&sku=89976&is=REG&A=details&Q=
http://www.ebay.com/itm/HAMA-Adjust...317?pt=US_Vintage_Cameras&hash=item56378cb375
So my couple of questions are.
Are these a good idea?
Does anyone know of anything i could use that is better and cheaper and give me the angle downwards that i am looking for.
One's got a cable (if you look at the images) so not sure if it will provide ETTL (or equivalent) but looks like it may be worth a shot (although a bit pricey).
EDIT: Apologies for the excessive use of bracketed comments in the above sentence (not really).
 IMG-20140918-00204 by jus_tin_rib, on Flickr
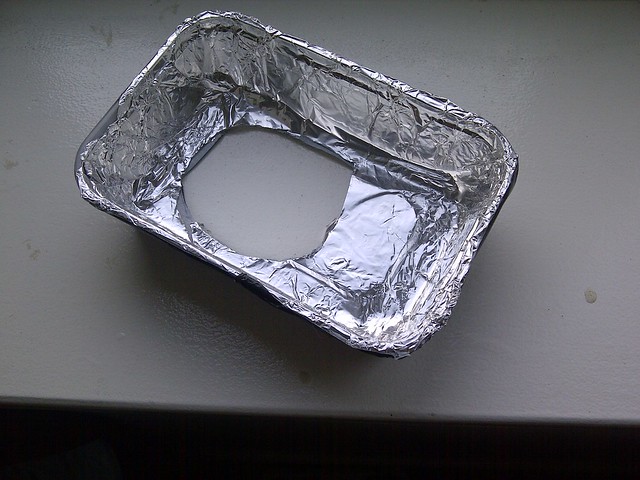 IMG-20140918-00205 by jus_tin_rib, on Flickr
 IMG-20140918-00206 by jus_tin_rib, on Flickr
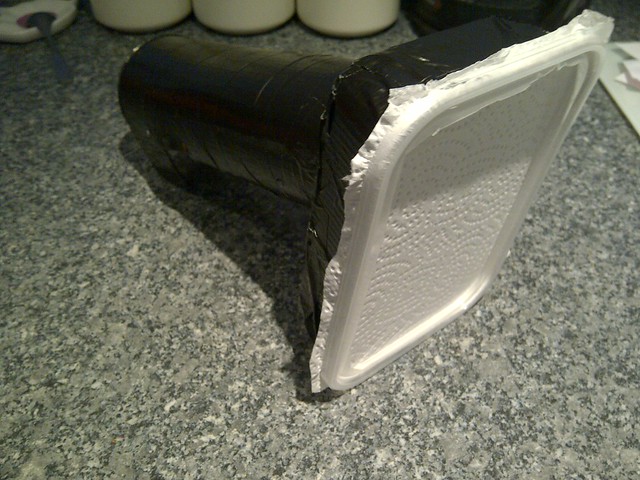 IMG-20140918-00207 by jus_tin_rib, on Flickr
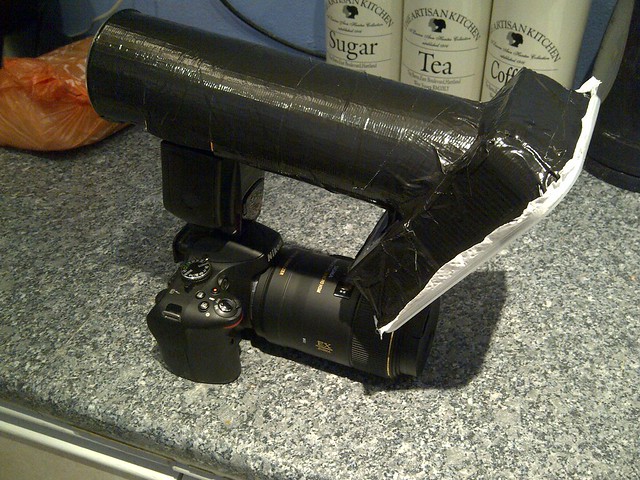 IMG-20140918-00208 by jus_tin_rib, on Flickr
 IMG-20140918-00210 by jus_tin_rib, on Flickr
It's easy to angle it down, you just cut a slit roughly 2/3 way around underneath, push part you want down and tape it to that angle.. Simples.I can just about put a shelf up, so my DIY skills were challenged!!!
(photo quality poor - taken with a Blackberry!!!)
Pringles Diffuser Mk1 - Didnt really take enough shots to know if it was any good, and struggled to angle it down so decided to upgrade - please ignore dead cactus' !!
Pringles Diffuser Mk2 - Used an indian takeaway tub... taking for a test drive this weekend.
Me tooGood looking DIY diffusers we've got going on here. looking forward to seeing how they perform


He is mine.
Nothing fancy or expensive and more or less the same as a few others on here.
Just a Lumix G6 with Pany 100-300 plus Raynox 250 lens, Olympus FL-36R Flashgun connected with a canon O/C cord on a cheap chinese bracket a LumiQuest Defuser. It does work quite well though, and that's all that counts.
Paul


Hi All
i was sorting through a box of Photographic junk and found this little old gem, only to be known to those of a certain age
A pretty useless gadget in its day because of the lack of TTL flash control.
For a laugh I though I would bring it into the modern age and quickly cobbled together a TTL bracket to hold my Olympus FL-36R flashgun on my G6
And surprise surprise it actually worked, it obviously needs some diffusion material to take the harshness of the light but it worked really well, well for a quick bodge it worked well.
Now got to find something to Photograph with it.
Paul
Ok I'll bight, what's the FMMB
 Gear Update by Tim.Garlick, on Flickr
That is awesome!Hi All
i was sorting through a box of Photographic junk and found this little old gem, only to be known to those of a certain age
A pretty useless gadget in its day because of the lack of TTL flash control.
For a laugh I though I would bring it into the modern age and quickly cobbled together a TTL bracket to hold my Olympus FL-36R flashgun on my G6
And surprise surprise it actually worked, it obviously needs some diffusion material to take the harshness of the light but it worked really well, well for a quick bodge it worked well.
Now got to find something to Photograph with it.
Paul
It would be great if it didn't keep steaming up! I bought it to overcome any glare in bright sunshine, but I can see it failing miserably if I'm a bit hot a sweaty. I might try puncturing some holes in the eye patch to get the air circulating a bit. Aside from that it's good fun to use. It improves stability by holding it against you face, and it's easy to remove quickly if needed (it's held on by a metal frame you screw into the tripod mount, and the main part of the loupe snaps into place with magnets). It only cost me about a tenner off eBay so it was worth a try.Tim
That set up is both ridiculous and amazing at once.
Canon were being muppets not supplying EVF though. What is it like using the lupe?
 Talc Container-1320 by G.K.Jnr., on Flickr
  Container Cutting Guide-1323 by G.K.Jnr., on Flickr
 Flash Extender (1)-1326 by G.K.Jnr., on Flickr
 Flash Extender (2)-1330 by G.K.Jnr., on Flickr
 SB800 Flash-1333 by G.K.Jnr., on Flickr
 Flash & Extender-1336 by G.K.Jnr., on Flickr
Just in case anyone should be interested here is a brief description of how I have made a Flash Diffuser/Extender for my Macro/Close Up photography.
Container of Talc/Baby Powder from Asda £1.00 at the time of writing.
Here I have put dotted lines as to where to cut the container (it's a good idea to empty it first).
The dotted line at the tapered right hand end is cut to the size of your speedlight head.
The other end is cut at the sides & bottom to form a hinge type opening. You then need to cut an angle of about 45 degrees to each side and also cut along the bottom to form an angled opening. Both cuts are shown by the dotted lines at the base left hand end of the container.
It's quite easy to cut with a Stanley Knife or even a good pair of Scissors.
I have then put three layers of the material that is used for packing around electrical appliances across the opening and hinged top and secured it with black electrical tape. This material forms a diffuser with a light reflector that can be angled to whatever angle you fancy and will give you a reasonable amount of reflected fill in light.
I have then covered the rest of the container with black electrical tape just to give it a bit better look.
Diffuser End View.
This is the speedlight that I use with the standard diffuser in place, but of coarse you can cut the container aperture size to whatever unit you use.
And here is the finished set up presented on a stand that can be activated with a triggering device or mounted on the hotshoe of whatever camera you use.
Hope all this is of some help to you.,
George.
That looks ok George, I hope its reaches the end of your lens. Looking forward to more shots with this setup too.
Just in case anyone should be interested here is a brief description of how I have made a Flash Diffuser/Extender for my Macro/Close Up photography.
Container of Talc/Baby Powder from Asda £1.00 at the time of writing.
Here I have put dotted lines as to where to cut the container (it's a good idea to empty it first).
The dotted line at the tapered right hand end is cut to the size of your speedlight head.
The other end is cut at the sides & bottom to form a hinge type opening. You then need to cut an angle of about 45 degrees to each side and also cut along the bottom to form an angled opening. Both cuts are shown by the dotted lines at the base left hand end of the container.
It's quite easy to cut with a Stanley Knife or even a good pair of Scissors.
I have then put three layers of the material that is used for packing around electrical appliances across the opening and hinged top and secured it with black electrical tape. This material forms a diffuser with a light reflector that can be angled to whatever angle you fancy and will give you a reasonable amount of reflected fill in light.
I have then covered the rest of the container with black electrical tape just to give it a bit better look.
Diffuser End View.
This is the speedlight that I use with the standard diffuser in place, but of coarse you can cut the container aperture size to whatever unit you use.
And here is the finished set up presented on a stand that can be activated with a triggering device or mounted on the hotshoe of whatever camera you use.
Hope all this is of some help to you.,
George.
Brilliant George just be careful of light bounce with that as light will be reflected back into end of len's.
It looks great, did you line the inside with foil/runners foil blanket.
This may just provide a solution for my reverse setup thanks.