New, lighting project

Messages
12,305
Name
Garry Edwards
Edit My Images
No
Someone suggested that as many of us are going to be stuck indoors with far too little to do, for the foreseeable future, we may as well practice some photography that we can do indoors, with a minimum of equipment and that doesn’t involve other people.

So, let’s run a few simple projects that everyone can try, post your results here, learn from the experience and help other people to do the same. And anyone who’s half way decent can also show me up by producing something much better:

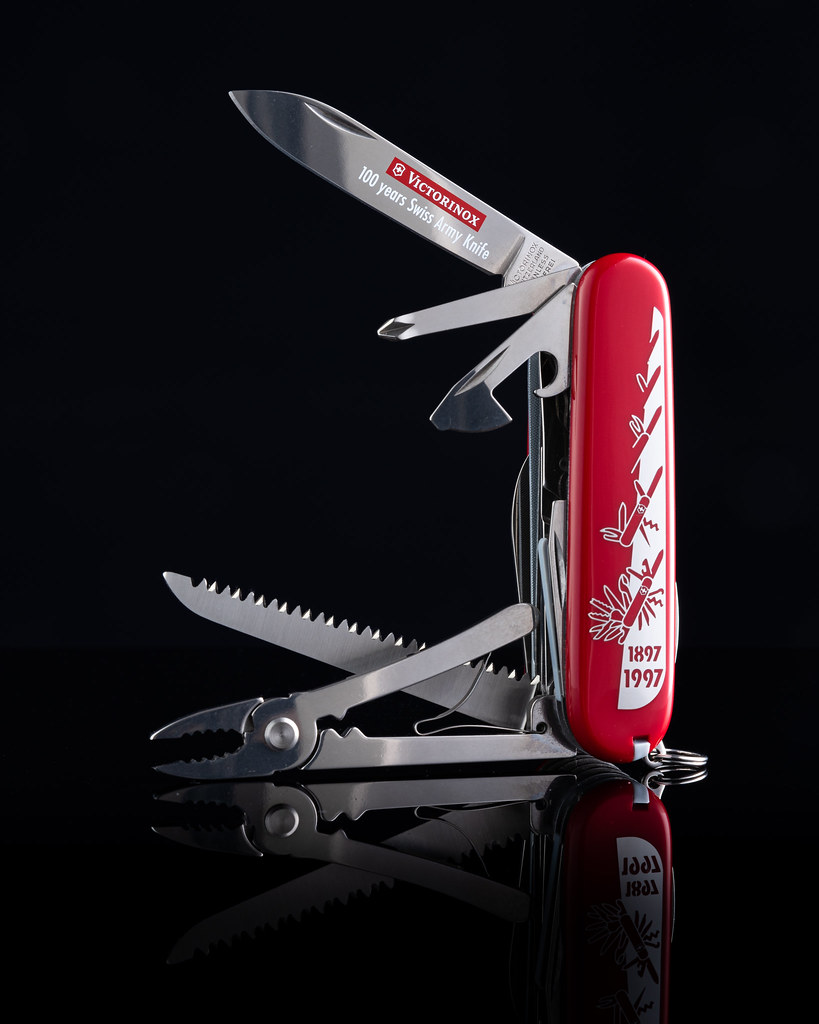
So, for the first of these lighting projects, let’s shoot something shiny. The principles are simple enough and everything is explained in this tutorial https://www.talkphotography.co.uk/tutorials/creating-diffused-specular-highlights.137/ but for this project we’re going to shoot something really shiny, a knife.

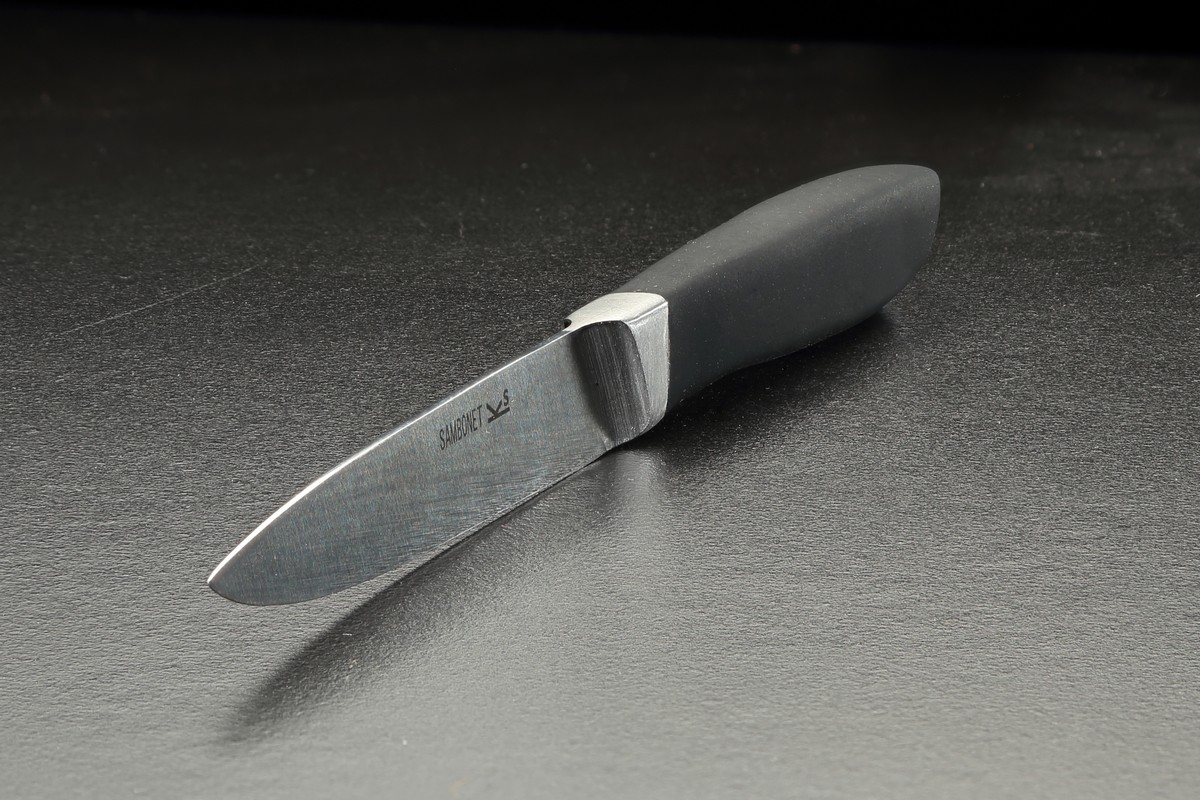
Everyone has a knife. In a perfect world the knife should be brand new and with no blemishes of any kind, but if you haven’t got a new one just root around in the kitchen drawer and shoot whatever you have.

This is the very basic setup if you use a softbox
softbox_setup.jpg

You can manage without the product shooting table, studio stand and the flash meter, in fact if you don’t have a softbox you can bounce light off of any large white surface, or even from the ceiling – it’s just a fact of life that professionals often use tools that make the job quicker and easier, just because they happen to have them.

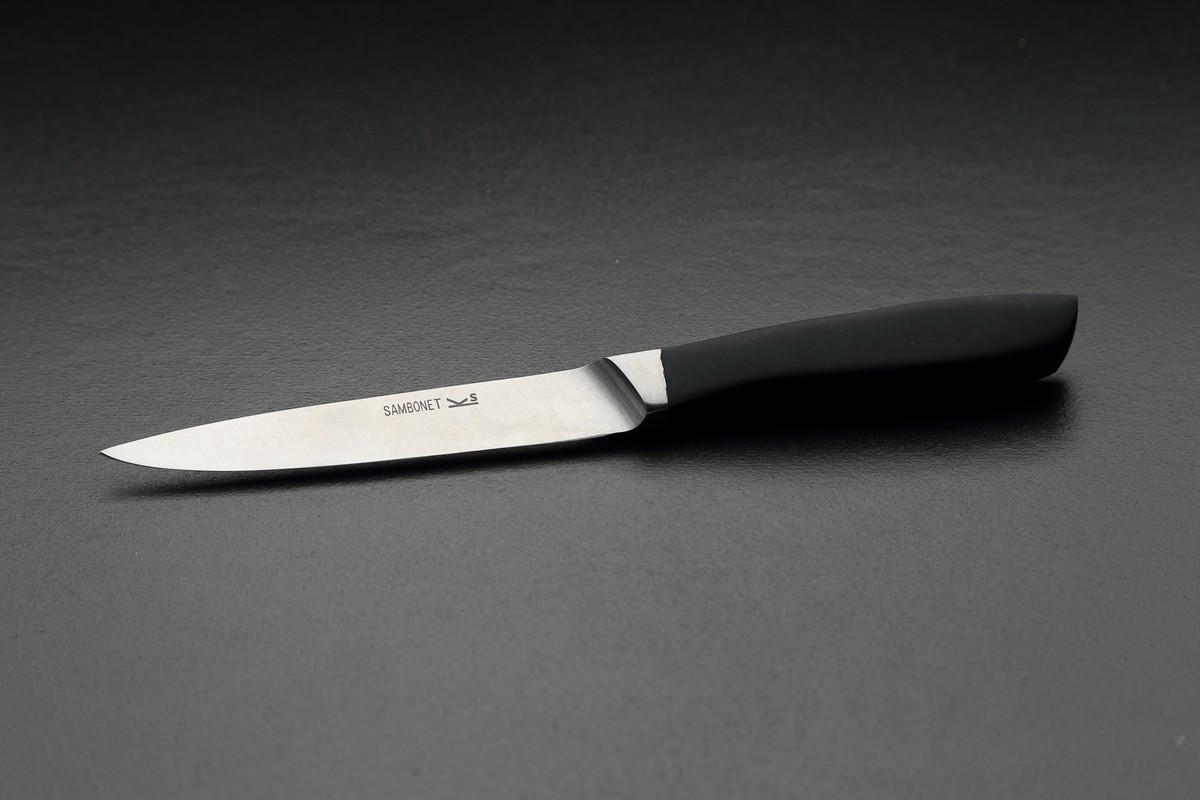
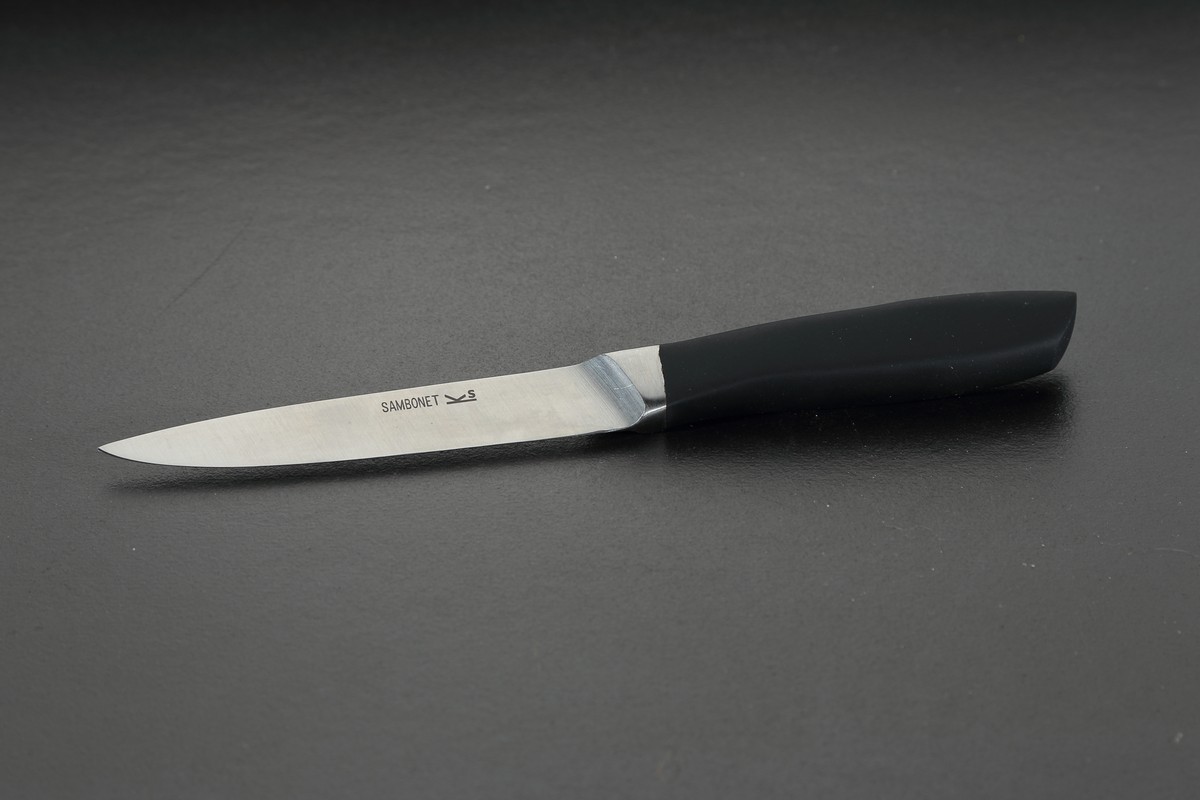
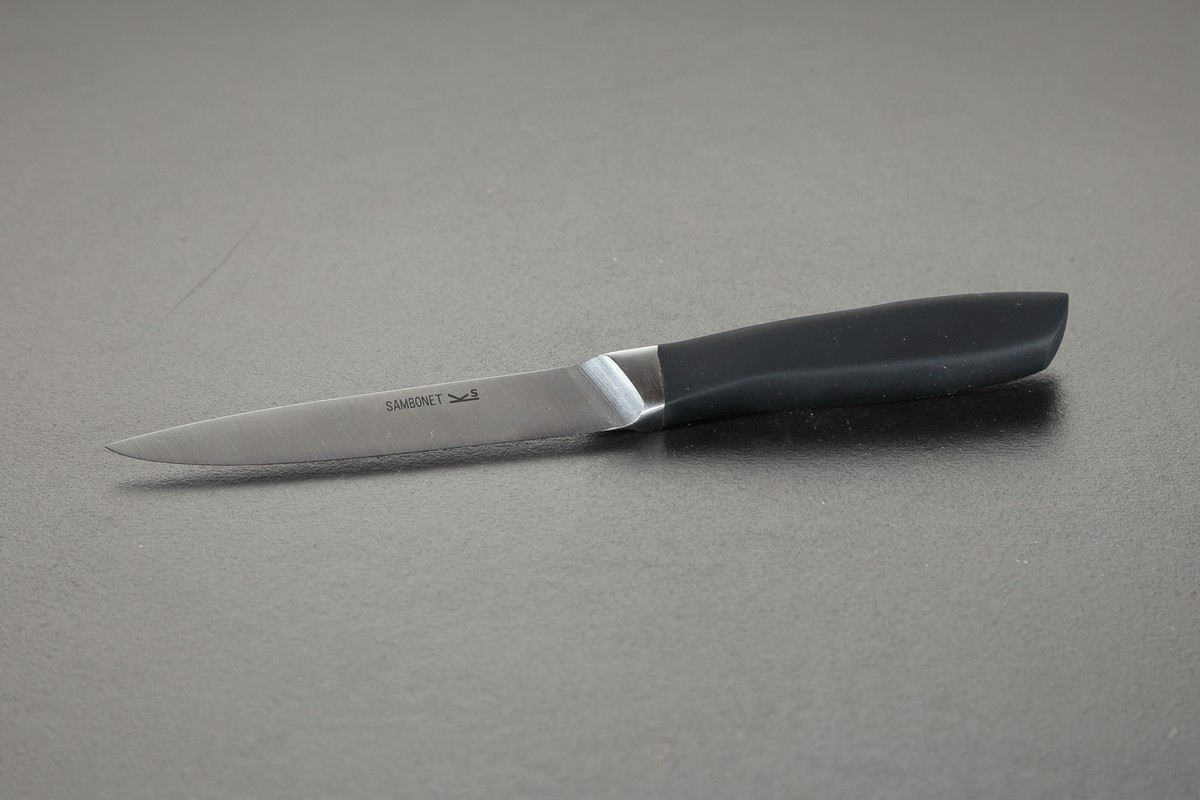
These shots show the product lit with just a single light, far left, with another light added, middle, and with yet another added, far right, just use whatever you happen to have available. I won't tell you where the other lights were placed, that's obvious from both the shadows and the highlights.
adding_light.jpg
I did a shot lit with a silk, when Tesco sold it to me they thought it was a shower curtain but I didn’t want to replace my periodic table shower curtain with something as mundane as this stripy one and I used it as a lighting silk instead, this is what it looks like close-up
silk_detail.jpg

And this is what it looks like in situ
_DSC9409.jpg

As you can see, there was a flash behind it, shining through. What the silk actually did was to put the pattern on the steel, making it look a bit like a Damascus steel knife – something to try if you feel like it.
browning_silk_1.jpg


The photo above has been cut out of the background and I don’t seem to have the original in a decent size.

Of course, we can all do clever things in PP, and you may (or may not) want your finished result to look a bit like this
photoshop.jpg
But please don’t – the whole idea is to post images with zero PP work.

Obviously, as I’m bone idle, as well as contributing to this thread with your own images, it would be good if other people start their own threads, spaced out a bit so that members have time to contribute to them.
 
Last edited:
Hi Garry

Thanks for setting us something to do.

I pretty much followed your instructions. I found it difficult trying to get the speedlights to light exactly where I wanted and to get the right amount.

Hopefully you can give some feedback on this first go.


1

This was a softbox behind the knife very close and angled down and forwards slightly

lxpqwgY.jpg


2

I added two speedlights to this image probably about 4 ft from the knife (approx) one had a small grid on it made from straws (you know the type of thing) the other had some cinefoil wrapped around it to form a snoot of types.

G975XGY.jpg


3

This image was the same lights as previous post only I moved softbox back and hung shower curtain in front of it.

iA0DPa8.jpg


Gaz
 
Hi Gary,
Thanks for taking part. You've done a good job and the progression, as each light has been added (in exactly the right place) is dramatic..
You lighting understanding has improved beyond recognition over the last couple of years ago, I don't think that you can claim to be a beginner any more:)

Now, if you want to see exactly what else can be done I could suggest that you photograph it from a completely different angle (perhaps with the point towards the lens) bearing in mind that the lighting position will need to change in line with the new angle, using focus stacking to maintain sharp focus - because again, focus stacking is a technique that we can use well with small objects.
 
Thanks Gary.

Thats good to know. As it still feels very much like i'm guessing.

Really all I did was copy your set up.

Moving things around is where I would struggle.


Gaz
 
I did have a try.

Kept the light at rear with just softbox.

My thinking was to light right along the knife.

Then moved speedlight with snoot shooting from the back and low along the knife.

Then added the gridded speedlight opposite the rear from the front to light the curve to handle.

Did the stacking thing. For some reason cs6 kept leaving a blury top edge of blade.

Downloaded the trial of Helicon which seemed ok with it.


No idea if I lit this in the right way.

Gaz

6XFXdxk.jpg
 
Last edited:
I think the lighting is fine - what stands out and hits me is the dramatic improvement caused by using the lighting silk - not the same effect as mine because I bought a striped one, but a tool that more people should use, more often. Back in the bad old days of photography when there weren't any softboxes we all used silks because we had to. Softboxes are much more convenient to use and so the silk virtually died but, as you can see, it's perfect for some subjects.

As with most things in life, there's usually several different ways of doing most things, and in most cases photography is too subjective for only one way of being "correct".

I haven't used focus stacking in CS6, maybe the version I have has improved it.

I think that what really matters is that we try things, and try to do things differently, a vital part of the learning process. Anyone else want to have a go?
 
what stands out and hits me is the dramatic improvement caused by using the lighting silk
Thanks for the feedback Garry.

Looking back at these images with fresh eyes I too can now see the vast differance the scrim made.

Gaz
 
I had a go at this, but with a slightly different type of knife. I think the principle is the same - shoot something shiny !

Took quite a while messing around with different 'inventions' (e.g. even made a homemade snoot at one point), but ended up with something relatively simple. Godox V860 speedlight through a small Godox square softbox and a cheapo Amazon special, round diffuser- camera left. Godox AD360 (lent to me a while ago by a good friend) through a Luxlight Stripbox and a home made diffuser (foam board with tracing paper insert) - camera left. Penknife placed on a piece of black perspex to get a nice reflection.

Only a few minor slider tweaks in Lightroom, a Lightroom grad at the bottom of the pic, and a few spot removals, but otherwise straight our of camera.

My aim was to get some decent highlights on the Knife body with a slight graduation across the face and to get some 'pattern' in the main blade to give it some 'effect' (without losing the writing on the blade).

Swiss Army Knife by Richard Breland, on Flickr

And here is the setup :-

IMG_20200407_113817.jpg

My own 'ciritque' :-

1) The background is not completely black probably due to some light leakage and the window blind being too close.
2) The end of the 'pliers' are a bit dark.
3) I was at F16 to try and get everything in focus - I think I would focus stack it at around F8 to get the best result.
4) Reflections are a nightmare !
5) It is difficult to simulate the 'Chrome-ness' of the metal !

I am quite pleased with the result and with a bit more time with Focus stacking and compositing several more pictures together, along with some clean up/work in Photoshop, I think it could be passable !

All comments gratefully received and thanks to Garry for the challenge :)
 
You've done a good job with a difficult subject - difficult simply because it's a complex shape with lots of different bits, far easier with a simpler subject.
Your difficulty here was lack of space. Having the light on the right so close to the subject caused a very bright highlight along the edge of the handle and most of the power had been lost by the time it reached the end of the pliers. That's the inverse square law for you, every time the distance from light to subject doubles the exposure falls to 1/4. It isn't quite that simple because the softbox is a relatively large light source, not the point source of light that applies to the ISL, which means that the softbox consists of a few million different point sources of light in a few million different places, and light is also being reflected, but if you had been able to increase the distance from light source to subject then it would have been a big help. Effectively, your home made diffuser isn't acting as a silk, it's too perfect, a silk is generally not taut. It's acting as a softbox, and when I talk about the light source, it's the diffuser that's the light source, not the softbox that's lighting it.

The other thing that you could do is to move that right hand light source closer to the camera and angled back a bit, this would have put more light on to the 'pliars' and also on to the bottle opener but the downside of this is that some more of that light would have reached the black background.

You could also have masked off part of the width of the softbox, camera right, to make it much more of a strip softbox. The standard pro tool for that is a piece of Cinefoil (blackwrap) but a black bin bag works too. This would have controlled the area being lit, and would have made the diffuser act more like a silk.

I'm not sure what the diffuser is bringing to the party, other than allowing some unwanted light to reach the background. I think that the small square softbox behind it would do a better job on its own, and also create a bit of backlighting.

Just some things to think about, and drive you mad:)
 
Hi Garry - thanks for the feedback.

The highlight on the right is quite 'hot' - I was hoping, the 'homemade' diffuser would soften it somewhat and also help to create the light graduation across the face of the body. I think (as you suggest), moving the light source away will help this ? The problem have is that the softboxes dont seem to be, errr, 'soft' and I always end up putting something else in front of them. Is this because they are too close to the subject? I have some room to play with, otherwise I will have to move into the garage :LOL:

I'm not sure what the diffuser is bringing to the party, other than allowing some unwanted light to reach the background. I think that the small square softbox behind it would do a better job on its own, and also create a bit of backlighting.

In my (inexperieced!) mind, the diffuser(s) allow some light to hit the sides and front of the subject, otherwise I cant see how to light the front of the Knife? If I have the square softbox behind the knife (and no diffusers), surely the front wont be lit? I can see how it works for your example as the knife is flat(-sh) on the table, but maybe not so with my effort? And I think that is the issue - I am trying to do something that is not what you are asking us to do!! Still great fun though, but I will try the 'single' knife shot and persevere with the Swiss Army Knife another day.

Thanks again :)
 
Hi Garry - thanks for the feedback.

The highlight on the right is quite 'hot' - I was hoping, the 'homemade' diffuser would soften it somewhat and also help to create the light graduation across the face of the body. I think (as you suggest), moving the light source away will help this ? The problem have is that the softboxes dont seem to be, errr, 'soft' and I always end up putting something else in front of them. Is this because they are too close to the subject? I have some room to play with, otherwise I will have to move into the garage :LOL:
That isn't how it works. The softboxes aren't 'soft' because they aren't using the best materials and don't have the best design. most people just buy the cheapest softboxes they can find, some don't even have an inner diffuser and often, even those that do have the inner diffuser too close to the outer diffuser, and the diffusers are typically far too thin and far too translucent to diffuse the light well. Also, although t.The Godox AD360 works well in a softbox because it doesn't have a built in reflector and so the light bounces off of the walls as it needs to, .your speedlight doesn't do this.

To get diffused specular highlights that are truly soft and that you can see through to the subject beneath, the softbox has to be massive relative to the size of the subject - the inverse square law applies here, as well as to the fall off of light, because every time you double the distance from light source to subject the light source becomes, effectively, just a quarter of its size.
What we tend to do in this type of lighting situation is to use a silk close to the subject (to gain advantage of relative size) and to place the softbox (or other lighting modifier) quite a long way away from the silk, so that the silk is lit unevenly. This then changes the quality of the light from the silk from diffused specular highlight to graduated specular highlight - or to put it another way, it lights the subject smoothly and softly but also creates a pattern.
.

In my (inexperieced!) mind, the diffuser(s) allow some light to hit the sides and front of the subject, otherwise I cant see how to light the front of the Knife? If I have the square softbox behind the knife (and no diffusers), surely the front wont be lit? I can see how it works for your example as the knife is flat(-sh) on the table, but maybe not so with my effort?
You're doing what most people do, you're trying to make a single light do more than a single job.
The whole idea of lighting (regardless of subject) is to start off with a single light. This is the key light and it usually does 80 - 90% of the work. If you then find that a second light is needed to deal with a specific problem caused by the key light, then you bring in a second light, and repeat as necessary.

With your quite complex subject, I would have used the biggest light source possible, on the right, to do the job of the key light.. Bigger is better, not only because of the softer light but because a larger light can be further away, reducing the level of light fall-off. I would then have seen that there were bits on the left that aren't being lit and would then have introduced the square softbox, left. This would need to be angled forward a bit to create a backlighting effect and I would have introduced a third light, which would have just been a piece of white card, catching 'spare' light from the softbox and bouncing light on to the recessed end of the pliers and on the angled end of the bottle opener.

Of course, that isn't a complete answer either - it's a bit like pushing your finger into a balloon, the balloon will make way for your finger but the displaced air just comes out somewhere else - and if you do that then a bit more light will end up on the background, but fortunately for you, there is a solution to that.
move into the garage :LOL:


And, although I can see the lighting challenges because I've been doing it a long time, the easy way of doing it is to just add one light at a time, and only when strictly necessary.

Hope this helps.

P.S. Thinking about it, it was probably a bad idea to mention focus stacking. It's a very useful studio technique that removes the need for a large format camera, but it's complicating things a bit, we should really keep it as simple as we can - getting it all in sharp focus is just a nice finishing touch, but this is really just a simple lighting exercise.
 
That isn't how it works. The softboxes aren't 'soft' because they aren't using the best materials and don't have the best design. most people just buy the cheapest softboxes they can find, some don't even have an inner diffuser and often, even those that do have the inner diffuser too close to the outer diffuser, and the diffusers are typically far too thin and far too translucent to diffuse the light well. Also, although t.The Godox AD360 works well in a softbox because it doesn't have a built in reflector and so the light bounces off of the walls as it needs to, .your speedlight doesn't do this.

To get diffused specular highlights that are truly soft and that you can see through to the subject beneath, the softbox has to be massive relative to the size of the subject - the inverse square law applies here, as well as to the fall off of light, because every time you double the distance from light source to subject the light source becomes, effectively, just a quarter of its size.
What we tend to do in this type of lighting situation is to use a silk close to the subject (to gain advantage of relative size) and to place the softbox (or other lighting modifier) quite a long way away from the silk, so that the silk is lit unevenly. This then changes the quality of the light from the silk from diffused specular highlight to graduated specular highlight - or to put it another way, it lights the subject smoothly and softly but also creates a pattern.

You're doing what most people do, you're trying to make a single light do more than a single job.
The whole idea of lighting (regardless of subject) is to start off with a single light. This is the key light and it usually does 80 - 90% of the work. If you then find that a second light is needed to deal with a specific problem caused by the key light, then you bring in a second light, and repeat as necessary.

With your quite complex subject, I would have used the biggest light source possible, on the right, to do the job of the key light.. Bigger is better, not only because of the softer light but because a larger light can be further away, reducing the level of light fall-off. I would then have seen that there were bits on the left that aren't being lit and would then have introduced the square softbox, left. This would need to be angled forward a bit to create a backlighting effect and I would have introduced a third light, which would have just been a piece of white card, catching 'spare' light from the softbox and bouncing light on to the recessed end of the pliers and on the angled end of the bottle opener.

Of course, that isn't a complete answer either - it's a bit like pushing your finger into a balloon, the balloon will make way for your finger but the displaced air just comes out somewhere else - and if you do that then a bit more light will end up on the background, but fortunately for you, there is a solution to that.


And, although I can see the lighting challenges because I've been doing it a long time, the easy way of doing it is to just add one light at a time, and only when strictly necessary.

Hope this helps.

P.S. Thinking about it, it was probably a bad idea to mention focus stacking. It's a very useful studio technique that removes the need for a large format camera, but it's complicating things a bit, we should really keep it as simple as we can - getting it all in sharp focus is just a nice finishing touch, but this is really just a simple lighting exercise.

"...the inverse square law applies here, as well as to the fall off of light, because every time you double the distance from light source to subject the light source becomes, effectively, just a quarter of its size."

Not quite true. The Inverse Square Law applies to exposure, but 'softness' (the rate of gradation from highlight to shadow) is determined by the physical linear dimensions of the light source. Or to put that another way, at twice the distance the brightness will be reduced to one quarter as per the ISL, but the softness only halved, eg a 100cm diam softbox at 2m will produce shadow gradation like a 50cm diam softbox at 1m.
 
P.S. Thinking about it, it was probably a bad idea to mention focus stacking
Maybe but :

It was something different so I enjoyed the task.
Since posting this morning I found out Affinity does focus stacking. Which I have but up until now have never used.
I just tried it and it worked like a dream it was great to see the knife sharp from front to back.

A ridiculous amount of dust particles are on my knife. Is there secret way to clean products before shooting ?

Gaz
 
"...the inverse square law applies here, as well as to the fall off of light, because every time you double the distance from light source to subject the light source becomes, effectively, just a quarter of its size."

Not quite true. The Inverse Square Law applies to exposure, but 'softness' (the rate of gradation from highlight to shadow) is determined by the physical linear dimensions of the light source. Or to put that another way, at twice the distance the brightness will be reduced to one quarter as per the ISL, but the softness only halved, eg a 100cm diam softbox at 2m will produce shadow gradation like a 50cm diam softbox at 1m.
Sorry Richard, can't agree with you on that, and anyway you've confused me, because you now seem to be disagreeing with yourself. For example,
Your post 16 in this thread https://www.talkphotography.co.uk/threads/mini-diffuser-for-godox-tt350f.677762/#post-8168080
And your post 12 in this thread https://www.talkphotography.co.uk/threads/lighting-and-simply-physics.561928/#post-6505822

And I'm pretty sure that you've agreed with me about this in other posts too, haven't checked.
But, it doesn't really matter because it's all theoretical anyway. The first practical issue that can cause confusion is the presence of unplanned bounced light, especially in small, light areas, and the second one is the efficiency (or otherwise) of the softbox. Apart from all the usual poor design effects and cheap manufacturing effects, the spread of light can be greatly affected by the depth of the softbox (part of the design) Typically, small softboxes are far deeper than large ones in terms of width / depth ratio and this alters the amount of light that spreads both where it is wanted and where it isn't.

But whether I'm right or you're right, or whether you were right and are now wrong of whether you are right and were wrong doesn't matter a lot, what matters is that everyone understands the principles involved so that they know what can't work before they start..
Maybe but :

It was something different so I enjoyed the task.
Since posting this morning I found out Affinity does focus stacking. Which I have but up until now have never used.
I just tried it and it worked like a dream it was great to see the knife sharp from front to back.

A ridiculous amount of dust particles are on my knife. Is there secret way to clean products before shooting ?

Gaz
Isopropol alcohol, and pharmacies are still open. You can manage without it but, whatever you do, don't use any muscle when cleaning it, or it will be even worse. Hang on, wait a minute, we're stuck indoors:)
 
this was done a while ago wiith a torch using a bit of light painting. will have a proper go later this week if I get time, :)


13522862_991206947615878_8184853723787085042_o.jpg
 
Last edited:
Funny that you've posted that, light painting is something else that everyone who's stuck at home can do and I was thinking about starting a thread about it. It's so easy to do well now, with powerful LED torches.

Back in the day, when I went through a phase of doing a lot of light painted artistic nudes, it was a little yellow light from a little torch stuck inside a plastic coffee cup:)
 
Sorry Richard, can't agree with you on that, and anyway you've confused me, because you now seem to be disagreeing with yourself. For example,
Your post 16 in this thread https://www.talkphotography.co.uk/threads/mini-diffuser-for-godox-tt350f.677762/#post-8168080
And your post 12 in this thread https://www.talkphotography.co.uk/threads/lighting-and-simply-physics.561928/#post-6505822

And I'm pretty sure that you've agreed with me about this in other posts too, haven't checked.
But, it doesn't really matter because it's all theoretical anyway. The first practical issue that can cause confusion is the presence of unplanned bounced light, especially in small, light areas, and the second one is the efficiency (or otherwise) of the softbox. Apart from all the usual poor design effects and cheap manufacturing effects, the spread of light can be greatly affected by the depth of the softbox (part of the design) Typically, small softboxes are far deeper than large ones in terms of width / depth ratio and this alters the amount of light that spreads both where it is wanted and where it isn't.

But whether I'm right or you're right, or whether you were right and are now wrong of whether you are right and were wrong doesn't matter a lot, what matters is that everyone understands the principles involved so that they know what can't work before they start..

Isopropol alcohol, and pharmacies are still open. You can manage without it but, whatever you do, don't use any muscle when cleaning it, or it will be even worse. Hang on, wait a minute, we're stuck indoors:)

I was wrong in those links Garry. I don't know what I was thinking back then, especially since Steven sk66 actually picked me up on it and explained correctly in the second link (but his reasoning got rather mixed up with a lot of other stuff - that's my excuse anyway ;)). I can only apologise.

Brightness/exposure follow the ISL, because when the distance is doubled the light is spread over four times the area and therefore brightness over the subject is quartered. But it's the diameter of the light source (linear dimension, not area) that defines the way shadows transition from light to dark which we commonly refer to as softness/hardness and when a light source is moved back to twice the distance its (effective) diameter is only halved.*

In practise, of course it's never quite that simple and there are always other factors that come into play whenever a light is moved - eg the effect of the environment changes as light is spread about differently, and ISL fall-off varies as different parts of the subject are at different distances relative to the light.

*Edit: this has to be true, or the ISL formula wouldn't work!
 
Last edited:
I take your point, and understand the theory very well but in my experience the effective size does reduce to the square of the distance, at least in most situations, although not with all. Take the classic usage of a strip softbox as an example. I'm only talking about the width here, the length is almost irrelevant but if placed in the classical position to light an edge of a wine bottle at a distance of say 3", the strip of reflected light is always about 4 times as wide as when it is placed at double the distance, 6". Of course, the shape of the subject in this situation is highly relevant but then many of our subjects have convex shapes.

Quite a few of the people who've seen me working have commented that Ii"throw light about" and on a good day I interpret that to mean that I work quickly because I have a pretty good idea where to place the light, and on a bad day I interpret it to mean that I don't take enough care:) but whether these comments amount to praise or to insults doesn't matter, the simple fact of the matter is that placing a light source such as a softbox in the right position and at the distance that's needed is based on both experience of what works and knowledge of what cannot work, and I find - in practical terms at least - that - and especially with complex and / or convex shapes, doubling the distance does make the specular highlight about 1/4 of the size.

There are of course a lot of myths about softbox size and distance - you know better of course - but a lot of people seem to believe that the 'right' distance to subject for a softbox is the diagonal of the softbox, i.e. if the softbox measures say 3' x 4' then it has a diagonal distance of 5' and therefore that it should be placed 5' from the subject. My guess is that this fallacy is based on the fact that that's the maximum distance at which a softbox can no longer wrap around the subject and stops behaving like a softbox.. The true answer to size and distance is of course that it depends entirely on what the photographer wants to achieve and is not governed by any 'rules'.
 
Funny that you've posted that, light painting is something else that everyone who's stuck at home can do and I was thinking about starting a thread about it. It's so easy to do well now, with powerful LED torches.

Back in the day, when I went through a phase of doing a lot of light painted artistic nudes, it was a little yellow light from a little torch stuck inside a plastic coffee cup:)

Love a bit of light painting, you never know how its going to turn out, you do get some "WOW that's really good" moments.
 
Just a quick comment to say 'Thank You' to @Garry Edwards for these lighting projects - I've not got a dedicated space to use for photography, so have to occasionally take over a room at home to use as my 'studio', but I do find reading through these tutorials, seeing what others attempt and how issues are resolved (and trying to figure out how to resolve them before someone with more experience posts an answer!), really helpful.
 
I take your point, and understand the theory very well but in my experience the effective size does reduce to the square of the distance, at least in most situations, although not with all. <snip>

We can certainly agree that what we 'see' in practise is very often skewed by the subject and environment etc concealing and confusing everything, but the underlying science still applies.

So, if you double the distance of a softbox, its diameter - the effective dimension in terms of shadows softening - is halved. I happen to have a Selens 65cm softbox and a 130cm umbrellabox that is twice the diameter (actually it's 129cm across the points) but when they're lined up 1.0m apart and 1.0m from the camera* they end up exactly the same size.

*distance from the camera is measured from the entrance pupil which is towards the front of the lens


untitled-9284.jpg

untitled-9282.jpg
 
This was light paining, one shot, one torch, tiny PS to remove a bit of dust, had the idea, set up first shot was this, that was that, 5 mins end to end, that’s light paining sometimes you just hit it first time :)

3A5A3B40-2DE7-44B9-978F-3149B56A3504.jpeg
 
Nice shot. Perhaps you could explain how you did it, so that people have a starting point for trying it themselves?
 
Nice shot. Perhaps you could explain how you did it, so that people have a starting point for trying it themselves?

Easy to explain but it was dead simple, the base was the side of an old DELL XPS computer, its a brushed stainless steel, the mouse is obvious. light the subject so you can get focus, switch to manual focus and don't move anything :) we use the canon EOS utility tethered to fire the camera and adjust any settings going forward that way you don't need to touch the camera.

From memory this would be a 15 second exposure in total darkness, then with your torch, basically paint the scene, this was lit like a spotlight from above.

The longer you leave the light in one place the brighter that area becomes, if you go over an area a few times the lighter it becomes, the longer the shutter the more time you get to play, but the more light is allowed to leak into the sensor, this is very much a trial and error setup, and that is the fun, you never know what your going to get until the image pops up.

Its really easy to setup and anyone can do it.
Thanks for that. It's simple enough for those of us who've done it but your explanation will be a big help to those who haven't.
 
Ok, so i've had a go.
I was a bit limited for space and probably know how, but i gave it a go and did quite enjoy the process. I'm fairly happy with the results.

So the first shot i'm happy with the light on the blade and handle, but not so happy with the light (well high light) on the ferrule. I'd set the knife up so that it was tilting slightly forward (towards the camera), so that it wasn't flat against the wood. This created a shadow under the front edge of the handle (which i expected). My problem came went trying to lift the shadow with another light and still trying to keep a black background, which i sort of managed in the end. This light also gave the highlight on the ferrule and try as i might i couldn't reduce it (lack of skill on my part). A reflector i think would have been better, but because my key light was behind and pointing down, there wasn't really any light spill to bounce back. Maybe a gridded soft box in front/above would have worked (i've only got one soft box at present).
Anyway here's the first shot. Please excuse the blade on the knife, i haven't got anything newer.

untitled-2.jpg by Dominic Rodgers, on Flickr

I'm happier with the reduced highlights, but the blade looks dull. Maybe another light too light the blade?

untitled-11.jpg by Dominic Rodgers, on Flickr

This is the set up, the light on the right is shooting through i piece of about 15mm foam packaging, which i sometimes use when shooting small flowers and macro, not so good when shooting shiny stuff. I introduced the reflector on the left to bounce some light back onto the blade from the light on the right.

untitled-12.jpg by Dominic Rodgers, on Flickr

Thanks for the challenge, obviously any advice would be appreciated.

P.S. The only editing that i've done to this was to add a graduated filter in lightroom, just to darken the background down a bit, as there was a small slither of the tabletop showing. The knife the wood etc have not been touched. I really am not a great fan of sitting at the computer editing things in or out, that i couldn't have done in camera.
 
Last edited:
My internet has gone down and unfortunately I'm with Talktalk, so getting zero help and can only view your photos on my phone, but the thing that jumps out and hits me is that your overhead softbox is far to far away - 2-4 inches will be much better. Then adjust the angle until you're happy with the result.

And switch off the second light first, only add it back in later and if needed.
 
Back
Top