Bridge, MFT, achromats, dSLR, primes - a journey of exploration

Does your FZ200 shoot raw?

Yes

In fact do you shoot raw in both cameras? Cause colour will be handled differently in both if jpeg is used.

Yes, I shoot RAW with all my cameras.

Also note exposure needs to be spot on, on the colour checker to work correctly so I use my light meter to give me settings first.

I have taken to more or less filling the reference images with the target, so the exposure relates specifically to the target. The reference shots are exposed within 1 or 2 thirds of a stop from blowing highlights according to the blinkies.

It's worth checking out mac on campus YouTube videos for how to's and what not to do's. Which is not in instructions of the colour checker.

Bryn, thanks so much for that. The first video I looked at showed that the X-rite instructional video missed out something rather important. At least, it misled me.

The instructional video says "While setting the internal [i.e. camera] White Balance is not required for the RAW workflow, it will help improve the previews on the camera's built in display and may speed up post production colour editing." Because I'm using RAW, and because I'm not bothered about the colours on the cameras' LCDs, and because it said "may speed up ... editing" rather than "must be used to make things work right" or similar, I wrongly assumed that I didn't need to bother with setting the White Balance because the profile would look after that - after all, the colour checker reference target has grey patches for the software to work with.

It seems that you do have to explicitly set the White Balance, as well as applying an appropriate profile.

Here is an example. First, two images as imported into Lightroom.


0561 01 2014_05_18 Before WB and profile 70D and FZ200
by gardenersassistant, on Flickr

Then with White Balance applied, by first using the White Balance dropper in Lightroom to one of the neutral patches on the reference image for the camera concerned, and then copying this white balance to the test image for that camera.


0561 02 2014_05_18 After WB, before profile 70D and FZ200
by gardenersassistant, on Flickr

And then with the camera profile generated from the reference image applied to each test image.


0561 02 2014_05_18 After WB, before profile 70D and FZ200
by gardenersassistant, on Flickr

Here are a couple more examples.


0561 04 2014_05_18 Before WB and profile 70D and FZ200
by gardenersassistant, on Flickr


0561 05 2014_05_18 After WB and profile 70D and FZ200
by gardenersassistant, on Flickr


0561 06 2014_05_18 Before WB and profile
by gardenersassistant, on Flickr


0561 07 2014_05_18 After WB and profile
by gardenersassistant, on Flickr

There are another three examples here.

It looks like it is working to me. There are some slight differences in the pairs of profiled images, but then again there were some differences between the captures, for example different amounts of exposure compensation used to control highlights, certainly in the last example in the linked album, and possibly in others. And the difference in subject size in the last but one example in the linked album, and the different rendering of the background in the second example may confuse the eye a bit. So, overall, I'm content.

In the first example I have included an image showing the effect of setting the White Balance. It was similar with all the other examples in that it looks like setting the White Balance does much of the "heavy lifting", with the subsequent changes arising from the profiling being more subtle. But although subtle, they still look significant to me (more so in some cases than others).

I apologise for providing misleading information with the previous post, to which I have added a prominent edit pointing out that it is incorrect, and linking to this post.
 
Last edited:
Glad you solved the issue I have a number of profiles set..

Have you created a profile using light room these are ones I have.

Flash
Sunlight light diffused
Sunlight heavy diffused (cloudy)
Ambient lounge
Ambient lounge with flash
 
thats off the dxo website, soo might be worth a play?
word of warning, dxo can sometimes desaturate flower pics

That is interesting, thanks. I don't actually need an alternative now I've got the ColorChecker Passport working ok, but I now understand what dxo are doing, and given that the changes made by the ColorChecker are (at least in the examples I have done) rather subtle (compared to the big changes setting the White Balance can make), then the dxo approach may indeed by quite sufficient.

With the ColorChecker I'm going to do some experiments to see what the effect is of using profiles generated in different conditions to the same images, to see if a single profile or just a few (sunny, shade, late afternoon low sun or whatever) will be sufficient rather than capturing images more or less frequently during a capture session. Reusing a small number of profiles would certainly be easier and quicker, although the way they have it set up with Lightroom it is not too much of a bother to use. A bigger issue is that I have to dismount my achromats to capture the ColorChecker reference images, which if I need to do it frequently could become a significant inconvenience.

Thanks again for pointing out the dxo option, and also for the warning. Even though it happens that I'm not now going to follow it up, I'm sure there are others who will find it helpful (and possibly rather more economical) to pursue that option. Good call.
 
Glad you solved the issue I have a number of profiles set..

Have you created a profile using light room these are ones I have.

Flash
Sunlight light diffused
Sunlight heavy diffused (cloudy)
Ambient lounge
Ambient lounge with flash

I need to experiment with profiles. I created scene-specific profiles for the first few of these tests, and then moved to one profile for several scenes. I need to experiment to find out whether I want to create a set of profiles to cover common lighting conditions, like you have done, or whether to use session-specific or even scene-specific profiles. The X-rite training video does keep saying about how you need to make a new profile if the light conditions change, and when I start at dawn the light certainly does change over the course of the several hours that I'm typically on site, so a single profile made for example at the start of the session quite possibly wouldn't be sufficient.

I'm also wondering about scene-specific profiles. For example, I've had several discussions here and elsewhere about shots I take on a Choisya bush, which can throw a lot of yellow light around. If my subjects have a yellow cast because of this, do I really want to "correct" it, away from what it actually looked like to what it would have looked like in different lighting conditions? The same question arises for example with an insect or spider that is on the under side of a translucent leaf with direct sunlight falling on it, in which case the subject can take on a green cast. I don't think I want to "correct" these, so a "standard" profile would probably be fine, but these are questions I really need to experiment with to help me get a better feel for profiles and how best to use them.
 
I find there is very little difference in my profiles bar flash so don't think you'look need to do one each time. Of course Xrite won't say that because any one around the world could create 10 profiles and that would make product obsolete.

I say yes you'll need one for dusk/dawn and golden hour as colour changes dramatically during these times.

But dusk 1 day is not dramatically different than the next. Though you can be more specific if you wish on whether it was cloudy etc.

Again maybe misleading I would do a profile for each camera too in each condition.

As for colour cast I use the profile to correct my colours. Then sort out cast after. 1 thing always do is try to remember to shoot wb card. In different light situations to get the most accurate colour possible out of camera.

Good stuff. Thanks.

I'm doing some tests today with the 70D, and you have confirmed my suspicion about what I'm likely to discover. That will give me some insight into time of day differences. I'll need to repeat on days with different conditions when the opportunity arises.

I'd forgotten about flash, so I need to do some tests with the FZ200 (having totally given up on using flash with the 70D).

As to the white card, the last couple of days' experiences have convinced me of how important that is. I might use the ColorChecker (the colour target), as this has neutrals for WB and in addition I'll be able to create a profile for the particular conditions if I want. However, I can't capture that with an achromat attached (apart from the least powerful one, the 500D), so I might use my grey card for that (or the grey target on the ColorChecker, either of which I can capture with any of my achromats attached of course.

How often during a session might you shoot a WB card for natural light shots? Do you do separate ones for e.g. working in full sun and working in the shade?

Do you just use flash WB in PP, or do you have a standard flash WB of your own, or do you shoot separate WB shots from time to time when using flash?
 
How often during a session might you shoot a WB card for natural light shots? Do you do separate ones for e.g. working in full sun and working in the shade?

Generally only shoot a WB once unless light changes considerably... Might shoot one in shade but again there isn't much difference in colour temperature I find.

I have been naughty/lazy recently and let the camera choose the white balance but do find I have to tweek the temp and tint a lot more this way.

Do you just use flash WB in PP, or do you have a standard flash WB of your own, or do you shoot separate WB shots from time to time when using flash?

Well as you mentioned can be done with the colour card section as 4 one from the bottom right is roughly 18% grey. But I would shoot a WB before session and let the photo have the WB set for easier post processing.
 
Generally only shoot a WB once unless light changes considerably... Might shoot one in shade but again there isn't much difference in colour temperature I find.

I've started looking at results from today's tests. It's going to take a while to sort it all out, but I've already found some quite large differences in temperature as between ColorChecker reference shots taken around the garden in a single half hour "sweep" - Temp ranging from 4850 to 6550, which makes a big difference to the colours.

These tests have raised a question in my mind about preparing profiles. When you have an image of the ColorChecker that you are going to use to make a profile, do you set the White Balance of the ColorChecker image (eg using the WB dropper on one of its neutral patches) before you Export to make the profile?

I have been naughty/lazy recently and let the camera choose the white balance but do find I have to tweek the temp and tint a lot more this way.

I've been lazy like that for quite a while - in fact I never really got thoroughly into using a grey card - but my recent experience has taught me a lesson I think.

Well as you mentioned can be done with the colour card section as 4 one from the bottom right is roughly 18% grey. But I would shoot a WB before session and let the photo have the WB set for easier post processing.

I'll come back to the issue of "one WB shot per session or more" when I've worked more on today's data (there is quite a lot of it). Based on very limited evidence thus far, I suspect the answer for me is going to be "more than one".
 
These tests have raised a question in my mind about preparing profiles. When you have an image of the ColorChecker that you are going to use to make a profile, do you set the White Balance of the ColorChecker image (eg using the WB dropper on one of its neutral patches) before you Export to make the profile?


From results that I don't notice much colour change from using daylight diffused and daylight strong diffused I would suspect the software does the auto white balance anyway. It knows where the 18% grey is.

But then again I think I've always set WB before shooting the colour card... ummm

I think you are right WB is the thing that needs to be constantly set and you can just use 5-8 colour profiles and be fine, and probably less.
 
From results that I don't notice much colour change from using daylight diffused and daylight strong diffused I would suspect the software does the auto white balance anyway. It knows where the 18% grey is.

That's what I thought, but I think my first post about this shows that although it has the neutral patches available it doesn't use them to set the White Balance. So, because I wasn't touching the white balance before applying the profiles, and because the cameras' AWB were set up differently, I was getting very different results from the two cameras. It was only when I set the White Balance from reference shots that I got consistent (and realistic) results from the two cameras. I think the big differences I was getting stemmed from the fact that the 70D AWB is quite good, but that I had altered the FZ200 AWB to a rather odd setting (you can define a Temp and Tint compensation amount with the FZ200 that gets applied to every AWB reading). I only remembered today that I had made a change like that. I don't remember why I did it, but I expect I thought that because I'm using RAW it didn't really matter how the camera White Balance was adjusted (but I was wrong about that I now realise), and so I didn't bother to put it back to a more sensible adjustment.

But then again I think I've always set WB before shooting the colour card... ummm

I don't understand that. I've just been setting the White Balance of the reference shots in Lightroom (using the neutral patches on the ColorChecker) before generating the profiles, but I don't understand what sort of WB setting/adjustment you would be altering before shooting the colour card.

I think you are right WB is the thing that needs to be constantly set and you can just use 5-8 colour profiles and be fine, and probably less.

I think that's where I'm heading, but if past experience is anything to go by there may be some twists and turns before I get there. :D
 
Sorry should be more specific I set WB before shooting colour card because I was doing a session as well hence the camera was correct for shots.

So don't have to bother with doing it all in PP. Hope that explains it.
 
White Balance and camera profiles

I'll go into more detail in the following posts, but here is a summary of my conclusions so far from the work I have been doing recently on capturing and rendering light and colours.

I can now produce more accurate/realistic-looking light and colours in my images, and more vibrant images (although the vibrancy can sometimes reduce the accuracy of the rendition compared to what my eyes saw).

The improved accuracy/realism comes from two things – applying a White Balance from Grey card captures, and turning down the Saturation in Lightroom's import settings.

The improved vibrancy comes from applying Camera Profiles generated from x-rite ColorChecker Passport captures.

Using these techniques has simplified and speeded up my post processing.

These conclusions are based mainly on botanical (mainly flower) images, mainly captured with the 70D, using natural light. Early indications are that they also apply to the FZ200 using natural light, and to invertebrate images as well as botanical images.

For images with flash as the dominant light source White balance issues may be easy to deal with without using Grey cards or a ColorChecker. However, Camera profiles may increase the vibrancy of flash images.

These conclusions apply most strongly to RAW captures. Camera profiles are not available for JPEG images, and even with Grey Card White Balances applied, JPEGs may not produce such good results as RAW, or may need much more effort and skill in post processing.

There are overheads during the capture phase, involving the capture of Grey card and ColorChecker reference images. There are overheads during post processing, principally having to generate Camera profiles from ColorChecker reference images. There are time and disk space overheads after processing is finished, involving the archiving of Grey card and Camera profile reference images.

Here are links [to be done] to the more detailed posts

Capturing and working on the images
Using White balance and camera profile reference images
Overheads of using Grey card White balance and camera profiles
White balance and camera profiles for RAW and JPEG
Different rendition of colours in several PC applications
Back to 70D versus FZ200
 
Last edited:
Capturing and working on the images

After purchasing an x-rite ColorChecker Passport, and working out how to use it, I have spend a lot of time in the last 10 days exploring its use and some related issues that have come to light during the exploration.

Capturing the images

I started, 10 days ago, with three sessions on the same day using the 70D, from about 7:30am to 9am (50% cloud cover of thin, high cloud), 12pm to 1:30pm (sunny with 100% thin high clouds) and 5:30 to 6:30pm (100% overcast, light level declining as rain clouds moved in).

During each session I started by putting the ColorChecker Passport on the ground at the same dozen or so places in the garden and photographing it (my ColorChecker “reference images”).

I then captured images of the same 36 subjects (“test images”). I then spent some time in a more relaxed, creative mode, trying to capture some nice images, many of which involved the same subjects, but some of which were of other subjects (“creative images”). In these sessions I did not capture any Grey card readings, reckoning on just taking the White balance from neutral patches on the ColorChecker image from that part of the garden.

The following morning at around 8am I photographed most of the previous day's test images, but this time using Grey card captures (Grey card “reference images”) for each scene. During this time it was 100% overcast. Just as I finished the sun came out and I photographed some of the subjects again, in the sun, this time capturing ColorChecker images. I then did some more “creative” shots, this time capturing Grey card shots from time to time.

From about 12pm to 1pm I did another “creative” session. The sun was coming in and out from behind the clouds. I did just two ColorChecker captures, one sunny and one shady, and used Grey card readings for each of the scenes.

It was raining all afternoon but at around 8:30pm I noticed the light going golden and there was no rain, so I rushed out to capture ColorChecker reference images and take a few pictures as I had been wanting to add “Golden hour” to the range of light conditions I had been working with. I managed to get one direct sun ColorChecker shot and one Shady, when the light changed again. I looked around and the sun was going behind a cloud bank, from which it didn't emerge. I spent a few minutes taking some pictures anyway.

The following day I spend from 5am to midday at a nature reserve, and I haven't looked at those images, but I had two more “creative” sessions, the first for about 40 minutes around 5pm, when there was sun through light cloud. The second session was from 7pm to 8:40pm. It was sunny to begin with, but the sun then went behind clouds, and I carried on capturing images in a declining light level. Just as I had packed up and was going indoors the light went really golden. I captured ColorChecker images of full sun and shade. I was too tired to go back out and take more photos, and in any case the light level fell fast to an impractical level as the sun went back behind clouds as it was setting.

Two days later, while discussing these issues with my wife, I took a handful of images out of the front door (it was raining quite heavily) so we could compare what we saw out of the door with what we saw a couple of minutes later on the screen.

On the following two days, I had sessions in the garden with the FZ200, but I have not looked at those yet.

Working on the images

I had accumulated something over 2,000 70D images to work on. I processed all the test images, irrespective of image quality, composition etc. For the “creative” images I selected and processed the best of them.

In Lightroom, White balance settings (values for TEMP and TINT) are captured by using the White balance eye dropper on a grey area in a reference image such as this.


0574 3.1 Grey card reference image
by gardenersassistant, on Flickr

You then copy those values to any other images to which you want that White balance to apply.

In Lightroom, a camera profile is generated by telling Lightroom to export an image like this which contains the ColorChecker Passport.


0574 3.2 ColorChecker Passport reference image
by gardenersassistant, on Flickr

The software then finds the colour patches in the image and generates a profile that you can then apply to images as required.

While processing the test and creative images I experimented with applying camera profiles and Grey card settings, both appropriate ones, and inappropriate ones, to see what the effects were. I also compared taking White balance readings from neutral patches on the ColorChecker Passport to readings taken from a simple Grey card.

While doing the processing I discussed some examples with my wife, who is very good indeed with colours, and has been saying for years that the colours in my images of her flowers are often not right. It was my wife who suggested reducing the saturation.

When I had finished I posted all the processed images to Flickr. These are very repetitive and I don't expect anyone to be interested in them, but just in case you do want to glance at them they are here.
 
Using White balance and camera profile reference images

The following image was captured in RAW. This composite image illustrates the effect of applying a Grey card white balance and a ColorChecker camera profile. (The differences discussed here may be much clearer if you click between the larger, individual images here.


0574 1.1 Example 1
by gardenersassistant, on Flickr

At the top left is the image as imported into Lightroom. The camera was set to use Auto White Balance and Lightoom used this setting together with the Lightroom “Adobe standard” camera profile and an import setting of Saturation -10 to define the colour values in the image. The hue (“colour”) of the flower is wrong – it should be more lilac than blue.

At the top right is the image as imported above, but with its White balance set from a Grey card capture. The hue looks much more accurate/realistic.

At the bottom left is the image as imported, but with its camera profile set to a profile generated from a ColorChecker reference image. It has stronger/richer colours and better microcontrast, but the hue is still wrong.

At the bottom right is the image as imported, but with its White balance set from a Grey card capture and its camera profile set to a profile generated from a ColorChecker reference image. The hue looks accurate/realistic and it also has richer colours and stronger microcontrast. The richness of the colours and the strength of the microcontrast are a little more than I perceived at the time, but not (to my eye) troublingly so. They look credible to me, even if not completely accurate, and (to my eye) they make for a strong visual impact, and a “look” that I find pleasing. The same was true of quite a lot of the images I processed. (Note that these images have had no processing other than default chroma noise reduction and a reduction of Saturation on import to Lightroom, and the application (or not) of a Grey card White balance and/or a Camera profile.)

Camera profiles

We have seen that applying a camera profile makes a difference. Can you use a single camera profile for a particular camera, or do you need to use different profiles in various circumstances?

This composite image illustrates the impact of applying different camera profiles to the same image. Note that all six versions have exactly the same White balance. It is only the camera profiles that differ. (The differences discussed here may be much clearer if you click between the larger, individual images here.


0574 2.1 Example 2
by gardenersassistant, on Flickr

At the top left is the image using Lightroom's built in “Adobe Standard” camera profile. The others use profiles that I generated from ColorChecker reference images in various light conditions.

All of the ColorChecker profiles give results which are different from the Adobe Standard profile. The Sunny and Overcast ColorChecker profiles gave very similar results, and this seemed to be generally the case for Colorchecker profiles, whatever the light conditions, except at the beginning and end of the day. The Late Afternoon profile produces significantly different results from the Sunny and Cloudy profiles, and the Golden Hour profile even more so. The Dawn profile produces radically different colours.

It therefore seems that a single camera profile is not the best solution. I obviously need more experience to firm up on how this all works in practice, but for now, the closer it is to dawn or dusk, the more frequently I shall capture ColorChecker reference images. For much of the day it looks like a single, or occasional, reference image captures will suffice.

In due course I might assemble a set of ColorChecker profiles and just use those. However, I don't think I'll be too quick to do that as there may turn out to be differences between seasons, or depending on how clear or polluted the atmosphere is, and possibly other factors.

Grey card readings

Similarly, what is the best strategy for using Grey card reference images to set images' White balance?

White balance is expressed in terms of TEMP and TINT. As TEMP ranges from smaller to larger, the overall Colour balance varies from bluer to more yellow/orange. Changing TINT varies the colour balance from more green to more magenta.

A single TEMP,TINT combination is used to define the colour balance in an image, but an image may have areas with different colour balances depending on the illumination (e.g. sunlit and shady areas). When I took a look at the the TEMP and TINT at various points on the Grey card in a small number of Grey card reference images I found a few differences in TEMP of 250 or so at different points on a given Grey card, and a difference of 500 in one case. This level of difference only causes minor changes to colours.

From one scene to another the White balance can change much more than this. In the session where I looked at some Grey card readings there was a difference in TEMP of 3,500 between the “coldest” and “hottest” image, which is enough to make a significant difference to colours, as illustrated by this composite image. This is two versions of the same image, differing only in their White balances, which have been set to the minimum and maximum TEMP I found in the scenes I examined.


0574 4 Example 3
by gardenersassistant, on Flickr

In just the 30 or so Grey card images used in that session I found several examples of differences in TEMP of 2000 or so between one Grey card image and the next.

The conclusion I have drawn from this is that I will capture Grey card reference images fairly often during photo sessions.
 
Overheads of using Grey card White balance and camera profiles

Capturing reference images

When using Grey card and ColorChecker reference images there is obviously some extra effort needed while capturing images. However, I'm not finding this time consuming or burdensome. Indeed, Grey card captures involve almost no time at all.

I am finding it much easier to use a simple strip of grey card than using the neutral areas of the ColorChecker. The ColorChecker is awkward to handle, especially because it has a latch holding it shut that I haven't yet worked out how to use one-handed. This makes using it quite disruptive and slow. In contrast, I can very quickly take out the strip of grey card out of a pocket, put put it in front of the lens, snap an image (it doesn't matter about focus) and put it away again. I have checked the TEMP and TINT values with the Grey card and ColorChecker both in the same image, and they give the same results.

I'm not doing ColorChecker colour captures nearly so often as Grey card captures, which is just as well. Not only is the ColorChecker awkward to open up, but to use it for colour purposes rather than as a Grey card you have to get quite a lot of it into the picture, which I can't if using any achromat other than my least powerful one, the 500D. This means I often have to dismount an achromat in order to capture a reference image. I also have to put the ColorChecker somewhere on the ground, because I can't hold it far enough away to get it in focus while holding it, and unlike for Grey card purposes, for colour purposes it does have to be in focus. Putting it on the ground in amongst thick, wet grass, brambles etc, it can be awkward to get a view of it clear of obstructions. I have taken to mounting it, with blue tak, onto a clipboard which I take from my bag and lean against the bag in order to capture a reference image.

Using reference images during post processing

Using the Grey card reference images in Lightroom is easy and quick, using the eye dropper.

Generating the ColorChecker camera profiles in Lightroom is straightforward. Each one takes 30 seconds or so to generate and you have to restart Lightroom before you can use a new profile, but as not many profiles are needed I'm not finding the delay problematic. Applying the ColorChecker camera profiles is even easier and quicker than applying White balance adjustments.

It is easy in Lightroom to apply a White balance and/or camera profile to one image and then with a single step copy this to a number of other images.

Archiving reference images

Since I may want to reprocess images in the future I need to keep the appropriate ColorChecker and Grey card reference images. This is turning out not be too much of a problem. I'm not bothering to write notes about which reference images apply to which finished images, because it's usually pretty obvious.

Balance of benefits and overheads

So there are overheads, but there are also benefits, apart from the (to my eye) improved image quality I'm getting. There has been a totally unexpected impact on my post processing. I'm fiddling far less with Highlights, Shadows, Blacks, Whites, Clarity and Vibrance, which I find can sometimes be quite time-consuming and frustrating as I flit back and forth trying to find a combination of slider positions that makes for a nice looking image, and I have noticed by comparing my adjusted version to the original that I sometimes make the images worse. Now, in many cases, having applied the White balance and Camera profile, all I'm doing is to adjust the Exposure, giving much less opportunity for the image to “fall apart” under my ministrations.
 
White balance and camera profiles for RAW and JPEG

As far as I can tell you cannot generate a camera profile from a JPEG image, and you cannot apply a camera profile to a JPEG image.

I have used Grey card White balance reference images with JPEG occasionally in the past and I assumed that if you applied a Grey card's settings to both a JPEG and a RAW version of an image you would end up with the same colours. This turns out not to be the case.

This composite image deals with a RAW + JPEG pair of images from my FZ200. It is the same exposure, saved as both a RAW and a JPEG version.

At the top left is an out of the camera JPEG image. Beneath that is the JPEG image with its White balance set by using the eye dropper on the grey area. At the top right is the RAW version as imported into Lightroom. Beneath that is the RAW version with its White balance set by using the eye dropper on the grey area.


0574 7 White balance applied to JPEG and RAW versions of an image P1330508-Edit
by gardenersassistant, on Flickr

I was surprised to find that the hue of the flower did not look the same in both versions after their White Balances had been set from the Grey card. It may look like you could get the White balanced JPEG to look like the White balanced RAW just by turning the Brightness/Exposure Down. It didn't work like that when I tried it, nor did anything else I tried.
 
Last edited:
Different rendition of colours in several PC applications

I was obviously paying closer attention than usual to colours during this exercise and I noticed something that I'm surprised has never registered before. Different PC applications can render colours differently. This was the source of considerable confusion until I realised what was going on. I don't know if this is something specific about my setup or a more general issue.

Here is an example, with a screen shot of the same image shown in Windows Photo Viewer, Lightroom, Firefox, Photoshop CS2, Irfanview and Faststone Image Viewer.


0574 5.1 Six renditions of a Rhododendron flower
by gardenersassistant, on Flickr

The Irfanview and Faststone versions are similar to one another (and similar to XnView's rendition), and different to the other four versions. There may be less conspicuous differences amongst the other four; I find it difficult to tell.

The differences are not consistent. Here is the same image shown in CS2, Lightroom, Windows Photo Viewer, XnView, Irfanview and Faststone. I don't discern any significant differences in this case.


0574 5.2 Six renditions of an Iris
by gardenersassistant, on Flickr
 
Last edited:
Back to 70D versus FZ200

I have come to regard the 70D as my “flower camera”. A large part of this is because it produces more realistic colours than the FZ200. However, early indications are that I may now be able to get pretty much the same colours from the FZ200 as from the 70D. That being the case, the question arises once more of which camera to use for what types of scene and circumstance.

During the course of this exercise I have had two days (and 2,500 or so images) of FZ200 image capture in our garden, giving me a mixed bag of flower and invertebrate images. Some of the flower images are of the same subjects as I tackled with the 70D, so I may be able to do some useful comparisons. My gut feeling that the 70D can capture greater subtlety of colour and texture and can handle a wider variety of lighting conditions, as well as having at least one stop and sometimes two stops extra of dof variation compared to the FZ200. But I was surprised that the like for like invertebrate comparisons I did in the garden did not yield a clear “win” for the 70D, so I need to keep an open mind about this regarding flowers.

As to invertebrates, as well as the ones from our garden (not very good probably because of the conditions), I have had several more quite long sessions at a couple of the local nature reserves, sometimes using one camera sometimes the other. I'm still collecting evidence about early morning moving snail shots, for which my evidence to date suggests the 70D may be superior, and still air stationary subject long exposure shots for which the 70D ought to be superior.

As a taster on the still air stationary subjects issue, how much better is this (this image was included in a previous post)


0574 6.1 70D Early morning long exposure example IMG_0137-Edit
by gardenersassistant, on Flickr

than this? (That is a genuine question btw. I'd like to know what you think.)


0574 6.2 FZ200 Early morning long exposure example P1350452-Edit2
by gardenersassistant, on Flickr

(These are both taken from large (1000+ image) sets that I have only dipped into to look at perhaps 20 or 30 images to find an example to use from each.)

There will be more on this subject in due course no doubt, when I've trawled through lots more images to see where the balance of advantage lies overall. Same with the moving snails and slugs.

The journey is ongoing. :)
 
Wow Nick so comprehensive... love it and thanks for sharing your findings.

It makes sense jpeg and raw would be different due to the camera doing some post process for you like sharpness and compress etc. Did you use the 'as shot' (can't remember what they call it maybe neutral) profile on 70d for the comparison?
 
Wow Nick so comprehensive... love it and thanks for sharing your findings.

Thanks Bryn.

It makes sense jpeg and raw would be different due to the camera doing some post process for you like sharpness and compress etc.

True, but it was the fact that the colours were so different after applying the Grey card white balance that surprised me.

Did you use the 'as shot' (can't remember what they call it maybe neutral) profile on 70d for the comparison?

I used the FZ200 for the RAW/JPEG comparison. I haven't done any RAW/JPEG comparisons for the 70D yet - I only really did it at all because of discussions I've been taking part in on another site (the old "JPEG or RAW?" discussion. or as it so often turns into, argument. Tiresome). Because that discussion is ongoing I turned on RAW+JPEG for both the FZ200 and the 70D this morning for another FZ200/70D comparison test run I did in the garden - this time true like for like with flowers. Same shot, one camera after the other, several shots each, with a Grey card reading for each camera for each shot, and a ColorChecker reading at the start and finish of the session. Also with the cameras set up to give similar dof and shutter speeds. That should help me pin down which camera to use for flowers (I'm expecting it to be the 70D, but we'll see soon enough).

For the JPEG/RAW comparison with the FZ200 the camera was in its "Natural" mode, with Contrast, Sharpening, Saturation and Noise reduction all turned down to the minimum settings (all of which only effects the JPEG image of course). The top two images in the post used the "As shot" White Balance and the "Adobe Standard" camera profile. The bottom two use the White Balance taken from the Grey card shot and the "Adobe Standard" camera profile.
 
Always interesting to read your findings. In answer to your question I do think there is a difference between quality of those through fly images (I've looked at both full size on flickr) and the first shows more detail as far as I'm concerned. I do think the colour hue has an impact, and the yellows seem a bit strong in the second, and this may be skewing my opinion, but both images are of very high quality, and we are back to the question of what is "good enough."
 
Always interesting to read your findings. In answer to your question I do think there is a difference between quality of those through fly images (I've looked at both full size on flickr) and the first shows more detail as far as I'm concerned. I do think the colour hue has an impact, and the yellows seem a bit strong in the second, and this may be skewing my opinion, but both images are of very high quality, and we are back to the question of what is "good enough."

That is very, very interesting Tim, both about the amount of detail and about the colour in the second one. Thank you. I must go to bed now as I'm getting up in three hours to go out to one of the reserves to hopefully do some direct like for like shots of, most probably, dung flies again. If it works out then I may be able to pin this down with a bit more certainty.
 
Hi Nick
Just had a look at both of the dung fly shots on flicker and agree with Tim
They are both very good the 70D one does have more detail
The main difference is that the light is much better in the first one, it's one one those occasions when the quality of the light is more important than slight differences in equipment
I think I said before that I really like the first one it's one of the best dung fly shots I've seen, superb

Thanks Pete. Interesting point about the light - I'd assumed it was the camera, but ... I'm still dithering as to which to use when. I went out as planned this morning to do some careful like for like comparison shots, but things went wrong.
  • Unlike the previous two or three times I've been to that site recently, the flies started moving almost as soon as I got there (5am), so it was difficult to get many like for like shots.
  • I had equipment problems. My tripod died a little while ago and I can't find anyone who supplies that design any more. I could buy another arm, which is what broke, but I did that last time and it is the second time the arm has snapped off. Luckily I caught the camera but I thought that as it has happened twice then it was time to consider a more conventional design. So I bought a Benro with an adjustable arm - carbon fibre, so light, and with quick release fittings on the legs that you can use quickly, and one-handed. My initial impression was very favourable indeed. However, in use it turns out to be very different indeed from the previous one - I'm just hoping it's a matter of experience and learning how best to use the available adjustments, but at the moment I'm finding it very unsatisfactory compared to the previous one. Worse though was a new ball head I bought. I got one of the bigger Gorillapods for working close to the ground, knowing that the new tripod wouldn't do what the old one would in that respect, and the Gorillapod has a ball head with an Arca Swiss quick release plate, so to allow for quick switching between tripods I got a new ballhead, also Arca Swiss fitting, to use on the Benro. It is hopeless. It has three things you have to turn to release and tighten the head, and one of them in particular often ends up in a very awkward place to get at. It was a nightmare to use. As soon as I got home I refitted my other ballhead, which has a single lever to lock and release the ball. I'll live with slower switching to the Gorillapod, besides which having tried it today I'm not sure how much use the Gorillapod is actually going to be. I'm thinking that I may get a replacement arm after all and live with the fact that it will probably snap off in due course.
  • And then I looked at some of the few comparison pictures I had managed to capture. The ones I looked at were complete rubbish. Not "not quite right in some little respect or other" - rubbish. I had used the 70D for the rest of the session after giving up on the comparison shots, and I looked at a few of the shots from later in the session - some that I "knew" would be good. They weren't. They were unusable.
I've been doing some gardening to take my mind off what looks like more wasted money on kit and photos that turn out to be no good for no good reason I can think of. And I've been looking at all the nice stuff being posted on the forum, and seeing terrific pictures of little things captured with the MPE that I'm sure I can't get with my kit - so was sending the MPE back another mistake? I think it might have been.

Oh dear. Sorry to moan. A bit of a rough patch on the journey today. Maybe I'll find there are some nice piccies in today's stuff when I look through them all. That has happened before, when the first few I looked at when dipping in for a quick look were horrible, but there turned out to be others that were ok. And at least the flower side of things seems to be going ok. I've got a session of flower comparison shots to look at, but I'm pretty sure the 70D is the right tool for the job. Usability for flowers is fine, hand-held and tripod, and the results are nice. Can't really ask for more than that. :)
 
Last edited:
I know it's ups and down sometimes glad you're thinking positively about it :)
Think you are right getting a new leg for the tripod it's best to stick with what you know works
I definitely think that in the long run the 70D is your best bet
I went out yesterday for butterflies but couldn't find any and today to the moss (whixall) and didn't get any decent shots but I met a really nice guy and we spent the afternoon chatting and watching the white face darters and four spots flying round the pool and egg laying
 
I know it's ups and down sometimes glad you're thinking positively about it :)

I am now. I wasn't earlier in the day! :)

Think you are right getting a new leg for the tripod it's best to stick with what you know works

Yes. I've ordered a Velbon V4 boom arm (never come across it before). I'm hoping it might be a bit tougher than the only other alternative I can find - the same as I had before, which had issues in use as well as snapping off. I'm planning on using the boom arm with the Benro. It might actually turn out to be
a rather good combination. We'll see. Fingers crossed.

I definitely think that in the long run the 70D is your best bet

I think you're probably right. I've had a look at and a play with a few of today's 70D images - they aren't as bad as I thought. I think part of the problem might have been that I was looking at them in Faststone and (apart from the fact that some of them really were rather bad) I happened to pick ones that Faststone didn't render very well but which looked better in Lightroom. I haven't looked at the small number of FZ200 comparison images yet. More on that in due course. (And the flower comparisons too from a few days ago, that I also haven't looked at yet.)

I went out yesterday for butterflies but couldn't find any and today to the moss (whixall) and didn't get any decent shots but I met a really nice guy and we spent the afternoon chatting and watching the white face darters and four spots flying round the pool and egg laying

I'm glad you got something good from today's outing. (Note to self - Important not to expect things to work all the time, and very important not to get too locked into this stuff and miss out on other aspects of life. Thanks Pete.)
 
I definitely think that in the long run the 70D is your best bet

As you know one of my concerns with the 70D has been my inability to place the centre of focus as accurately as with the FZ200 because of the too large autofocus box. I made another change to my tripod arrangements that I forgot to mention.

My focus rail has died (the quick release catch no longer reliably locks the rail in place), so I now have a two way rail. It's a bit shorter in the front to back travel than my old one, but I think it will be ok. The forward/backward position of the old one was done by releasing the quick release and pushing the rail - the fine adjustment knob was too fiddly and slow for most purposes. Pushing the rail was a bit crude in terms of positioning, but fine for getting into the right working distance range for my achromats, except the MSN-202 and sometimes the 150 and 250 stacked, but I was using rocking focus for them anyway and pushing the rail was fine for getting into the right general area and then rocking from there.

The new rail has a wheel which has enough travel to get a long way fast, but gives fine enough control to be usable for manual focusing (which wasn't the case with rail pushing with the old rail). the wheel is also much more conveniently place on the side rather than the end of the rail, so it comes to hand much very readily. And the knob is bigger and easier to use. Coupled with the very nice LCD screen the 70D has, this is making manual focus very doable, just using the rail wheel rather than the more difficult to get at camera focusing ring, and without having to magnify the image and lose the composition. I need to practice more to make sure it does actually work in terms of image focus, but it is looking very promising at the moment.
 
Hi Nick
Glad that you are getting things sorted
It's interesting that you are using a tripod
I haven't actually been using a tripod at all for the "wild" insects (for the zoo butterfly house I used the tripod all of the time)
I did try but the legs just got in the way and got caught up with the long grass and nettles etc and I just ended up scaring everything off
I had fully intended to use the tripod as much as possible but I leave it at home now and use a monopod and for low down work handhold
 
Last edited:
Hi Nick
Glad that you are getting things sorted

Thanks Pete. Even more sorted now, see below. :D

It's interesting that you are using a tripod

It's essential for some of my stuff, like the early morning stationary subject low ISO shots, where I can be using exposures of over a second. These are full "classic tripod" shots - hands off, remote release. I also need a tripod for my "tripod assisted" shots, for example of slugs and snails in motion, as these too are usually early in the day when light levels are still low and even though I use ISO 800 and up I'm still typically using exposures in the 1/15 to 1/5 sec range. Because the subjects are moving I can't use a hands off approach, but the tripod damps down a lot of the vibrations and also gives me a stable platform for continuously changing composition. I also find a tripod important for series of shots of the same subject, which may involve working on the same scene for several minutes (longer sometimes). The tripod keeps the framing steady, even in positions that I couldn't possibly hand hold for any length of time, and even in "easy" positions my naturally quite large hand-shake quickly becomes silly large.

I haven't actually been using a tripod at all for the "wild" insects (for the zoo butterfly house I used the tripod all of the time)
I did try but the legs just got in the way and got caught up with the long grass and nettles etc and I just ended up scaring everything off

An important point. I'll get back to this at the end.

As I mentioned, I have gone back to my previous ball head, and I had a session yesterday afternoon in our garden, and that side of things was fine. However, even though the garden is a very easy environment compared to the reserves, I was really struggling with the tripod (fighting with in more like) to adjust it to get the camera where I wanted it. I missed shots because either the subject (for invertebrates) or the light (for flowers) had gone. And I gave up on some shots because I simply couldn't arrange the tripod so I could take the shot. It convinced me that I really, really wanted the new arm that was due to be delivered today to turn up, and to work. "Please, please let it work," I thought. "I don't think I can live with this degree of hassle, irk and struggle".

The Velbon arm turned up this afternoon. I put it on the new Benro tripod straight away and went out to try it. Oh, what a relief! It worked - my hands almost immediately understood what to turn, push or pull to get to the positions I wanted, and I suddenly realised that I was thinking about photographic issues again rather than being in a constant state of conflict with the tripod.

The new setup isn't perfect. It has one rotational weakness that I've come across before. In fact, it has two of them. The central arm on the Benro (which I now deploy vertically in this setup) has three allen screws on the round plate at the end which you can use to stop an attached ball head rotating. However, the base of the Velbon arm that attaches there has such a small diameter that those screws can't engage. Also, the round plate at the end of the Velbon arm, where the ball head now attaches, doesn't have any allen screws, so I can't lock that against rotation either. So both these joints are liable to loosening and sudden rotation. In fact I had it happen a couple of times in this first session, with the ball head rotating on the end of the arm. That's not good, but I already have the habits needed to cope with that (you frequently test it and give it a bit of a turn in the tightening direction), so I think I can live with that. (On balance, I don't see any realistic alternative. It seems that I really do need a lateral arm, and the only other one I've found is the one I used previously, and that has the same problem, and another problem which the Velbon doesn't.)

It may not be perfect, but thus far it seems to be very good indeed.

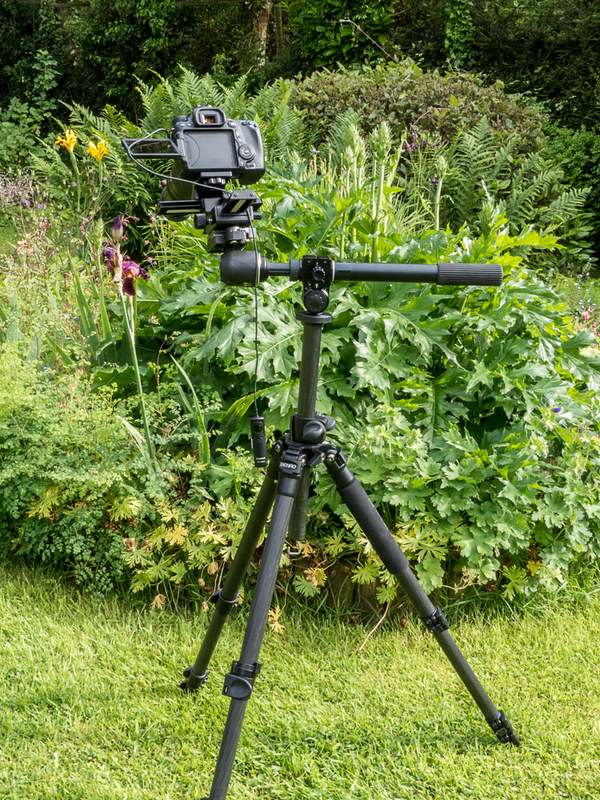
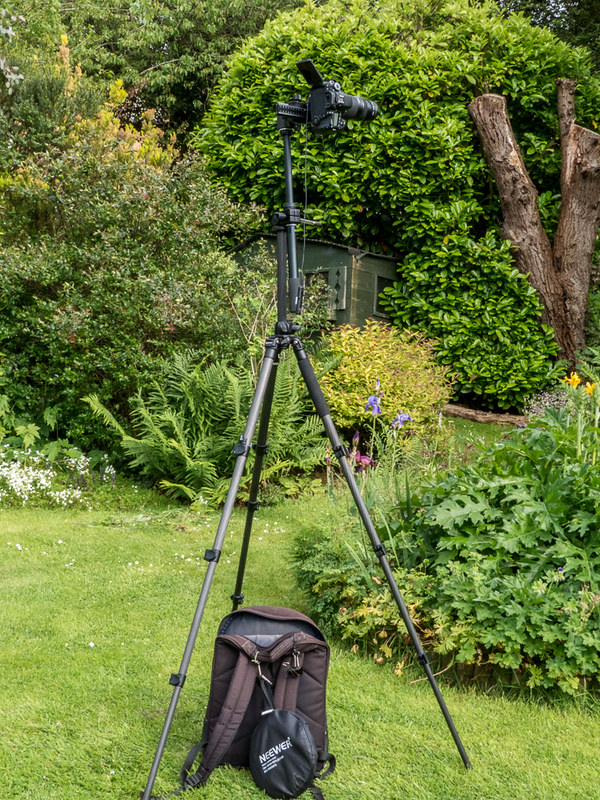
The Benro tripod has an arm which can be used vertically, and is easy to reverse. It can also be rotated, horizontally and at various angles. With this setup however I'm only using it vertically. Here we see it with the central column in its normal orientation, with the Velbon arm attached to the top of it. The ball head is attached to the arm, the two way focus rail is attached to the ball head, and the camera on the upper (lateral moving) rail.


0575 02 2014_06_03 P1370597
by gardenersassistant, on Flickr

Here it is with the central column raised. This in itself is a huge difference from using the Benro by itself and depending on its adjustable arm. You can have the Benro arm move vertically, or you can have it "lateral" (sideways and various other angles). However, if you have the non-vertical flexibility you don't have a straight vertical adjustment, and trying to emulate that by adjusting the legs is not straightforward, and can sometimes be downright difficult ("fighting with the tripod" type difficult).


0575 05 2014_06_03 P1370574
by gardenersassistant, on Flickr

On the Velbon arm, the knurled end of the arm can be turned. This unlocks the arm and lets you make smooth movements in two rotations - horizontally (360 degrees) and vertically (180 degrees). Turn the knurled end back the other way and it locks in the new position, and it locks tight. This is absolutely brilliant and gives a flexibility I've never had before.

In the first image you can see a handle on the Velbon arm. You can turn this to extend the arm. Not far, up to 205mm, but that turns out to be enough to be definitely useful. Here it is with the arm locket in a new position, and with the arm extended. There is knob you can see pointing towards us just above the base of the arm, (where the lateral arm connects to the vertical tripod arm. This knob locks the lateral arm extension in position to it won't change length under its own steam.


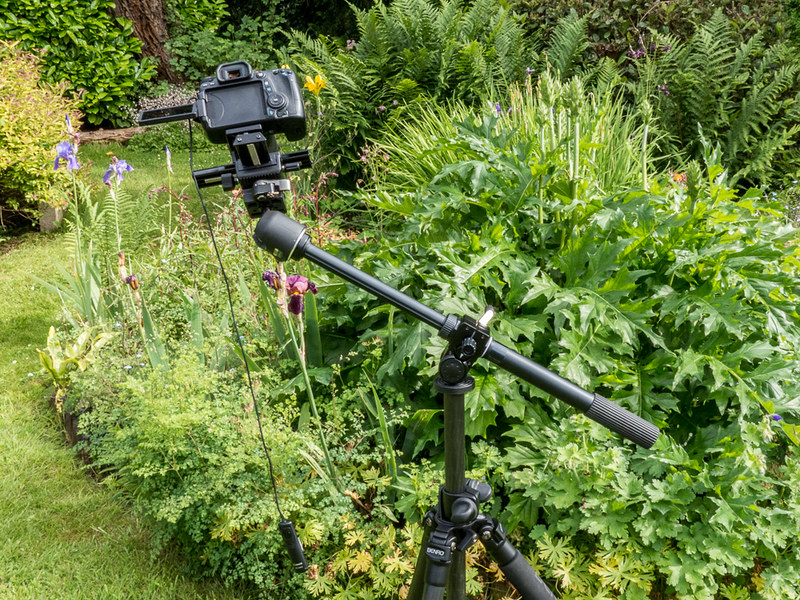
0575 08 2014_06_03 P1370576
by gardenersassistant, on Flickr

Reversing the tripod's central column is really easy - much easier and much faster too than with my previous lateral arm arrangement. With the central column reversed I can get the camera fairly close to the ground.


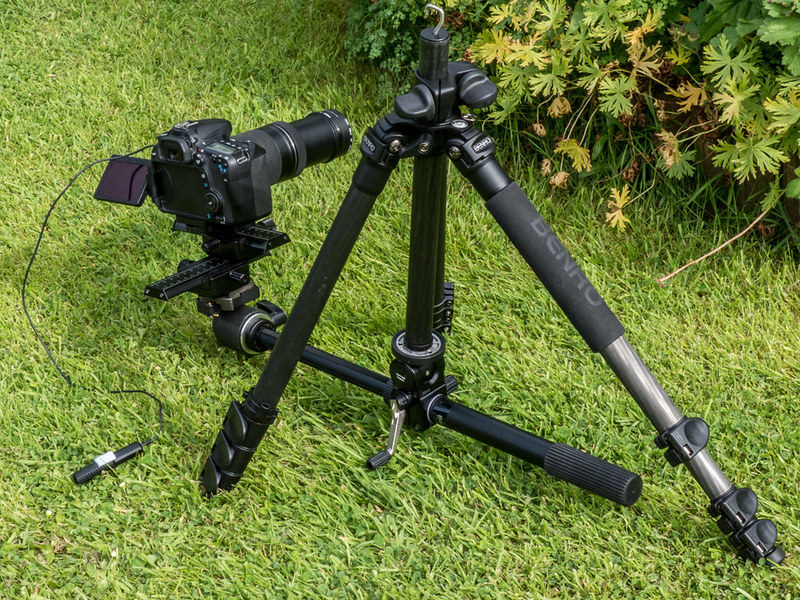
0575 12 2014_06_03 P1370581
by gardenersassistant, on Flickr

The two way rail means that I can't get the camera quite as low as I could before. I'll have to find out which is more important to me - having the lateral movement on the rail, or being able to get that bit closer to the ground. I haven't yet internalised the fact that I've got lateral movement available, but I did use it once today, just for a slight movement sideways, and it made me realise that lateral rail movement may be very useful indeed. Getting that slight movement without the lateral rail would have been quite fiddly, and it did make a big difference to the composition. I can get the camera closer to the ground using the Gorillapod on its side or removing the focus rail and mounting the camera directly on to the ball head, although either of these would mean changing quick release plates. Sometimes for really low shots I just hold the camera so it is supported by the ground, or possibly by my foot if I want it just a bit higher. This is generally when I'm working hand held, but when working with the tripod I could detach the camera from the focus rail (which is done using a knob that is fairly easy to use) and use the ground, foot, leg or whatever to rest the camera on.

You can get to various other positions with the tripod column reversed. With my previous arrangement I would sometimes extend the legs and work much higher up with the arm reversed, but that was mainly because of the difficulty of reversing the central column. With this set up I'd be much more inclined to reverse the column when I need to get higher because you get much more flexibility in how you can move the lateral arm because the legs don't get in the way and greatly restrict the available movements.


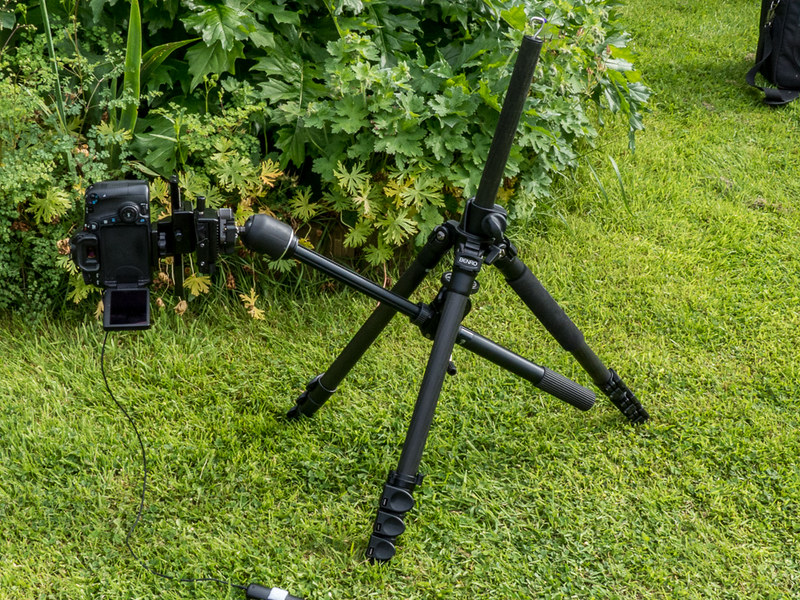
0575 14 2014_06_03 P1370583
by gardenersassistant, on Flickr

And with the tripod legs extended you can get the camera quite high - about as high as I could reach without using something to stand on I think.


0575 18 2014_06_03 P1370587
by gardenersassistant, on Flickr

There are some more pictures of the setup here.

Finally, your point about disturbing the subjects and scaring them off. That is something I recognise well. One of the great advantages IMO of a vertical plus lateral arm arrangement is that it minimises that sort of disturbance. Using the Benro tripod by itself (and the same is true of a lateral arm Cullman that I bought but never proved to be useful), with the arm deployed laterally you have to handle height adjustments with the legs. To work very low down you have to splay the legs out flat, and that can cause a great deal of disruption to the surroundings. Further up, you have to change the lengths and/or angles of the legs and it can be really difficult to work out exactly what adjustments to make in order to get to where you want to be, it can be surprisingly difficult to actually make the changes because of difficulty in getting the required leverage on the legs for angular adjustments, you have to keep lifting the legs off the ground and back again, and you may have to keep repeating all of this stuff because the changes you make don't have the exact effect you need. All of this can get quite disruptive of the environment (especially if you get annoyed by the difficulty of it all).

Things are very different when you have a central column and an attached lateral arm. The legs get adjusted far less (so there is less frequent disruption), and the adjustments you do make to the legs are much simpler, in the sense both of being simple to understand what is required and it being simple to execute. And as far as execution goes, the lightness of this tripod, being carbon fibre, and the quick release fittings on the legs, make the leg adjustments that are needed physically easier and also much faster to execute than with my previous rig, which was heavy (metal) and used screw fittings on the legs. And since, with this type of setup, the legs stay at a fairly close to vertical orientation, and never splayed out flat, it is relatively easy to ease them through brambles etc, causing less disruption than when the legs have to be set at flatter angles some of the time.
 
Thanks very much Nick for taking the time to show me your tripod setup
My tripod is a manfrotto 190 carbon fibre with the central column that can be set horizontal
It is good but as you say to adjust it I have to adjust the legs and its awkward
Its fine if the subject isn't going anywhere but it's only got horizontal adjustment and setting the hight is very fiddly as I can only lock the legs in two positions but can of course extend or retract them
The silly part is that the plate that the ball head sits on is oval as its got a spirit level bubble and this gets in the way of the ball head when using the tripod arm horizontally
I will have to look and see if the velbon arm will fit onto my 190 tripod
I have found it on Amazon and saved it to my wishlist
I am using on that tripod a quick release ball head think its called the r32 its a pistol grip type thing (am at work at the moment so working from memory)
 
Last edited:
I described in this post how I went to one of the reserves specifically to get some early morning stationary subject like for like comparison shots between the FZ200 and the 70D, and how the session didn't go very well. I've now looked at the images from the start of the session (the only time when I was attempting like for like shots) and have found four comparisons that I would very much appreciate feedback on.

I can make the original RAW files and/or full size JPEGs available if you like, although I suspect that what I've provided here (complete with Flickr's sharpening halos, grrr), with the 1100 pixel high versions linked through at Flickr, may prove sufficient.

I have picked the most like for like pairs I could find, and I picked what looked to me to be the best of typically three captures for each camera. (I know the image quality isn't stellar in any of these, but as you'll understand that doesn't matter - it's the comparisons that I'm interested in.) In the fourth "pair", I really couldn't find a convincing like for like pair, and there were two 70D images that I couldn't decide between, so I have included both of them. For that reason there are nine images, with four in this post and five in the next (because, I think, there is a restriction of 8 images in a post here).

The images were imported into Lightroom using my default import settings, which is Lightroom's default chroma noise reduction and a reduction in saturation of -10 for the FZ200 images and -20 for the 70D images. In each pair, the two (or three) images have been given the same Temp and Tint values, taken (not that it matters) from a ColorChecker reference image captured at the start of the session. (The third pair have the same Temp and Tint as one another, but different from all the others. I don't know where the third pair's Temp and Tint came from, but I don't think it matters for current purposes.) The images were then passed across to CS2 for my standard "finishing" procedure, with the images in each pair receiving the same amount of sharpening, apart from the first pair, where the FZ200 image had very slightly less sharpening.

I would very much welcome any feedback on your views as to relative image quality as between the FZ200 and 70D versions, individually and/or as a whole. Any aspects of the images that strike you as significantly different are of interest. One thing that I think confuses the issue of sharpness and detail is that the centre of focus falls at different places relative to the subject as between the images in each pair. (By and large I suspect the centre of focus is exactly where I intended it to be in the FZ200 images, and for the others, where the 70D happened to place the centre of focus inside the larger focus box that it uses, and not necessarily at the centre of that focus box.)

Comparison 1 - 70D

0576 01 2014_05_31 IMG_4291-Edit PS1 PSS3.86
by gardenersassistant, on Flickr

Comparison 1 - FZ200

0576 02 2014_05_31 P1370448-Edit PS1 PSS3.75
by gardenersassistant, on Flickr

Comparison 2 - 70D

0576 03 2014_05_31 IMG_4322-Edit PS1 PSS3
by gardenersassistant, on Flickr

Comparison 2 - FZ200

0576 04 2014_05_31 P1370469-Edit PS1 PSS3
by gardenersassistant, on Flickr


Comparison 3 and 4 in the next post.
 
Thanks very much Nick for taking the time to show me your tripod setup
My tripod is a manfrotto 190 carbon fibre with the central column that can be set horizontal
It is good but as you say to adjust it I have to adjust the legs and its awkward
Its fine if the subject isn't going anywhere but it's only got horizontal adjustment and setting the hight is very fiddly as I can only lock the legs in two positions but can of course extend or retract them

Yesterday in the garden, and before that at the reserve, I got into all sorts of tangles with the legs. I had them splayed at various angles, mainly not the ?two angles at which they lock, so the angle would change, depending on what pressure I applied. And I ended up with the the top of the tripod being far from horizontal some of the time, which had a tendency to impart a rotational motion to the arm. I did get some shots off, but if any of them come out nice I'll be feeling that it is definitely in spite of the tripod not because of!

The silly part is that the plate that the ball head sits on is oval as its got a spirit level bubble and this gets in the way of the ball head when using the tripod arm horizontally

Oh. :( That's the sort of thing you don't find out about until you've spent your money, not matter how many reviews you read.

I will have to look and see if the velbon arm will fit onto my 190 tripod

I think it will fit on anything. The base of the Velbon comes with a 1/4" female thread in it but they supply a 3/8" one you can use instead. (I suppose your tripod's central column probably has a reversible 1/4" / 3/8" fitting anyway, so that probably doesn't matter). If you are going to fit a ball head on to the end of the arm like I have you'll need to get (if you haven't got one lying around, which I did) a 1/4" to 3/8" adaptor, because the Velbon arm has a 1/4" fitting on the end (which, I think I read, is too long for attaching a camera directly. Can't remember what the solution was for that. It's in the reviews at Amazon I think.)

I have found it on Amazon and saved it to my wishlist

Don't be too quick Pete. It may have a fatal flaw that I haven't noticed in my initial enthusiasm. And longer term my concern is that, especially by being deployed upside down a lot of the time, it will break like my previous two lateral arms have.

I am using on that tripod a quick release ball head think its called the r32 its a pistol grip type thing (am at work at the moment so working from memory)

I've wondered about a pistol grip. Not sure how much added value that would provide with my current setup, and if it is larger than a ball head then it would increase the minimum height off the ground that I could reach, which I wouldn't be keen on, depending on the amount of extra height it would need.
 
Am viewing your comparison images on my Samsung mobile at the moment but will have a proper look on my computer when I can tomorrow
But what's interesting is that as far as I can tell on my small screen is how little difference there is between them in image quality
The 70D one's look slightly better with more details and the fz200 shots look a touch warmer as well as having more depth of field but would expect that from the smaller sensor
Can't tell any more than that and I probably shouldn't try using a mobile screen but will have a proper look tomorrow using a decent screen
 
Last edited:
Yesterday in the gardenen, and before that at the reserve, I got into all sorts of tangles with the legs.m splayed at various angles, mainly not the ?two angles at which they lock, so the angle would change, depending on what pressure I applied. And I ended up with the the top of the tripod being far from horizontal some of the time, which had a tendency to impart a rotational motion to the arm. I did get some shots off, but if any of them come out nice I'll be feeling that it is definitely in spite of the tripod not because of!


Oh. :( That's the sort of thing you don't find out about until you've spent your money, not matter how many reviews you read.


I think it will fit on anything. The base of the Velbon comes with a 1/4" female thread in it but they supply a 3/8" one you can use instead. (I suppose your tripod's central column probably has a reversible 1/4" / 3/8" fitting anyway, so that probably doesn't matter). If you are going to fit a ball head on to the end of the arm like I have you'll need to get (if you haven't got one lying around, which I did) a 1/4" to 3/8" adaptor, because the Velbon arm has a 1/4" fitting on the end (which, I think I read, is too long for attaching a camera directly. Can't remember what the solution was for that. It's in the reviews at Amazon I think.)


Don't be too quick Pete. It may have a fatal flaw that I haven't noticed in my initial enthusiasm. And longer term my concern is that, especially by being deployed upside down a lot of the time, it will break like my previous two lateral arms have.


I've wondered about a pistol grip. Not sure how much added value that would provide with my current setup, and if it is larger than a ball head then it would increase the minimum height off the ground that I could reach, which I wouldn't be keen on, depending on the amount of extra height it would need.

Yes there's probably no ideal tripod
setting the legs for macro subjects when each one you get to is going to be at a different height its just the way it is
for damselflies i have found that the tripod is just too much hassle as they are very flightly and can fly even when its raining
For some subjects and when its cool early in the morning i think that your approach with the tripod is better
I think that i will carry both the monopod and tripod in the car and decide when i get there what to use

Yes you are right about waiting to see how the velbon arm works long term, it does look good though

The pistol grip works really well i can make quick precise adjustments
My old ball head always moved a little bit after tightening it which made precise framing tricky
 
Last edited:
My old ball head always moved a little bit after tightening it which made precise framing tricky

Ah, now I'm really interested in a pistol grip (assuming it will fit into my configuration without undue side effects, like increasing the minimum camera height too much). I have to frame taking account of where I think that little movement is going to leave it after tightening, and it can take a number of attempts; and sometimes I just give up and demagnify slightly (if I can) to give a cropping edge.

Could you post the brand and model of your pistol grip please? If I could get something that didn't shift after tightening I would be well pleased. I wonder if there are any ordinary ball heads that don't shift? Perhaps it is intrinsic to the design? But am I right in thinking your pistol grip has a ball head too? A different type of locking mechanism perhaps? Anyway, you've definitely got me interested!
 
Am viewing your comparison images on my Samsung mobile at the moment but will have a proper look on my computer when I can tomorrow
But what's interesting is that as far as I can tell on my small screen is how little difference there is between them in image quality
The 70D one's look slightly better with more details and the fz200 shots look a touch warmer as well as having more depth of field but would expect that from the smaller sensor
Can't tell any more than that and I probably shouldn't try using a mobile screen but will have a proper look tomorrow using a decent screen

I'll be very interested to see what you think when you can have a close look on a decent screen. My reading of the detail is not quite the same, but I don't really trust my own judgement in this, because of what I may want to be the case - 70D because of the money I've spent on it, and it really should be better given its bigger sensor and narrower-ranged zoom; the FZ200 because it is easier and faster to use. Not sure which of those might be influencing me more unconsciously, which is why I'm asking for help with this.:)

If others find the results really rather close, or even mixed or too close to call, then that leads to a useful conclusion in its own right; "Not much significant difference in the examples provided so far". It would make the rather similar results I got in the 3 examples linked from this post look more like confirmation than anomalies. And if there is a consistent but rather small difference (in favour of the 70D) it brings us back to Tim's point about "How good is good enough?", and also the counterbalancing issue of "How often do you actually get the shot?" (more often with the FZ200).
 
And if there is a consistent but rather small difference (in favour of the 70D) it brings us back to Tim's point about "How good is good enough?", and also the counterbalancing issue of "How often do you actually get the shot?" (more often with the FZ200).

Not to forget "And which camera do you enjoy using most?" (FZ200 for invertebrates, 70D for flowers, in both cases because of the operational characteristics of the camera, particularly but not solely in terms of focusing - manual focusing in the case of the 70D, autofocusing for the FZ200.)
 
for damselflies i have found that the tripod is just too much hassle as they are very flightly and can fly even when its raining
For some subjects and when its cool early in the morning i think that your approach with the tripod is better

As with butterflies, I work hand held with damselflies when they are active (tripod early in the morning when they aren't). I don't see dragonflies very often, especially not in a position I can photograph them even though there are plenty at some of the reserves (although I haven't seen any this year yet). I seem to recall that on at least some of the few occasions when I have come across dragonflies (never, yet, early morning btw) I have been able to use a tripod. Don't know how typical that would be - I'm operating on an extremely small sample.
 
Back
Top