Bridge, MFT, achromats, dSLR, primes - a journey of exploration

Product issues

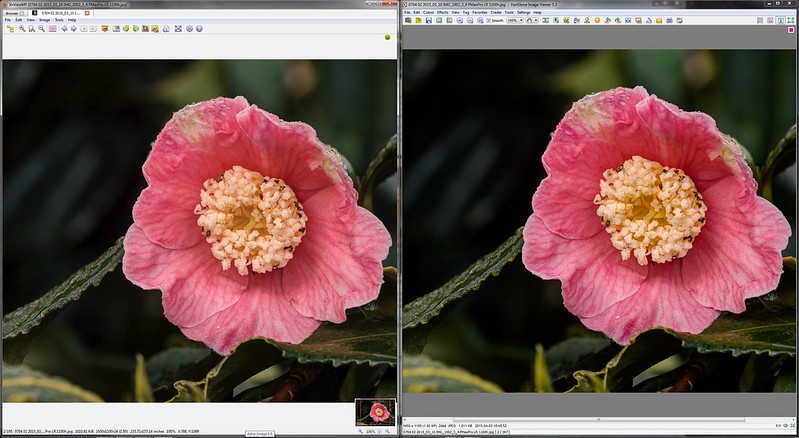
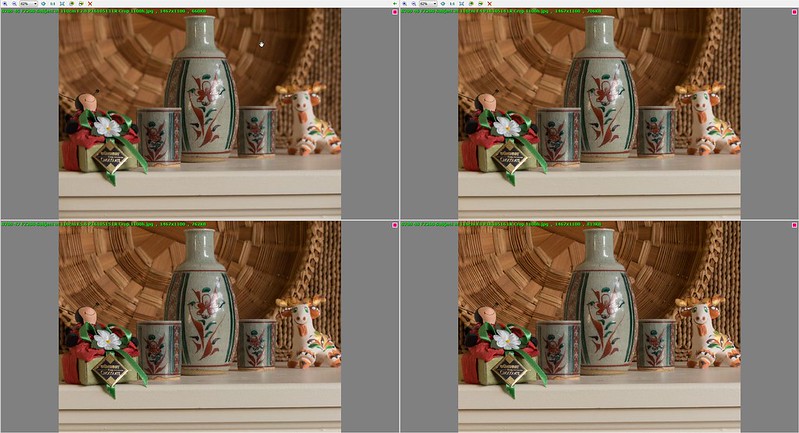
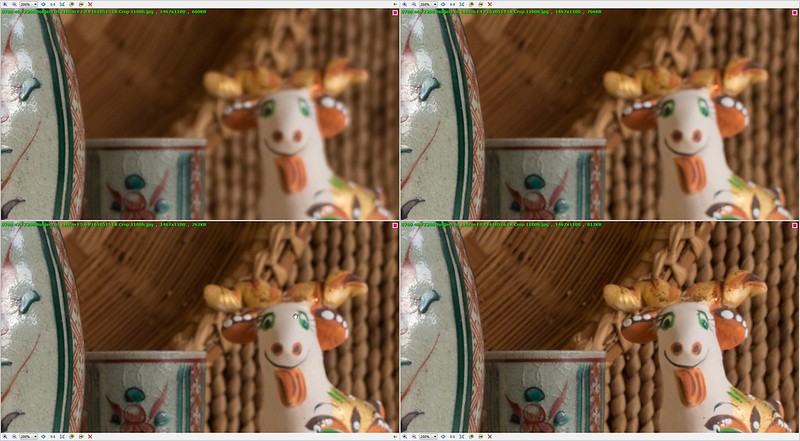
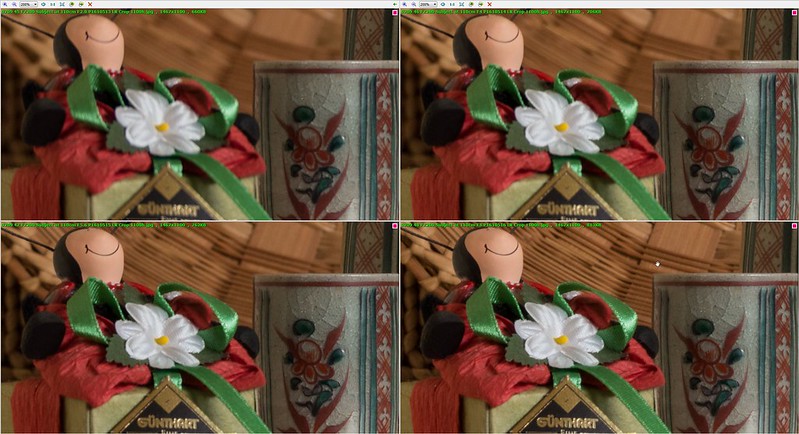
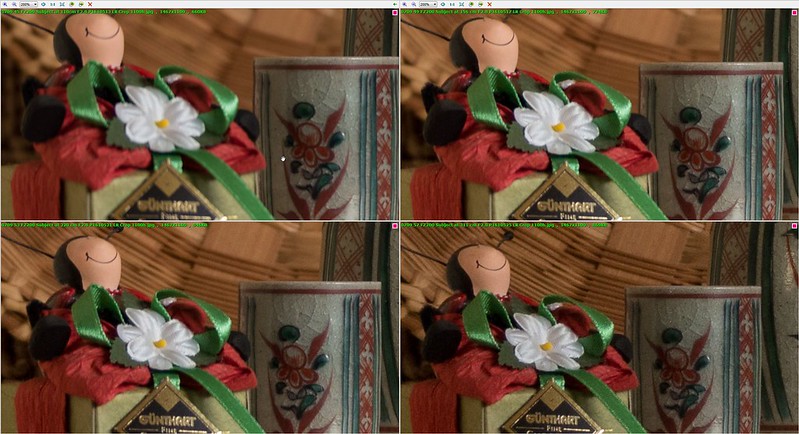
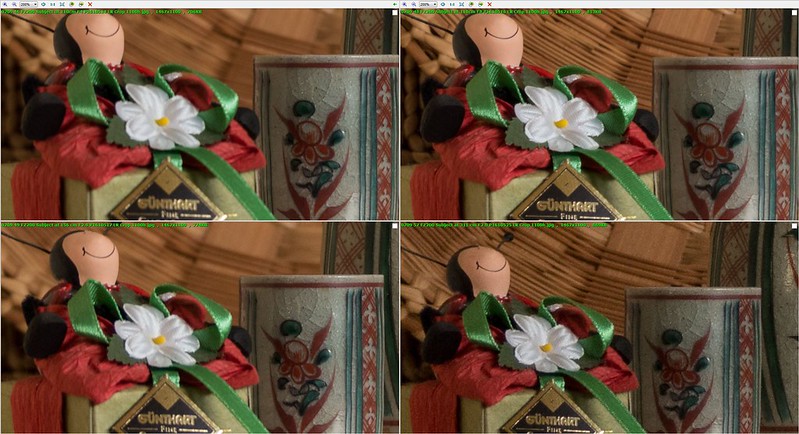
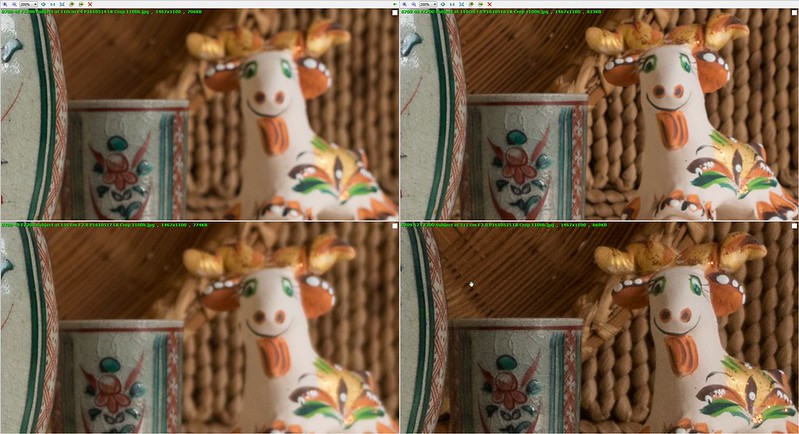
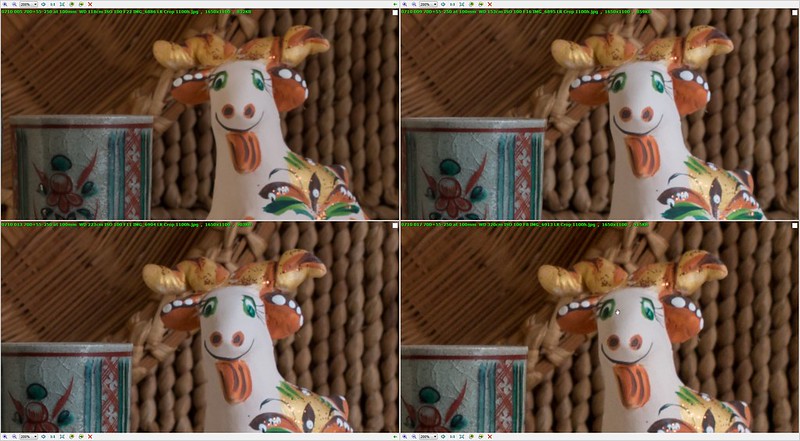
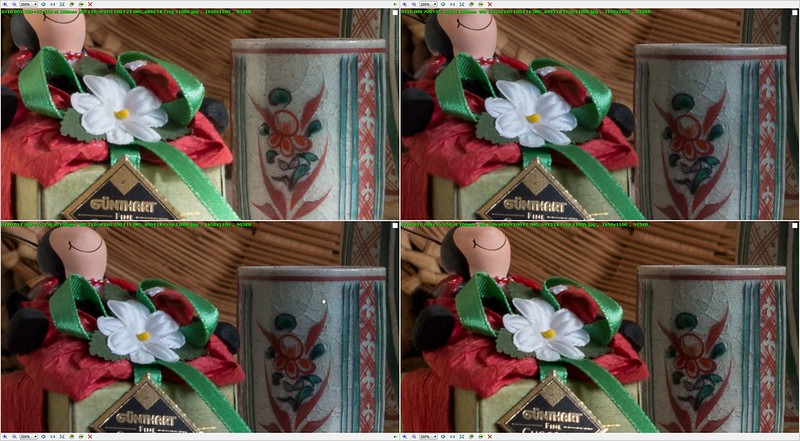
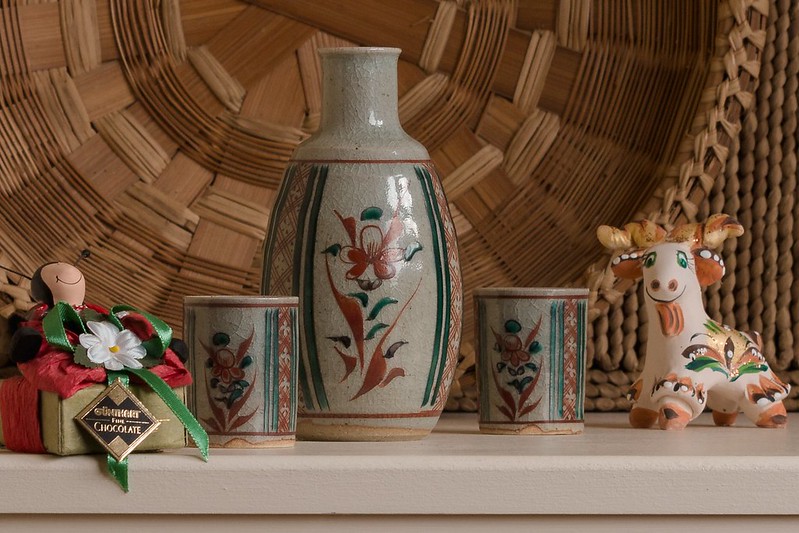
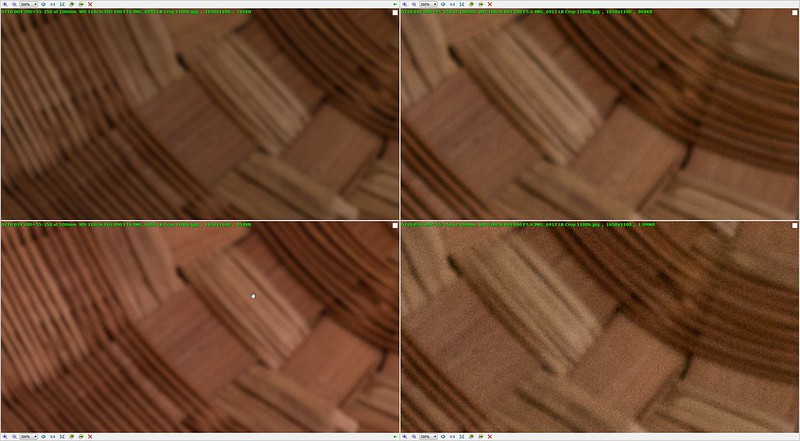
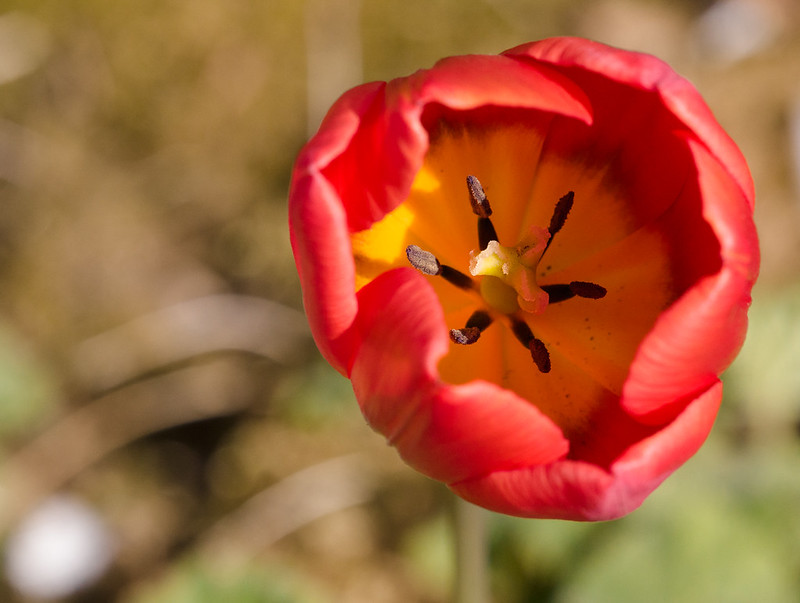
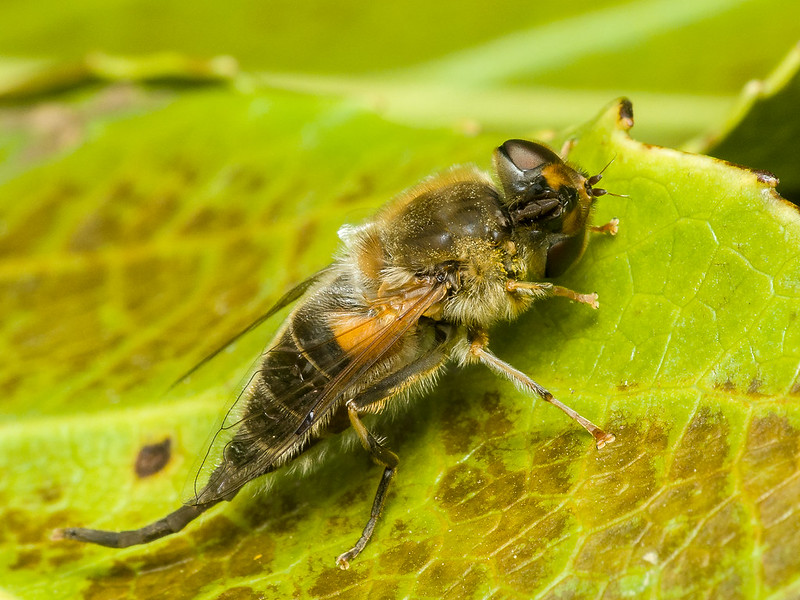
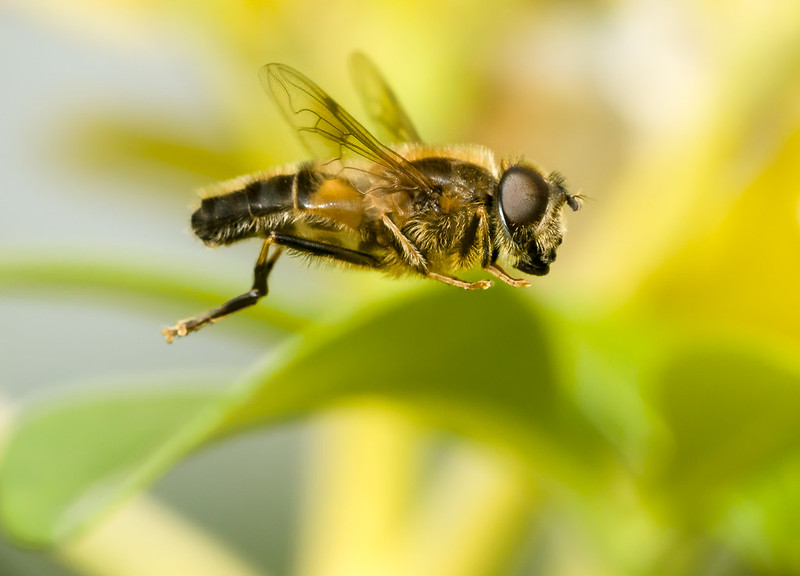
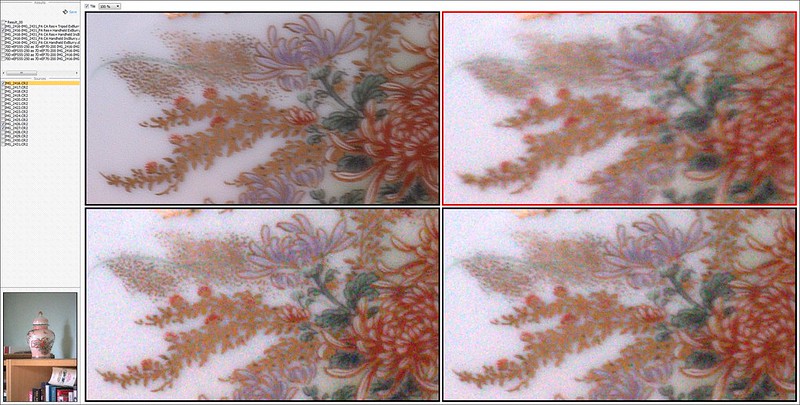
The tests seemed to leave PhotoAcute as the only viable option from amongst the products I had found and tested. It did at least as well as any of the others with noise reduction, and was the only one that could do a reasonably good job of resolution enhancement. Also, it's user interface worked well for me, including a very usable batch processing facility which automatically gathers the images for stacks from a folder or a nest of folders, and which can be left running while you do other things. This takes the sting out of the long processing times required for this technique. And it can write the results out as dng or hdr files, thus allowing all the details to be handed over to other software for further processing.

However, there are three major problems with PhotoAcute.

PhotoAcute is expensive. There is a version that works with JPEG images from cameras which don't have interchangeable lenses. It costs $29 plus VAT. But if you want to use images from an interchangeable lens camera, or use RAW files from any sort of camera, it costs $149 plus VAT.

I bought the expensive version as I liked the results I got from the trial version and wanted to be able to use it with all my cameras, and with RAW. However, the day after I bought it I happened upon a message on the PhotoAcute forum saying that it had been withdrawn from support a week or two previously. They hoped to be able to work on it again at some point in the future, if possible. There was no mention of this on their web site, and as far as I can see there still isn't. The message did say to email them if you felt you should have a refund, but I have no idea if they would actually provide a refund.

You might think that if it works then the fact that it is not supported does not really matter. After all, it isn't suddenly going to stop working. Except, what happens with new versions of Windows for example? And even if that is ok, there is another problem. Camera and lens "profiles".

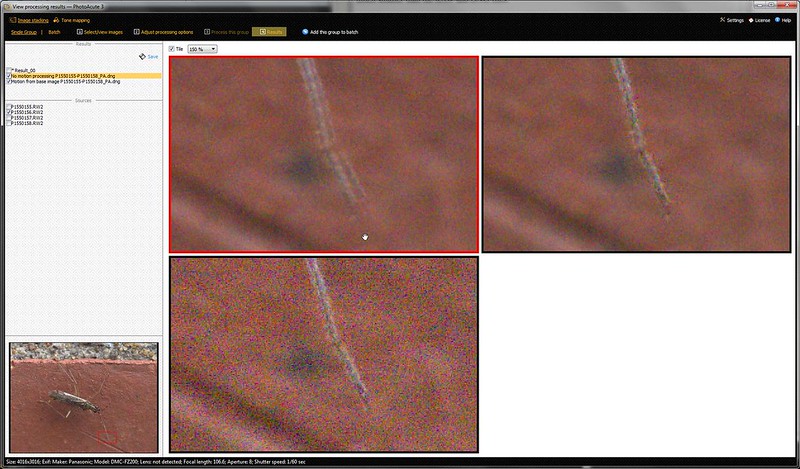
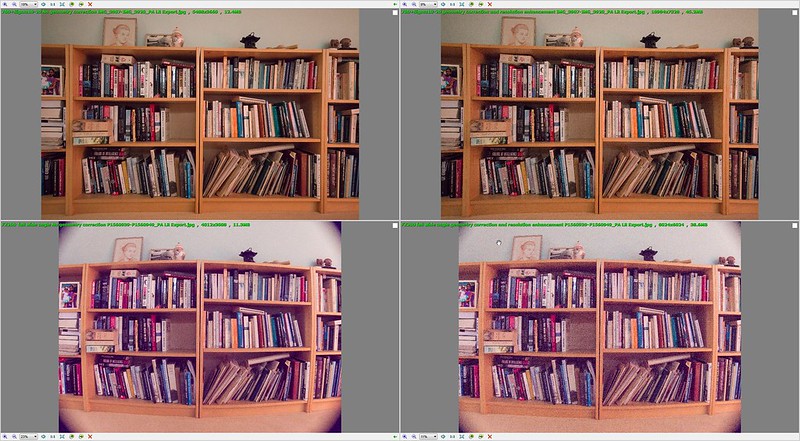
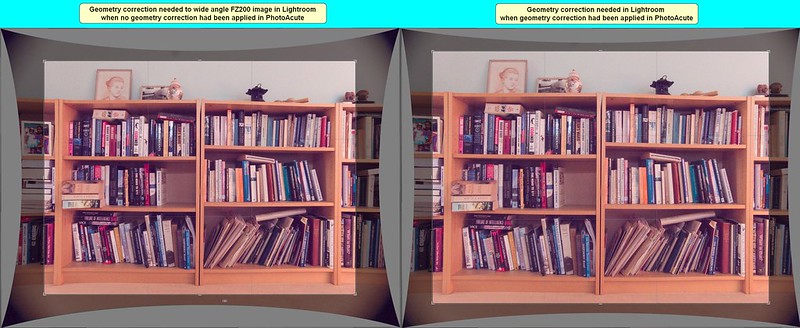
Although it can do noise reduction for images from any camera, in order to do resolution enhancement PhotoAcute needs some information about the camera and lens being used. (Incidentally, it also needs camera/lens-specific information to do geometry correction, but it didn't seem to do that very well for the FZ200, which it allegedly knew about, and such corrections can be done in other software, so I'm not too concerned about geometry corrections).

The makers of PhotoAcute have accumulated camera/lens-specific data by getting users to run tests with the camera/lenses that they own. The makers then produce profiles from the results of these tests.

This has left the firm with a jumble of combinations of camera and lenses. If you can't find the combination you want you may be able to make do with something "similar". However, it seems likely that there won't be anything similar enough for some existing camera/lens combinations, and this situation can only get worse as new cameras and lenses are introduced because the firm won't be producing any more profiles. Certainly not in the forseeable future, and quite possibly never.

The software knows about the FZ200, and that covers the sensor and the lens as the FZ200 is a fixed lens camera.

For interchangeable lens cameras things get more complicated. For example, it doesn't know anything about the 70D. It does know about the Sigma 10-20 and the Sigma 105 Macro, both of which I use, but only for the 10-20 used on the Canon 7D and the 105 Macro on the 10D.

The software suppliers say that you can use the settings for a camera/lens combination which is similar to what you have. I didn't find any guidance as to what to look for by way of similarity. I mainly used settings for the 7D because it has a 20 megapixel sensor like my 70D, but the 70D sensor with its "dual pixel" technology is of a radically different design. I don't know if that matters or not. The software knows about several lenses with the 7D. The Sigma 10-20 is one of them. The Sigma 105 Macro is not.

For test images captured with the 70D and Sigma 10-20 I told the software I was using the 7D and Sigma 10-20. For tests with the 70D and Sigma 105 I tried settings for the 7D and Canon 100L macro and the 10D with the Sigma 105. For the EF-S 55-250 I used the setting for that lens (or an earlier version of it) on the 400D.
For the 18-55 EF-S I used the settings for the Canon 17-55 on the 7D.

The results varied from image to image for each of the lenses. I didn't have any success at all with the 18-55, but then again I hardly ever use it and I did hardly any tests with it. The results were worth having, for some images, for the other three lenses.

So, three problems: PhotoAcute is expensive, unsupported and won't work very well, or at all, for some, unknown, combinations of cameras and lenses, now and in the future.

Tricky.

PhotoAcute is the only viable option I've found so far for resolution enhancement, and it works well and conveniently for noise reduction. For certain sorts of shots, of static or nearly static scenes, a type of which I do quite a lot, PhotoAcute seems to let me get more out of (some of) my gear and (at least some of the time) produce images with better image quality and/or work more fluidly by working hand-held rather than with a tripod and/or in poorer ambient light than is otherwise practical. It expands the envelope of the possible and practical.

But it's probably never going to be updated. If it does stop working at some point because of operating system developments, or if I move to gear that won't work with it, there will be nothing to be done about it.

Time to put this into context I think. I've paid considerably more than this for lenses and other equipment that I haven't used much, or have broken and had to replace. I'm not happy about the situation, but having seen what this software can do I do want to have it in my kitbag.

I'm going to keep it. I won't be asking for a refund (unless anyone can point out a suitable product that I've missed).


Return to contents page
 
Last edited:
Practical issues


Capturing the images

Capturing the images for a stack takes about one second with the FZ200 and 2 - 3 seconds with the 70D (assuming the shutter speeds are not so slow as to slow down the capturing).

With the 70D the screen is blank during the capture process. This makes it very difficult to keep the framing the same from shot to shot when working hand-held. If it was just a case of hand shake making the framing jump back and forth around a central point it would not be too bad, but I found that despite my best efforts the framing would in some cases drift in a particular direction which could result in a significant part of the image being lost. This problem obviously gets worse as the magnification or telephoto zoom increases. I will need to learn to frame wider to allow for edge losses.

After each shot in a burst the FZ200 updates the LCD with the shot just captured. This provides some feedback which can help to avoid drifting while the burst is in progress. Also, the fact that a FZ200 burst is two or three times faster than a 70D burst helps too.

The 70D does have the advantage of allowing more captures in a burst. A test I did indicated that having more images in a burst can be better, particularly for noise reduction. Not so much for resolution enhancement, for which the PhotoAcute developers say you don't get much additional benefit after 8 shots or so.

After the burst is captured the cameras lock up while some of the images are written from the buffer to the card. You get control back before this process is completed, so you can get on with setting up the next burst, but you have to wait for the writing to be completed before starting the next burst or you won't get as many shots in the burst before the capturing stalls again. You get control back in 3-4 seconds with the 70D and the buffer writing takes 8-9 seconds in total (ie. four seconds or so after you get control back). You get control back after around 5 seconds with the FZ200, but the buffer writing takes around 22 seconds in total.

File sizes

On a cursory examination of just a handful of file sizes it seems that

A 4000 x 3000 FZ200 RAW file is about about 15MB. An 8000 x 6000 resolution enhanced FZ200 DNG file produced by PhotoAcute can approach 300 MB.
A 5496 x 3670 70D RAW file is 20 - 35 MB. An 11000 x 7000 resolution enhanced 70D DNG file produced by PhotoAcute can approach 500 MB.

The sizes of the final output JPEG images obviously depend on their size and compression. They are though much smaller than the RAW and DNG files.

The files from bursts take up a lot of space on the camera card. A 32G card would be filled by 60-70 or so 14-image bursts with the 70D or 200 or so 11-image bursts with the FZ200. I always carry a spare 32GB card in my bag, but If this technique turns out to be routinely useful then I will need to use larger cards I think.

Using bursts it takes 10 -15 times longer to download the files from the camera to the PC compared to the same number of individual images, and the files take up 10-15 times more storage on the PC (at least temporarily until they have been processed and can then be culled).

If you are using a product that requires tif files to operate on, or which writes its outputs as tif files, there is another overhead in terms of file storage. Tif files are very large. The exact size of a tif file depends on what settings are used, but the 4000 x 3000 tif files used by and written by the Hugin/ImageMagick software were around 70-100MB for a single image compared to about 15MB for an FZ200 RAW file.

Whenever I keep a processed image I archive the original image(s) along with the processed version. For a single FZ200 stacked image this would need around 300 MB if I wanted to be able to rework the post processing of the DNG image produced by PhotoAcute, and an additional 11 x 15 MB if I wanted to be able to rework the stacking with different options or another product. For a single 70D image the numbers would be more like 500MB and 14 x 30 MB.

Processing bursts

In PhotoAcute bursts can be processed one at a time, or processed in batches. To process a single batch, the source files can be drag and dropped into PhotoAcute, the processing settings adjusted if necessary, and the processing started.


0694 12.1 PhotoAcute processing options screen
by gardenersassistant, on Flickr

When the processing has been completed you can compare the processed image with any of the originals or with another burst processed in the same session or with the same burst processed with different settings in the current session.

For example, the following screenshot shows two versions of a processed stack that used different processing settings. At the top left is a version that was processed taking no account of motion, and to the right of it a version that detected motion and used the content of one of the images for the areas concerned. Below it is one of the source files. The magnification and position of the three is synchronised. The magnification can be changed with the mouse wheel, and you can drag the image around to look at a different part of the image, or click on a different part of the image in the small whole-image version of the currently selected file in the bottom left hand corner.


0694 12.2 Comparing processed and original versions in PhotoAcute
by gardenersassistant, on Flickr

Alternatively, you can point PhotoAcute at a folder and it will group together the images for each burst. You can specify how it works this out, for example telling it to group together the images captured no more than 1 second apart. You can set the options for all the groups in the batch in one go using the settings screen shown above. You can override those settings for individual groups.

Once you have set the processing off you can go away and do other things, and in due course the processed images will be placed in the specified folder in DNG format. In this case you don't have the option of using PhotoAcute to compare versions, for example to pick the best of several similar ones. You have to use a viewer or editing application instead.

I am running the 64-bit version of PhotoAcute on Windows 7 on a PC with a quad processor. The processing is very processor intensive - all four processors are used. However, PhotoAcute obviously releases resources when other processes need them because I have not noticed any slowdown in browsing, typing etc while processing is going on. That is just as well as the processing times are very long.

Exactly how long the processing takes depends on what options are chosen. The most time consuming is resolution enhancement. Each FZ200 burst takes a bit more than 30 seconds for each source image if resolution enhancement is used. 70D bursts take about twice as long. This can result in batches taking several hours to complete. The other applications I tried were similarly slow.


Return to contents page
 
Last edited:
Geometry adjustments, colour adjustments and speckling


Geometry adjustments

Post processing of stacked images may need to include geometry adjustments.

The top left image in the next illustration shows what the geometry of a 14 shot stack captured with the 70D+Sigma 10-20 and prepared in PhotoAcute looks like when put into Lightroom. In this case PhotoAcute did not do any geometry adjustment. On the right is the same, but for a stack where PhotoAcute did do geometry adjustment. In both cases the geometry is pretty good. There is not much difference, although on looking closely at the full size images I think PhotoAcute's geometry adjustment may have made the geometry just a fraction worse rather than better.


0694 12.3 Geometry comparison FZ200 wide angle Vs 70D+Sigma10-20
by gardenersassistant, on Flickr

The bottom two images show the same thing for an 11 shot stack captured with the FZ200. In this case there is a large amount of barrel distortion in both versions, although the version on the right where PhotoAcute did geometry adjutment has a bit less barrel distortion.

There is another difference between the 70D and FZ200 stacks. The 70D stack looks pretty much (I don't remember precisely) like what I saw on the LCD at capture time. The FZ200 version doesn't. It covers a larger height and width than I framed on the LCD and has significant vignetting, which I didn't see on the LCD.

In order to cure the barrel distortion in the two FZ200 stacks and get the coverage the same as what I thought I had captured I needed to distort and crop the images, as shown in the next illustration.


0694 12.4 FZ200 geometry correction comparison
by gardenersassistant, on Flickr

You can tell (by comparing the vertical curves in the middle, between the two images) that the right hand one needed less distortion and less cropping. That was the version to which PhotoAcute had applied geometry adjustment.

The difference in distortion and cropping is reflected in the sizes of the files. The version that did not have geometry adjustment done in PhotoAcute, and which needed more distortion and cropping, contains 61% of the pixels contained in one of the source files. The version that did have geometry adjustment done in PhotoAcute contains 71% of the pixels contained in one of the source files. So, even though the PhotoAcute geometry adjustment doesn't fully correct the geometry it may be worth using anyway as it may (not sure about this) provide more information/throw away less information from the original.

The next illustration shows at the top left what a single source image captured with the 70D+Sigma 10-20 looks like on being imported directly into Lightroom. At the top right is what the associated stack looks like. The superimposed straight red lines help compare the two versions. In both cases the lines of the bookcase closely match the superimposed lines.


0694 12.5 Lightroom Vs PhotoAcute handling of FZ200 wide angle geometry
by gardenersassistant, on Flickr

On the bottom row is the same comparison for a single FZ200 source image and the related stack. In this case the geometry looks fine for the single image imported directly into Lightroom, but the version passed over from PhotoAcute looks very different. I suspect this means two things:
  • Lightroom handles geometry issues well. PhotoAcute does not.
  • The Sigma 105 distorts images much less than the FZ200 at equivalent focal length.

Colour adjustments

The colours look ok for the 70d images, whether imported directly to Lightroom or imported into Lightroom as a stack via PhotoAcute. However, while the FZ200 colours look ok (subject to some loss of intensity from the use of a high ISO 6400) for an image imported directly into Lightroom, they look wrong for the FZ200 stack coming into Lightroom via PhotoAcute. This is too small a sample to generalise from, but it does reinforce the need to consider colours carefully in post processing any image arriving via PhotoAcute.


Speckling

Using the same images as in the previous paragraphs, which use the highest ISO available with each camera, the following illustration compares:

On the left, a source image captured with the FZ200 as imported directly into Lightroom
In the middle, the associated stack created in PhotoAcute without using resolution enhancement, and then imported into Lightroom
On the right, the same images stacked, but with this time with resolution enhancement used


0694 12.6 FZ200 speckle comparison
by gardenersassistant, on Flickr

In amongst the noise of the directly imported single image there are a dozen or so not very prominent white speckles. The first of the stacks has a lot of prominent white and coloured speckles. In the second (enhanced resolution) stack the speckles are individually smaller, but there are a lot more of them.

Here is a similar comparison for the 70D + Sigma 10-20. I can only see three, small and inconspicuous speckles, all in the enhanced resolution version. (Incidentally, the horizontal banding on the underside and back of the shelves in the enhanced resolution version come and go as you zoom in and out of the image. Are they are perhaps Moire patterns? Anyway, I don't think they are intrinsic to the image.)


0694 12.7 70D+Sigma10-20 speckle comparison
by gardenersassistant, on Flickr

We are pixel peeping here to examine these speckles. Do they matter in practical terms? In the case of the 70D I think not. But for the FZ200 they are clearly visible at my normal viewing size. And these are unsharpened images. Sharpening would make them stand out more.


0694 12.8 FZ200 ISO 6400 speckles after PhotoAcute 11 image NR, no Res+
by gardenersassistant, on Flickr

A lot of the FZ200 examples used in these posts (and a lot of others I have looked at) used ISO 3200, and these generally proved unproblematic in terms of speckling, but that does appear to be the practical limit of this technique for the FZ200 as far as ISO goes.


Return to contents page
 
Last edited:
Processing options

In Working with the 55-250 we saw with the vase example that PhotoAcute can produce a decent enhanced resolution image from source images with variable sharpness. I could not remember whether I had processed the burst using the "exclude blurry images" option. It could be that PhotoAcute was discarding the worst of the images in order to improve the end result. I processed the images again to produce enhanced resolution stacks, once with the "exclude blurry images" option on, and once with it off. I could not see any consistent difference between the two versions, even when comparing the almost 48 megapixel images at 300%. I thought that, perhaps, one was fractionally sharper than the other, and vice versa, in different parts of the image, but it was very, very slight, and I wasn't totally convinced. If there were any differences I think they would be completely inconsequential at any more normal viewing size.

As part of the exercise I ranked the source images in terms of their sharpness. Here is the stacked version, at the top left, compared to the softest image, a middling image and the sharpest image. The stack is I think sharper, more detailed and less noisy than any of the input images.


0694 13.1 Enhanced resolution from a combination of three levels of blur
by gardenersassistant, on Flickr

I tried comparing the outcomes with some other combinations of processing settings.

On the left here we can see what happened when I processed these hand-held source images with the setting for tripod captured images. That makes a difference!


0694 13.2 Hand-held images processed as if captured using a tripod
by gardenersassistant, on Flickr

Next we have enhanced resolution versions produced using the settings for 400D + EF-S 55-250 on the left and 7D + EF 70-200L on the right.


0694 13.3 Processed as 400D+EFS 55-250 STM Vs EF 7D+70-200L
by gardenersassistant, on Flickr

To my eye the left hand version looks to have more contrast/microcontrast/clarity or some such, and possibly because of that a greater impression of sharpness. However, the plain areas and the lighter areas (around the reflection of the window and the glass door) don't look smooth as they do in the right hand version. Looking more closely confirms this impression. In the left hand version we can see the patterns we saw in A building exterior.


0694 13.4 200% view Processed as 400D+EFS 55-250 STM Vs EF 7D+70-200L
by gardenersassistant, on Flickr

As to which of these would be better may depend on the circumstances. For example the smoother version might be preferable if doing a hard crop for dof. On the other hand, enhancing the contrast in the the right hand version to match that of the left hand version might bring the patterning into a similar level of visibility, so in practical terms there might not be much difference between these versions. Issues for further experiments in due course. :)

I tried two other processing options, an increased grid size and "Shift/Rotate/Scale/Skew. I don't know what either of these mean or what they are suitable for. They didn't make any difference in this case.


Return to contents page
 
Last edited:
Thanks again for sharing your technique experiments. I thought of your noise reduction techniques when I had a go at shooting the moon recently. It worked really well with 10 frames, so this is something I'll try again when I get a clear night and a full moon. I want to try stacking for resolution next!

Here's what I ended up with (although it's not a good example to show off the noise reduction). Thought it would add a bit more "interest" to my recent eclipse shots :)

Solar Eclipse by Tim.Garlick, on Flickr

That's a terrific image Tim. I'm glad the technique was helpful. How did you do the stacking? And how are you going to process for resolution?
 
That's a terrific image Tim. I'm glad the technique was helpful. How did you do the stacking? And how are you going to process for resolution?
Thanks Nick. I use Adobe Photoshop CC so was able to make use of that following this tutorial:

http://www.pointsinfocus.com/learni...toshop-smart-object-stacking-noise-reduction/

Stacking for resolution seems to be a bit more involved and I haven't figured out how to do this alongside stacking for noise reduction as yet. One to try another day when I can get enough time I think...
http://arstechnica.com/civis/viewtopic.php?t=1224931
 
Thanks Nick. I use Adobe Photoshop CC so was able to make use of that following this tutorial:

http://www.pointsinfocus.com/learni...toshop-smart-object-stacking-noise-reduction/

That looks like it would be a bit fiddly and time-consuming for my taste for other than for the odd stack. Mind you, like a lot of things I suppose it might be much easier to do than the instructions make it sound, especially once you've done it a few times. And in any case I think you've got a lot more patience than me for the amount of effort you put into a single image.

Stacking for resolution seems to be a bit more involved and I haven't figured out how to do this alongside stacking for noise reduction as yet. One to try another day when I can get enough time I think...
http://arstechnica.com/civis/viewtopic.php?t=1224931

A very interesting link Tim, thanks for that. The resolution enhancement procedure does seem rather involved.

I downloaded and tried Astra Image. Is that an application you use? I looked at the convolution sharpening. And promptly bought it. Maybe a bit impulsive - perhaps I can get the same effect by simply turning up the sharpening in Lightroom. I'll have to test that. Anyway, If you don't use it you might want to take a look (I had to turn off my virus checker to get it to download). The trial version seems to be fully functional apart from not saving.

I had a quick look at the several convolution sharpening methods it provides and then concentrated on the Lucy Richardson method that is mentioned in the linked post. I tried it mainly on JPEGs that are already sized (and sharpened) to my usual output pixel dimensions of 1100 pixels high. It certainly has an effect, and easy to take it OTT. I had to turn down the "strength" parameter a long way below the default to get into my visual comfort zone.

What with there being several methods, and multiple parameters for each of them, I think it will need some careful experimentation to work out what it is capable of and where to put it in the workflow (if at all of course). For example, it looks like balancing between sharpening the subject and raising noise in the background may be a delicate issue, which may need to be handled on an image by image basis. I've also seen mild (almost imperceptible) halos raised to glorious visibility. But with suitable adjustments elsewhere in the workflow I think this may be a runner. Definitely worth a try from my point of view, so thanks again Tim.
 
I am getting to like the burst technique. It works best with the FZ200 because of the FZ200's fast 11-shot RAW burst and the fact that the image on the LCD is updated during the burst.

The processing to convert the RAW source files to a DNG file for each burst takes quite a while (about 5-6 minutes per burst, so about 10-12 bursts processed per hour), but mostly that is unattended. So the fact it took 8 hours or so to process one session's 1000 or so captures to produce 90 or so DNG files wasn't really a problem, apart from my impatience to see the results and see if the technique had worked. Setting up to do a processing run is trivial, and quick; several minutes at most, more often more like a minute.

There are rather significant storage implications. Since I archive the source files for images that I process and keep, and given that the FZ200 RAW files are about 15MB apiece, it needs around 165MB storage for each burst that I keep. I think that is manageable though. Of course it also requires 165MB on the camera card while I'm capturing images. I've tackled that by investing in a 128GB card. (Class 10, seems a bit faster when downloading to the PC than my 32GB Sandisk cards. £29.)

The use of bursts with the FZ200 is changing my capture style. Partly that is because the camera locks up for 30 seconds or so after a burst. These gaps prevent me getting locked into a shoot, shoot, shoot frame of mind. I'm finding that I'm being more careful about setting up shots. Each burst has significant implications in terms of the time needed later for data handling and processing, and the number of captures accumulates alarmingly quickly. I have started using single shots to test exposure, dof placement and framing, and only capturing a burst when I'm good and ready. (This is with botanical stuff. Invertebrates will be a different matter I'm sure, but I've encountered only three invertebrates thus far in the month I have been experimenting with burst techniques.) Perhaps because of this more measured approach my hit rate has been very high for bursts with botanical subjects.

I haven't been using the tripod, and that has been liberating. It has also meant that I have been able to capture some shots that would not have been possible with the tripod because they required the camera to be close to, or on, the ground, or in some other awkward position as for the first example below, where tripod use would have been very difficult, or perhaps impossible. This example used 1/160 sec with ISO 2000. That would have needed 1/8 second at ISO 100, which is what I normally try to use the whole time with the FZ200 because of noise and the complications for post processing higher ISO images. I do sometimes use up to ISO 400, but ISO 2000 is IMO (others differ) pretty much unusable on the FZ200 no matter what contortions I go through in post processing. However, this image, like all the other examples in this post, has had no luminance noise reduction.

One way and another I found this a difficult shot; very awkward position to get at, almost no latitude for framing, deep shade (it is under decking), backlit and the need to bring up shadows a lot as I didn't use any fill light. I was pleased that it worked out as well as it did.

As usual, there are 1100 pixel high versions of all these images over at Flickr.


0696 12 2015_03_24 P1570222-P1570232_PA LR-3 AI
by gardenersassistant, on Flickr

I have been exploring smaller scenes, mainly using the Canon 500D on the FZ200. Not exactly "microscapes", but "smallscapes" perhaps. This one used 1/250 sec with ISO 800, which would have needed 1/30 sec with ISO 100. I think most or all of these smallscape examples would have been too low for tripod use.


0698 09 2015_03_24 P1570393-P1570403_PA LR 1100h AI
by gardenersassistant, on Flickr

For once there was no problem with light with this one. 1/200 sec with ISO 100.


0698 02 2015_03_24 P1570346-P1570356_PA LR 1100h AI
by gardenersassistant, on Flickr


Next 1/400 sec with ISO 800, which would have needed 1/50 sec with ISO 100.


0701 0700 026 2015_03_26 P1580641-P1580651_PA LR 1100h
by gardenersassistant, on Flickr

1/125 sec at ISO 400 (Would have been 1/30 at ISO 100)


0701 0700 002 2015_03_26 P1580377-P1580387_PA LR 1100h
by gardenersassistant, on Flickr

1/125 sec at ISO 500 (Would have been 1/25 at ISO 100)


0701 0700 024 2015_03_26 P1580608-P1580618_PA LR 1100h
by gardenersassistant, on Flickr

During the last several days of using bursts I have encountered only one invertebrate, this fly. Here the success rate was much lower. I tried 11 bursts. In the first two the shot was ruined by grass that I didn't realise was in the way. Of the other nine several were not usable because the fly moved during the 1 second capture period. I showed in an earlier post that the technique can deal with movement of a part of the subject, such as antennae, but in this case the fly kept shifting its angle to the camera by a few degrees. The software actually managed to align on the fly in each position it moved to and so get it more or less in focus despite the movement. However, this resulted in a very peculiar effect with the ground, which took on a rippled appearance. The following shots used the first four of one of the 11-shot bursts, during which the fly remained still. Even with only four shots there was a visible benefit in terms of detail and clarity. I'm quite encouraged by this.

This is almost the full frame, captured with the Raynox 150 on the FZ200 using ISO 100 at 1/250 sec.


0701 0700 070 2015_03_26 P1590434-P1590437_PA LR 1100h
by gardenersassistant, on Flickr

And here is a crop.


0701 0700 072 2015_03_26 P1590434-P1590437_PA LR 1100h-3
by gardenersassistant, on Flickr

Just one other thing to note. After the bursts were turned into DNGs, the DNGs were imported into Lightroom for post processing, which included modest sharpening. When completed the images were exported to 1100 pixel high JPEG images using Lightroom's output sharpening with the "Standard" setting. Earlier today, following on from a very interesting link Tim provided, I purchased a copy of Astra Image and have used one of its deconvolution sharpening methods on the (already sharpened) JPEG images used in this post.
 
You are doing really thought provoking work at the moment Nick
I don't understand how the stacking for noise and resulution works but it's 3am and I'm at work so will have another read through when I'm off work next week
I have used photomatix for exposure blending recently for a butterfly and flower shot and it works really well
I'm definitely going to try to use it more at those times when the subject isn't going to fly off for a while
Focus stacking is something that I do quite a bit of and it's a great technique
I'm getting a new camera the 7D mk2 mainly for wildlife telephoto shots but also am hopeful that the improved autofocus will make getting a series of macro image stacks easier
My 7D mk 1 can struggle on small parts of insects like damselfly tails even with spot focus
Anyway sorry to go off topic and really like the results that you are getting with the flower exposure blends using photomatix
I too normally find two shots is enough to blend one exposure for a bright background and one for the subject:)
 
Last edited:
You are doing really thought provoking work at the moment Nick

Thanks Pete.

I don't understand how the stacking for noise and resulution works but it's 3am and I'm at work so will have another read through when I'm off work next week
I have used photomatix for exposure blending recently for a butterfly and flower shot and it works really well
I'm definitely going to try to use it more at those times when the subject isn't going to fly off for a while .....
and really like the results that you are getting with the flower exposure blends using photomatix
I too normally find two shots is enough to blend one exposure for a bright background and one for the subject:)

I'm working on a set of images at the moment where I tried exposure blending and (separately, not combined with) burst processing on the same subject, so I'll be able to put a comparison in a future post. I'll probably also compare an exposure blend with a single image, and a single image with a "pseudo-exposure blend" where you use one image but get Photomatix to use two or more versions of it of different brightness. This stuff will probably be the next thing I write up, or possibly the next but one as I've got some stuff on some complications to do with on-screen colour rendition that I may do first.

Focus stacking is something that I do quite a bit of and it's a great technique

I'm doing more of it too. The current set I'm working on has some focus stacks too and I think there is another comparison I'll be able to document, between a focus stack and an exposure blend. (Of the three techniques, exposure blend, burst processing and focus stacking, my taste is pulling me most towards exposure blending (Photomatix). I find the results the most appealing. As it happens it's the quickest to do in the capture phase, and the quickest and easiest to process too, but that's a side issue of course. Image quality (or perhaps more accurately my take on "image appeal") is what these techniques are about for me.

So far this has been almost all to do with flowers though. It may be different for invertebrates of course. And for flowers it depends on the circumstances. In lower light levels, especially when working hand-held, burst processing may be the only practical option, and it can produce some lovely results. And sometimes a focus stack makes more of a difference than an exposure blend would. Horses for courses. But where there is a choice, I do like the outputs from exposure blending.

I'm getting a new camera the 7D mk2 mainly for wildlife telephoto shots but also am hopeful that the improved autofocus will make getting a series of macro image stacks easier
My 7D mk 1 can struggle on small parts of insects like damselfly tails even with spot focus

Nice piece of kit! I hope it works well for you. What telephoto lens will you be using?

Maybe I've said this before, but I'm a bit puzzled about autofocus for stacking. As you know I am more than most a fan of autofocus, but even I don't use it for focus stacks. For tripod work with flowers I use the focus ring on the 55-250, which has a lot of play and so allows for fine adjustments. I just do "focus on back of subject, take shot, move focus ring a little, take shot, move focus ring a little" etc until nothing at the front is in focus. I have yet to explore stacks for invertebrates. For natural light stacks I can use the 55-250 and achromats, so I could use the same technique, but for flash stacks I'd be using the FZ200, and I'll need to tackle that differently, by moving the camera I think.

Anyway sorry to go off topic

Eh? I don't see anything off topic here Pete. Do please pitch in. It's good to get some feedback and related thoughts and experience.
 
Thanks Pete.


I'm working on a set of images at the moment where I tried exposure blending and (separately, not combined with) burst processing on the same subject, so I'll be able to put a comparison in a future post. I'll probably also compare an exposure blend with a single image, and a single image with a "pseudo-exposure blend" where you use one image but get Photomatix to use two or more versions of it of different brightness. This stuff will probably be the next thing I write up, or possibly the next but one as I've got some stuff on some complications to do with on-screen colour rendition that I may do first.


I'm doing more of it too. The current set I'm working on has some focus stacks too and I think there is another comparison I'll be able to document, between a focus stack and an exposure blend. (Of the three techniques, exposure blend, burst processing and focus stacking, my taste is pulling me most towards exposure blending (Photomatix). I find the results the most appealing. As it happens it's the quickest to do in the capture phase, and the quickest and easiest to process too, but that's a side issue of course. Image quality (or perhaps more accurately my take on "image appeal") is what these techniques are about for me.

So far this has been almost all to do with flowers though. It may be different for invertebrates of course. And for flowers it depends on the circumstances. In lower light levels, especially when working hand-held, burst processing may be the only practical option, and it can produce some lovely results. And sometimes a focus stack makes more of a difference than an exposure blend would. Horses for courses. But where there is a choice, I do like the outputs from exposure blending.


Nice piece of kit! I hope it works well for you. What telephoto lens will you be using?

Maybe I've said this before, but I'm a bit puzzled about autofocus for stacking. As you know I am more than most a fan of autofocus, but even I don't use it for focus stacks. For tripod work with flowers I use the focus ring on the 55-250, which has a lot of play and so allows for fine adjustments. I just do "focus on back of subject, take shot, move focus ring a little, take shot, move focus ring a little" etc until nothing at the front is in focus. I have yet to explore stacks for invertebrates. For natural light stacks I can use the 55-250 and achromats, so I could use the same technique, but for flash stacks I'd be using the FZ200, and I'll need to tackle that differently, by moving the camera I think.


Eh? I don't see anything off topic here Pete. Do please pitch in. It's good to get some feedback and related thoughts and experience.


I see what you mean now so the stacking for noise and resolution is just taking a burst of the same shot and blending them together, clever I hadn't heard of that

I've had the lens for nearly two years now it's the Canon 300 2.8 mk 2 an amazing lens the image quality is outstanding
I'm getting shots that I wasn't able to with my old zoom the 100-400 f 5.6 the faster lens is perfect for low light

I use auto focus for macro stacking just because its what I'm used to doing I have tried moving my body backwards and forwards but results were not always in focus
I should practice and try again
I find it quick and easy to move the focus point around the subject firing off the shutter as I go:)
 
I have just processed a set of images from a session in the garden a couple of weeks ago when I was playing with multi-image captures. I have tried doing a comparison of scenes captured and processed using several multi-image and single-image techniques. I'm not sure how much the differences between the versions has to do with the particular technique used in each case and how much is to do with the way I have processed the images, but there might be something of interest here all the same.

Here is the scene. All the source images were captured as raw files with the 70D and bare 55-250. We'll look at some captures of the scene from two angles, both a little closer in than this. By a "capture" I mean a single source image or a single image created from two or more source images.


0704 01 2015_03_10 IMG_0999_1000_1001 PMaxPro-2 LR 1100h
by gardenersassistant, on Flickr

This album at Flickr has 1100 pixel high versions of the captures in the order that I refer to them in the following text.

The first version below is an exposure fusion in Photomatix with three source images with exposure compensation of -1, 0, +1 stops. My wife has just commented that it looks over-saturated. She knows the colours of these flowers very well. One of the ladies in one of my little photography group said the same about another Photomatix exposure fusion which I recently showed the group. I think this is something I'm going to have to work on.


0704 02 2015_03_10 IMG_1002_3_4 PMaxPro LR 1100h
by gardenersassistant, on Flickr

The next version is another exposure fusion, but a peculiar one. It uses the first three images from a burst, so they all had the same exposure. Photomatix noticed this and I had to specify an exposure adjustment for Photomatix to make before fusing the images. I chose -1, 0, +1 stops. This looks very similar to the first version, although I think some of the fine detail may be slightly better defined in the second version.


0704 03 2015_03_10 IMG_1005_6_7 PMaxPro LR 1100h
by gardenersassistant, on Flickr

The third version is a 13-image stack processed in PhotoAcute with resolution enhancement. (The previous version used the first three of these 13 images.) Despite my efforts to make it look better, to my eye it looks nowhere near as good as either of the previous versions; the centre of the flower and the petals look flat, as does the shadow of the central stuff, and the leaves and the water on them don't look as good to me either.


0704 04 2015_03_10 IMG_1005-IMG_1017_PA LR 1100h
by gardenersassistant, on Flickr

The fourth version is a processed single image. The single image used was the first of the 13 in the previous burst version. To my eye it doesn't look as good as either of the exposure fusion versions - the centre of the flower and the petals look less well defined. However, the overall distribution of light is different and I'm sure some would prefer the lighter feel of the background in this version.

This 1-image version looks much better to my eye than the 13 image burst stack, for the same reasons as with the two exposure fusion versions.


0704 05 2015_03_10 IMG_1005 LR 1100h
by gardenersassistant, on Flickr

The fifth version is another exposure fusion. This one is also peculiar. By accident I used two source images that used different apertures, and so had different depth of field. The apertures differed by two stops, and so one of the source images had twice the dof of the other one. Despite this the result looks similar to the other two exposure fusion versions, and looks better than the 13-image burst.

In terms of its overall appearance, this version appeals to me most because of the way the background works. However, I don't think that has much to do with the technique used. I think it is simply that the apertures were f/16 and f/32 compared to f/10 for the previous versions, and so this version has greater dof and that gives more content to the background, which I like.


0704 06 2015_03_10 IMG_1018_9 PMaxPro LR 1100h
by gardenersassistant, on Flickr

There are a couple more comparisons from a different angle in the next post.
 
The next version is another exposure fusion which used three images with the same exposure, captured as part of a burst. In this case I told Photomatix to change the exposures by -2, 0 and +2 stops. What I found interesting with this was that I got exactly the same result when I told Photomatix to use -1/2, 0, +1/2 stop, -2/3, 0, +2/3 stop and -1, 0 +1 stop.


0704 07 2015_03_10 IMG_1020_1_2 PMaxPro-7 LR 1100h
by gardenersassistant, on Flickr

Next is a normal exposure fusion with different exposures which used exposure compensation of -2/3, 0 and +2/3 stop.


0704 08 2015_03_10 IMG_1057_8_9 PMaxPro LR 1100h
by gardenersassistant, on Flickr

Next we have one of the three source images for the previous version, which I edited to try to get it to look like the previous version.


0704 09 2015_03_10 IMG_1059 LR 1100h
by gardenersassistant, on Flickr

Finally the same single image, but this time the only adjustment I made (other than the default Lightroom import adjustments, which all of the images had) was to pull the Exposure down a little.


0704 10 2015_03_10 IMG_1059 LR 1100h-2
by gardenersassistant, on Flickr

Of these last three the exposure fusion looks to have better detail/texture/microcontrast to me and I prefer the distribution of light in it.

Conclusions?

I like the look of Photomatix exposure fusions (subject to questions about the saturation), including the ones based on identically exposed images, and even though this was not a high contrast scene, which is what I have previously associated with Photomatix and (realistic) HDR.

I could get some way towards that Photomatix "look" with ordinary post processing on a single image, but not all the way. This might well be limitations in my post processing abilities, but whether or not that is the case I'm finding (for example with other scenes in this day's images) that Photomatix is giving me results that I am content to use with very little further adjustment. It is slightly more complicated in terms of capture technique and a bit slower in terms of processing, but overall it is a very untaxing approach with results I like, a trade-off I'm happy with.

In this case burst processing was not at all successful. On reflection I don't think this was a fair test of the technique. I think I was using it wrongly. Rather than using 13 slow (1/10 sec) low ISO (100) exposures I think I would have done better to increase the ISO and use faster exposures, for example ISO 1600 and 1/160 sec or ISO 3200 and 1/320 for example. That is the approach I have been using with the FZ200 and getting good results with.
 
The session also included a comparison of focus stacking with exposure fusion. Here is a 3-image exposure fusion of a scene. It used a very small aperture, f/29, so as to get the entire flower in focus. However, this also has the effect of displaying quite a bit of detail in the background.


0704 19 2015_03_10 IMG_1270_1_2 PMaxPro LR 1100h
by gardenersassistant, on Flickr

Here is the same scene captured as an 8-image focus stack using f/5. This time the background is thrown deeply out of focus.

Looking at the larger versions of the images the yellow stamen seems a bit sharper in the stacked version. This may well be the result of f/5 causing much less loss of sharpness/detail than the f/29 used for the exposure fusion images. Shutter speed might also have been a factor though, even though I used a hands-off tripod technique for both sets of captures. The stack captures were at 1/200 sec as against 1/12 sec for the exposure fusion captures, so any slight subject movement would have been more significant for the exposure fusion captures.


0704 18 2015_03_10 IMG_1277-84-Edit ZS PMax LR 1100h
by gardenersassistant, on Flickr
 
I see what you mean now so the stacking for noise and resolution is just taking a burst of the same shot and blending them together, clever I hadn't heard of that

That's right. For noise reduction the software doesn't need to know anything about the camera. For resolution enhancement PhotoAcute says it does need to know about the camera/lens, but Chasys Draw (the only other product I found to do resolution enhancement) doesn't. However, as illustrated at the end of this post, Chasys Draw didn't do a good job on the example I tried it with.

I've had the lens for nearly two years now it's the Canon 300 2.8 mk 2 an amazing lens the image quality is outstanding
I'm getting shots that I wasn't able to with my old zoom the 100-400 f 5.6 the faster lens is perfect for low light

Nice.

I use auto focus for macro stacking just because its what I'm used to doing I have tried moving my body backwards and forwards but results were not always in focus

Have you tried moving your hands rather than your body? Just a thought. I have no idea if it would work any better.

I should practice and try again
I find it quick and easy to move the focus point around the subject firing off the shutter as I go:)

Ah, of course, you are working hand-held. I hadn't thought of that. I can see that your technique would make sense for working hand-held.
 
My wife has just commented that it looks over-saturated. She knows the colours of these flowers very well. One of the ladies in one of my little photography group said the same about another Photomatix exposure fusion which I recently showed the group. I think this is something I'm going to have to work on.

This raises another issue I've been meaning to mention for a while now. Have a look at this comparison. It is exactly the same image. On the left it is shown in XnView, on the right it is shown in FastStone Image Viewer. The colours are different, most obviously with the yellow of the trumpet.


0699 33 2-way yellow XnView Vs FastStone
by gardenersassistant, on Flickr

Here is another image in XnView and Faststone. This time the red of the petals is the most obvious difference, but I think the yellows are different too.


0699 32 2-way red XnView Vs FastStone
by gardenersassistant, on Flickr

These are taken from the same day's images as those discussed in the previous posts but I have been aware for a while now that the colours in Faststone sometimes seem to be a bit overcooked. I did some research and found that other people were having trouble with colours in Faststone, describing the colours as "oversaturated", "garish" and similar. Various other image viewers were suggested as alternatives which handled colours better, so I tried several of them and compared how they rendered a yellow image that had given me problems in Faststone, and comparing them to how Lightroom, Photoshop and several browsers rendered the colours.

Here is a comparison of eight versions. The four on the left render the colours one way, and the four on the right render it differently (the same as one another, but differently from the four on the left).


0699 06 8-way colour rendition comparison
by gardenersassistant, on Flickr

The four on the left are FastPictureViewer, FastStone Image Viewer, JPEGview and a not up to date version of Internet Explorer. On the right are Lightroom, Photoshop, Google Chrome and Firefox. It seems that the four on the right handle windows colour management correctly and the others don't, for me at least. You have to set up some applications to get them to use colour management, but even if you do that they still may not handle colours properly. Faststone is a case in point. It has a setting to turn on colour management, but on my system at least it doesn't seem to make any difference. And my research, albeit limited, only turned up people saying that it didn't work, and none that said it did. As I recall (not entirely sure about this) opinions varied as to colour management in JPEGview and/or FastPictureViewer.

At the time I did these comparisons XnView was on my "doesn't work for me" list, even though like Faststone it had the option for turning on colour management. A bit later though I came across a workaround that made XnView work properly. The following 5-way comparison shows (I think) Photoshop CS2 on the right, and to its left two versions of XnView (the single processor version and the multiprocessor version), both rendering the image the same way as CS2. To their left is Faststone, rendering it wrongly, And on the extreme left is IrfanView, which is another one on my "doesn't work for me" list.


0699 05a 5-way colour rendition comparison
by gardenersassistant, on Flickr

It would be nice just to switch from Faststone to XnView, but Faststone has some features that I use a lot when working on sets of images, so I've taken to using Faststone when working on sets of images but firing up XnView when I want to see or compare images when colours matter, and when I'm showing images to other people. Well, I fire up XnView when I remember, which I didn't yesterday with my wife, which brings us back to the issue of Photomatix oversaturating exposure fusions.

The red camellia above was what the lady in my photographic groups said was oversaturated. It wasn't this particular flower as it was several weeks ago, but it was a flower on the same plant, which as we have seen clearly exhibits the Faststone oversaturation issue. And I did show it to the group using Faststone (I didn't have XnView or any of the other image viewers at the time). Just to be clear about this, I processed the image in Lightroom, and got the colours looking ok to my eye there in Lightroom. But I then used Faststone to show it to the group, which hyped up the colours.

And what about the image my wife said was overcooked yesterday? I just showed her this comparison, again with XnView on the left and Faststone on the right. I had been a bit doubtful about the extent of any difference between them, but her reaction was instant. "The one on the left is more peachy." (She had said yesterday that it needed more yellow in it to be realistic). So I asked if it was ok now. I was a bit hesitant about this as I didn't think there was that much difference between them. "It'll do," she said. That's good enough for me. :)


0699 34 2-way pink XnView Vs FastStone
by gardenersassistant, on Flickr

So does Photomatix "overcook" its exposure fusions? I still think it might. I had a quick go yesterday at turning the "Strength" slider right down in Photomatix but it didn't seem to make any difference and I got distracted by something else. I think I need to play with this some more. If the Strength slider doesn't make a difference perhaps I'll turn the Vibrance down a tad in Lightroom when I do exposure fusions. Or perhaps I'm just overreacting.
 
I have been doing some more experiments with the FZ200 and the 70D on the relationship between depth of field (dof), aperture and cropping.

There are 1100 pixel high versions of the images discussed in these posts, and a lot of others that aren't, in this set and this set at Flickr.

Here is a scene that I captured with the FZ200.

0709 66 FZ200 scene from 3 angles
by gardenersassistant, on Flickr

Here is the scene captured at f/2.8 (top left), f/4 (top right), f/5.6 (bottom left) and f/8 (bottom right), all with the camera in the same position (on a tripod, using a wired remote release) and using the same focal length. As expected, as the aperture gets smaller the dof gets bigger.


0709 67 FZ200 whole scene at 1-stop intervals
by gardenersassistant, on Flickr

For example, looking more closely we can see that the goat, which is further away than the tall jar in the centre on which I focused, gets sharper as the aperture decreases.


0709 68 FZ200 goat and background at 1-stop intervals
by gardenersassistant, on Flickr

Similarly, the chocolate man, which is nearer than the tall jar, also gets sharper as the aperture decreases.


0709 69 FZ200 Chocolate man at 1-stop intervals
by gardenersassistant, on Flickr

So, with things both in front and behind the focus point coming more into focus as the aperture decreases, this means the depth of field is getting larger.

We can get a very similar effect by keeping the aperture and focal length constant, moving further away from the subject and then cropping. For example, here are four versions of the scene captured using the same aperture and focal length, but changing the distance to the subject as shown on the left, and then cropping by the amount shown on the right. As usual I had problems keeping the shots aligned the same when moving the camera so you will notice differences in angles and perspective especially when looking close in.


0709 70 FZ200 cropping for dof F2.8
by gardenersassistant, on Flickr

Looking in more detail we can see how similar the dof is in the cropped versions compared to what I got by altering the aperture.


0709 71 FZ200 whole scene at 1-stop crop differences
by gardenersassistant, on Flickr


0709 72 FZ200 goat and background at 1-stop crop differences
by gardenersassistant, on Flickr


0709 73 FZ200 chocolate man at 1-stop crop differences
by gardenersassistant, on Flickr

Because these results are so similar to the results I got by decreasing the aperture by one, two and three stops, I refer to these crops as a "1-stop crop", "2-stop crop" and "3-stop crop".

Skippable note: The distances were chosen so as to give this result. I framed up the closest in shot and measured the distance to the camera. I then calculated that distance times 1.41 and used that distance for the second shot (well, I tried to use that distance. In fact my measurements were a bit approximate, so the actual distances were not exactly as stated here). The distance for the third shot was 1.41 times the distance for the second shot, and I multiplied again by 1.41 to get the distance for ths fourth shot. Why 1.41? Because it is the square root of 2. The third distance is twice the first, and the fourth distance is twice the second. Doubling the distance to the camera cuts the amount of light falling on the sensor to 1/4 of what it was at the previous distance, and that needs an increase in aperture of two stops to get the light back up to the right level. Increasing the distance to the camera by a factor of 1.41 halves the amount of light falling on the sensor and that needs an increase in aperture of one stop to get the light back up to the right level.

The disadvantage of cropping is that as the amount of cropping increases the number of pixels goes down, details are lost and noise increases. This is discussed in the next post.
 
The full size image is 4000 x 3000 pixels. The 1-stop crop is 2723 x 2042. The 2-stop crop is 2089 x 1567 and the 3-stop crop is 1517 x 1138. My usual viewing size is 1100 pixels high, so for a 3-stop crop that is pretty much a 100% crop. Especially for a small sensor camera like the FZ200, a 100% crop is not generally regarded as very useful, except in extremis where a capture is special enough to override any image quality considerations. And printing from a 100% crop would presumably be even less likely to be useful.

So how much of a crop might be useful? I don't think you can really tell from artificial examples like this, but here are some comparisons that might give some clues.

First, the area that is most in focus - the tall jar that I focused on. On the top left we can see it as captured from about 110 cm at f/4, uncropped. Below it is the capture from about 156 cm at f/2.8, given a 1-stop crop. These look rather similar to me.

At the top right is the capture from about 110cm at f/8, uncropped. Below it is the capture from about 311 cm at f/2.8, given a 3-stop crop. I think the uncropped version has distinctly better clarity and detail, and less noise.


0709 74 FZ200 focused area 1 and 3 stop crop vs aperture noise etc
by gardenersassistant, on Flickr

Here is a simliar comparison for the chocolate man. The 3-stop crop at the bottom right has the same problems of noise and lack of clarity and detail. For the 1-stop crop, on the left, the chocolate man's flower and ribbon and the lettering on the label actually look slightly sharper in the crop.


0709 75 FZ200 chocolate man 1 and 3 stop crop vs aperture noise etc
by gardenersassistant, on Flickr

The 1-stop crop of the goat, on the left in the next illustration, has better detail on the pot to the left of the goat than the uncropped version above it.


0709 76 FZ200 goat 1 and 3 stop crop vs aperture noise etc
by gardenersassistant, on Flickr

The pot next to the goat is behind the tall pot that I focused on, and the chocolate man is in front of it. Since both are sharper in the cropped version it looks like the dof is actually larger for the 1-stop crop version. (I was intending them to be the same, which means there is something wrong with my calculations, my capture technique or my assessment of the images, or something else I don't understand about they way these things work.)

For the 3-stop crop we again see better clarity and detail and less noise in the uncropped version.

These 1-stop and 3-stop results raise the obvious question of how the 2 stop crop, shown on the right below, compares to the uncropped version on the left.

The tall pot on which I focused and the pot on the left look very similar in both versions to me.


0709 77 FZ200 focused area 2-stop crop vs aperture noise etc
by gardenersassistant, on Flickr

The goat looks to have a bit better clarity/sharpness in the cropped version on the right, as does the pot to its left. Both of these are further away than the tall jar.


0709 78 FZ200 goat 2-stop crop vs aperture noise etc
by gardenersassistant, on Flickr

In contrast, the chocolate man and the pot to its right have slightly better detail in the uncropped version. This suggests to me that the plane of focus may be slightly further back in the cropped version.


0709 79 FZ200 chocolate man 2-stop crop vs aperture noise etc
by gardenersassistant, on Flickr

Overall, the 2-stop crop version is noisier than the uncropped version, but it seems very similar to the uncropped version in terms of clarity and detail, and allowing for the possible difference in focus pointquite similar in dof too.

What conclusions do I draw from this? My calculations/technique/understanding seem to be not be quite right (any thoughts anyone?), but based on these comparisons I will be a bit more relaxed about cropping with the FZ200 than I might otherwise have been.

Given that the FZ200 has a very small sensor, it would seem obvious that the 70D would have even more potential for cropping. After all, its sensor is 10 times the area of the FZ200 sensor. It has more pixels (about 60% more) and the pixels are larger. So how would the 70D do with this test? See next post.
 
Last edited:
I captured the same scene using the 55-250 STM on the 70D, capturing shots at f/5.6, f/8, f/11, f/16 and f/22 at ISO 100 and ISO 800. As with the previous tests, I used a tripod and a wired remote shutter release. As with the previous 70D shots I used live view autofocus, going to 10x view and waiting for that to settle before capturing a shot.

I used a focal length of 100mm on the 55-250, which is 160mm in 35mm terms. This is very similar to the 27.4mm focal length I used with the FZ200, which is 152mm in 35mm terms. As a result the four distances were similar to those used with the FZ200, in this case being about 118, 166, 236 and 333 cm (as with the FZ200, each distance was 1.41 times the previous one).

As before, despite being even more careful about alignments, they still varied, as is obvious from the close views. And as before, the distances weren't exact either.

The sun was going in and out from behind clouds. I assume that is what caused the radical differences in white balance.

As before, I used the nearest shots uncropped and the other shots with 1-stop, 2-stop and 3-stop crops as appropriate.

Let's consider ISO 100 first. In the next three illustrations we have:
  • Top left, f/16 from 118cm, uncropped
  • Top right, f/11 from 166cm, 1-stop crop
  • Bottom left, f/8 from 236cm, 2-stop crop
  • Bottom right, f/5.6 from 333cm, 3-stop crop
First, the tall pot, with the area I auto-focused on in the centre.


0710 041 ISO 100 Focused area
by gardenersassistant, on Flickr

Now the goat.


0710 042 ISO 100 Goat
by gardenersassistant, on Flickr

And the chocolate man.


0710 043 ISO 100 Chocolate man
by gardenersassistant, on Flickr

The first thing I noticed with these was that the crops don't seem to be suffering from noise as much as with the FZ200. In fact, I wondered if the 3-stop crop might actually be usable for screen viewing at my usual 1100 pixel height. The crop is only 1244 pixels high, so 1100 high would be well on the way to a 100% crop. Here it is, with no luminance noise reduction having been applied, and just a light touch of deconvolution sharpening on the 1100 pixel high JPEG exported from Lightroom.


0710 044 0710 017 70D+55-250 at 100mm WD 320cm ISO 100 F8 IMG_6913 LR Crop LR no lum NR 1100h AI 0.2
by gardenersassistant, on Flickr

For screen viewing at this size this looks promising (with the usual caveat that just because a test shot looks ok doesn't mean that something with natural world subtleties of colour, texture and fine detail will. But it does look promising I think.)

This result wasn't surprising, given the results with the FZ200 and the fact of the 70D's bigger, better sensor. Indeed, intuitively it seemed to me that a 3-stop crop from an ISO 100 original might well look, noise-wise, somewhat like an uncropped ISO 800 image, and I use 70D ISO 800 images quite happily with no great concern about noise. And when I compared a 3-stop crop from an ISO 100 original (top right in the following illustration) with an uncropped ISO 800 shot (bottom left), they did indeed look quite similar noise-wise. For comparison purposes a less noisy uncropped ISO 100 shot is shown at the top left and a more noisy 3-stop cropped ISO 800 shot at the bottom right.


0710 045 Noise cf ISO 100 3-stop crop vs ISO 800 uncropped
by gardenersassistant, on Flickr

In contrast, the next thing I noticed did surprise me - in each of the above three comparison illustrations, looking back and forth between the uncropped f/22 image and the heavily cropped (2-stop crop) f/11 image beneath it, it seemed to me that the cropped version had better detail/sharpness/microcontrast. It was slightly noisier, but it was very slight and not enough to be an issue I think.

To my eye the f/16 1-stop crops at the top right looks better than the uncropped version too, but not quite as good as the 2-stop crop. So it actually looks to me as if the 2-stop crop is the best of the bunch in terms of detail/sharpness/microcontrast. (One of the women in one of my little photography groups, who has very good perception of detail and colour - better than mine - thought that the 3-stop crop was best. We looked at it and discussed what we saw in great detail, and came to the conclusion that we were quite literally seeing things differently. We know from previous discussions that her colour perception is better than mine and I suspect she was picking up information from the colours that I wasn't, and neither was the other member of the group, who like me thought the 2-stop crop was sharper than the 3-stop crop.)

This doesn't seem to be a one-off anomaly because I see the same sort of difference when moving everything down one stop and comparing the uncropped f/16 image with the cropped f/11 and f/8 images.

I imagine what is happening here is that the sharpness/detail drops off a lot with the smallest apertures of f/22 and f/16, and that this drops off faster than the loss of detail from the cropping. This raises the interesting prospect that it may be better, for my purposes, to use a larger aperture and crop rather than use the very small apertures that I use so often, particularly for invertebrates.

Other questions immediately come to mind. Is this a one off, or can I replicate it in different circumstances? Is it similar with other cameras, for example the FZ200? Is it similar with other lenses on the 70D, for example the Sigma 105 Macro? Is it similar at other ISOs?

I have done a big series of test shots with the FZ200 and 70D+55-250 using four distances and for each distance a range of apertures, and doing this with a range of ISOs, and for each ISO capturing a burst of images so I can reduce the noise and see if that affects which ISOs produce better results from crops than uncropped. I also took a similar series of test shots with the G3, but just single images not bursts.

Since doing the test shots I have got into doing quite a lot of "real" photography rather than experiments, in the garden and out at nature reserves. I haven't got the enthusiasm just now to do what would be quite time-consuming processing and analysis of what is a rather large set of images (about 1,600 of them).

I don't know if I'll get around to doing that work. But why might any of this stuff about cropping matter to me? Well, I can think of several potential uses for cropping, and I'd like to have a firmer grip on the circumstances in which it might be of practical use and how far in practice such cropping can usefully be taken. These potential uses include:
  • Obtaining magnification beyond my current (uncropped) maximum magnification (for very small subjects, although this isn't a primary area of interest for me).
  • Increased reach for closeups of difficult to get at subjects (flowers mainly, although the number of applications would be quite small. But where I do have a reach issue I'd rather crop in post processing than be exposing the sensor out in the field while I put teleconverters on and off.)
  • Increasing DOF beyond what I can currently obtain (for invertebrates mainly, and definitely of interest, with possibly wide application).
  • Increased range of cropping to increase the potential for creating "pictures" from deeper within images.
  • Increased magnification for the times when I'm using the wrong (not powerful enough) achromat for a subject that turns up and I need to move fast to capture an image of it and so don't want to stop to change to another achromat.
  • Improved detail for low ISO 70D natural light shots
Rather than going through the tedium of processing and analysing a huge collection of experimental test images, I may just try some of these options out in the course of ordinary sessions. The possibility of increasing dof is for me the most enticing.
 
Last edited:
That's right. For noise reduction the software doesn't need to know anything about the camera. For resolution enhancement PhotoAcute says it does need to know about the camera/lens, but Chasys Draw (the only other product I found to do resolution enhancement) doesn't. However, as illustrated at the end of this post, Chasys Draw didn't do a good job on the example I tried it with.


Nice.


Have you tried moving your hands rather than your body? Just a thought. I have no idea if it would work any better.


Ah, of course, you are working hand-held. I hadn't thought of that. I can see that your technique would make sense for working hand-held.

Sorry for delay in replying
I am unusual in preferring autofocus for macro
I'm just set in my ways I think I've found a way of working that I am used to and am loathe to change! :D
Also though autofocus does allow me to quickly get some shots before the subject moves sometimes with butterflies you only get a few seconds before they move off to the next flower
 
Last edited:
Sorry for delay in replying

??

No need to apologise Pete.

I am unusual in preferring autofocus for macro
I'm just set in my ways I think I've found a way of working that I am used to and am loathe to change! :D
Also though autofocus does allow me to quickly get some shots before the subject moves sometimes with butterflies you only get a few seconds before they move off to the next flower

It was autofocus for focus stacking I was curious about Pete. As you may know I use autofocus a great deal, but not for focus stacking.

I find I'm using manual focus more and more for flowers. I can get the dof coverage I want with greater certainty with manual focus. I move the focus ring back and forth to establish (so "my fingers know") the position for the front and back elements of the scene that I want in focus, and then I move the focus ring between those two positions and shoot. It works a treat. This is hand-held btw. I haven't used the tripod at all recently. More on that (amongst other things) in another post I'm cogitating on at the moment.

For most invertebrates I use autofocus, whichever camera I'm using. I generally know where I want to put the centre of focus so I use single point with focus and recompose or focus box positioning as appropriate. Like you say, you need to be quick with some subjects like butterflies, and the autofocus is much quicker and more accurate than I am when focusing manually in a hurry.

For small invertebrates, not that I photograph them very often, I usually use rocking manual focus.
 
I have done a big series of test shots with the FZ200 and 70D+55-250 ....I don't know if I'll get around to doing that work.

That was a couple of weeks ago. I haven't analysed that test series, and in fact I haven't even so much as glanced at any of the images. I've lost momentum on the testing front. There have been too many real world photo opportunities to play with.

I've been doing a lot of photography in the garden. Mainly botanical, but a few invertebrates too. And I've been out to a couple of the nature reserves, although one of those visits was a dead loss, and I didn't see much variety of subjects during the other visit. Now I've got big gardening job finished, as soon as the wind calms down a bit I'll be out at the reserves again. Hopefully things have revved up a bit by now.

On the "bridge or MFT or dSLR etc etc" front, things seem to have clarified, at least for now, and simplified too. What I have found myself using is the 70D for natural light work (which has been almost all botanical recently) and the FZ200 for flash work (all invertebrates). With the 70D I've been using the 55-250 STM with and without the Canon 500D. With the FZ200 I've been using mainly the Raynox 150. With both cameras I have been working hand-held and using mainly single-shot techniques, only minor cropping and pretty basic post processing.

What this means I haven't been using is the tripod, the G3, the Sigma 105 Macro, extension tubes, teleconverters, focus stacking, noise stacking, exposure fusion, crop for dof or deconvolution sharpening, and I haven't been using white card reference shots much either, instead trusting more to my own eyes for white balancing.

So I've been enjoying a bit of simplicity, which has felt quite liberating, and brought a nice feeling of relaxed, unhurried and contemplative flow to my capturing sessions. Very enjoyable.

Along the way I have tried several of the alternatives I have available, including
  • the G3
  • teleconverter to get reach for a butterfly
  • flash (yet again) with the 70D
  • Sigma 105 using the OVF and phase detect focusing for insects in flight
  • Deconvolution sharpening
However, in each case I ran into practical issues and didn't pursue it.

There are a couple of other options swimming around in my head at the moment. One is that when I look at some of the images posted here from full frame cameras I can't help feeling some of them have a special "something" about them. It's difficult to describe, but there seems to be something special about the subtleties of tonal rendition, particularly with botanical subjects and backgrounds. I find that very appealing. However, being realistic, I think it would take a full frame camera with a fully articulated LCD and live view that works tolerably well (like with the 70D) to get me really interested.

The other possibility is the KuangRen KR800 Twin Flash Unit that Paul @Paul Iddon has been telling us about in this thread. I can't help wondering if this might make it practical to use flash on the 70D with achromats on the 55-250 STM. The flexibility looks terrific, including the possibility of using one of the flashes to illuminate the background. But Paul has mentioned the stiffness of the arms, so perhaps this would be more of a good idea than a practical success. Plus it isn't TTL. I think I could live with that. Flash for closeups/macros always seems for me to be a case of "try it and adjust the level". If I'm doing that by adjusting FEC with TTL, I might just as well be adjusting the power manually. What might be more difficult to live with might be the lack of HSS/FP, so it sometimes couldn't be used for fill on bright days, or not without using a neutral density filter. I do have a variable density neutral filter which I can fit onto the Canon 500D, Raynox 150 and 250 (but not the MSN-202), but I really don't want to go there. However, since I use such small apertures perhaps this would hardly ever be a problem. I think I'm going to be very tempted to try this, because I really would like to be able to use flash with my 70D.

In the meantime, I've started processing to a larger display size - 1300 pixels high. This seems to be significantly more demanding than my previous 1100 pixels high, for example in terms of noise. I use base ISO with the FZ200 most of the time, but I quite often bring up the brightness by a stop or more in post processing and at the new larger size noise can then become an issue in backgrounds that needs selective noise reduction. And you need to be a bit careful about doing it otherwise it leaves "noise halos" around the edge of the subject. The same is true for the 70D at ISO 800 or thereabouts and higher. This is another reason for looking longingly at full frame, although taking dof into account I suspect there are equivalence issues that mean the advantage in terms of noise wouldn't be as great as one might imagine.

Anyway, those are maybes for the future. Here are some examples of what I've actually been up to in the garden in the past week (1300 pixel high versions over at Flickr). I think I can happily enjoy the 70D, the FZ200 and my achromats for a little while longer. :)

70D, 55-250 STM, natural light


0718 04 2015_04_28 IMG_1016 LR 1300h
by gardenersassistant, on Flickr


0718 27 2015_04_28 IMG_1176 LR 1300h
by gardenersassistant, on Flickr


0717 14 2015_04_26 IMG_0943 LR 1300h
by gardenersassistant, on Flickr

FZ200, Flash, Raynox 150


0716 01 2015_04_24 P1640777 LR 1300h
by gardenersassistant, on Flickr


0716 10 2015_04_24 P1640838 LR 1300h
by gardenersassistant, on Flickr

Not properly in focus, but a happy accident that amused me anyway


0716 17 2015_04_24 P1640785 LR 1300h-2
by gardenersassistant, on Flickr


70D, 55-250 STM, natural light, probably with Canon 500D

This one might have used the Raynox 150, or even possibly the 250 I suppose. It was a quite small fly.


0715 23 2015_04_22 IMG_9799 LR 1300h
by gardenersassistant, on Flickr

This one is a significant crop.


0715 12 2015_04_22 IMG_9714 LR 1300h-2
by gardenersassistant, on Flickr
 
Last edited:
I know what you mean Nick about going back to keeping things simple it's how I prefer to work
I just try to get near enough to the subject, get the composition right then get it in focus
If I have to mess about with settings or anything complicated I couldn't cope ! :D
Just want the camera to be easy and just have to worry about the light and composition
 
Great shots BTW really like the inflight as you say it's a shame it's not quite sharp but it's still a great shot I've tried in flights and just got blurred blobs :D
 
I know what you mean Nick about going back to keeping things simple it's how I prefer to work
I just try to get near enough to the subject, get the composition right then get it in focus
If I have to mess about with settings or anything complicated I couldn't cope ! :D
Just want the camera to be easy and just have to worry about the light and composition

Yes, I went out to one of the nature reserves today. Not much around unfortunately but I definitely kept it simple. I had the tripod and the 70D with me, but I soon put the tripod back in the car and I didn't get the 70D out of the bag. I just used the FZ200. Espcially when using flash, which I was most of the time today, it is very straightforward - base ISO, fast shutter speed (1/640 or so, because the FZ200 can sync at any shutter speed), minimum aperture, TTL flash. Point. Autofocus. Shoot. Repeat. Perhaps move the focus box, perhaps recompose. Adjust flash exposure compensation as needed. Occasionally lengthen exposure and/or increase ISO to bring up dark backgrounds (but at the risk of forgetting I've done it and working with an inappropriate shutter speed/ISO until I notice. :( ).

Actually, I was trying something else today, and at first it seemed a bit less straightforward. I've been getting quite annoyed at how much exposure can vary from shot to shot of the same scene when using flash, for no apparent reason I can pin down. So I tried controlling the flash manually. This gives more consistent results from shot to shot of a particular scene, and it doesn't seem to be any more difficult to adjust the flash power than to adjust the FEC. I'm a bit slow at making the changes at the moment because my hands haven't developed the appropriate muscle memory, but I think that will be ok. The buttons on the flash are quite conveniently placed and sized, more so actually than the button on the camera I've got assigned to FEC. While doing this experiment I had in mind the KR800 that @Paul Iddon is working with and that I am minded to try, which of course is manually controlled.

Whether using manual flash control or TTL I find that the first shot is always hit and miss as to whether it will be nicely exposed, so I'm not convinced that, once the muscle memory develops, that manual control will be any slower to deploy than TTL flash. Indeed, I have the feeling that the range of appropriate flash power settings might be quite small and I might be able to get a handle on where best to start for particular types of scene. That would be good.
 
@GardenersHelper Nick - to be truthful - the twin is good, but not if you are chasing bugs.

If your subject is static - yes. Set it up, position it, control the power, but today when In was trying to get the bees and flies etc, almost impossible. Most of the time the 19" worth of flexible arms snagged on every twig and flower like a magnet.

Paul.

Oh dear. Well, thanks for letting me know Paul. .... Hmmmm.......I'm wondering if perhaps my subjects count as static. Thinking about my session today for example, most of the time I photograph flies etc when they are not moving around much, or at all in a lot of cases. I wonder - maybe it would work.

When you say "set it up, position it", are you finding that you have to bend the arms around much from shot to shot? I was thinking that the arms would tend to stay in much the same position (above, "10 and 2" perhaps), with just a bit of rotation of the heads, perhaps, for big changes in working distance. But is it more complicated than that? For example, are you manipulating the arms for changes in working distance? (Presumably this shouldn't affect me as much because I'm using achromats, each of which has only a small range of working distance.)

I'm also a bit concerned about the small size of the flashes. I'm using a 7 inch diameter dual-layer diffuser at the moment that sits on the flash on the hot shoe. I don't suppose it will be practical to spread the source that much from the units mounted on the arms. I'm highly curious as to what your diffusion arrangement actually looks like. Could you post an image? (Please forgive me if you have already - I'm not fully up to date with all the current threads.) I could do with some clues as to how I might tackle the diffusion if I do get one of these (despite your warning - perhaps I'm suffering from a bit of GAS. :) )
 
The head is about 2+ inches across:


First diffusion is piece of polystyrene plate:


This is sat inside a piece of packing foam:


On the opposite side is a small piece of 129 Heavy frost gel held on with tape:


This is the best I've managed.

The cutout piece sits over the head of course.


Paul.
 
The head is about 2+ inches across .....

Thanks Paul. That is extremely helpful. I was expecting something much larger and more cumbersome by way of diffuser. That is very promising.

I've not come across gel like that. Do you have a favourite supplier for this sort of thing? (Have you got lots of different sorts of this type of stuff?) A quick search turned up StageDepot. Don't know if they are any good.

That's the stuff, yes m8.

Paul.
 
I tried controlling the flash manually. This gives more consistent results from shot to shot of a particular scene, and it doesn't seem to be any more difficult to adjust the flash power than to adjust the FEC. I'm a bit slow at making the changes at the moment because my hands haven't developed the appropriate muscle memory, but I think that will be ok. The buttons on the flash are quite conveniently placed and sized, more so actually than the button on the camera I've got assigned to FEC. While doing this experiment I had in mind the KR800 that @Paul Iddon is working with and that I am minded to try, which of course is manually controlled.

I've done a couple of experiments with manual flash that bear on whether I might or might not use the KX800 (apparently the KR800 is the previous version and the KX800 is the newer version, with stronger arms, but which at the moment is being shipped in KR800 boxes).

The KX800 is shown as working with Canon/ Nikon / Sony A /Pentax Cameras. Panasonic is not mentioned. I have two Metz 58-AF2 flash units, one Panasonic fitting and one Canon fitting. I put the Canon fitting one on to the G3, put the flash unit into manual mode and tried it. It worked. This presumably means that the KX800 (which is manual mode only, not TTL) will work on the G3 and the FZ200 as well as on the 70D. Interesting.

The other experiment is something I should have tried ages ago, but never got round to. I know that I have to use f/22 with the G3 to get similar DOF to using f/8 on the FZ200 (minimum aperture in both cases). This means that if I want the same DOF and the same shutter speed I have to use ISO 800 on the G3 compared to ISO 100 on the FZ200. That's ok because ISO 800 on the G3 gives similar IQ to ISO 100 on the FZ200.

What I've never bothered to pin down exactly is how this works with flash. I've just started using Manual flash and this jogged me into doing a simple experiment to see how the required flash levels compare between the G3 and the FZ200.

The base ISO of the G3 is ISO 160, so I set both cameras to ISO 160. I put the Pansonic fitting Metz 58 on the FZ200 and the Canon fitting Metz 58 on the G3, with both set to Manual mode. I then captured an image with the Raynox 150 on the G3, turning up the flash power until I got overexposure blinkies. I then dialled the power back by 1/3 stop and noted the value. I then did the same with the FZ200.

The manual flash settings cover 8 stops, from full power (1/1) through 1/2, 1/4 etc to 1/128. There are 1/3 stop increments shown as 1/1 - 1/3, 1/1 - 2/3 etc. The G3 needed 1/4 power. The FZ200 needed 1/32 - 1/3. This confirms a roughly 3 stop difference (I say "roughly" because the blinkies may show up at slightly different levels with each camera, and the power of the two Metz flashes may not be exactly the same). This was as expected, given the use of f/8 with the FZ200 and f/22 with the G3.

This means that the FZ200 can capture an image with the same framing, dof and ISO as the G3 using about 1/8th of the flash power, and hence much faster recycling time. Similar to the situation with natural light, the ISO would need to be raised to ISO 800 with the G3 to get down to the same flash power and recycle times. The 70D, when operating at f/32 (which it does towards full zoom with the 55-250 STM) would need 16 times more flash power at base ISO compared to the FZ200, or an ISO of 1600 for the same flash power and recycle time.

It may not be rational, but I feel more comfortable using base ISO with the FZ200 than the higher ISOs with the other cameras. I have never done proper tests (and I can't raise the enthusiasm to do them just at the moment), but I have a hunch that the image quality may be slightly better with the FZ200 at base ISO using flash than with the higher ISOs on the other cameras when using flash.

This test made me think again about the KX800. It has the same power as my Metz flashes (a guide number of 58, although I don't know if this relates to the individual flashes or the two working together), and the same range of power from full to 1/128, but it is only adjustable in increments of a full stop. I don't know how much of an issue this relatively crude adjustment would be. Conceivably there could be an advantage because of simplicity and speed of changing power levels. (It takes several button presses to get the Metz flashes to the point where you can press buttons to change the power level. In contrast there are a pair of single-function + and - power keys for each flash on the back of the unit that fits in the hot shoe.)
 
Yes, I went out to one of the nature reserves today. Not much around unfortunately but I definitely kept it simple. I had the tripod and the 70D with me, but I soon put the tripod back in the car and I didn't get the 70D out of the bag. I just used the FZ200. Espcially when using flash, which I was most of the time today, it is very straightforward - base ISO, fast shutter speed (1/640 or so, because the FZ200 can sync at any shutter speed), minimum aperture, TTL flash. Point. Autofocus. Shoot. Repeat. Perhaps move the focus box, perhaps recompose. Adjust flash exposure compensation as needed. Occasionally lengthen exposure and/or increase ISO to bring up dark backgrounds (but at the risk of forgetting I've done it and working with an inappropriate shutter speed/ISO until I notice. :( ).

Actually, I was trying something else today, and at first it seemed a bit less straightforward. I've been getting quite annoyed at how much exposure can vary from shot to shot of the same scene when using flash, for no apparent reason I can pin down. So I tried controlling the flash manually. This gives more consistent results from shot to shot of a particular scene, and it doesn't seem to be any more difficult to adjust the flash power than to adjust the FEC. I'm a bit slow at making the changes at the moment because my hands haven't developed the appropriate muscle memory, but I think that will be ok. The buttons on the flash are quite conveniently placed and sized, more so actually than the button on the camera I've got assigned to FEC. While doing this experiment I had in mind the KR800 that @Paul Iddon is working with and that I am minded to try, which of course is manually controlled.

Whether using manual flash control or TTL I find that the first shot is always hit and miss as to whether it will be nicely exposed, so I'm not convinced that, once the muscle memory develops, that manual control will be any slower to deploy than TTL flash. Indeed, I have the feeling that the range of appropriate flash power settings might be quite small and I might be able to get a handle on where best to start for particular types of scene. That would be good.


Yes I normally just carry one camera and lens and wander around to find bugs a
At the start of last season I started carrying two camera's with different lenses and a tripod but got fed up with lugging it around and now just carry one camera
I do want to try some close up shot's tho so will carry a set of tubes now as well
 
Just want to say sorry I haven't posted for ages I haven't gone away I've been trying new sites lately what with that and the weather I haven't managed a single shot yet this season
The butterflies are now out up here I just haven't got lucky yet but haven't seen any dragonflies at all and only one damselfly
I've got next week off work so hopefully will be able to find some insects :)

Absolutely no need to apologise Pete. Especially not to me - I'm quite capable of upping sticks and disappearing for months. I did that last year if you remember!

I'm sorry you haven't found anything yet. It's much easier for me of course because I'm retired, and I've been out half a dozen times now to the local nature reserves. That said, I've been rather disappointed at the lack of subjects so far. Well, there are subjects, but mainly the same things over and over, with very little variety. I do hope you find plenty of subjects next week.
Thanks very much Nick yes it's the weather I think it's very cold up here for the time of year and also the area that I normally go to early in the season has been cut down it was a clearing in an area of trees but it's all been cut down frustrating but I am very hopeful that next week I will find some dragonflies in a new area I have been told about by the river dee
 
About 6 weeks ago I wrote this.

On the "bridge or MFT or dSLR etc etc" front, things seem to have clarified, at least for now, and simplified too. What I have found myself using is the 70D for natural light work (which has been almost all botanical recently) and the FZ200 for flash work (all invertebrates). With the 70D I've been using the 55-250 STM with and without the Canon 500D. With the FZ200 I've been using mainly the Raynox 150. With both cameras I have been working hand-held and using mainly single-shot techniques, only minor cropping and pretty basic post processing.

What this means I haven't been using is the tripod, the G3, the Sigma 105 Macro, extension tubes, teleconverters, focus stacking, noise stacking, exposure fusion, crop for dof or deconvolution sharpening, and I haven't been using white card reference shots much either, instead trusting more to my own eyes for white balancing.

Since then I have been capturing lots of photos in the garden and at the local nature reserves (and processing some of them, and adding others to the backlog). What I wrote then is still the case. Things definitely seem to have stabilised and I am in a "tweaking" phase at the moment.

In terms of cameras I have thought about, and decided against, the new Panasonic G7 and several full frame options. The only other camera I'm thinking about at the moment is the FZ300, which has not been announced but is expected quite soon (it was registered for WiFi at the same time as the G7). Because of the particular combination of features I'm looking for, it is quite possible that the FZ300 won't suit me and if so I will continue to use the FZ200. (One of my macro heroes, Mark Berkerey, has chosen to stay with FZ50's (he has more than one) since 2006, so sticking with a camera that is working well for me even when it isn't the "latest and greatest" doesn't seem problematic to me.) Just in case the FZ300 isn't to my liking I have bought a spare FZ200, the price of which has recently reduced significantly, so I got a new one for £275.

My use of the tripod has changed significantly over the past couple of months. I am using it much less. Indeed, I don't recall using it at all in the past few weeks. However, I think that will change. It is very liberating working hand-held, and it means I am getting some shots that I wouldn't with the tripod, either because I couldn't set it up quickly enough or the required camera position wasn't achievable with the tripod. On the other hand I am becoming increasingly aware that I am losing shots because hand shake is adding a random element to framing shots, especially as the magnification increases. Also, and here too it is particularly at higher magnifications, I am missing focus more often because of camera movement during the delay between pressing the shutter button and the shot being captured. It is also very noticeable that the more powerful achromats are significantly more difficult to use hand-held because of the difficulty of keeping the camera at an acceptable working distance, the tolerance for which decreases significantly as magnification increases. With the 500D and the Raynox 150 (which is up to about 1.5:1, the gains from flexibility and speed probably outweigh the loss from bad framing and focus loss, but beyond that, unless I can brace myself effectively (which I often can't) I think the disadvantages of working hand-held probably outweigh the advantages. Therefore, I'll go back to using the tripod for higher magnification shots and see how that goes.

The higher magnification stuff is with the FZ200. I'm obviously still going to need to use the tripod for slow exposure work (hands-off and hands-on), which is mainly with the 70D. There is another reason for using the tripod with the FZ200 even if the magnification isn't very high, and that is when I'm using flash in bright or moderately bright conditions but using slower shutter speeds to try to avoid black backgrounds. I got caught out badly with this yesterday, working hand held. I had been shooting at 1/160 sec or slower to try to lighten up black backgrounds. The trouble was that the ambient light was strong enough that the flash was not dominant - the slow exposure natural light element of the captures suffered from motion blur which was sufficient to ruin every one of the shots.

My wife suggested that perhaps a monopod might help with the camera stabilisation issue. That seemed like too good an offer to turn down. (Well, I took it as an offer :D) Unfortunately, as soon as I tried using my nice new monopod with its snazzy head what should have been apparent from just thinking about it quickly became obvious - it isn't suitable for working near the ground, where much of my photography goes on. And even where the height is convenient there is a set up time involved - albeit not as long as with the tripod. Rather less obviously, moving from one position to another isn't necessarily straightforward when using a monopod. It can involve changing the length of the leg and also the rotation of the head, which coupled with the need to get/keep the working distance right when using achromats can make it surprisingly complicated to change the angle of attack, which is something I do a lot. I suspect that the clever arm I use on the tripod, coupled with the focus rail, can actually make that sort of manoeuvre faster with the tripod. Anyway, as far as close-ups are concerned, the monopod has gone on the shelf. (It may have some other uses, sunsets perhaps, not that I've done one of those for ... years I think.)

The 70D and 55-250 STM are working fine, with and without the Canon 500D, and so I haven't needed to do any tweaking on that front. I have therefore concentrated on tweaking the FZ200.

The main problem with the FZ200 is noise. I have been handling that by using selective noise reduction in Lightroom. That works quite well and I can do it quite fast for each single image, but it gets tedious to do for tens of images, which is often the case for a single set of images. Also, when done at speed it is particularly prone to leaving "rough edges" which sharp-eyed viewers may pick up. What I really wanted was a non-selective approach where the software did the work. I looked again at Neat Image and Noiseware, but didn't like the loss of detail when using them non-selectively. I then tried DXO Optics 10. This has what they call their "Prime" noise reduction technique, which only works on raw files. I was very impressed with the results. It takes some time for each image (on my PC, about 30 seconds for an FZ200 raw file, and about 50 seconds for a 70D raw file), and so processing a set of images can take hours.

However, I have developed a workflow where this delay is not a problem. I do a first selection in Lightoom to get rid of the unusable stuff. I then export (copy) the selected raw files from Lightroom to another directory. I then set DXO Optics off processing the raw files and producing noise-reduced dng files. I can use the PC for other things while this is going on, including doing my normal processing and further selection/rejection in Lightroom, using the DXO'd dng files rather than the original raw files. It seems to work fine. The only issue is that I can't use a camera profile with this workflow because they don't work with DNG files. However, I'm using flash almost all the time with the FZ200 and the auto white balance seems to be doing fine as far as colours are concerned, The other potential advantage of using a camera profile has to do with rendering subtle details/textures, but the FZ200 seems to be doing well enough on that front for invertebrate shots. So overall I'm not really bothered about the camera profile shortcoming of using DXO with FZ200 images.

I'm only using DXO for FZ200 images at the moment. 70D images are fairly easy to handle as far as noise in concerned, and not using DXO (or only using it exceptionally) simplifies the workflow logistics. Also, DXO loses the Exif data from 70D raw files (it retains if for FZ200 files), which I'm not at all keen on. I can always go and look at the original raw files, which I retain for the images I keep after processing, but I don't want to have to do that as a matter of course for 70D images. And, by not using DXO I can continue to use camera profiles with the 70D, and this is more important with the 70D as I'm using natural light on botanical subjects, where colour rendition and the rendering of subtle textures can be more of an issue.

Another thing I've been tweaking with the FZ200 is flash diffusion. I've been writing about that in one of my recent image sharing posts in the forum. I have considered the KX800 that @Paul Iddon has been showing us, but decided against that given Paul's experience with it. I've been working on tweaking my pie-tin diffuser, adding extra diffusion layers to it. I've ordered some frosted plastic sheet like @Tintin124 has been using recently, and also some parchment paper, which I read a while ago is a good diffusion material.

One other tweak with flash is with TTL plus Flash Exposure Compensation versus manual flash power setting. I am now using both. There are some subjects, some flies in particular, that move (sometimes completely out of the frame) when the TTL pre-flash goes off. For those I'm now using manual flash, for which there is no pre-flash. Also, I can get much more consistent results with manual setting, compared to the sometimes wildly different exposures I get from shot to shot using TTL. The downside of manual flash is slow speed of operation. With both manual and TTL flash it is a bit of a lottery as to how well the first shot is exposed, and I often need to adjust the flash level. Because of the way the various buttons are positioned and how many of them need to be pressed in what order, it is much faster to change the flash exposure compensation than to change the manual flash level. In fact the button presses on the flash are sufficiently complicated that I sometimes get in a muddle with the button presses and it takes even longer to backtrack and try again to get to the output level I'm aiming for.

So, that's where I'm at, and with things stabilised on the bridge, MFT or dSLR etc front, there may not be anything much else to add to this thread. We'll see. :)
 
Last edited:
Glad that you are getting there Nick as we have said before it doesn't really matter what kit you use as long as it suits how you work and you find it easy to use

I know what you mean about the tripod I havent used mine yet this season I have either been laying on the ground or bracing myself on the knee
It just takes to long to get the right angle and background if I have to mess around with a tripod
I also find it hard to stabilise the camera tho if I can't do that tho and have to hold it freehand am not getting many sharp shots
I have been struggling to find subjects but this week finally the blue damselflies are out so things are looking up:)
 
Glad that you are getting there Nick as we have said before it doesn't really matter what kit you use as long as it suits how you work and you find it easy to use

Absolutely.

I know what you mean about the tripod I havent used mine yet this season I have either been laying on the ground or bracing myself on the knee
It just takes to long to get the right angle and background if I have to mess around with a tripod
I also find it hard to stabilise the camera tho if I can't do that tho and have to hold it freehand am not getting many sharp shots
I have been struggling to find subjects but this week finally the blue damselflies are out so things are looking up:)

Glad you are finding subjects now.

It's tricky isn't it, sharpness versus speed to get into position. I'm using flash to get round that (for invertebrates), but that has its own problems of course. Other things being equal, I very much prefer natural light, but I simply can't get good sharpness a lot of the time hand-held in natural light (for invertebrates - it works better for botanical work, but that is generally much less magnification - bare lens and 500D for botanical, Raynox 150, 250, 150+250 and MSN-202 for invertebrates). Also, the light has to be pretty strong for me to get a fast shutter speed at minimum aperture, and if it is that strong I tend to get problems with dynamic range/contrast and start to need fill flash to calm that down. This again is with invertebrates. I often use larger apertures for botanical work, and the subjects don't (apart from some glossy leaves, which are a nightmare) have highly reflective surfaces like some invertebrates do. From the technical perspective, I find botanical a lot easier. Aesthetics though - I think that is more complicated and subtle for botanical work than with invertebrates.

Anyway, no single best solution I think - problems with all of them. I think I'm (starting to) get more discriminating about what technique to use in what circumstances, and being more varied in the techniques I use. (Although sometimes for me, like with manual vs TTL flash, it's a case trying a different approach because I get exasperated with the one I'm currently using. I switch back and forth during a session.)
 
Yes you're right it's tricky to get enough light with natural light shots especially at higher magnifications
I was finding that early in the morning it's really difficult to get a decent shutter speed but the image stabilisation on the Canon macro gets me out of trouble normally :D
I do keep meaning to try flash but never seem to get around to it

I've been carrying around my set of tubes and achromat but it's always too windy to be worth trying as the subject is always moving a bit but haven't given up trying

I will post a couple of shots up in the week, I got lucky and discovered a good place for mayflies :)
 
Back
Top