Critique Final reflections - changing ISO

Messages
777
Name
Amanda Herbert
Edit My Images
No
Hi all,

First a huge thank you for a member in the film forum that sent some BW filters for me to play with. Such a kind and thoughtful gesture. I've not yet used them, but I will!

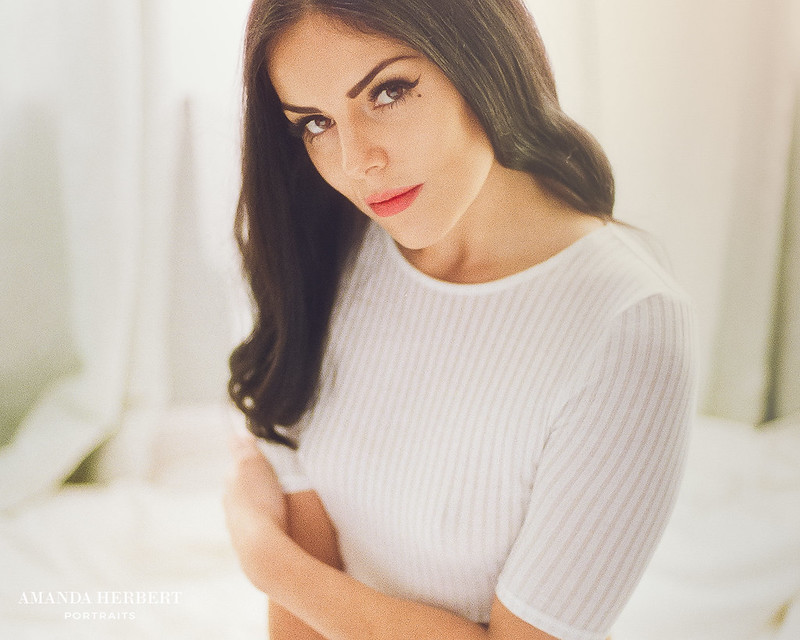
I've completed two portrait sessions using Porta 400 and tried the camera set on ISO 100 and 200.

Right at the end I then discoverd this article and here, which helped me me decide I'll be keeping to ISO 200 on the camera, but also still over exposing at times. I still feel my pictures are slightly underexposed, or it might be that I miss my reflector / flash to light up the eyes more. I'm also going to try my Sigma on the f100 and return to the 100m macro in the future.

Happy for CC, but not on the models please.

#1 Set at ISO200
Amanda Herbert Photography by M@ndy, on Flickr

#2
12994359_1048062005267706_3440510415578168249_n.jpg


#3
12993479_1048781661862407_7845299800305757964_n.jpg


#4 ISO 100
Amanda Herbert Photography by M@ndy, on Flickr

#5
Amanda Herbert Photography by M@ndy, on Flickr

Can someone remind me - what are the benefits of changing up the ISO i.e. If it is a darker day, is it better to use ISO 400 to 100 to add more light? If I'm in a dark room and I want to keep to shutter speed 125, I'd use a faster ISO right? Sorry, I know I should be clearer on this!

Thanks Mandy


With this set, Mandy, I'm in you fan club!
…that Mandy Magic again!:)
 
#1 too central - my eyes are drawn to the black area in the top right corner - crop to the step in the wall.?

#3 too central for me again - and crop all the light wall down the LHS

however they are all very well done - so perhaps ignore me....:)
 
The combinations of red and green in the first three are gorgeous.

I do agree that the first one is unbalanced a little by being central. I've been holding up my fingers to my screen, and feel that it could lose either the left fifth or so, or the right fifth or so, and feel much more balanced.

On the other hand, I think number 2 is enhanced by the centrality.
 
Love the poses in #6&7
You need to dial down the hotspots on the nose ring #6. It's very distracting.
#7 quite a lot of dust on the neg here. Did you develop yourself ? If not you need to have a word with lab.
Exposures look good. Try and expose the whole roll with the same ISO, after all the frames will get the same development.

Thanks for that tip - I'm going to stick with one approach now - I just needed to see what film does in different situations.

I sent the film to a lab. I decided to keep the dust spot things because I'm wanting an honest image for this forum. I have removed a crease from the curtain mind. In other images that I probably won't share I went the whole hog and added lens flare to the jpeg.

Thanks for commenting Trevor, Mandy
 
Can someone remind me - what are the benefits of changing up the ISO i.e. If it is a darker day, is it better to use ISO 400 to 100 to add more light? If I'm in a dark room and I want to keep to shutter speed 125, I'd use a faster ISO right? Sorry, I know I should be clearer on this!

Well, technically you can't really change the ISO of a film; it's an agreed international standard. Under normal conditions, the ISO of Portra 400 is, well, always 400.

That said, negative film often has a lot of latitude, especially for overexposure, so you could shoot the film as if it were ISO 100 or 200 and get perfectly useable—if not preferable—results, but you haven't actually changed the ISO (although that's what you tell the camera), you've changed the exposure index (EI).

When it comes to shooting in a dark room, I'd try my darnedest to still get enough light and keep the same EI if you can. If anything, in a dark room, especially with artificial lights, you need to shoot at a slower speed or you'll get colour shifts.

If this isn't possible, however, Kodak Portra 400 has some of the best underexposure tolerance of any film emulsion out there and the film also pushes relatively well (developing longer), but I'd be using a monopod, tripod, or flashgun before resorting to underexposure or pushing. Black and white film tends to work better for shooting at faster EI and pushing (e.g., I often use Ilford HP5 shot at EI 1600 and pushed three stops in development to 3200).

Right at the end I then discoverd this article and here, which helped me me decide I'll be keeping to ISO 200 on the camera, but also still over exposing at times.

I'm confused here. If your exposure index is anything lower than 400, then you are always overexposing or are you saying something different?
 
I think the confusion is between ISO in digital cameras - where changing the ISO actually changes the sensitivity of the sensor - and ISO in film, which is fixed, but can be compensated for by different exposure+development.

Basically, @manda , I'd shoot at box speed unless you have a really good reason not to. I tend to shoot 400 film at 320 because film usually deals better with overexposure than under, and old shutters tend to run slow, not fast.
 
As above - the ASA/ISO sensitivity rating of film is what it says on the box.

The ASA selector* on the camera jut tells the camera's meter what film you have put in it, so where it's 'coupled' to the shutter & aperture controls, it can 'balance' the exposure triangle for the metered light level for set aperture & shutter settings, or if you have coupled Automatic Exposure, set one or both for you.
Changing the ASA setting on the camera, then, wont change the actual film sensitivity, just the calculated exposure - which can useful for exposure compensation.

*I say ASA 'selector' - I do have a couple of old film cameras, where the ASA 'dial' doesn't actually do ANYTHING! It's just an aid memoir so that you can remember what film you have loaded when you look at a hand held meter to work out your settings! I think they were 'legacy' controls for the 'budget' versions of coupled meter cameras, where they didn't fit the metering components, but left the dial in place to save blanking it off!

That said, there is a technique known as 'Push/Pull' processing in film development. This does change the 'effective' film sensitivity, (of the whole roll). If you have a roll of say, 400ASA (box rated) film, you could expose it as 100ASA, 200ASA, 800ASA or 1600ASA in the camera; but then when you develop it**:-

"Pulling the Film" - If you ignored the 'box' rating of your 400ASA film, and exposed it as 100 or 200ASA, and then developed the film 'normally' to the instructions, you would get dense dark negatives, but, you could compensate for that by 'under-developing' the film; usually giving it less time in the developer solution, though can be done by using a more dilute concentration; and your negs come out lighter and less dense, closer to 'normal'.

"Pushing the Film" - If you ignore the box rating of your 400ASA film and exposed it as 800 or 1600ASA, and then developed the film 'normally' to the instructions, you would get very 'thin' light negatives, but again, you could compensate the other way, by 'over-developing' the film; usually giving it more time in the developer solution, or using a stronger concentration; and your negs come out darker and denser, closer to a 'normal;' exposure again.

** Way back when, as impoverished student; I used to buy bulk-lengths of cheap Croatian B&W or Slide film, box-rated at 400ASA. When high-street print film was about £3 a roll, bulk loaded slide film worked out about £1 a can; and I could home develop it in the kitchen sink, again, for about £1 a roll, rather than the £5 boots charged for a set of prints. Only 'niggle' was you got 20 rolls of film all of the same 'box' rating.. BUT, standardising on 400ASA, and using push/pull processing, I could rate any film, anywhere from 100 to 1600ASA, and it didn't cost me any more, which was handy, when 1600ASA Fuji (for low-light rock-gigs in the SU bar!) cost about £10 a roll! Just meant I had to label up the cans with masking tape, and carry a pencil to mark the ASA I actually shot each one at.... and hope the lable didn't fall off!

I used push-processing as an economic expedience; it was a heck of a lot cheaper than buying very fast film! But trade off was over-developing tended to dramatically increase 'grain' and increased contrast, and lost colour 'subtlety', compared to using box-rated film of the same speed. Looking back over some of those old photo's now; its quite apparent that the cheap film-stock I standardised on was far from wonderful to begin with, and pushing it that much only made it worse!

More usually, push/pull processing was offered by Pro-Labs as a 'recovery' for over-sight; if you had swapped films and forgotten to change the ASA selector, so exposed a roll of say 100ASA at the rating of the last film loaded, maybe 400ASA, they would 'push' it for you to 'correct' the mistake. High-Street labs, often suggested they could do the same, but changing the developing process for a single roll of film tends to mean a 'one-off' in a dev-tank, rather than through a dry-to-dry machine; so more often they would run it through at box rating, and add 'correction' when the negatives were printed, over or under exposing the print, relying on the 'exposure latitude' of the film to get a decent picture off it...

That again, 'exposure latitude' offered a bit more scope for correcting exposure in development, and 'cheating' the box sensitivity some more. Not possible with colour slide film, where the negative is your final positive image; but making prints from B&W, you could possibly 'push' a box-rated 400ASA film to the 'equivalent' of 3200ASA, with two-stops of 'push-process' in development, to get negs about a stop under-exposed, then under-exposing the print made from that neg to get that stop back.. but on cheap Croatian film stock and paper, by that point, pictures are becoming almost 'lithographic' Black OR White, rather than shades of gray 'mono-chrome!

All interesting stuff, and a lot of 'fun' to mess with, taking control in the dark-room.. which these days you don't even need, if you scan from neg. all you need for home development is a changing bag, developing tank & spiral, the correct chemicals for your film, maybe a thermometer if you are doing colour print or slide, a clock and a kitchen sink.

However; point is, the Box 'sensitivity ASA/ISO rating' of a film, is what it is; It's calculated from how much light is needed to make a silver halide crystal turn a 'mid-grey' of a certain size. the latitude and response curve of the film, around that mid-point then give you the 'dynamic range', and these are similarly fixed by the box rated sensitivity. Push/Pull processing, doesn't change that basic property of the chemicals, hence why push--processing increases grain & contrast and reduces colour subtlety, even though you can change the 'effective' rating in the results you get.

Interesting to note, IN DIGTAL, the ISO setting is not doing anything a lot different!

In a Digital 'sensor', light falls on a receptor, and you get an electrical 'signal' from it. So the ISO 'rating', just like for film, says what light level you need to get a 'signal' that represents a mid-grey pixel value. When you change the ISO setting on a digital camera, you don't ACTUALLY change the 'sensitivity' of the actual sensor.. that is what it is, like the box rating on a roll of film. I think for most cannon sensors that sensitivity is ISO80, on Nikon ISO100.. when you change the ISO setting, what the camera actually does, is change the 'gain' on the signal amplification... it turns up the volume for want of a better description, so the same 'threshold' signal value that represents a mid-grey pixel value, is achieved with less light... just like 'push-processing' a roll of film, making under-exposed silver halide crystals go darker! Only reason that t doesn't have the same drawbacks as push-processing, is that a 'pixel receptor' is a pixel receptor and unlike a grain of silver halide, its size doesn't change, while the electrickery looking at the receptor signal values to work out what the pixel values should be, can change the response curve to offer different contrast responses.... until the signal is so weak it 'struggles' to discern between different thresholds and you get 'noise' instead of grain.
 
Thanks so many useful and detailed responses - I just know that I'll be returning to this thread again and again.

@Keith - I might just start using 400ISO and over exposing it slightly. I've another blog somewhere that described how far you can overexpose film.

@RJ - I've one more set with more orange skin tones and was wondering why - there will be a colour shift just as you described! Thanks for solving that mystery. I use a monopod with digital, but might have to start with my F100 too. I know the sweet light is 60sec, but I'd restricted myself to 125sec as I know this speed works well with my shaky hand. I've done a couple of test shoots with flash and monobloc, but I've enough to learn with natural light!

@Mike - the BW shots came back 'weak and thin' and I had too add contrast in LR. Now I know why (I did tell the lab what my settings were).

So much to think about! Mandy
 
#8 Last one - I attempted this with my digital. Failed and left it with frustration. I know I dialed in +3 stops of overexposure plus ISO 200 or 100. This was the set with mixed skin tones. But blow me - film nailed the shot!

Edit - I'm sure no one cares by now, but I remembered this was shot on a roll of Porta 800.
Untitled by M@ndy, on Flickr
 
Last edited:
I think these are all great work, Amanda. Exposure seems fine on all of them... except possibly no 7? I'm sure the dark RHS was your intent, but it seems to me you've lost any detail in the back of the model's head, which has an odd effect. Might be possible to lift in PP? (Although I can't see anything there at all in the web version.) I'd guess that exposing a bit more for that shadow area would not have caused too many problems in the highlights; film doesn't "blow the pixels" like digital does.

No 1, I agree with John that a crop might help. Agree with Keith on the red over green. In fact, the colours are gorgeous throughout. Which lab did the processing? I'd bet against UKFL from the look!

Personally, I'd stick with shooting at 320 or 250, process at box, unless you really need the wiggle room (darker situations). AND expose for the shadows. Works for me... but I'm not in your league otherwise!(y)
 
@chris - spot on with #7 This was the most complex lighting situation and one that I'm learning.

I can pull some background in, but didn't want to - namely because the radiator on the back wall annoys me!

Again, I prefer the film version to the digital in this high contrast situation. Reviewing the session, I'd already decided I'd need to refine the lighting for this series, and the film images confirmed this.

In general, the digital images won hands down though. Including those from the blonde haired girls session.

Lab was AG-labs. Even with the scratched and water marks on #7 I've been happy with them so far.

Note, I also add adjustments to the Jpegs from the lab.

Thanks for your feedback, Mandy
 
These are stunning, Amanda. :) I can't anymore than that, except perhaps that the first one has the most incredible tones. Well done!
 
I saw these on Flickr Amanda and they're really not doing my film itch any good whatsoever, simply fab. There's a lot of very interesting info too here that I think I shall digest too before having a go. The tones in these are just lovely.
 
Amanda, lots of discussion in this thread, bottom line is that these are really excellent images! You are very effectively demonstrating the power and validity of film.
 
Excellent work, keep it up as you are! You really can't overexpose C41 in normal usage so just find the spot that gives you the colour results you want and the grain quality you want. Shooting half box speed has always been good to me, and gives you extra leeway with underexposure. (I.E. If you accidentally underexpose a stop, then your still only shooting box speed).
 
I do love that third shot, great colours, well composed, well framed, well done!!
 
In general, the digital images won hands down though. Including those from the blonde haired girls session.

I was surprised at this, given the tone of some of your other comments! Since the film images are pretty darned good, IMHO, the digeri ones must have been completely stunning... ;)
 
I love the first three. The colours in the set complement the colour of the model's hair. As someone said, the first one does have that dark shadow at top right, but it doesn't bother me much. All beautiful portraits.
 
Love the first three, beautiful model, superb photographs.
 
Correct the film was on the right - you can see the hair retains the texture and the wall is a truer colour! Thanks for playing! Mandy
Heh. That was my initial thoughts to be honest, but would have been a guess either way in the end! :)
 
Too late for me to play before the reveal, in truth I had no idea, but I preferred the one on the right for the way the colour above the hair and to the left is rendered.

One thing that is interesting is how in general the colours on the two images are very similar. There are so many variables in the film process, from film through processing and particularly to scanning, that I find colours, though somehow internally consistent, can be at odds with my memory, and often with digital comparators. We did do a thread for a while, showing film versus digital comparison shots, but it died a year or so back.
 
Thanks for that tip - I'm going to stick with one approach now - I just needed to see what film does in different situations.

With B&W.. pick a film, or a couple of films that work for you, use one developer and get used to it. It's about consistency and the only way you can do that is to get to know films and developers. So many photographers spend so much time searching for the perfect methods that they end up placing more importance on the processes than they do the photography. Stick to one approach/film/dev combination that works for you. People are always telling me there are better developers than HC110, and they may be right, but I KNOW HC110... I can get perfect negs every time that print perfectly on grade 2, no matter what conditions, lighting etc. I've tried others, and just end up feeling I need to start that learning process all over again, and what for? I can't say the results were any better than I get with HC110.

Stick with what works and get to know it intimately.
 
Correct the film was on the right - you can see the hair retains the texture and the wall is a truer colour! Thanks for playing! Mandy
Haha, saw this 'guess which is film' on Facebook, didn't want to embarrass myself ... I never would have been able to guess. :)
 
Back
Top