First Attempt With Home-Made Pixel Stick

Messages
1,796
Name
Rich
Edit My Images
Yes
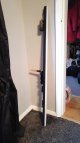
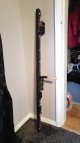
After seeing someone on here using a Pixel Stick i really liked the idea of having one, but i don't think i could warrant paying a couple of hundred quid for one, and after looking around the internet found a really good tutorial on how to make your own using an Arduino (like a Raspberry Pi)

So last year i decided i wanted a little project to keep me busy over the Xmas break, so i decided to make myself a Light Painting Stick................... £30 later and a few weeks of building and trial and error i finally have a working Light Painting Stick, then i just needed a break in the weather to get out and use it

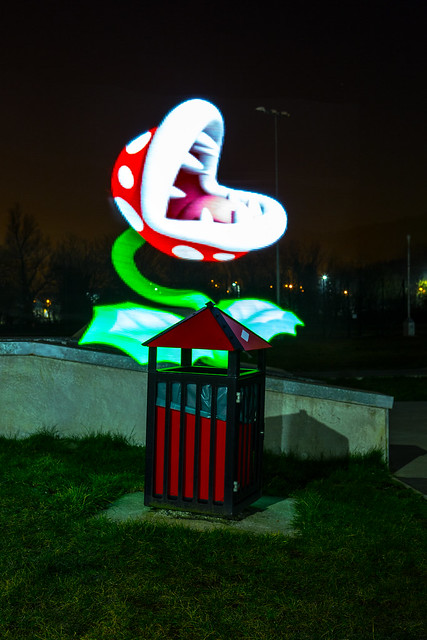
So last night i finally got the chance to meet up with a mate to have a little play with it, this was about the best we came up, but i was quite impressed with it considering how much it cost me


Light Stick Silhouette
by Richard Smith, on Flickr
 

Pretty cool… the silhouette!
Nice fluid movements and colour rendition.
 
I like that!
 

Pretty cool… the silhouette!
Nice fluid movements and colour rendition.

Cheers, i was quite pleased with how well it came out in the end, it took a few attempts to get the movement right, and i was really pleased how the well the colours came out too, really bright and vivid as i'd hoped
 
Silky smooth lights and a cool silhouette.

Could you link the tutorial on how to make your own please
:ty:
 
Silky smooth lights and a cool silhouette.

Could you link the tutorial on how to make your own please
:ty:

Cheers, and yes, here is the link to the one i created

https://learn.adafruit.com/neopixel-painter/overview#

Luckily i work in a firm with our own software department, so one of the guys from there helped me to make a few tweaks to the code to make it a bit more user friendly to use, i'm fine with the mechanicals (hardware, electronics) of it, but software just baffles the hell out of me, but the standard code in the tutorial does what you need, it's just not that intuitive, but for £30 against £250 for a pixelstick, i know which i prefer ;)

Thanks for the link :)
I want to try something like this but as it would probably be used just a few times (like my home made light orb) I'm totally with you. 250 is a big no no .
 
That's really great and something I would like to have a go with myself too. I'll keep an eye out for any more you want to post.
 
That is neat ;) and well done for the DIY job too (y)
 
Thats amazing, I'll take a look into creating one of these now :) Thanks for the share
 
Just out of interest really, do you have any pictures of your actual light stick completed?
 
I dont suppose you have a list of items and places you purchased them from?
I cant get anywhere near the £30 for all the needed products
 
Just out of interest really, do you have any pictures of your actual light stick completed?

I will get some photos of it tonight....... if i remember ;)

I dont suppose you have a list of items and places you purchased them from?
I cant get anywhere near the £30 for all the needed products

eBay mostly, plus i had a few bits knocking around, but the main part id the LED Strip i paid around £20, Arduino Pro Nano was about £3.50, SD Card Module £2, Battery Holder was £3, 5A Power Regulator £5

Pretty much the rest of it was wood, screws, brackets (for the handle) foam board, elastic, wiring, most of which i already had, but shouldn't come to much more than another £10-15 i would guess

So yes, maybe a little over £40 if doing it from scratch, but i do a fair bit of DIY and made use of lots of left overs from the garage ;)
 
I will get some photos of it tonight....... if i remember ;)


eBay mostly, plus i had a few bits knocking around, but the main part id the LED Strip i paid around £20, Arduino Pro Nano was about £3.50, SD Card Module £2, Battery Holder was £3, 5A Power Regulator £5

Pretty much the rest of it was wood, screws, brackets (for the handle) foam board, elastic, wiring, most of which i already had, but shouldn't come to much more than another £10-15 i would guess
Thanks for the breakdown, :)
 
Just out of interest really, do you have any pictures of your actual light stick completed?

Sorry, not the easiest of thing to photograph, but here are a few phone snaps of the finished article
 

Attachments

  • 20160302_172445.jpg
    20160302_172445.jpg
    91 KB · Views: 108
  • 20160302_172504.jpg
    20160302_172504.jpg
    82.6 KB · Views: 100
  • 20160302_172522.jpg
    20160302_172522.jpg
    71 KB · Views: 101
Can I ask where you bought the LED strips from? As I've seen some strips that are 12v and others at 5v and not sure which are the one's to use.

G

Sorry, only just seen this, been away of holiday for a week

These are the same as the ones i bought, and they are 5V, they are powered by 8 rechargeable AA batteries, but they go through a 5V, 5A UBEC (link also below), this will convert up to 24V down to 5V with a maximum current of 5A

http://www.ebay.co.uk/itm/WS2812B-5...hash=item3d13537ae2:m:mtFTdfEEM8Z7jAvf8G2cTPw

http://www.ebay.co.uk/itm/Turnigy-5...106506?hash=item2c84795a4a:g:vy8AAOxyOalTXVTG

Thanks :)
 
Some brilliant tips in this post. I have made the one designed by Michael Ross - http://mrossphoto.com/digital-light-wand/
I just need to tidy it up now and sort out a better portable power supply and it will be up and running. I am trying to source an aluminium strip to mount it on which will take the 12mm width of the led strip.
 
Pretty good for a homemade stick :)
Tutorial looks relatively easy too - tempting.
 
Some brilliant tips in this post. I have made the one designed by Michael Ross - http://mrossphoto.com/digital-light-wand/
I just need to tidy it up now and sort out a better portable power supply and it will be up and running. I am trying to source an aluminium strip to mount it on which will take the 12mm width of the led strip.

Funnily enough, this weekend i finally finished off my MKII version, made from a length of Bosch Rexroth 30x30mm Aluminium Extrusion (luckily i work in Engineering, so can get reasonably easy access to this stuff), and the LED strip (including the Silicone sheath) fits down the slot perfectly, a few holes here and there to make the wiring nice and neat, and viola, an almost indestructible PixelStick

If i remember later i will post some photos up, but we are supposed to be going out with it tomorrow night, so hopefully will have a few more shots to show off later in the week
 
All that looks really cool, and I may even give it a play. I have a few idea and they won't be costing £300. All that said I would still love to have a play with one of the "real" ones though.
 
Parts on order:)
I had a play with @MWHCVT 's pixelstick a while back and was impressed but can't justify a proper one, plus building one should be quite satisfying.
 
Looks like i might have started a "movement" lol

But yes, the functionality won't be up to that of a genuine PixelStick, i do however have the luxury of working alongside a few Software Engineers who know what they are doing regards programming, so i have had a few tweaks made to make mine much more user friendly that the standard code you can download off the Tutorial ;)
 
Can you select what image it shows or does it just scroll through the images on the card?
What did the tweaks do to your code to make it better?

I'm wondering if there is a way to connect a small screen and buttons to select images or if it's best to have a load of small cards with say one or two images each.

Much thinking going on.
 
The standard code just cycles each image as you press the button, which is ok if you only have a few images

The changes i have made means that you need to long press the button to cycle the images, and each time you do this another LED lights up, so if you want image 8, long press 8 times till 8 LEDs light up

But it's not quite as simple as that, as normally long press makes the current image repeat, so now if i want to make an image repeat, i have to single press first to start playing it, then let go and then long press before it has finishing playing (sounds trickier than it actually is)

The other main tweak i have had made is that normally during start up it goes through each image and writes each individual images brightness into a separate file, this takes ages, so now on mine i have to hold the button before power up to do this brightness check, which is only required if i add any new images in

So now i can switch it on and play images almost instantaneously, it also helps save battery power too ;)

There are definitely ways to attach screens and multiple buttons etc to do a lot of the selection etc, a friend of mine has also integrated a remote camera release into his, as well as beeper to help him keep pace when walking
 
Last edited:
Back
Top