Tutorial Layer masks - a beginners guide

Hacker

TPer Emeritus
Messages
7,625
Name
Colin
Edit My Images
Yes
Hacker submitted a new resource:

Layer masks - a beginners guide - Layer masks - a beginners guide

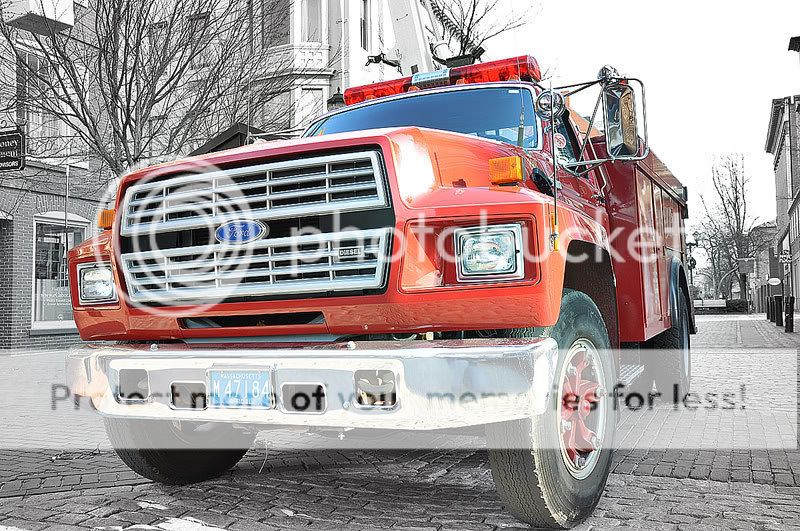
I've often seen posts on here about layer masks and the confusion that surrounds them particulalry for photographers new to digital editing and Photoshop and I remember when I first started I just couldn't get my head around what people meant so I decided to put together this quick tutorial as an introduction to layer masks.

Open your image and press CTRL + J to duplicate. For this tutorial I am using a layer mask to make a selective colour image from the original but you can use this method...

Read more about this resource...
 
Last edited by a moderator:
Thats a great guide Colin.
I'll add a couple of extras if I may.

You dont need to use the eraser in the mask, but can simply paint in white / black

Some useful keys are:

  • "B" selects the brush tool
  • "D" resets the foreground to black and the background to white, ideal for painting on a mask
  • "X" to switch between the current foreground and background colours
  • "\" shows (toggles on off) the current mask as an overlay on the image. Click on the image in the layer you are interested (not its mask) and then hit "\" you can then paint/change the mask overlay as it appears on the image
 
Excellent guide Hacker. Now I at least understand what & how Layer Masks work, will have to give it a go.

(y)(y)
 
Nice one Hacker :clap: - so you're a Teacher then?

A couple of weeks ago I gave a lecture in school for an hour on photography - the staff member walked me out afterwards telling me I'm a natural teacher - I couldn't decide whether to feel insulted or not! :shrug:

Took me ages to get the hang of using masks as initially I couldn't see the point, right up to when I needed to make a change to something and then couldn't :bang:

My tip - follow Hacker's tip

BTW - any chance of a tutorial on how to get my teenage daughter to tidy her room? :thinking:
 
My tip - follow Hacker's tip

BTW - any chance of a tutorial on how to get my teenage daughter to tidy her room? :thinking:


I'll come back and read this when i dont have headache...
as for your tutorial Dave...there isnt one!!! :D
Im 23 and my mum has now stopped asking for me to tidy my organised mess" cos I know where everything is...she doesnt. It stops parents rummaging..lol
 
Great stuff there Colin, (y)

So, that explains nicely 'How to use' the Layer mask but what Id like to know is 'Why' use the layer mask?

I already use the Duplicate layer/Eraser method for Selective Colouring and am happy with that, so would you/someone please enlighten me further as to 'when' or 'where' or 'why' (outside of Selective Colouring) that you use Layer masks as opposed to just working on a duplicate layer?

As you can probably tell Layer Masks is an area I need to familiarise myself with.

Trust me to throw a spanner in the works, eh!
... theres always one isnt there, and according to an old teacher of mine ... I was always it! :D
 
Thanks Hacker
Explanation with proper pics (y)

I also do selective colouring by using the Duplicate layer/Eraser method, so would also be intrested in why use Layer mask as the outcome is the same.
 
Thanks Hacker, this looks good and will be really useful when I'm not at work and can actually see the images!
 
great tutorial!
thanks, Colin ;)

as we agreed I've added it to my tutorials site along with the others you "prepared earlier"
 
Thanks Hacker
Explanation with proper pics (y)

I also do selective colouring by using the Duplicate layer/Eraser method.

Me too but looking at the tutorial the first thing that stands out for me is that using layers will allow me to go back and put stuff back in which using the eraser I can't.

Andrew
 
Me too but looking at the tutorial the first thing that stands out for me is that using layers will allow me to go back and put stuff back in which using the eraser I can't.

Andrew

Beat me to it there Andrew - but that's exactly the point.

Using layer masks like this is non-destructive, when you use the eraser tool that info has gone; whereas with a layer mask it's still there just hidden, so fine adjustments are possible again & again

Years ago it was after spending ages on an image I realised I'd erased a bit of something and couldn't get it back, I asked my PS guru for help and he said "You know those layer masks I keep on about..." :bang:
 
Using layer masks like this is non-destructive, when you use the eraser tool that info has gone; whereas with a layer mask it's still there just hidden, so fine adjustments are possible again & again

I think I will be using layer masks from now on ;)
 
Glo, they've all beaten me to it! Also with layer masks you can switch between the foreground and background for detailed adjustments, something you couldn't do with the eraser tool.
 
What an excellent guide, just tried this same effect on a wedding picture I took a while ago, great for making people stand out.
Thankyou
 
Top guide! (y)

I'd never even tried it before, or even knew what it meant! :(
 
Have always wanted to know how to do this, going to have a play :D Thanks Hacker
 
Great stuff - here's my first effort.

3163747062_3e3cb33c2d_o.jpg
 
Last edited:
Does anyone have any tips for using Paint.net or GIMP as i have only just ventured into the realms of post editing and haven't splashed the cash for PS yet?

Any help for a newbie much appreciated. :cheers:
 
trying to follow this guide as i'd like to learn this... i can't seem to get it right i am proberbly over looking something not sure what though. I create a new layer but when i desaturate layer1 it does it with the other layer also and i can't seem to work out why. any one have any ideas as to what am doing wrong?
 
Thanks for the tutorial, I've just joined as I've just started in digital photography.
I followed your guide and after a few mistakes got it right....
The problem I am having is saving the finished image...
when it is saved in the folder, upon opening the image it opens up in Photoshop, how do you save it so it is just like my other images in the folder ?
IE viewable in windows viewer
Thanks
David
 
Great tutorial, thanks! I was thinking just yesterday "hmm, how can I get a good result with a colour subject and a black and white background!"

So this has been very useful :)
 
Gimp doesn't do layer masks :(

Krita does - so I'm told - so there may be a package for us linux/freetard people.
 
just got PSE8 for mac
giving it ago for the first time

but i can't find:

Click on the Layer mask icon, don't seem to have it

Also tried to set it as B&W as a trial, but no luck?

1.Desaturate Layer 1
2.Click on the Layer mask icon
3.Ensure your foreground colour is set to black (I've made it red in this instance to show which is the foreground colour)
4.Select your brush
 
This never works for me :annoyed:

When ever I paint over the layer, it stays the same.
The colour doesn't show through :dummy:

Dis-regard.

I'm a muppet, and had the wrong brush mode :wacky:
 
Last edited:
just got PSE8 for mac
giving it ago for the first time

but i can't find:

Click on the Layer mask icon, don't seem to have it

Also tried to set it as B&W as a trial, but no luck?

1.Desaturate Layer 1
2.Click on the Layer mask icon
3.Ensure your foreground colour is set to black (I've made it red in this instance to show which is the foreground colour)
4.Select your brush

I may be wrong about this, but I dont think Elements supports masks. However, I remember reading about an add in (plug in) that will allow this. Hopefully someone with more knowledge of this than me will be able to help you. Good luck.
 
oh, anyone know how to do a partial picture in colour and then black and white within elements?
 
oh, anyone know how to do a partial picture in colour and then black and white within elements?

One sugestion but there may be a better way.

Open your image and CTRL +J (dont know the MAC equivalent) to make a copy layer.
Select the section you want to change using magic wand or whatever you feel is best for you.
go to. Enhance>Adjust colour>Adjust Hue/Saturation
Reduce the saturation slider to -100 (or whatever suits you)
This will take the selected section to black and white.
When your satisfied, flatten layers.

The downside is you cant select areas to put the colour back in the same way you can in CS masks so you need to be extra careful when you make your selection.

This is based on my slight knowledge of Elements 7 but I rarely use it now, I would think 8 is similar but I havent seen it yet.

Hope this helps and maybe someone with more knowledge can come up with a better way.
Good luck (y)

I believe Elements 9 now does layer masks - have just bought it but not yet had the chance to try it.
 
Just having a troll thro the tuts and noticed that no-one has mentioned that you can use any shade of grey from white to black for your Mask brush.
In effect this subtly varies the opacity of the mask and you can get Very fine edge masking this way.
J
 
Just having a troll thro the tuts and noticed that no-one has mentioned that you can use any shade of grey from white to black for your Mask brush.
In effect this subtly varies the opacity of the mask and you can get Very fine edge masking this way.
J

Well you can do, but I find it easiest to adjust the hardness of the brush.
 
Back
Top