Home made Light Box Mark II – B – Base Update

Messages
2,767
Name
Barry
Edit My Images
Yes
Link to original light box: http://www.talkphotography.co.uk/forums/showthread.php?t=61584

I had some decent results using the original light box but was experiencing some inconsistencies with the black background due to the subject and lighting being so close to the back of the box.


Light Box Mark II

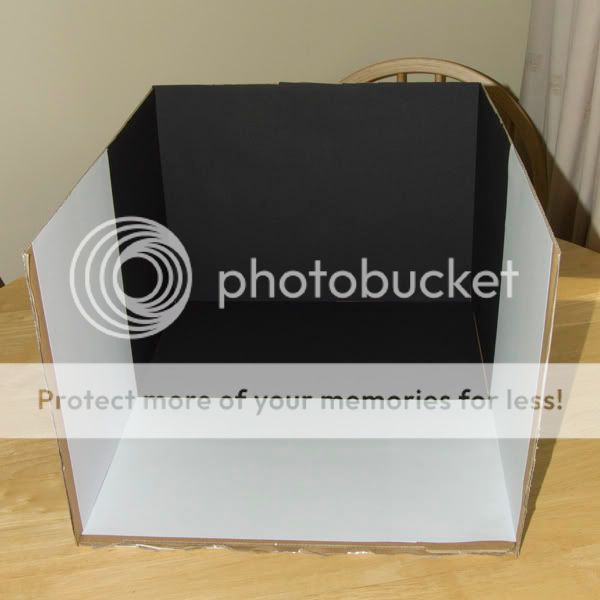
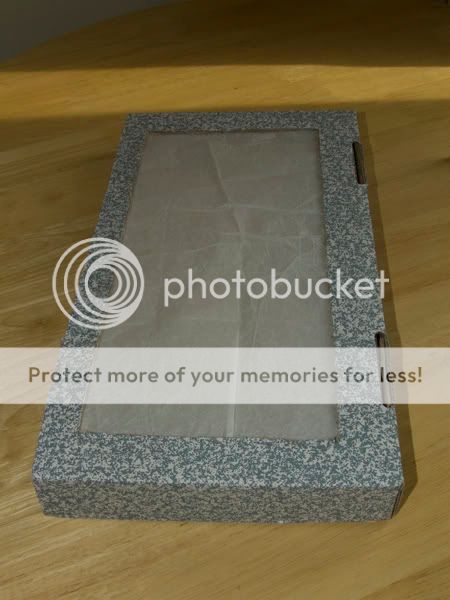
The box is one of those flat pack storage boxes with a separate top lid.


Making the light box

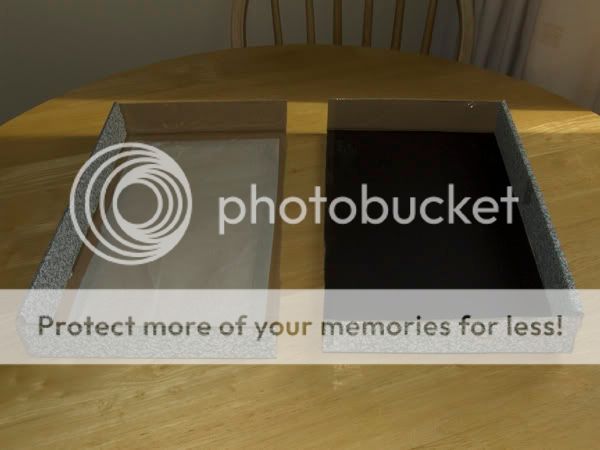
1. Cut out one end of the box. Glue to the inside black card to the back half and white card to the front half.

DSCF2072.jpg


2. Cut the lid in half.

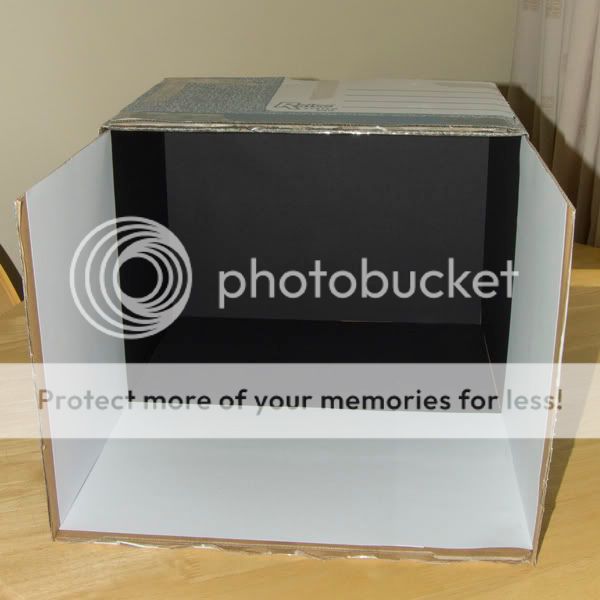
3. Back half of lid. Glue black card to inside face of the lid. I also glued the cut out piece from the front to the box to the top of the lid to stiffen it up as the light source will stand on this.

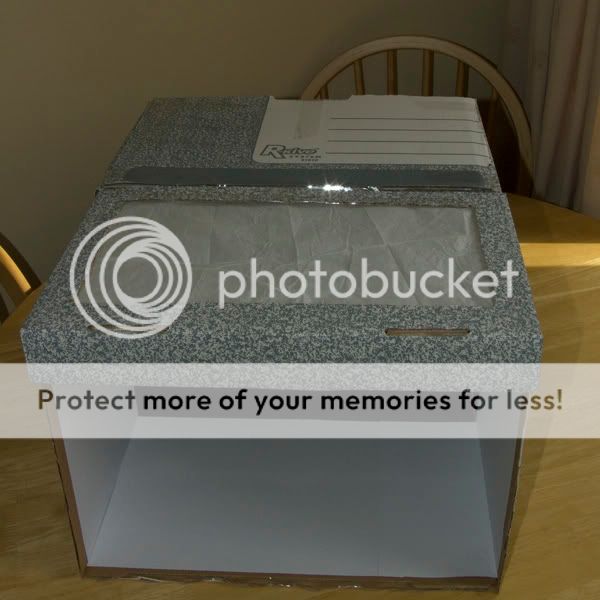
4. Front half of lid. Cut out an opening. Glue over the opening 2 layers of white tissue paper. This is to soften/diffuse the light.

DSCF2071.jpg


Picture of back and front lids:

DSCF2070.jpg


Picture of box with back lid fitted:

DSCF2073.jpg


Picture of box with back and front lids fitted:

DSCF2074.jpg


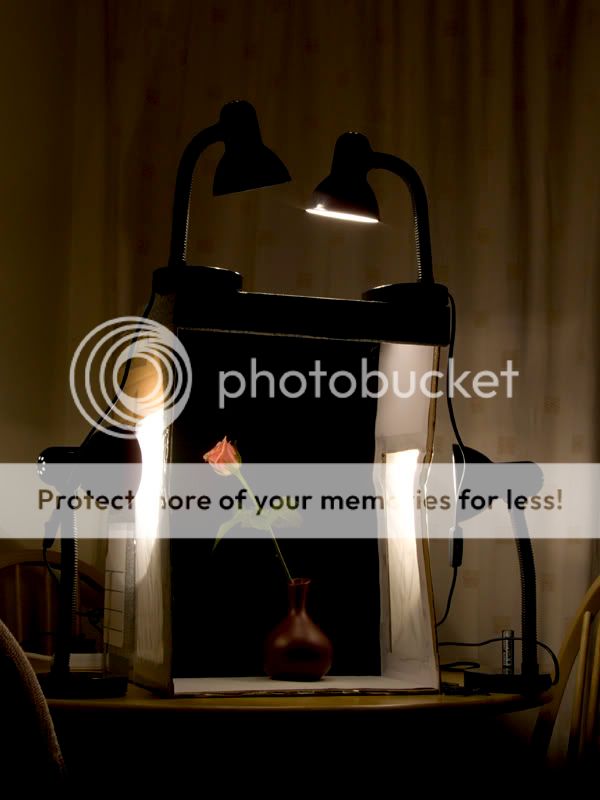
Picture of box showing single light source, more can be added if required.

DSCF2075.jpg


Light bought from Tesco for £2.99. I bought standard 40W bulbs and 40W spots. I found the standard 40W bulb gives better results.


Advantages:

The black of the background is solid due to no light contamination.

The lighting is more even and diffused.


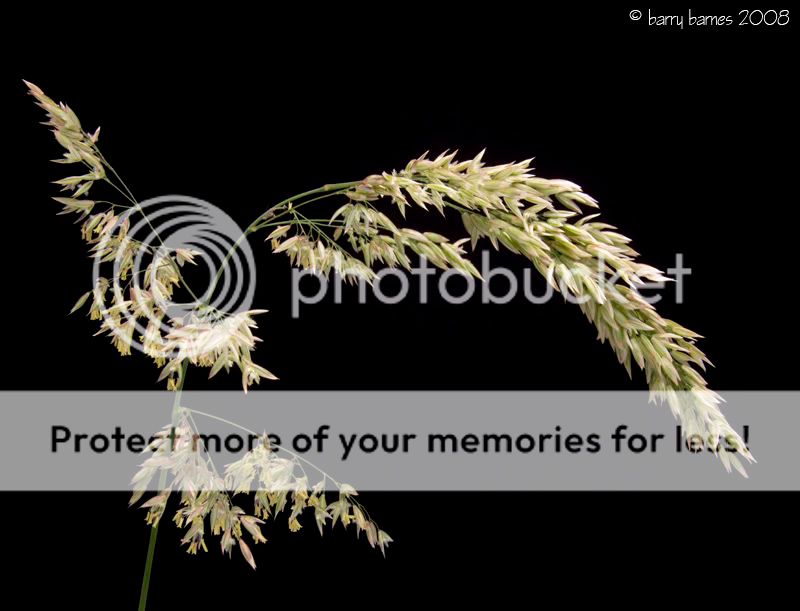
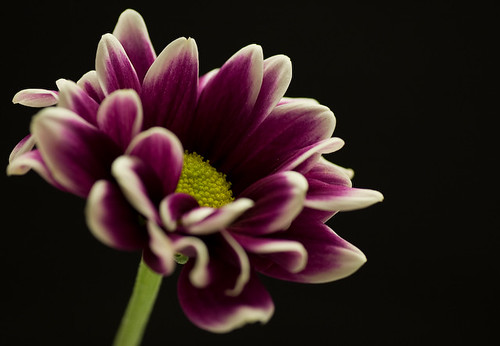
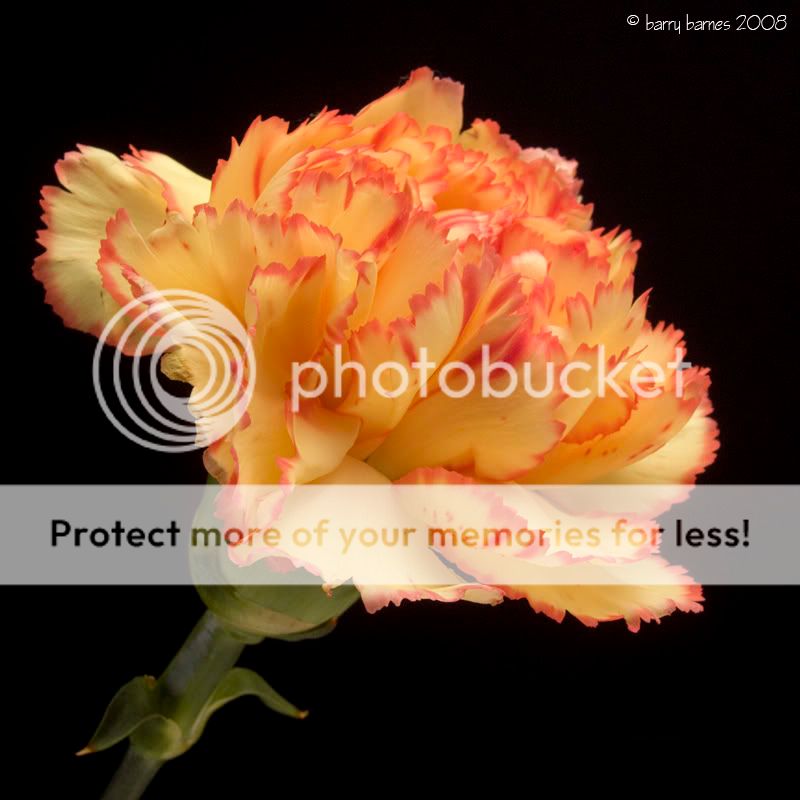
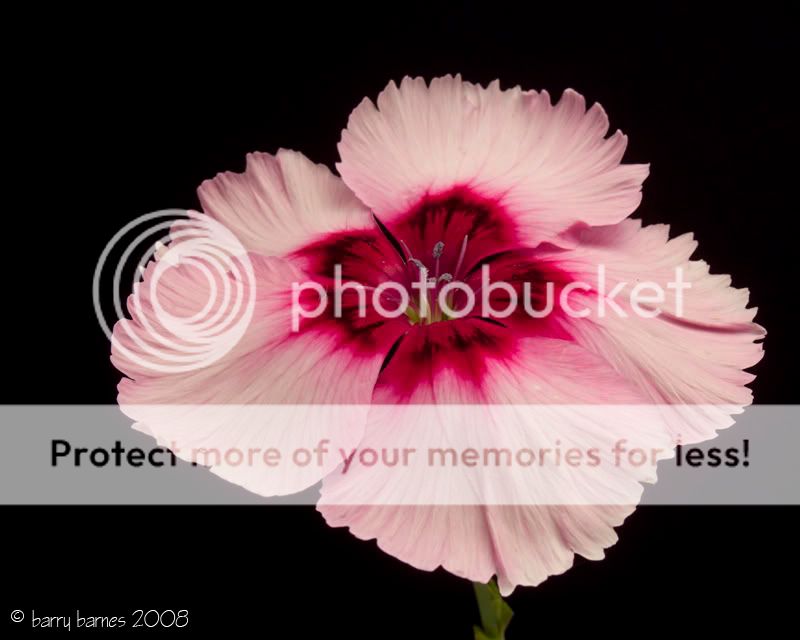
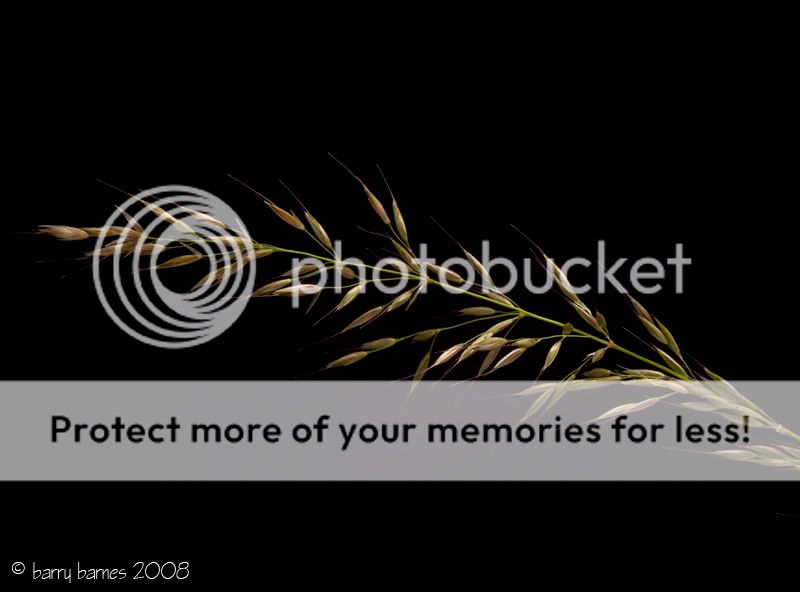
Some early example test shots:

DSCF2079-800.jpg


DSCF2020-800.jpg


DSCF2029-800.jpg


Fabric can be used instead of black card.

The white tissue paper can be removed or added too to change the lighting levels.
 
Great stuff - a practical and money saving idea. (y)
 
So simple its fantastic .... now where's those scissors?

Thank you

Gary :)
 
Love all DIY stuff! there's a pretty good book called 'Low budget shooting' by Cyrill Harnischmacher, makes you want to break out the scissors, tin foil and sticky back plastic!

Only problem is that was making a soft box diffuser... ended up with Tracey Island...:D
 
Excellent! I've been planning to build one of these, this past few days, but working some sort of system where I can interchange the background (change the card colours), and the use these freebie reflectors / diffusers that I got from Focus on Imaging and Amateur Photographer.
 
Thans for sharing your professional secrets with us Barry. You sure do get some excellent shots from the box. I'll be making one myself after summer, when theres not so much to shoot outside !!
:beer: here's to you !
 
Last minute decision to have a go at one of these, making do with whatever was in the house already.

2584423545_d37000ecbc.jpg

45mm with the kit lens : 4sec @f11.

2584433237_5ac6a03087.jpg

250mm with the nifty2fifty : 3.2sec @f11.

All I've done is load the RAW image in DPP, convert and save with resizing to 6x4" - added frame in Flickr.

Room for improvements here. There was ambient light in the room (mid-evening), lens choice not ideal for close ups, the lamp I wanted to use was in my sleeping son's bedroom, no light diffuser, nothing worthy to photograph and no black backdrop! Apart from that, ideal! :nuts:
 
Baz

:clap:Thanks for this great idea .... will save me looking like an :nuts: idiot jumping around my front room in pitch black setting off my only flash gun to try and get even subtle lighting.

Paul

[S1]Team Sony[/S1]
 
This is keeping me amused, even if no-one else...not sure on the white balance adjustment here, but again (other than WB) no processing except to resize in DPP and addition of the border in flickr:

2593098419_a844f384d4.jpg

47mm with the kit lens : 0.6sec@f7.1
 
ho no there is a upgrade !!!!!!!
i feel so outdated now :( i dint even get round to making Mk1, time to get my blue peter badge out :D :LOL:
 
Think I'm going to need to re-work mine...need more boxes!
 
Hmm I built mine this morning... but not getting the result I expected .. the lighting is all knackered up.

I used a cloth background from an old shirt but i think it was a little too old so a little too grey...

yellow-flower1.jpg


yellow-flower2.jpg
 
This is what I do with each subject.

All shots are taken in RAW, camera mode manual. ISO 100. Macro mode, (I have the Fuji 9600 with fixed lens).

Tripod with cable release is essential, (use camera timer if you don’t have a cable release)

Set the aperture for the desired DOF, (generally F8 for most shots).

I bracket the shutter speed from say 1.5 seconds through 6 shorter increments, so I end up with 6 shots of each subject. This depends greatly on the subject, light/dark.

In PS RAW I change the WB from ‘as taken’ to ‘auto’. This is generally enough to remove the yellow cast from the artificial light.

Another shot from the other night.

DSCF2259-800.jpg


Also now tried subjects other than flowers, see link: http://www.talkphotography.co.uk/forums/showthread.php?t=67420
 
Thanks Bazz, that is spot on, here is my first 2 subjects.

Well impressed, putting you down for an OBE.(y)

2682895315_07c46bbe4f.jpg


2683014061_0221fa4f8a.jpg


Cheers.
 
That is well neat! You know, I might give that a go . . . wonder if I could convert this abandoned project into a lightbox?

cardboard1.jpg


It was meant to be a toy castle for a female friend's 6 years old son, but then she became a mum all over again . . . with twins! The lack of space at her tiny 2 bedroomed house meant that this castle project was put on the backburner.
If converted into as a lightbox, boy, it would look very classy, not to mention decorative :D:D:D
 
I really cant see the sense in making home made light tents or boxes.
Ok..it costs you only a few quid in materials and a couple of hours to put it all together.

£3 + 2 hours @ £14 and hour = £31.

Ebay = £15..saving of £16.

I guess its good to mess around and be creative but i would rather sped the time taking pictures.

Cheaper from Maplin £9.99 at present
 
just thought might it not be also better to have screened windows on the side so the light is more controlable.
 
I really cant see the sense in making home made light tents or boxes.
Ok..it costs you only a few quid in materials and a couple of hours to put it all together.

£3 + 2 hours @ £14 and hour = £31.

Ebay = £15..saving of £16.

I guess its good to mess around and be creative but i would rather sped the time taking pictures.

2 hours? :shrug: Took me 10 mins to make mine with stuff I already had lying about. http://www.talkphotography.co.uk/forums/showthread.php?t=80583

Besides, with e-bay, you have to wait for it to be delivered. I made mine on a rainy day because I wanted to take pictures!


Cheaper from Maplin £9.99 at present

Yeah, plus £20 in fuel to go and get it! :LOL:
 
Thanks for all this info folks. Especially the settings you have tried successfully Barry.
Personally I like the idea of making stuff out of recycled materials. Great stuff.
 
Something satisfying about working with something you have made yourself..........specially if the photos come out well (y)

Do you just use the desklamps or use flash from the camera too?
 
Something satisfying about working with something you have made yourself..........specially if the photos come out well (y)

Do you just use the desklamps or use flash from the camera too?


Just desk lamps - 2 or 4 depending on the subject and lighting I want.

Make sure you change the white balnce to remove the yellow cast from the lamps.

I have bought a light box but prefer the results from the home made one.
 
excellent, think ill try one of these, you seem to have got some good results from it...
 
Base Update

Up until now I have been using a piece of glass over black card as a base for close up, downward shots. The problem was that the ‘weave’ in the card meant that I had to shoot using a faster shutter speed than I would like and to then bring up the levels in Photoshop.

I have now purchased a circular black lacquered tray, (Tesco’s), which allows for much slower shutter speeds whilst maintaining a solid black background.

Link here: http://www.talkphotography.co.uk/forums/showthread.php?t=82423
 
What's the glass for over the card? To stop water off your flowers dripping?

I like the idea - I have a use for it too, but wouldn't need to worry about anything getting wet! All dry subjects.

I like the idea of the black background, but a blue infinity would be good too, and the back of the box is just far enough away to prevent the card from being defined. Ideal solution to a shooting problem I had.

Many thanks.
 
this is a great idea, im now hunting around to find a suitable box with a lid. :)
 
Hi, Great idea, going to have a go, Few questions, do you need the white section? How long is the box and the black/white sections? I have a box but worried it to small. So would like some measurments and i will buy a new box. Cheers.
 
Back
Top