First lighting recommendations?

Messages
11
Edit My Images
No
Hi everyone. Long time reader, first time poster. Please, go gently!

I have been taking photos for years, but mostly a reportage style.

For the last couple of years I've been taking more studio style photos for my work as an independent knitwear designer. Between severe discomfort on the wrong side of the camera (I'm now also the model), moving house, and a general lack of experience with lighting, it's taken that long to find my style, but I think I'm finally there.

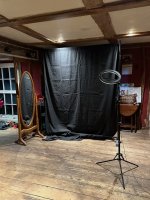
I typically shoot full body photos (using the remote timer, so I can hide the remote) in front of a plain black backdrop in a large, dark room. I also do headshots from time to time.

The goal is to clearly demonstrate the fit and details of the knitwear on the model, rather than to create something artistic - but I'd like to have the option to do fun stuff, too.

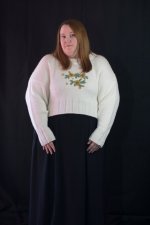
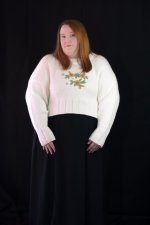
I did a session yesterday with a cheap ring light and a strategically placed mirror, and had to spend a lot of time lightening the subject in the edit. (Well, about a minute per photo, but it adds up!) The overhead light wasn't on for the session, and it was daylight, so there was some natural light coming from behind the mirror. Not much though.

I want to get a freestanding light (or two? with softboxes?) to address that, but I'm a bit overwhelmed by all the options. LEDs seem better, but since the photography is more of an add-on to the main event, would I get better value from fluorescent options?

I've attached photos of the space I'm working in (for now at least - we're renovating, so it may move around), and a before / after of a photo I was happy with from yesterday, so you can see what I'm getting and what the goal is.

Budget is... flexible? I don't have thousands to drop here, but I'd rather save for a while and eventually spend £500 on something that will work well and give me options for life than spend £100 on something that breaks in 2 years or limits me in some way down the line.

Thank you for reading all that, and for any advice!
 

Attachments

  • IMG_4053.jpeg
    IMG_4053.jpeg
    179.1 KB · Views: 68
  • 20231125(1 of 1).jpg
    20231125(1 of 1).jpg
    54.2 KB · Views: 68
  • 20231125(1 of 1)-2.jpg
    20231125(1 of 1)-2.jpg
    47.9 KB · Views: 67
Your ring light is junk, but you probably already know that:)
Fluorescent lights were popular a lot of years ago, but are nowhere near as good as LED. One of the problems with them is that they are physically large, which makes it impossible to fit any creative lighting modifiers to them. Another problem is that they are incapable of reproducing colours accurately, especially yellow, orange and red, and they can't be adjusted for power either.

LED is a massive step up from fluorescent, the panel-type LED lights are pretty useless because, like fluorescent, they can't be fitted with modifiers. The ones with a S-fit fitting can, and also have more power, but (despite what some suppliers claim) they still can't reproduce colours accurately. This doesn't always matter all that much but I would have thought that it matters a lot with your products - you won't want people sending goods back because the colours are wrong . . .

And, all continuous lights seem to be very bright and dazzle the subject - not much of a problem with experienced professional models, but a real problem for beginner models. Also, although they seem to be powerful they are in fact very low-powered, usually forcing either a slow shutter speed or a high ISO setting, and any ambient light (existing light from any source) will also affect the colour rendition and contaminate and reduce the effect of the lighting that you set up.

So, the answer is flash. You can, just about, use flashguns, but they are fiddly to use and difficult to modify well, so I strongly recommend studio flash, which is mains-powered, has much more power and which also has built-in modelling lamps, which show where the shadows fall. This is a complete kit, and seems to me to be ideal for your needs https://www.lencarta.com/lencarta-s...h-head-umbrella-and-softbox-twin-lighting-kit.

Yes, there's a fairly sharp learning curve involved, but once you've got past that point you'll get consistent results, the colours will be 100% accurate, you won't have problems with camera shake or subject movement and the post-processing needs will be minimal to say the least.

This kit has a softbox, you will of course need to experiment with the position but basically, with the example shown, you would put it a fairly long way away, off to one side and a bit to the front, skimming across the fabric to emphasise the pattern. The other light has an umbrella, which is cheap and cheerful, this will normally be used as a fill light, from the camera position. You will also need a reflector of some kind. This one will do fine https://www.lencarta.com/neewer-5-in-1-collapsible-light-reflector or you could use a piece of white card. This would be placed opposite the key light (the one with the softbox) and would reflect the required amount of spare light back, to balance the lighting and mitigate, as required, the effect of the key light.

And finally, you're asking a lot of yourself if you think that you can be both photographer and model - just get a model!
 
A couple of questions, and a couple of comments (hoping it’ll help)
Questions (before I could recommend lighting):
What camera are you using?
What lens (so we can ascertain the size of the space)?
What’s your budget?

Comments:
Garry was blunter than I’d have been, you’d be better using a model.
Whether using a model or not, if shooting jumpers, you don’t need to shoot so far below the garment. A closer shot would work better, also angles, straight on isn’t the best shot for the garment or model here.

Look at a site like ASOS for the range of shots that’ll work best.
 
Garry was blunter than I’d have been
Surely not :D
Whether using a model or not, if shooting jumpers, you don’t need to shoot so far below the garment. A closer shot would work better,
Agreed. Typically, for this type of shot, main pic would be from just below the chin (to show that it's a real person not a mannequin) to just below the bottom of the product. This shows the main benefits, which for your product will be the pattern and the design. Then there would be 5 or 6 other shots, showing detail, which would include a close-up of the neckline, cuffs, rear and anything else that matters. This article may help https://www.talkphotography.co.uk/tutorials/photography-for-amazon-ebay.157/
 
All I'll add as the pros have already spoken if the suggested options are too expensive, studio lighting is on ebay all the time at very good prices, modern stuff too
 
I missed your budget; sorry.

For £500 you easily have enough for 2 cheap 200 or 300 Ws flashes, a couple of decent stands, a large softbox and a large brolly. (Garry linked a kit)

Straightforward beginner lighting would be a softbox off to the side (45°) and the brolly at camera position as fill (so half to 1 stop lower).

Loads of tutorials on line but as a basic myth buster; lighting isn’t supposed to be ‘to eliminate shadows’ but the opposite, it’s shadows that actually allow the viewer to see the texture of your knit. So your ring light or any similar lighting pattern is genuinely counterproductive.
 
My only suggestion to add to what has been said is to get an easy assembly softbox rather than the traditional one that is in the kit Gary linked to if you are going to be frequently assembling / dis-assembling it - the 'traditional' style are fine to set up then leave assembled, but you'll be cursing them if you have to do so often!
The Lencarta version is;
https://www.lencarta.com/lencarta-profold-folding-softbox-70x100cm
 
Thank you so much for all the advice!

Gear stuff:
Sony a77, 50mm f1.4, 35mm f1.8 (I vastly prefer the 50, but have used the 35 when shooting in smaller spaces)
This shot was with the 50, the shot of the space was from my phone. The room is over 30 feet long, but I have about 14 feet of it available before I have to start moving heavy furniture.
Yes, the ring light is garbage, but I didn't buy it for this! It's for shooting top down tutorial videos, and it works well for that. I used it here because I couldn't put the backdrop closer to the wall, which meant the overhead lights lit the backdrop and not the model, and I had no other options for any kind of lighting and everything was extremely dark.

Something to clarify - I don't sell knitwear. I design knitwear, and sell pdf knitting patterns so that other people can knit it themselves. The photos are used on websites where the pattern file is sold, but also in the pattern file itself (some of which are also professionally printed), and on social media. I may also want to use them on things like pullup banners and other signage in the future.

Using a model isn't an option for a huge list of reasons, but mostly because the item I'm modelling has been hand knit, by me, to my measurements, which takes hundreds of hours and costs hundreds of pounds in yarn. Finding a model with the same body measurements as me would be prohibitive, and so is knitting it twice. Also, my audience is specifically fat and plus sized knitters, so they want to see it on a fat person, not a thin one. Yes, I could hire a fat model, but that would mean that knitting a second jumper for her to wear would cost more in yarn and take more time, which makes it much more expensive to do. Anyway - TL;DR, the model is me and that's not changing.

Composition: this is just one shot out of over a hundred. They're not all composed like this! It was just a good example of the difference between the lighting I got, and the lighting I wanted. Most of the shots are framed closer than this one, and of course there are close ups on the details.

The twin kit looks fantastic. I haven't used a wireless trigger before. I'm happy to learn though - is there anything I need to check to make sure it's compatible with my camera? I'll have a search here for some resources for using it, but if anyone has links handy, that would be so helpful.
 
The twin kit looks fantastic. I haven't used a wireless trigger before. I'm happy to learn though - is there anything I need to check to make sure it's compatible with my camera? I'll have a search here for some resources for using it, but if anyone has links handy, that would be so helpful.

From memory, like other Sony SLT cameras, the A77 has a unique hotshoe design, so check compatibility with the supplier before buying.
 
This trigger should work with your camera, but I'm not sure on the one in the kit.

 
From memory, like other Sony SLT cameras, the A77 has a unique hotshoe design, so check compatibility with the supplier before buying.
Yes, the A77 has the old Minolta iISO hot shoe - so will NOT be compatible with the vase majority of triggers available today :(

You can get an adaptor though,

https://www.amazon.co.uk/Adapter-Converts-hotshoe-industry-standard/dp/B00B00AVAS

(that's a general one, Sony also make one that converts to the full MIS hotshoe, but you probably will be fine with a generic one).

This will give you the option to use a trigger like the one Gav mentioned (or the one which comes with the Lencarta set - they use the same triggering system, the Lencarta Wavesync 2.4Ghx is just a re-brand of an old Godox basic trigger).
 
Last edited:
My only suggestion to add to what has been said is to get an easy assembly softbox rather than the traditional one that is in the kit Gary linked to if you are going to be frequently assembling / dis-assembling it - the 'traditional' style are fine to set up then leave assembled, but you'll be cursing them if you have to do so often!
The Lencarta version is;
https://www.lencarta.com/lencarta-profold-folding-softbox-70x100cm
Good point. The folding softbox produces more even illumination as well as being much easier to use. The supplier will mix and match as required, so no problem there.
From memory, like other Sony SLT cameras, the A77 has a unique hotshoe design, so check compatibility with the supplier before buying.
Adapters are available.
Using a model isn't an option for a huge list of reasons, but mostly because the item I'm modelling has been hand knit, by me, to my measurements, which takes hundreds of hours and costs hundreds of pounds in yarn. Finding a model with the same body measurements as me would be prohibitive, and so is knitting it twice. Also, my audience is specifically fat and plus sized knitters, so they want to see it on a fat person, not a thin one. Yes, I could hire a fat model, but that would mean that knitting a second jumper for her to wear would cost more in yarn and take more time, which makes it much more expensive to do. Anyway - TL;DR, the model is me and that's not changing.
Being your own model simply won't work. I've photographed untold thousands of clothing items on models, and I know what I'm talking about. If I can't do it, then with the greatest possible respect, you won't be able to.
It won't work, partly because the process is so slow, but mainly because when you're being the model you won't be able to see where the shadows fall, and the shadows (lighting) is by far the most important part. Another challenge is that the photographer has to approve the model's pose. The slightest movement of the model (it could be a change of posture or anything else) will ruin the shot. One of the workarounds used by all experienced photographers is to get the model in the required position and, with the feet never moving, to "dance" or flirt for the camera, taking loads of different shots in the expectation that one or two will be perfect. How are you going to achieve that, when you can only take a single shot using a time delay?

So, if product size is important, either find a friend of the same size to act as model or find someone to act as photographer.

I don't want to be discouraging, but I do know what does and does not work.
 
The twin kit looks fantastic. I haven't used a wireless trigger before. I'm happy to learn though - is there anything I need to check to make sure it's compatible with my camera? I'll have a search here for some resources for using it, but if anyone has links handy, that would be so helpful.
The kit includes a simple trigger, if you need a better trigger, or want to mix with speedlights, then the one @Gav. linked is the right one.
 
I don't want to be discouraging, but I do know what does and does not work.

I hear what you're saying. I don't disagree with you. I'm simply saying that I do not have any other options right now, and I have to do the best I can with the situation I have. I would LOVE to have a huge range of samples in different sizes and the most diverse collection of models to shoot them on, and stay behind the camera. That is exactly my idea of a very good time, and maybe one day I'll get to do it. But not today.

----------

So it sounds like the kit, plus the adapter, plus some reflectors, possibly a folding softbox, and bookmarking the better trigger in case I need that down the line is a good way forward. Thank you everybody, all your advice is greatly appreciated and I feel like I have a plan now.
 
I dont know if you have one but a remote shutter release might help as your the model. Open the camera flip screen so you can see your pose and shoot using the remote, they are not that expensive.
 
I dont know if you have one but a remote shutter release might help as your the model. Open the camera flip screen so you can see your pose and shoot using the remote, they are not that expensive.

That's what I do now. In the photo I posted I've used the 2 second delay and palmed the remote, it's in my right hand.

Could shoot tethered with pc/laptop or with an app on a phone.

I have previously shot tethered with a laptop, but these days I have a desktop, and I can't really move it into the kitchen (nor is there space to shoot in my office). I can dig out the laptop and give that a try, but it's very old at this point and might not work well, if at all. Maybe there's an iPad app? That'd have a bigger screen than my phone, and could be easily set up just out of shot where I can see it. If not the phone would work too. (Another use for the ring light! :LOL:)
 
I hear what you're saying. I don't disagree with you. I'm simply saying that I do not have any other options right now, and I have to do the best I can with the situation I have. I would LOVE to have a huge range of samples in different sizes and the most diverse collection of models to shoot them on, and stay behind the camera. That is exactly my idea of a very good time, and maybe one day I'll get to do it. But not today.

----------

So it sounds like the kit, plus the adapter, plus some reflectors, possibly a folding softbox, and bookmarking the better trigger in case I need that down the line is a good way forward. Thank you everybody, all your advice is greatly appreciated and I feel like I have a plan now.
If you’re gonna buy a better softbox, you can contact Lencarta and they’ll swap out the std one for the better one. Usually maintain or increases the discount.

Or you could price up similar from Amazon, would save a few ££s but lose your after sales support. Depends what’s important.

I’ve just added everything you need to a basket at Amazon and it’s pennies under £400.
Godox flashes, transmitter and octabox
Lencarta stands
Cheap brolly and 5 in 1 reflector.
 
Last edited:
There is a lighting set up in the for sale section that would do the job
 
Ooh thank you very much! Now to get access...
That kit will be fine for you, but you still need a model . . .
According to the rules, you need to be a member for 30 days and have a total of at least 26 meaningful posts

"The Market Place and all the sub forums contained therein are a perk for members that have been a member for 30 days,
and have made 26 meaningful posts."
 
Ordinarily I would recommend a flash WITH MODELLING LIGHT (preferably >150W incandescent, to overpower light that might come in thru window)...it permits you to adjust the source (position/modifier) and see what placement best shows off the item you are shooting.
But since you are serving as both model and photographer, the benefit of modelling light and INSTANTLY SEEING the result is not going to happen, unless you get a model.
 
I'd split your budget like this..

1 studio flash - a cheapish 300Ws with built in receiver will do the job
1 biggish popup softbox with grid. Rectangular stripboxes are good in confined spaces but can be a bit more fiddly to position
2 decent air damped stands the right height for your space
1 large 5-in-1 reflector (white one side, black the other, with options for silver / diffuser)
1 clamp to attach reflector to one of the stands
1 trigger for your camera
1 afternoon of training to show you how to make it work for you


I'd strongly encourage you to stick to just one light until you really understand what you want a second one for. More photos are ruined - my own included - by poor positioning of multiple lights than you'd expect.

fwiw Garry is a proper expert at product lighting but I think he's being unnecessarily discouraging. I'm confident that with a little practice you'll be able to get results you're happy with.
 
Last edited:
I'd split your budget like this..

1 studio flash - a cheapish 300Ws with built in receiver will do the job
1 biggish popup softbox with grid. Rectangular stripboxes are good in confined spaces but can be a bit more fiddly to position
2 decent air damped stands the right height for your space
1 large 5-in-1 reflector (white one side, black the other, with options for silver / diffuser)
1 clamp to attach reflector to one of the stands
1 trigger for your camera
1 afternoon of training to show you how to make it work for you


I'd strongly encourage you to stick to just one light until you really understand what you want a second one for. More photos are ruined - my own included - by poor positioning of multiple lights than you'd expect.

fwiw Garry is a proper expert at product lighting but I think he's being unnecessarily discouraging. I'm confident that with a little practice you'll be able to get results you're happy with.

Thank you, this is pretty much the list I'm working with.

You mentioned that stands should be the right height for my space. How can I work out what that height is?
 
Ordinarily I would recommend a flash WITH MODELLING LIGHT (preferably >150W incandescent, to overpower light that might come in thru window)...it permits you to adjust the source (position/modifier) and see what placement best shows off the item you are shooting.
But since you are serving as both model and photographer, the benefit of modelling light and INSTANTLY SEEING the result is not going to happen, unless you get a model.

Thanks - I can easily black out the windows / doors if need be, which might be a simpler solution.

I usually do a few test shots with the item on a mannequin before jumping in myself; it's not quite the same, but gets me close enough. Like in the movies when they use a stand in for lighting before bringing in the big name talent.
 
I'll leave the photography advice to the experts but am loving the knitting! Keep up the good work. I love to see traditional skills.
 
Thank you, this is pretty much the list I'm working with.

You mentioned that stands should be the right height for my space. How can I work out what that height is?
Some stands don't go very low; others don't go high enough.

Typically you want the flash unit itself to be 30-45 degrees above the nose and not more than 2m from the subject. Then you need room for the softbox above that.
Sometimes you'll want it much lower.

Make sure you get an air or gas-damped one. More than one of us here has had serious finger injuries from a fast-descending stand.
 
Ordinarily I would recommend a flash WITH MODELLING LIGHT (preferably >150W incandescent, to overpower light that might come in thru window)...it permits you to adjust the source (position/modifier) and see what placement best shows off the item you are shooting.
But since you are serving as both model and photographer, the benefit of modelling light and INSTANTLY SEEING the result is not going to happen, unless you get a model.

Any mains flash unit you buy is likely to have a modelling light. They have uses - including focusing in a dark space - but interpreting what they're telling you about details of the lighting takes practice. Don't worry too much about one.
 
Thanks - I can easily black out the windows / doors if need be, which might be a simpler solution.
You won't need to do that when using studio flash.
Some stands don't go very low; others don't go high enough.

Typically you want the flash unit itself to be 30-45 degrees above the nose and not more than 2m from the subject. Then you need room for the softbox above that.
Sometimes you'll want it much lower.
This is the general 'rule' for portraits, but it doesn't apply to your needs.
Height will generally be level with the subject, not above it, and the angle will be about 90 degrees, i.e. parallel.
Distance from flash to subject will usually be as great as you can make it, to reduce the effect of the Inverse Square Law
Make sure you get an air or gas-damped one. More than one of us here has had serious finger injuries from a fast-descending stand.
This is where we agree:)
fwiw Garry is a proper expert at product lighting but I think he's being unnecessarily discouraging. I'm confident that with a little practice you'll be able to get results you're happy with.
I don't think that I am. You will get SOME results without a model, but it's unnecessarily hard and time-wasting.
 
I'll leave the photography advice to the experts but am loving the knitting! Keep up the good work. I love to see traditional skills.

Aw thank you! I really enjoy doing it. It's a perfect combination of technicality and creativity... much like photography in that sense.

Some stands don't go very low; others don't go high enough.

Typically you want the flash unit itself to be 30-45 degrees above the nose and not more than 2m from the subject. Then you need room for the softbox above that.
Sometimes you'll want it much lower.

Make sure you get an air or gas-damped one. More than one of us here has had serious finger injuries from a fast-descending stand.

Thank you, that's all really helpful. Definitely don't want any finger damage - that would make the knitting part of the job rather difficult.

You'll probably only need to do that if the sunshine is streaming in; ordinarily a flash will be so much brighter than the ambient light that daylight will have little effect.

Good to know, thank you! The light is a bit... spectacular in this house. It does stream in through the windows - the building has low ceilings, is painted in darker colours, and it's a long, thin shape, with windows on the long walls. The way it's positioned means you get glorious soft light coming in on sunny days, but it's a beam rather than filling the room. Makes for some lovely lifestyle shots. Usually easy to position myself out of it for these ones, but we haven't lived here through a summer yet, so I'm not sure what that'll be like.
 
'typically' = 'general rule', no?
Use whichever word you like, it doesn't seem to matter.
In the real world, light normally comes from above, so it has become a bit of a rule to place it in a natural position. But, with product photography, we put the key light in the position that shows the product at its best, so that "rule" doesn't apply.
 
Back
Top