would be interested in some of the techniques you've used Craig - they are quite subtle. My workflow is different in that I use lightroom then PS then lightroom.
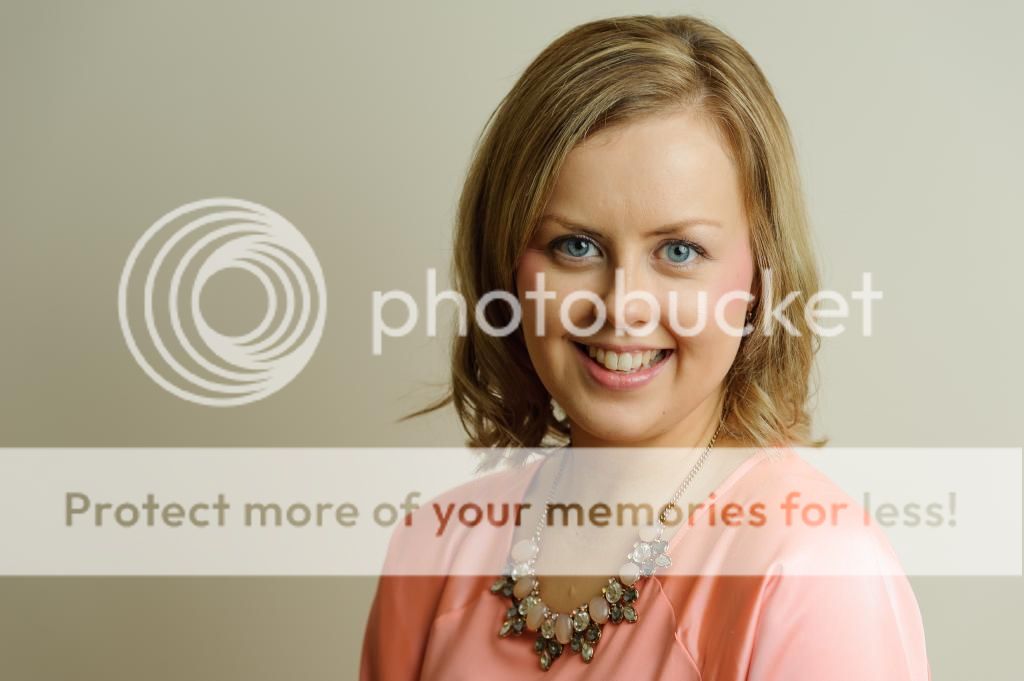
There are two bits I'm not so keen on . First is above her left eye ... that keeps drawing my attention and I'd want it smoothed a bit more. And second, and this was only a problem once I saw sooc is that I prefer the warmth of the sooc image over processed. Very subjective comment that one and if you prefer the cooler look than that's fine too
")
Is the part above her left eye the highlight between her eye and eyebrow? I've just noticed a hair floating on her forehead as well, dammit need to stop rushing to finish work during my we boys naps.
My workflow used to be edit it as far as I could in lightroom then take to photoshop and finish it with some sketchy techniques then bring it back into lightroom and usually end up doing a bit more. On this one and what I'll follow more often I think now is to open in set white balance, and do lens corrections and camera profile and then decide if it's going to need work in photoshop. If it is I remove all sharpening and open in photoshop.
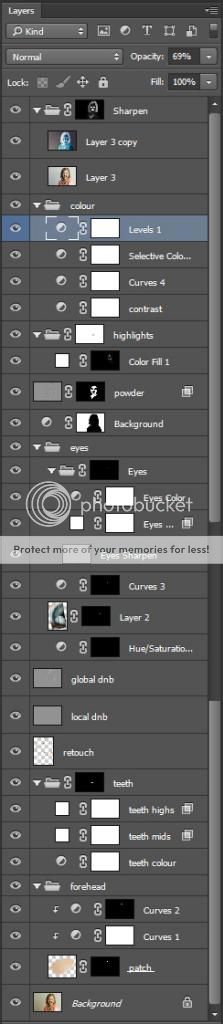
In photoshop I start off with a blank layer and use healing brush and clone stamp to sort any blemishes and scars on skin and any wee bits of lint on clothes. On this one there was a bunch of stray hairs coming down her forehead so copied a clean section of forehead from other side with lasoo tool and flipped it and covered area then used 2 curves adjustments to blend the exposures and masked in the areas I wanted, I'm pretty sure I set blend mode of the group to lighten to minimise the affect.
Next I jump to top and create a colour group and start looking at whole image I create a levels adjust to tweak black and white point then a curves layer and use the finger picker to choose a highlight point and shadow point and set the contrast where I want. Then a selective colour adjustment to get the skin tones where I wanted, though these are all done on a non colour adjusted laptop so not the most reliable. On this one cos its a magnolia wall, which probably caused the warm cast on the sooc, I used a marquee to quickly pick the background and refined edge around hair then used that as a mask on an hsl layer to desat the background and lightened it a wee bit.
To whiten teeth I use a mix of a quick calvin hollywood tip where you add an hsl layer and desaturate and lighten the yellows to whiten and a phlearn teeth tutorial to use a white solid colour layer with a blend if to fill any light spots. I then do local dodging and burning with a a black and white brush on soft light layer set to mid grey, there wasn't that much on this as Laura actually has really good skin so didn't need to really do anything with pores and was really just to reduce appearance of fine lines and shadows under her eyes. Then did global dodge and burn to bring out shape of hair and bost a couple of the higlights and shadows on her face.
Next I go back to retouch layer and work on eyes, I start out with only clone stamp to minimise the veins and blend out line from her contacts, on her left eye there was a funny yellow flare from her contact so I copied a section of the other side of her eye and transformed it into place then masked it all out and painted back in the part I needed. Once there retouched I sharpen them with a high pass, use curves layer for contrast using the picker to choose highlight and shadow points again and a curves layer and hsl to tweak colour casts in the whites.
Last retouching on her skin was the "digital powder" layer which was taken straight from that Gry Garness dvd, which is awesome and don't know if I'm really allowed to post techniques from non free sources but it's just a variation of an inverted high pass softening layer so... You create a stamp visible layer and use a gaussian blur until you cant see any detail in skin and colour blends are smooth, then note the number and cancel it and apply a high pass filter with the same radius and set layer to linear light. You then blur the high pass layer at 1/3 the radius and invert it, then use a blend if to bring back the amount of detail you need in the skin and mask out areas you don't want affected like eyes hair etc. To finish the the skin I make a selection using a colour range selection choosing the brightest skin highlight and using the fuzziness slider to control how much I want to select then apply a white solid colour layer using the selection as a mask to pop the highlights.
I would have retouched the hair a bit at this point but had to wake up my baby from his nap and I'd already spent nearly an hour on the image as a lot of it is first attempts at these techniques so just used a levels adjustment to colour the final image and used a
sharpen with blur to finish it masking off sharpening where it wasn't wanted.
I'm still just learning and I wouldn't do this on every image as it's quite labour intensive but a lot of it I think I can set up actions to improve the time spent creating parts so I just need to tweak masks and fine tune adjustments outside the actual retouch parts. Apologies if this post was overkill, it seems a hell of a long post at this point but you did make the mistake of asking, and it may make it easier to critique what I've done if anyone can be bothered reading it. TBH it was quite cathartic to to go back through the process like this as well and may help me in fine tuning my workflow.
apologies for likely grammar and spelling issues