GardenersHelper
In Memoriam
- Messages
- 6,344
- Name
- Nick
- Edit My Images
- Yes
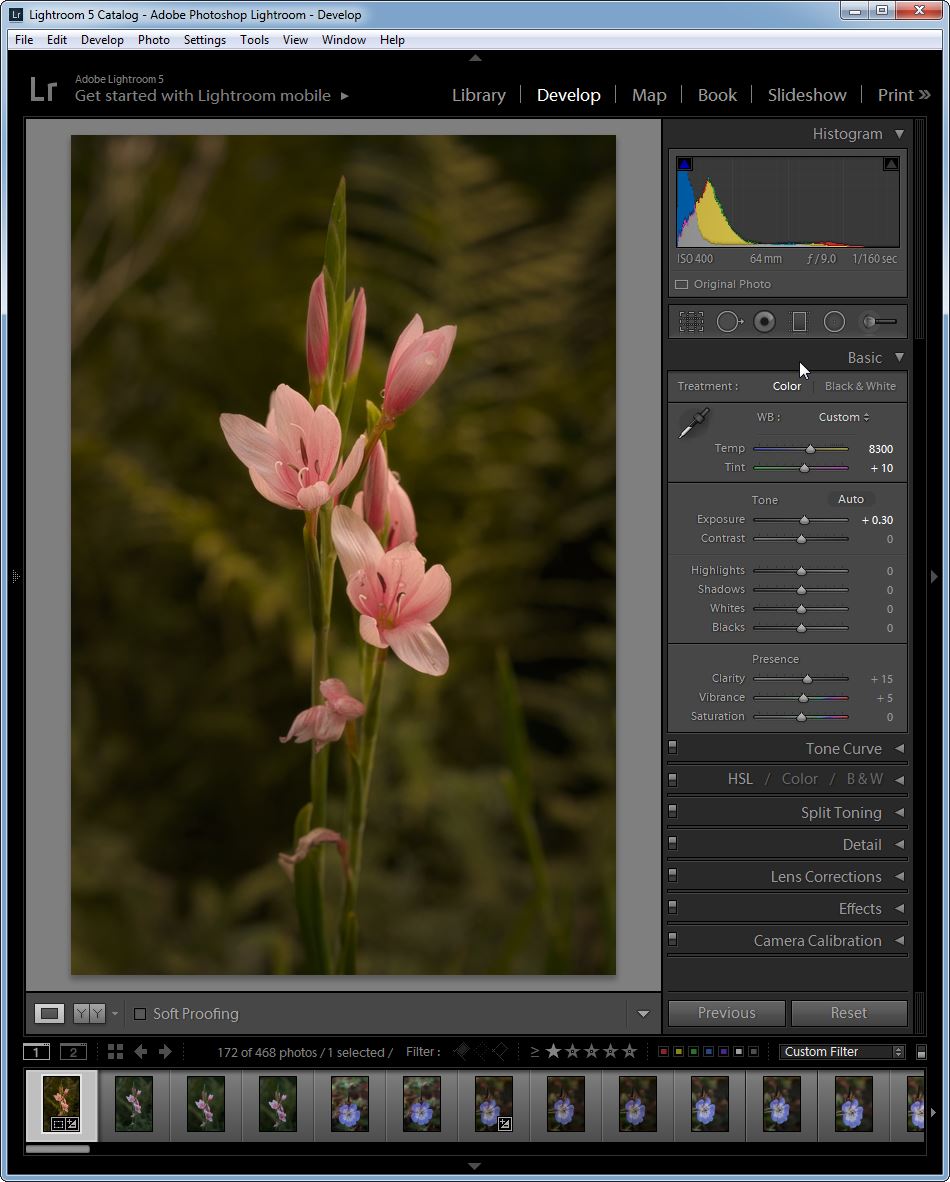
In this thread Andrew (@lightshipman) asked for critique on an image of an Orchid. I suggested changing the distribution of light in the image and one of the tools I used to do this was Lightroom 5's Radial Filter. I find radial filters useful when processing my close-up images, especially with flowers, but also sometimes with invertebrates, and I offered to write something about the technique.
You start off a Radial Filter by defining an oval, like this.

Radial Filter Example 1.1 by gardenersassistant, on Flickr
You can then make changes that take effect outside the oval, or inside the oval. Lightroom uses a very broad, slow transition between the area where the changes take effect and the area where they don't. This means that as long as you don't go overboard with the strength of the effects, they can be pretty seamless.
In the above example the changes take effect outside of the oval, and they turn the Highlights, Clarity and (to a lesser extent) Saturation down. These changes de-emphasise the background.
The oval can cut across the edges of the image, as for example in this case, where the Exposure is turned down a bit in the corners to give a mild vignetting effect.

Radial Filter Example 1.2 by gardenersassistant, on Flickr
The next filter takes effect inside the oval and emphasises the open flowers by increasing the contrast and sharpness, and also increases the saturation.

Radial Filter Example 1.3 by gardenersassistant, on Flickr
The last filter also takes effect inside the oval, in this case muting the brightness of a small area that was drawing my eye away from the flowers.

Radial Filter Example 1.4 by gardenersassistant, on Flickr
I only use Radial Filters for a few of my images, and when I do I rarely use more than one; the multiple effects here are for illustrative purposes only.
I do occasionally use Radial Filters for invertebrate images. Sometimes to help emphasise the subject and set it off from the background, or help reduce the impact of distracting elements, but also for images like this, where some of the detail is getting lost in deep shadows.
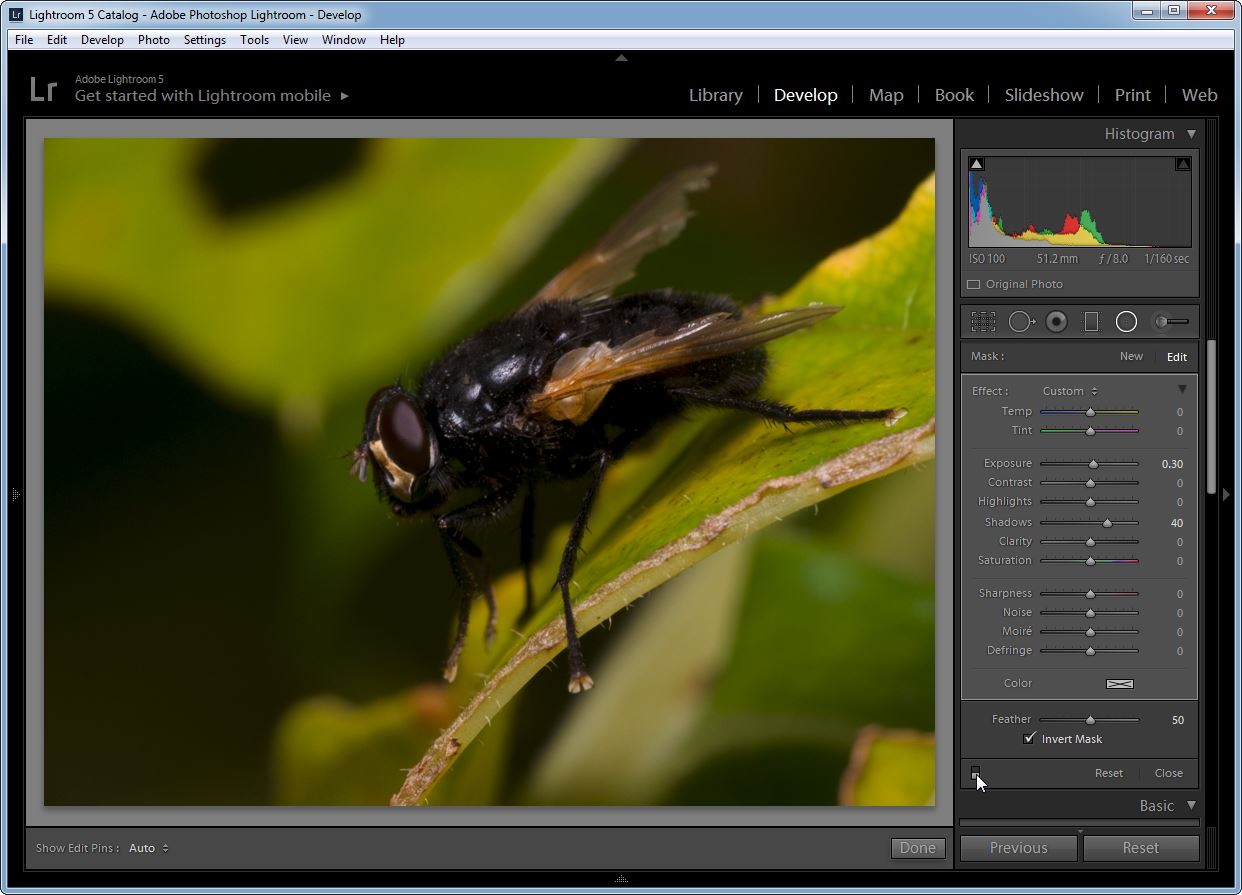
Radial Filter Example 2.1 by gardenersassistant, on Flickr
It can sometimes be better to raise the shadows in a very localised area such as this, rather than across the image, because the effect on the rest of the image may rather spoil it.

Radial Filter Example 2.2 by gardenersassistant, on Flickr
Radial Filters have a limitation that I sometimes find prevents me doing what I want to do; the effects you can use are less powerful than what is available for use on the whole image, and some don't allow as much control as you can get when working on the whole image. For example,when you use noise reduction on the whole image you have three sliders to use for luminance noise reduction and three for colour noise reduction. When applying noise reduction with a Radial Filter you have just one slider, for the amount to be applied. I don't know if it is luminance or colour noise reduction, or some combination of them.
Radial Filters are not, by and large, an alternative to selecting areas to make changes to, as in this example, where areas have been selected for noise reduction to be applied.

Radial Filter Example 3.1 by gardenersassistant, on Flickr
However, where Radial Filters are suitable, they are easy and very quick to apply (much quicker than making selections), and easy and quick to adjust.
You start off a Radial Filter by defining an oval, like this.
Radial Filter Example 1.1 by gardenersassistant, on Flickr
You can then make changes that take effect outside the oval, or inside the oval. Lightroom uses a very broad, slow transition between the area where the changes take effect and the area where they don't. This means that as long as you don't go overboard with the strength of the effects, they can be pretty seamless.
In the above example the changes take effect outside of the oval, and they turn the Highlights, Clarity and (to a lesser extent) Saturation down. These changes de-emphasise the background.
The oval can cut across the edges of the image, as for example in this case, where the Exposure is turned down a bit in the corners to give a mild vignetting effect.
Radial Filter Example 1.2 by gardenersassistant, on Flickr
The next filter takes effect inside the oval and emphasises the open flowers by increasing the contrast and sharpness, and also increases the saturation.
Radial Filter Example 1.3 by gardenersassistant, on Flickr
The last filter also takes effect inside the oval, in this case muting the brightness of a small area that was drawing my eye away from the flowers.
Radial Filter Example 1.4 by gardenersassistant, on Flickr
I only use Radial Filters for a few of my images, and when I do I rarely use more than one; the multiple effects here are for illustrative purposes only.
I do occasionally use Radial Filters for invertebrate images. Sometimes to help emphasise the subject and set it off from the background, or help reduce the impact of distracting elements, but also for images like this, where some of the detail is getting lost in deep shadows.
Radial Filter Example 2.1 by gardenersassistant, on Flickr
It can sometimes be better to raise the shadows in a very localised area such as this, rather than across the image, because the effect on the rest of the image may rather spoil it.
Radial Filter Example 2.2 by gardenersassistant, on Flickr
Radial Filters have a limitation that I sometimes find prevents me doing what I want to do; the effects you can use are less powerful than what is available for use on the whole image, and some don't allow as much control as you can get when working on the whole image. For example,when you use noise reduction on the whole image you have three sliders to use for luminance noise reduction and three for colour noise reduction. When applying noise reduction with a Radial Filter you have just one slider, for the amount to be applied. I don't know if it is luminance or colour noise reduction, or some combination of them.
Radial Filters are not, by and large, an alternative to selecting areas to make changes to, as in this example, where areas have been selected for noise reduction to be applied.
Radial Filter Example 3.1 by gardenersassistant, on Flickr
However, where Radial Filters are suitable, they are easy and very quick to apply (much quicker than making selections), and easy and quick to adjust.
Last edited:

")