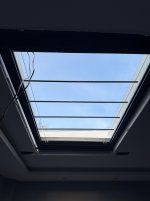
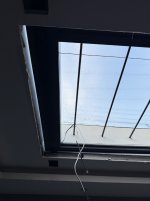
New home Studio with large skylight

Messages
4,731
Name
Neil Williams
Edit My Images
No
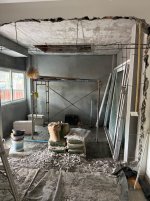
I’m in the process of building an extension onto my spare bedroom and making it into a gallery/studio.
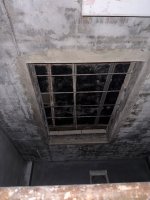
The total area will be around 3.5m x 7m. I’ve got the builder to install a 2m x 1m skylight directly above where the model will be doing her thing (2.5m ceiling) but now I’m wondering if I should add some sort of diffusion material in the opening or just wait and see what happens after it all comes together?
I’ll take some better pictures of the whole setup tomorrow.
 

Attachments

  • IMG_1192.jpeg
    IMG_1192.jpeg
    272 KB · Views: 16
Aren't skylights hard to cover? You might not want light you can't control or place where you want it...
It’s being covered with tempered glass. I’m hoping that that with it being north facing we won’t get any hard directional light, but I won’t know until it’s finished.
 
I'm sorry, but whether the light is hard and directional or not, it will be there, so unless you're going to do all of your photography in the middle of the night, it will create a large quantity of unwanted and uncontrolled light with variable colour temperature, so a major problem.

I don't see how a diffuser could help with that
 
I'm sorry, but whether the light is hard and directional or not, it will be there, so unless you're going to do all of your photography in the middle of the night, it will create a large quantity of unwanted and uncontrolled light with variable colour temperature, so a major problem.

I don't see how a diffuser could help with that
Me too mate just read somewhere that skylights were the bees knees so decided to give it a go.............worst case scenario it will cost me a sheet of plasterboard, but before that I will finish the job and give it a go(y)
 
Did you read that on the internet? :exit:

North-facing natural light was the bees knees once, starting in about 1840, when it was the only light available . . .

But ignore me, here in our community we have people who are passionate about ancient film cameras, large format cameras, the wet collodion process, sub-miniature cameras and all sorts of specialities, and there's absolutely nothing wrong with that. Fill your boots, enjoy the process and learn from it:)
 
Did you read that on the internet? :exit:

North-facing natural light was the bees knees once, starting in about 1840, when it was the only light available . . .

But ignore me, here in our community we have people who are passionate about ancient film cameras, large format cameras, the wet collodion process, sub-miniature cameras and all sorts of specialities, and there's absolutely nothing wrong with that. Fill your boots, enjoy the process and learn from it:)
I feel like I first got into photography around that time and still have cuberds full of that stuff...............but there's one thing for sure it's going to be fun trying:)
 
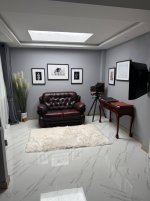
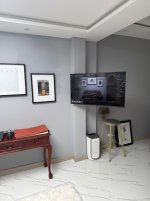
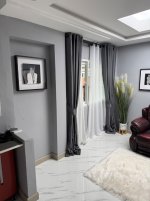
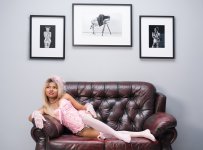
Okay 95% complete, There coming back tomorrow to correct the length of the window curtains, they need to do a little bit more touching up with the paint work, and I defiantly need to learn how to light this space.
My initial observations are
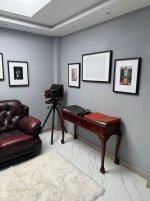
1/. The pictures on the wall need to go, when taking pictures of anyone sitting on the sofa
2/. The flowers on the left hand side corner need to go, my old view camera on the other side needs to go
3/. I have enough room to put backdrops up in front of the sofa to completely change the scenery and still get full length body shots with my Hasselblad 90mm (about 70mm full frame)
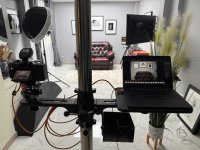
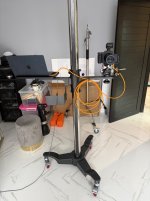
4/. The camera stand is the dogs ...........

As for the skylight I have already lined it with a delusion cloth, I have also ordered a motorised skylight blind to fit up inside that space (1.5m x 1m) to block out 100% of the light if necessary so hopefully I can play with that to get different kinds of lighting.
My new Camera stand arrived from China today and I am really chuffed with it, very sturdy and super easy to raise it up and down, I am tethering to Phocus in my Mac Book Air and mirroring that to a 43" TV for Fon to see how's she's doing........she loves it and works really well.
The last picture was shot utilising a 3 ft umbrella (as fill light) as we are in the middle of the rainy season here in Thailand so very overcast outside but still a bunch of ambient light coming in from the skylight
IMG_1374.jpegIMG_1377.jpegIMG_1376.jpegIMG_1375.jpegIMG_1383.jpegIMG_1382.jpegTest-Tethering_0065.jpg
 
Wow your workers have done a lovely job of the space. Apologies I couldn’t comment on how good it is as a photo studio (as I’m not a professional) but judging my your images it's fab.

Good luck with it all.

Gaz
 
4/. The camera stand is the dogs ...........

As for the skylight I have already lined it with a delusion cloth, I have also ordered a motorised skylight blind to fit up inside that space (1.5m x 1m) to block out 100% of the light if necessary so hopefully I can play with that to get different kinds of lighting.
My new Camera stand arrived from China today and I am really chuffed with it, very sturdy and super easy to raise it up and down, I am tethering to Phocus in my Mac Book Air and mirroring that to a 43" TV for Fon to see how's she's doing........she loves it and works really well.
Well done!

I'm glad that I suggested a camera stand, far better in every way than any tripod in a studio setting.
I love your miss-spelling of diffusion cloth, it really does explain what these cloths don't do:)
 
I tend to shoot "Hand Held" for my portrait shoots, but when a tripod is needed in my studio I have two old Regalite 6' camera stands that I have found used, bought them, and fixed them up to near new condition again. They are very similar in design to the one you have, but I only have a parts tray and no shelf for the computer on either of them, and I wish they did have them. But my stands likely were made 40 or more years ago when film technology reigned.

One of my stands now holds my studio camera, a Canon 90D, and the other is presently holding a Pro Video camera. The skylight is well done, but for photo shoots I think you are going to wish that it wasn't there. It's been best for me to completely eliminate uncontrollable light from my indoor photo shoots and place flash or constant light and modifiers where I can get the best result for the shots.

I do keep a center located ceiling LED light on during my shoots whenever possible for safety, and I set the F-Stop of my camera just high enough prevent this LED light from affecting my shoot. It's usually proven to be F-8 for most shoots. Then, all of my controllable studio lighting is the only light seen by my camera. I may adjust the F-Stop higher for more depth of focus, but at the cost of needing more flash power. If what I'm shooting and the camera settings require a lower F-Stop setting, then this ceiling LED must be turned off, at least for each shot. For safety, I now have this ceiling LED light remotely controlled, so I can turn it off for the shot, then back on without the need to move around in the dark to reach the switch. One of these remote switches is now located by the studio door where the original switch had been, then another located (Velcro attached) under the parts tray of each camera stand, one under the front edge of my computer table, and one on the wheeled toolbox that I usually keep just left of me when I'm shooting, which makes a nice place to set the camera when taking short breaks to make lighting adjustments, etc. So I can now control this ceiling mounted LED light without the need to move around in the dark to do it, a significant safety improvement. When needing very low F-Stop settings for the shoot, this becomes very important for safety. These switches look like wall rocker switches, but are thin in design to look like the wall switch and it's cover. The receiver module (cube shaped) fits inside the ceiling light fixture electrical box above the light fixture. These wireless remote light switch sets are available on Amazon, so easy to buy and quite reasonably priced, and they work very well. When installing them, each switch has a unique signal identity, and it is necessary to push a button on the receiver module, then active the light switch to record this identity so they will work together. Then you do the same for each switch to be added. Then you can cover the module with the light and all of the added switches should turn the light on or off as desired. I think they are also available for most electrical power systems in the World.

The hanging pictures are nice, but I don't think they belong in a second photo shoot, though hanging them in the rest of the room or adjoining room would usually be where I hang my framed photos from previous shoots. The room looks very nice and likely doubles as good living space too. Will you be adding backdrops of different colors and designs for different shoots? Though I have white walls in my studio, I frequently want different background colors, so use backdrops frequently. Most of mine are 10' wide. When I first built my studio I was using background stands, but now added a 6 backdrop roller system to the ceiling of my studio, and it is remotely controlled by portable remotes at each camera stand. It's very quiet when raising or lowering. Presently I have white, gray, black, Chroma Blue, Chroma Green, and a light blue theater pleated type curtain on the roller system. Running them up and down is so quiet that I can change backgrounds between shots without the subject knowing that they are changing. I have a CD player running low with mood music playing when doing shoots of live subjects, and the backdrop motor noise is not heard above it. If I wish to use a different backdrop than these, I either attach them to one of the backdrops on the rollers, or I have a ceiling mounted DIY 1X 1 X 1/4" steel angle running across in front of the roller system where I can A-Clamp hang anything that I want to use for a background. In my field kit I always keep the background stand and mostly 5 X 7' backgrounds in a small duffel bag to use. Sometimes I'll clip one of these field kit backgrounds to this rail to use or might attach it to one of the backgrounds on rollers.

Since adding the background roller system to my studio I have added a large white board to the wall behind them. If I'm teaching or just trying to describe something I have found this white board very handy to have. It's about 5' X 7' in size and complete with the "chalk tray" at the bottom just like used in schools. Of course, water based ink pens are used instead of chalk for this kind of board.

Will you only be doing portrait shoots, or do you plan to do other kinds of photography there too, like "Still Life" and "Macro"? Keeping your studio easy to switch from one kind of shoot or video to another has been one of my main goals when building my studio, and it has worked out very well for me.

Charley

 
I tend to shoot "Hand Held" for my portrait shoots, but when a tripod is needed in my studio I have two old Regalite 6' camera stands that I have found used, bought them, and fixed them up to near new condition again. They are very similar in design to the one you have, but I only have a parts tray and no shelf for the computer on either of them, and I wish they did have them. But my stands likely were made 40 or more years ago when film technology reigned.

One of my stands now holds my studio camera, a Canon 90D, and the other is presently holding a Pro Video camera. The skylight is well done, but for photo shoots I think you are going to wish that it wasn't there. It's been best for me to completely eliminate uncontrollable light from my indoor photo shoots and place flash or constant light and modifiers where I can get the best result for the shots.

I do keep a center located ceiling LED light on during my shoots whenever possible for safety, and I set the F-Stop of my camera just high enough prevent this LED light from affecting my shoot. It's usually proven to be F-8 for most shoots. Then, all of my controllable studio lighting is the only light seen by my camera. I may adjust the F-Stop higher for more depth of focus, but at the cost of needing more flash power. If what I'm shooting and the camera settings require a lower F-Stop setting, then this ceiling LED must be turned off, at least for each shot. For safety, I now have this ceiling LED light remotely controlled, so I can turn it off for the shot, then back on without the need to move around in the dark to reach the switch. One of these remote switches is now located by the studio door where the original switch had been, then another located (Velcro attached) under the parts tray of each camera stand, one under the front edge of my computer table, and one on the wheeled toolbox that I usually keep just left of me when I'm shooting, which makes a nice place to set the camera when taking short breaks to make lighting adjustments, etc. So I can now control this ceiling mounted LED light without the need to move around in the dark to do it, a significant safety improvement. When needing very low F-Stop settings for the shoot, this becomes very important for safety. These switches look like wall rocker switches, but are thin in design to look like the wall switch and it's cover. The receiver module (cube shaped) fits inside the ceiling light fixture electrical box above the light fixture. These wireless remote light switch sets are available on Amazon, so easy to buy and quite reasonably priced, and they work very well. When installing them, each switch has a unique signal identity, and it is necessary to push a button on the receiver module, then active the light switch to record this identity so they will work together. Then you do the same for each switch to be added. Then you can cover the module with the light and all of the added switches should turn the light on or off as desired. I think they are also available for most electrical power systems in the World.

The hanging pictures are nice, but I don't think they belong in a second photo shoot, though hanging them in the rest of the room or adjoining room would usually be where I hang my framed photos from previous shoots. The room looks very nice and likely doubles as good living space too. Will you be adding backdrops of different colors and designs for different shoots? Though I have white walls in my studio, I frequently want different background colors, so use backdrops frequently. Most of mine are 10' wide. When I first built my studio I was using background stands, but now added a 6 backdrop roller system to the ceiling of my studio, and it is remotely controlled by portable remotes at each camera stand. It's very quiet when raising or lowering. Presently I have white, gray, black, Chroma Blue, Chroma Green, and a light blue theater pleated type curtain on the roller system. Running them up and down is so quiet that I can change backgrounds between shots without the subject knowing that they are changing. I have a CD player running low with mood music playing when doing shoots of live subjects, and the backdrop motor noise is not heard above it. If I wish to use a different backdrop than these, I either attach them to one of the backdrops on the rollers, or I have a ceiling mounted DIY 1X 1 X 1/4" steel angle running across in front of the roller system where I can A-Clamp hang anything that I want to use for a background. In my field kit I always keep the background stand and mostly 5 X 7' backgrounds in a small duffel bag to use. Sometimes I'll clip one of these field kit backgrounds to this rail to use or might attach it to one of the backgrounds on rollers.

Since adding the background roller system to my studio I have added a large white board to the wall behind them. If I'm teaching or just trying to describe something I have found this white board very handy to have. It's about 5' X 7' in size and complete with the "chalk tray" at the bottom just like used in schools. Of course, water based ink pens are used instead of chalk for this kind of board.

Will you only be doing portrait shoots, or do you plan to do other kinds of photography there too, like "Still Life" and "Macro"? Keeping your studio easy to switch from one kind of shoot or video to another has been one of my main goals when building my studio, and it has worked out very well for me.

Charley

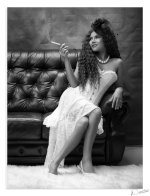
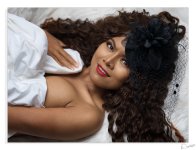
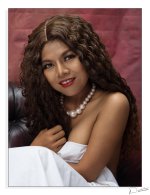
I did this shoot yesterday using a rusty coloured backdrop, I dont have a automated system but very easy to to hang a backdrop on a couple of stands, I can easily switch the pictures on the walls put a different cover on the sofa etc to change the scenery for different shoots..............here are a few from yeterday
Smoking-Cigarette_0113.jpgSmoking-Cigarette_0268.jpgSmoking-Cigarette_0341.jpg
 
As for the skylight I have already lined it with a delusion cloth, I have also ordered a motorised skylight blind to fit up inside that space (1.5m x 1m) to block out 100% of the light if necessary so hopefully I can play with that to get different kinds of lighting.
You might want to make the open/closing of the blackout screen for the skylight to be bi-directional so you can open and close from either end/side.
 
Back
Top