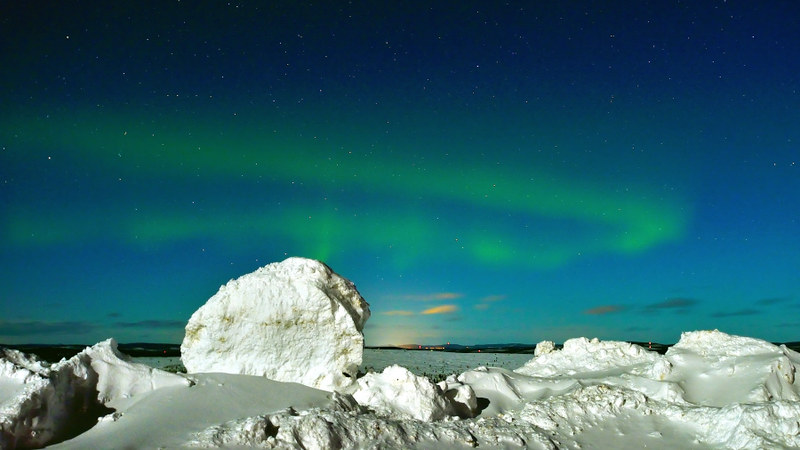
PHOTOGRAPHY - Tips for Photographing the Aurora Borealis
By
Fay Vincent on Friday, 8 February 2013 at 12:27
Hi everyone,
I've seen a few posts asking about photographing the aurora so thought I would create a document with some tips and advice that might help. By no means am I an expert, I only started night shooting in January 2012, but it was pretty research intensive for my Graded Unit at college so found some stuff that might help you out.
Aurora Activity
I know very little about predicting the Aurora but there are knowledgable people in the group, so I'll leave that bit to them.
Location, Location, Location!
Get to high ground if possible and shoot North (this may seem like an obvious thing to some), but you aren’t going to capture a low lying aurora with a big mountain in the way. Also, if you are looking south the chances are zero (unless you are in Australia lol). If you don’t have a compass, most modern mobile phones do, so use that, alternatively look for the big dipper, follow the far edge of the ‘pan’ and follow that line (of the two end starts) to the left to try to find the North Star. You get much better results if you are facing in the right direction!
On the same note, whilst scouting shooting locations why not try Google maps. Hit the 'terrain' button and see if there are some good high locations near you - you'll be surprised where you can drive to get a better vista North.
Weather
Obviously the weather plays a big factor in what you are going to see, cloud cover being the main one but really windy conditions make long exposures more difficult to keep equipment stable. I'd recommend
www.windfinder.com as they have access to localised weather stations and can give a good visual overview of cloud cover/wind. I wouldn't trust any long term forecasts but if you are heading out within a few hours it's worth a check of the area you are going to on there - or as near as you can get. I have seen their forecasts as accurate as it can possibly be with clouds heading in exactly when they predict. Also they have night predictions which are what you'll need. Just expand the night forecast and hit 'super forecast' and 'show night hours' for an hourly view.
Another one I use is the satellite IR images on the met office, if you watch the time-lapse of the images you can see which direction cloud and clear skies are headed.
http://www.metoffice.gov.uk/
Outdoor Webcams are a great tool, so it's worth looking if there are some in your area (or where you intend to view/shoot) that you can access online. You can see the real time conditions yourself and even at night you can usually see the brightest stars and planets such as Sirius and Jupiter so you'll know if it's clear.
http://www.scotlandinfo.eu/webcams-in-scotland
Moon Phases
Moon phase is another really important factor, it can greatly effect how a landscape can look at night. In some cases strong Moonlight can cast shadows and diminish starlight/aurora considerably. Without getting too techinical a full moon on a clear night can generate 0.27 lux, and a moonless night is around 0.002 lux.
Dark skies
You'll struggle to get pictures in areas (cities/towns) with a lot of light pollution - have a look at the map here
http://www.darkskydiscovery.org.uk/int_dark_sky_places.html to see if you can find somewhere with as little light pollution as possible.
Equipment
Having a DSLR is almost a must. I know that some good bridge cameras can get results, as well as film SLRs if you are feeling really ambitious, but you must be able to set your exposure manually. When I say exposure I mean ISO, Aperture and Shutter speed. A 30 second shutter speed is a good benchmark for night/aurora/star capture (on moonless nights) so you'll have to check what your maximum shutter speed options are. Don't be disheartened if you have an entry level DSLR, I have seen some great captures with them and anything is possible with the right settings/lens. (See the rule of 600 section for a basic equation to work out max shutter speeds and focal lengths) This will vary with your sensor size however.
My usual nightshooting equipment is (a DSLR - high end amatuer or low end proffesional), very sturdy tripod, preferably something with a plate rather than ball head.
Cleaning equipment cloth, brush and a remote timer. All of the above can be purchased online reasonably. Spare batteries. Taking long exposure shots burns though camera batteries quickly so it's a good idea to have a backup - especially if you intend to be out all night.
I am absolutely the opposite end of the scale when it comes to being health and safety, but have found myslf in the heat of the moment, miles from anywhere with the car stuck and no phone signal. Some sensible things to put in the car would be -
Head torch. When you are in the middle of nowhere with no light a head torch is your only friend! Red LED torches are good as they allow you to retain your night vision whilst using them.
Clothing/sundries - gloves, hat, food, hot drinks, blanket. Hiking boots and a flask will see you through. You have to think 'if I get stuck here in the cold with absolutely no phone signal what do I have?'
Hand torch for painting with light. If you want some foregound interest to be illuminated then you can take a torch - ranging from a small LED to a 1000 candle watt flash light for large rock formations.
ISO
A big factor in what you pick up is your ISO setting. Or should I say a big factor in the QUALITY of what you pick up is your ISO setting. For anyone who knows a bit about photography, generally lower is better as you'll get less grain/noise (the red/blue/green dots or hot pixels and the 'fuzziness' of the image) with a lower ISO.
For all you photographers I'm writing this as a guide to newbies btw!
HOWEVER, with night/aurora photographs you need to forget that ethos and up your ISO to around 1600 - 2000 (or even higher). This is where the money you have spent on a camera body gets tested unfortunately and higher end DSLRs will give much better results. That's not to say a little editing won't go a long way so don't lose hope just yet!
Aperture
Usually considered good practice to open to the widest aperture you can go to so f/2.8 f/3.5 f/4 is ideal BUT this can be lens dependant (I will post more about that in the 'Lenses' section). You also need to think what you have in your photograph when you are shooting. If there is a tree or foreground interest, shooting at such a wide aperture will give you focusing issues, so you need to be a good distance away from those type of objects or either the tree/rock/statue will be out of focus or the sky will be. I always shoot with a wide angle lens 20mm or below as I think it gives you better options for composition.
Shutter Speed
As I mentioned a long shutter speed is a must for night photography, which allows more light to fall on the sensor (am just dealing with digital here) My camera bodies will allow me to shoot up to 30 seconds (without using the bulb setting) and it's the speed I use most often even with a remote timer. Again, the longer the shutter speed, the more hot pixels you will see in the resulting image so playing around with the ISO/Shutter speed relationship may be beneficial. Some DSLRs will have a 'bulb' function where with a remote timer you can open the shutter for any amount of time you want - minutes or even hours. Useful for star trails.
NB. I never use the Noise Reduction (NR) for long exposures function in camera - it takes longer to write the image to the card and I would rather do necessary noise reduction in editing software.
A tripod will be a necessity for this, or a stable surface with remote timer or delay timer at a push. The remote timer (wireless or wired) is good but not a necessity. Put the camera on a 3 or 10 second delay to stop shake.
Rule of 600
Now if you are planning to use a remote timer and want the most amount of light to fall on the sensor, but also want to keep stars sharp (for those of you who don't know we live on a planet that rotates whilst the stars stay in the same place) you can use the rule of 600 to keep your stars sharp with no 'trails'.
Basically (for full frame cameras) it's -
600/focal length = maximum shutter speed.
So for my 14mm it would be 600/14 = 42.8 seconds. (I'd recommend a stopwatch rather than counting in your head)
Any longer and the stars will start to 'trail'. For cropped sensors it's more like the rule of 400.
Lenses
Great site here on the best lenses for night shooting. I can't recommend Jerry Lodriguss's site 'Catching the Light' enough and it will tell you more than I ever can about night shooting. This single page covers some good lenses for shooting and after reading this I switched from using my 14-24mm Nikkor at f/2.8 to f/4 and got sharper results.
http://www.astropix.com/HTML/I_ASTROP/LENSES.HTM
Focusing
Focusing at night is nearly impossible with automatic settings so switch to manual and find the 'infinity' mark on your lens*. For Nikon users it looks like a figure 8 and for Canon users it's an L shape. This will give you the widest focal range and keep very distant objects (ie stars and planet) in focus. Knowing hyperfocal distance will help with composing an image and there are mobile phone apps that will work all the setting out for you. *PLEASE BE AWARE - The infinity marks are just a guide and may be out by some distance. Make sure you take some test shots and the zoom in to see how sharp your stars or distant objects are, some adjustment and tweaking may be necessary.
http://www.slrphotographyguide.com/camera/settings/focus-infinity.shtml
White balance
I never use automatic white balance as it can give some really different results over a short space of time (this is particularly relevant if you are using interval shooting) I tend to go for a tungsten setting or set the kelvins manually at 2500-3500k. Yes, this can be rectified post shoot with software but I'd rather not edit 300 photographs manually in a time-lapse! The cooler temp will give a more pleasing (in my opinion) bluer sky, especially if you are in a light polluted area.
Lens Fogging
When shooting at night especially in the winter the temperatures can be pretty extreme. Taking a camera & lens from a warm car and exposing it to minus figure temps can cause lens fogging or condensation after a period of time. I use fleece socks with the bottoms cut of to cover my lenses and give myself a bit more time before the dreaded fog occurs (especially a problem for timelapse shooting). Alternatively, I know folk that use hand warmers. Don't forget this can apply the other way around so getting back into a warm car will have a similar effect. There is a method with zip lock backs although I haven't personally tried it.
FINALLY... Happy shooting!!
P.S. I'll no doubt expand on this at some point and I'm sure fellow photographers will have more to add but for now, I hope it helps.
P.P.S. Stay safe! Night shooting has taken me to some VERY rural locations, some places where I have no phone signal and have almost grounded the car many times. ALWAYS tell someone where you are headed and take provisions in the car - (blankets, flask, water, food, even additional fuel) Wrap up warm and wear appropriate footwear in case you have to walk out.


 ) and, no doubt every bit of camera equipment i possess, I'm hoping to be able to get some pics.