
You are using an out of date browser. It may not display this or other websites correctly.
You should upgrade or use an alternative browser.
You should upgrade or use an alternative browser.
David's Photo52 2011: Index Post 1: Weeks 44 to 46 belatedly added
- Thread starter David Gethin
- Start date
drodd
Also loves to mass debate
- Messages
- 5,519
- Name
- Dawn
- Edit My Images
- No
Hiya David,
Just popping past for a quick catch up. I notice you have been very busy lately as I don't see you have commented on other posts in the Photo52. But heyho we are here to support and encourage each other so it is great that you are still with us.
Week 33: I have to say I wasn't that impressed with this shot, considering all the though process and technique you applied to previous posts. However, photography wise I think you have capture a crisp, clear shot of the button.
Week 34: A nice clear shot, with some great motion blur and the subjects in focus. However, a minor niggle is that you chopped the foot of the chap in the foreground, which does grab my attention.
Week 35: I like this shot ... and the idea of the technique you used for same to gain the zoom ... I'm not sure about more background drama adding anything to the shot as it is not detailed enough and personally I feel wouldn't contribute to same. Minor niggle for me though is it could do with a very slight straighten and perhaps the reg a bit more blurred .... but other than that I think you have captured the theme well.
Cheers
Dawn")
Just popping past for a quick catch up. I notice you have been very busy lately as I don't see you have commented on other posts in the Photo52. But heyho we are here to support and encourage each other so it is great that you are still with us.
Week 33: I have to say I wasn't that impressed with this shot, considering all the though process and technique you applied to previous posts. However, photography wise I think you have capture a crisp, clear shot of the button.
Week 34: A nice clear shot, with some great motion blur and the subjects in focus. However, a minor niggle is that you chopped the foot of the chap in the foreground, which does grab my attention.
Week 35: I like this shot ... and the idea of the technique you used for same to gain the zoom ... I'm not sure about more background drama adding anything to the shot as it is not detailed enough and personally I feel wouldn't contribute to same. Minor niggle for me though is it could do with a very slight straighten and perhaps the reg a bit more blurred .... but other than that I think you have captured the theme well.
Cheers
Dawn
OP
- Messages
- 218
- Name
- David
- Edit My Images
- Yes
Wreck of the Hesparus
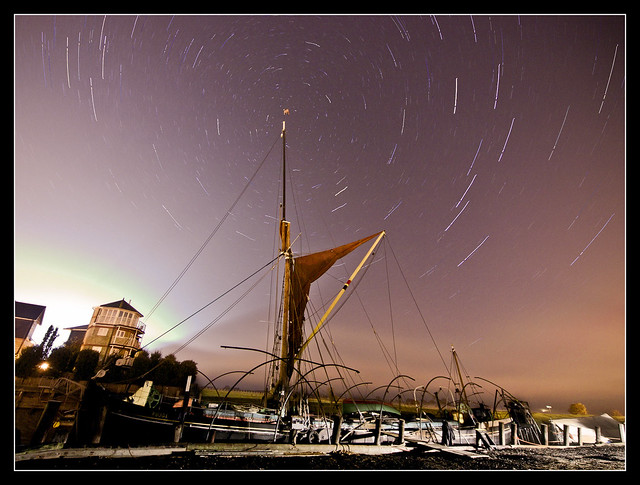
Week 36 - Time by morganthecat, on Flickr
What:
Star trail with the North Star positioned above the mast of the Thames Sailing Barge Pudge.
Why:
I originally wanted to photograph one of the boats in considerable disrepair being renovated down at Faversham Creek with the stars circulating above to give the sense of time passing against the decay. This barge appeared to present a better opportunity but in using a boat in such fine condition, I have lost the purpose of the photograph somewhat.
How:
Placed the camera on the tripod, attached my shutter remote and locked to 'on', set the exposure to 1 minute and kept taking pictures for half an hour making sure ISO was set as low as possible to avoid noise - I almost wrecked a sensor on a previous occasion shooting at ISO 800 for half an hour. I also took a separate 4 minute exposure to bring out more detail in the foreground plus in two of the 1 minute exposures, the headlights of a police Land Rover that came down to investigate what I was doing at 3 am helped to shine some light on the boat and pick out more detail. The images were then combined in Image Stacker using brightest pixel. I then layered this combined shot with a couple of others in CS3 and blended to help control some of the highlights in the boat. Levels/contrast/vibrance/saturation/WB etc adjusted in LR3 in order to give the final image.
Learnt:
To find the North Star (it is fairly non-descript in the sky) first locate the Plough and then drawing a line between the two rights hand stars follow that line up into the sky until it intercepts with the North Star.
I have taken star trail shots before, but forgot to apply mirror lock up which has resulted in vibration and less than smooth trails.
Make sure every screw/lever is as tight as possible on your tripod as there was a fair degree of movement when I came to line up the images.
Improvement:
General star trail technique. There are plenty of web resources and tips of what to do, and I need to take more of these to refine my technique. At least I now know how to locate the North Star.
Composition. I need to learn to accept defeat. By placing the North Star directly above the mast (which was a conscious decision), I have ended up with the houses in the background which detract from the composition as well as some hideous light pollution (hence why the best star trails are always taken in the wilds of some desolate Arizona desert).
OP
- Messages
- 218
- Name
- David
- Edit My Images
- Yes
Protection, Recreation, Construction
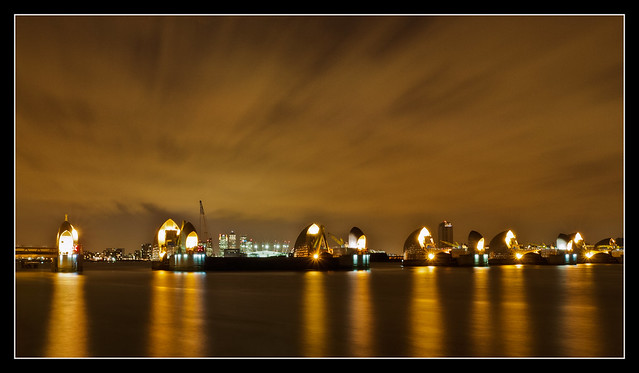
Week 37 - Mix (Version 1) by morganthecat, on Flickr
What:
The Thames Barrier with the O2 and Canary Wharf behind.
Why:
A shot that captures the mixture of purposes of architecture - to act as a defence, to act as a place of enjoyment, to act as a hub of wealth generation (and loss!).
How:
I shot this with the intention of a 3 shot HDR. However, there was a strong wind and I find that my long exposure HDR skies end up looking a right mess and so instead I settled for a 2 shot 'intensive fusion' in Photomatix Pro rather than tone mapping. I took this image, created a virtual copy in LR3 and adjusted the Tone and Presence settings to add more drama to the sky, imported both images into CS3 and manually blended away to give some definition in the sky whilst retaining the buildings and milky water of the base Photomatix image. I finally made some lens correction adjustments in CS3 and cloned out some artefacts.
Learnt:
I need to master the use of histograms as the LCD display on an E-30 is not the best screen to chimp your long exposures. Controlling the light in this situation was particularly challenging.
Improvement:
Composition. Although I prefer this shot, it does not speak so well to the theme as the focus subjects (barrier plus O2 and Canary Wharf) are lost in the scale of using a wide angle lens. Which is why I also present version 2 as my submission for Week 37:
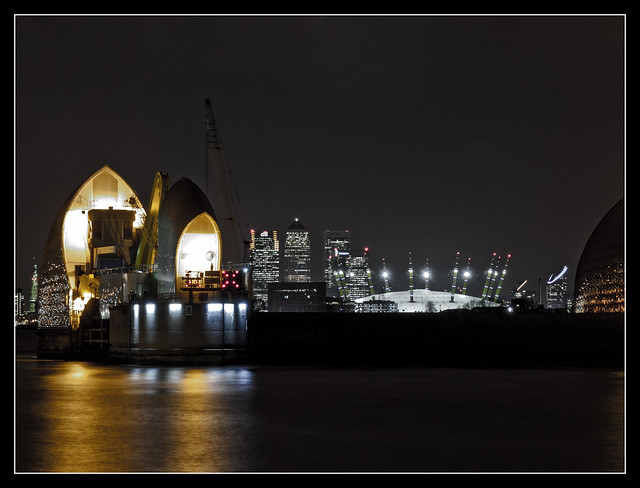
Week 37 - Mix (Version 2) by morganthecat, on Flickr
What:
The Thames Barrier with the O2 and Canary Wharf behind.
Why:
A shot that captures the mixture of purposes of architecture - to act as a defence, to act as a place of enjoyment, to act as a hub of wealth generation (and loss!).
How:
This was shot as a much tighter image using the zoom end of my 12-60mm lens. Processing was done in LR3 making various adjustments to WB, Tone, Presence and colour saturation before applying the Stylised1 LR preset. I then had more of a play with saturation, hue and luminance but using the HSL sliders in LR3. Finally used the heal spot removal tool to remove the small amount of cloud in the sky.
Learnt:
Use of the HSL sliders in LR3.
Improvement:
Quality. Focus - I had to sharpen this image considerably. Aperture was simply the same as above which had been chosen with exposure time principally in mind. A long exposure was still desirable to flatten the river but more attention should have been placed on achieving best quality in the focussing of this shot, although I did use Live View and magnified zoom to assist.
Week 37 - Mix (Version 1) by morganthecat, on Flickr
What:
The Thames Barrier with the O2 and Canary Wharf behind.
Why:
A shot that captures the mixture of purposes of architecture - to act as a defence, to act as a place of enjoyment, to act as a hub of wealth generation (and loss!).
How:
I shot this with the intention of a 3 shot HDR. However, there was a strong wind and I find that my long exposure HDR skies end up looking a right mess and so instead I settled for a 2 shot 'intensive fusion' in Photomatix Pro rather than tone mapping. I took this image, created a virtual copy in LR3 and adjusted the Tone and Presence settings to add more drama to the sky, imported both images into CS3 and manually blended away to give some definition in the sky whilst retaining the buildings and milky water of the base Photomatix image. I finally made some lens correction adjustments in CS3 and cloned out some artefacts.
Learnt:
I need to master the use of histograms as the LCD display on an E-30 is not the best screen to chimp your long exposures. Controlling the light in this situation was particularly challenging.
Improvement:
Composition. Although I prefer this shot, it does not speak so well to the theme as the focus subjects (barrier plus O2 and Canary Wharf) are lost in the scale of using a wide angle lens. Which is why I also present version 2 as my submission for Week 37:
Week 37 - Mix (Version 2) by morganthecat, on Flickr
What:
The Thames Barrier with the O2 and Canary Wharf behind.
Why:
A shot that captures the mixture of purposes of architecture - to act as a defence, to act as a place of enjoyment, to act as a hub of wealth generation (and loss!).
How:
This was shot as a much tighter image using the zoom end of my 12-60mm lens. Processing was done in LR3 making various adjustments to WB, Tone, Presence and colour saturation before applying the Stylised1 LR preset. I then had more of a play with saturation, hue and luminance but using the HSL sliders in LR3. Finally used the heal spot removal tool to remove the small amount of cloud in the sky.
Learnt:
Use of the HSL sliders in LR3.
Improvement:
Quality. Focus - I had to sharpen this image considerably. Aperture was simply the same as above which had been chosen with exposure time principally in mind. A long exposure was still desirable to flatten the river but more attention should have been placed on achieving best quality in the focussing of this shot, although I did use Live View and magnified zoom to assist.
drodd
Also loves to mass debate
- Messages
- 5,519
- Name
- Dawn
- Edit My Images
- No
Hiya David,
Well what can I say .... true to form you have produced some stunning photographs.
Time:
I like the idea of the star trails for time, however I am slightly distracted by the slant of the houses to the left of the mast, even though the mast is straight. If you could have moved a few paces to the left to omit the background houses, I think would have benefited the shot.
Generally, for star trails, I use a 30 second exposure, f/3.5 (or there about), ISO 200 ... camera set to continuous and trigger release on. Then use StartStax software link http://www.markus-enzweiler.de/software/software.html, or Startrails http://www.startrails.de/html/software.html. The former better in the sense that there is less noise ... the latter for the video function.
Mix:
Love the colours in the first, the cloudy sky and reflection ... all create a very warm image and quite a mix too.
The second image, as you say, captures better the idea you had for mix. I can still see a few spots of cloud in the sky. However another great image.
Well done
Cheers
Dawn
- Messages
- 2,175
- Name
- Neil
- Edit My Images
- No
Love the latest shots David
OP
- Messages
- 218
- Name
- David
- Edit My Images
- Yes
Amusements
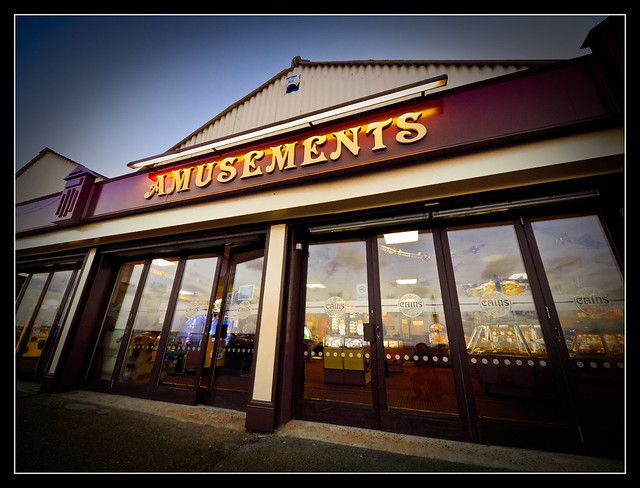
Week 38 - Fun by morganthecat, on Flickr
What:
Amusement arcade on Herne Bay seafront.
Why:
Interpretation of a fun activity... on a bitterly cold, empty Wednesday afternoon it was many things, but fun it wasn't.
How:
Shot with my ultra wide angle lens and saturation/clarity/vignette adjustments made in LR3.5.
Learnt:
I need to invest in some suitable gloves for the winter season.
Improvement:
Creativity. This leaves me with the feeling of a shot to brief and very little effort put into it. Must try better.
Composition. I was sloppy and I have ended up captured in the reflection of one of the windows.
OP
- Messages
- 218
- Name
- David
- Edit My Images
- Yes
Thanks Tina, Dawn, Michael and Neil.
My revised objective is to get to the end of the Photo52 before the end of the year. I'm going to be busy over the holidays.
My revised objective is to get to the end of the Photo52 before the end of the year. I'm going to be busy over the holidays.
OP
- Messages
- 218
- Name
- David
- Edit My Images
- Yes
Boom (Cardboard) Box
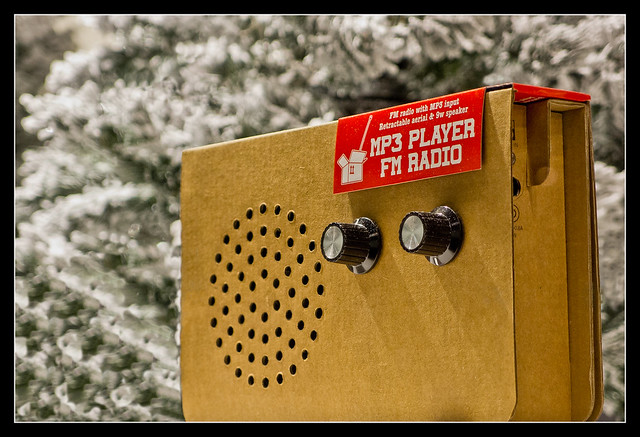
Week 39 - Volume by morganthecat, on Flickr
What:
Cardboard radio and speakers for sale in Peter Jones, Sloane Square
Why:
I had hoped that I would stumble across a stylish Bose shop or other high end audio retailer in order to shoot something focussed on the volume control of a beautifully designed amplifier. Instead I took a grab shot of this cardboard radio in the shop window.
How:
Usual saturation/clarity/levels adjustments made in LR3.6 on the RAW file before going to work in CS3 on cloning out the rather distracting bokeh (well you wouldn't expect a compact, even a high end compact, to produce smoothly gorgeous bokeh now would you?) and removing the advertising sign in front.
Learnt:
Perfecting my cloning technique and by chance stumbling across the different blending modes when cloning. The luminosity mode was quite effective when cloning the body of the cardboard box. I need to invest some time in the new year in CS3 to better understand its capabilities.
Improvement:
Creativity. Not the most creative take on the theme.
And for comparison, here is 'before' shot so you can see what was cloned out:
Untitled by morganthecat, on Flickr
Last edited:
OP
- Messages
- 218
- Name
- David
- Edit My Images
- Yes
Eruption
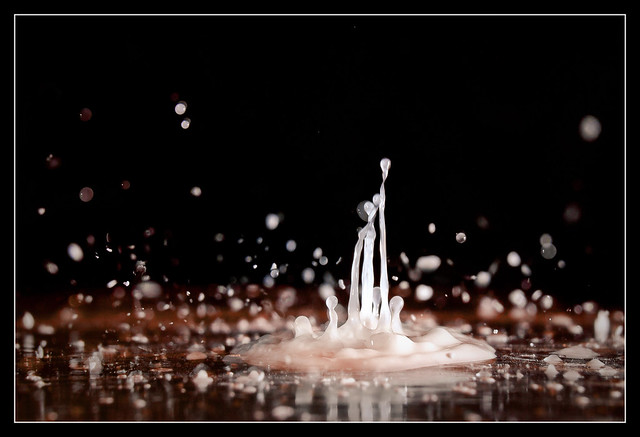
Week 40 - Explode by morganthecat, on Flickr
What:
A cornflour-water mix exploding on the surface of a speaker.
Why:
This was the perfect opportunity to shoot some aqueous explosions which I have wanted to try for sometime as an alternative to water drop shots.
How:
Photos of my setup for Eruption together with a detailed write up of how it was done can be found by following the link.
Please take the time to read Ryan Taylor's excellent Water Figure Tutorial which I pretty much followed.
My pc is running Multisine 1.74. Using the headphone output I have then connected my pc via the Mic input to an old stereo (at the the top of the picture) which is connected to the speaker.
The speaker was wrapped in clingfilm, and a small amount of a 50:50 cornflour (cornstarch)-water mix was placed on top.
I set the aperture to f/16 to get sufficient DOF as I was using my macro extension tube. This meant I could run a 5 second exposure without the ambient light spoiling the photo and giving me a window to do the following:
Using my wireless remote shutter I triggered the camera. During the 5 second exposure I activated a 0.2 sec pulse at a frequency of 120Hz on my pc and using a PT-04 wireless flash trigger in the other hand tried to time the flash to coincide with the sound. This took several attempts to time it right, and in actual fact the final shot is actually a blend in CS3 of two images in order to increase the drama.
The ghosting in the final edit is not an artefact of blending the two images, but due to some double triggering of the flashes when I pressed the remote trigger.
Strobist info:
1. Olympus FL-36R (1/32 power) with flip down diffuser, 8" to the right of the subject and at 15 degrees upwards;
2. YN460-II (1/32 power) with flip down diffuser, 8" to the left of the subject and at 15 degrees upwards.
Both flashes triggered with a PT-04 wireless trigger.
The pink/orange hues in the conflour-water mix of the final shot are, I think, attributable to the flashes bouncing off the bare plaster walls. This was not intended but presumably it would have helped to soften the light as specular highlights are not too much of a problem.
The final edit involved usual adjustments in LR3.6 to saturation, levels, sharpening etc together with burning in CS3 to darken the background which in the original shot I felt was distracting.
Learnt:
How to take a Water Figure shot, although there is lots of room for improvement when you look at Ryan Taylor's work which is just stunning. I learnt that it is a good way to kill a couple of hours.
Improvement:
Colour. Bolder, primary colours would add to the impact of this shot.
Lighting. Lots of experimentation possible here such as use of a Stofen or other diffuser to soften the light, use of filters, changing the position and directionality of the light.
Surface. I wrapped the speaker in cling film which did not result in a perfectly smooth surface, although as I shot in macro mode with shallow DOF means it is not too distracting. Ryan Taylor uses a stretched balloon but my speaker was way too big for that.
Timing. I will invest in a HiViz multi-trigger at some point which will give me much more control over shots of this type or classic water drop shots. That said my shoot and see technique wasn't too bad as I got a couple of good explosions - I was running at about a 1 in 10 ratio as sometimes I would manage to not click the button on the pc (I was looking the other way and if my mouse moved, the button was missed) or the flashes didn't fire.
- Messages
- 8,398
- Name
- Lynne
- Edit My Images
- Yes
Hi David
just love your Power image Not good enough to offer crit so suffice to say...LOVE IT
just love your Power image
Not good enough to offer crit so suffice to say...LOVE IT
OP
- Messages
- 218
- Name
- David
- Edit My Images
- Yes
Into the Void
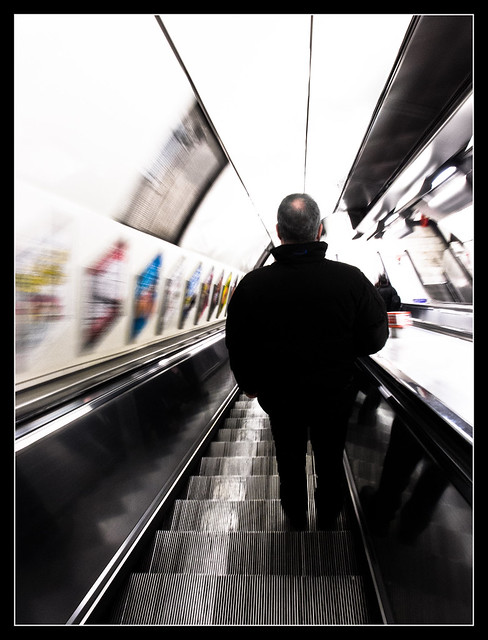
Week 41 - Rapid by morganthecat, on Flickr
What:
A motion blurred photo of a commuter travelling down the escalator at London Bridge Underground Station.
Why:
I wanted to try something different in terms of the motion blurred shots by keeping the subject in focus whilst the surroundings blur, and my panning technique needs a lot of work so this shot from behind allowed me to stay still relative to the subject.
How:
Shot with a longish exposure such that the advertising boards to the side are blurred whilst the subject and stairs remain in focus.
Learnt:
A different approach to motion blur - want to take this shot again on the travelators at either Heathrow or Waterloo underground as examples.
Improvement:
Composition. There needs to be more drama in what happens around the subject, particularly to the subject's right, to convey a greater sense of rapidly descending into the bowels of the underground.
Post processing. The limited dynamic range of the XZ-1 means I have lost a lot of detail in the lighting in the ceiling. I struggled to get the right look without being over saturated as I wanted to bring out the detail of the advertising signs.
Shutter speed. I could have afforded to go with a slower shutter speed as the subject remained fairly still.
OP
- Messages
- 218
- Name
- David
- Edit My Images
- Yes
The Guiding Thread
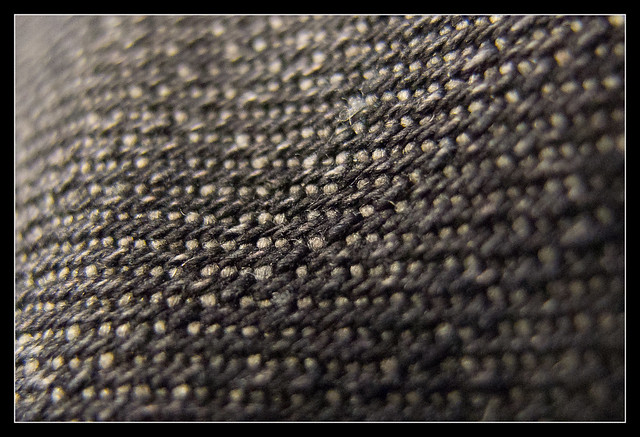
Week 42 - Weave by morganthecat, on Flickr
What:
A macro shot of the weave of my jeans as I travelled home on the train.
Why:
A simple interpretation of this week's theme.
How:
Shot in Super Macro mode and then usual adjustments made in LR 3.6
Learnt:
Just how competent a macro performer my compact XZ-1 actually is. In many ways, it is easier to get macro shots with this than with my E-30 using an EX-25 extension tube.
Improvement:
Composition. There is nothing for the eye to rest on, nor is the eye drawn in this shot and as a result it lacks interest.
DOF. I shot with a highish ISO and wide open to get the shutter speed up but I should have given more thought to the DOF of the shot given that I was shooting in Super Marco mode - I find it's too shallow and would have benefited from more DOF in the final edit.
OP
- Messages
- 218
- Name
- David
- Edit My Images
- Yes
Untitled

Week 43 - Abstract by morganthecat, on Flickr
What:
This will somewhat give away the nature of an abstract shot if I say what it is.
Why:
This will somewhat give away the nature of an abstract shot if I say why I shot it.
How:
Abstract photo taken, usual adjustments in LR 3.6 and then blended in CS3 with struckdumb's Film Border that I found on deviantart, before deleting the edges of the original shot layer so that it fitted the border.
Learnt:
Playing around with blending modes and layers to place a "background layer" inside a border.
Although not used in the final edit, I also learnt about how to create an identity plate with transparent space to use as a frame or border in the "Print" tab of LR 3.6.
For details of how to create png files with transparent spaces, see here. The technique involves creating a duplicate layer to work on rather than your background layer. Alternatively, click on the drop down menu on the eraser tool and select Background Eraser Tool or Magic Eraser Tool - using these erasers will reveal a transparent (chequered in Photoshop) space rather than reveal the background colour.
For details of how to use creative borders in Lightroom see Gavin Hoey's tutorial here.
Improvement:
Border. By choosing such an intricate border has drawn the eye from the abstract nature of the intended shot. A simpler, more classic film negative border rather than a distressed border may have been more appropriate.
Last edited:
- Messages
- 14,766
- Name
- Michael
- Edit My Images
- No
Hiya David, rapid is very good, I like the composition. As you say for weave, nothing for the eye to rest on, but it looks great, the dof looks good and it is nice and sharp.
Abstract fits the theme very well, great bit of processing, and I do like the borders too.
Merry Christmas!
Abstract fits the theme very well, great bit of processing, and I do like the borders too.
Merry Christmas!
OP
- Messages
- 218
- Name
- David
- Edit My Images
- Yes
Thanks Michael, and merry Christmas to you too.
10 shots (including the re-shoot) to do in 7 days... tough ask but hope to do it. Disappointed I never stuck to a proper 52 each week but still will be an achievement.
10 shots (including the re-shoot) to do in 7 days... tough ask but hope to do it. Disappointed I never stuck to a proper 52 each week but still will be an achievement.
drodd
Also loves to mass debate
- Messages
- 5,519
- Name
- Dawn
- Edit My Images
- No
Hiya David,
Apologies that I have not popped past for some while, I have however always viewed each post, but at this time the year there has just been so much going on as I am sure you will appreciate. I trust you have had a fantastic festive season, full of love, joy and happiness.
So here I am now, after getting Christmas over and done with, to catch up on commenting on your recent posts.
Week 38 - Fun: Hmmmm, TBH I am slightly disappointed with this one, especially considering the amazing quality and thought of your previous weeks. But as you have already pointed out in your expose, I will not say more, except that ... we have all experienced a week or more where the inspiration has been lacking. However, I do like the colours and in a way it reminds me of the movie 'Big' with Tom Hanks.
Week 39 - Volume: Well done on the cloning, very impressive and if you had not mentioned and posted the original I would never have noticed the difference. I'm not so keen on the crop .... which impacts on the composition, but I guess that would have involved a lot more cloning to remove the table. Well done to you though for taking on the challenge.
Week 40 - Explode: Wow this is great, and back to your true form This is something I would like to try some time next year. I would have never thought of cornflour water mix, so thanks for that tip, links and settings
Week 41 - Rapid: Excellent and I think you have captured the motion really well. It has a sort of 3D effect. Well done!
Week 42 - Weave: I agree with your self critique, however I had never thought about how intricate the weave of denim is, which you have shown here. I think a colour version of same would have provided more interest to the shot. :shrug:
Week 43 - Abstract: Certainly fits the theme, and I really like the processing on this one (although not sure about the border .... and that is rich coming from me ). So go on ..... what is it? I look at it and think it is blinds in a window, shutting off the world outside.
David, don't be so harsh on yourself .... the Photo52 is your own project and you dictate and decide when you can post. We all have other commitments, but the fact that you have got this far is commendable and I do hope you manage to complete the challenge, even if it is not before the New Year.
You have been a true inspiration throughout the year, I have learned so much from your project. The detail that you include with same is valuable information and a true example of a well thought out and composed Photo52.
The photos that you have produced are amazing and you should be proud of what you have achieved to date, and I for one would love to see your final shots.
It has been great to have you on our team this year, and I look forward to seeing you complete the project.
All the best for the New Year.
Take care
Cheers
Dawn
Apologies that I have not popped past for some while, I have however always viewed each post, but at this time the year there has just been so much going on as I am sure you will appreciate. I trust you have had a fantastic festive season, full of love, joy and happiness.
So here I am now, after getting Christmas over and done with, to catch up on commenting on your recent posts.
Week 38 - Fun:
Hmmmm, TBH I am slightly disappointed with this one, especially considering the amazing quality and thought of your previous weeks. But as you have already pointed out in your expose, I will not say more, except that ... we have all experienced a week or more where the inspiration has been lacking. However, I do like the colours and in a way it reminds me of the movie 'Big' with Tom Hanks.Week 39 - Volume: Well done on the cloning, very impressive and if you had not mentioned and posted the original I would never have noticed the difference. I'm not so keen on the crop .... which impacts on the composition, but I guess that would have involved a lot more cloning to remove the table. Well done to you though for taking on the challenge.
Week 40 - Explode: Wow this is great, and back to your true form
This is something I would like to try some time next year. I would have never thought of cornflour water mix, so thanks for that tip, links and settings Week 41 - Rapid: Excellent and I think you have captured the motion really well. It has a sort of 3D effect. Well done!
Week 42 - Weave: I agree with your self critique, however I had never thought about how intricate the weave of denim is, which you have shown here. I think a colour version of same would have provided more interest to the shot. :shrug:
Week 43 - Abstract: Certainly fits the theme, and I really like the processing on this one (although not sure about the border .... and that is rich coming from me
). So go on ..... what is it? I look at it and think it is blinds in a window, shutting off the world outside.David, don't be so harsh on yourself .... the Photo52 is your own project and you dictate and decide when you can post. We all have other commitments, but the fact that you have got this far is commendable and I do hope you manage to complete the challenge, even if it is not before the New Year.
You have been a true inspiration throughout the year, I have learned so much from your project. The detail that you include with same is valuable information and a true example of a well thought out and composed Photo52.
The photos that you have produced are amazing and you should be proud of what you have achieved to date, and I for one would love to see your final shots.
It has been great to have you on our team this year, and I look forward to seeing you complete the project.
All the best for the New Year.
Take care
Cheers
Dawn
OP
- Messages
- 218
- Name
- David
- Edit My Images
- Yes
Dawn
Thank you for your very kind comments. It is nice to know that my contributions have been appreciated as I know how remiss I have been in offering feedback. Part of the reason has been as I play catch up, I wanted to avoid being influenced by others' ideas.
The 'subject' of Week 43 - Abstract is actually the tarpaulin covering on the scaffolding along the outside of Victoria Station, with the working lights diffused by the material. I then rotated it 90 degrees to make it even more abstract.
The desaturated colouring in Week 42 - Weave was chosen as there was a generally unpleasant tint caused by the lighting on the train when I took this photo of my leg
Still 10 shots to take in only 3 days It will either be a compromise in my creativity/quality or an extension of the deadline. I am off to Paris 4th-9th January, so plenty of inspiration to be had there but I would like to complete before then.
David
Thank you for your very kind comments. It is nice to know that my contributions have been appreciated as I know how remiss I have been in offering feedback. Part of the reason has been as I play catch up, I wanted to avoid being influenced by others' ideas.
The 'subject' of Week 43 - Abstract is actually the tarpaulin covering on the scaffolding along the outside of Victoria Station, with the working lights diffused by the material. I then rotated it 90 degrees to make it even more abstract.
The desaturated colouring in Week 42 - Weave was chosen as there was a generally unpleasant tint caused by the lighting on the train when I took this photo of my leg
Still 10 shots to take in only 3 days
It will either be a compromise in my creativity/quality or an extension of the deadline. I am off to Paris 4th-9th January, so plenty of inspiration to be had there but I would like to complete before then.David
OP
- Messages
- 218
- Name
- David
- Edit My Images
- Yes
After and Before
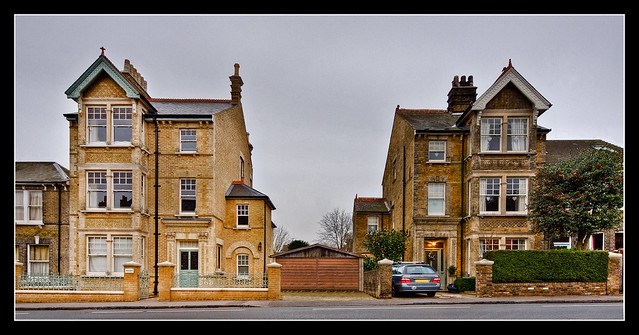
Week 44 - Pair by morganthecat, on Flickr
What:
Photo of two similar, albeit not identical, Victorian houses along Newton Road in Faversham.
Why:
The renovation of Rose Bank (left) has completed in 2011. I have been fascinated to see the revealing of such a vibrant and colourful building. My view of Victorian buildings has always been that they are dour, dark, coal stained, imposing monoliths of Dickensian suppression. And Rose Bank probably became this in just a matter of months. But also this reveals the truth that when originally built they were sparkling jewels of colour with ornate and intricate detailing.
I have intended to take this photograph since earlier in the year when the renovation was complete as I think it is a magnificent building, as of course is its more classically envisaged neighbour. It was a lousy day with lousy, dull and dreary flat light but I needed to shoot this as my penultimate submission to the 2011 edition of A Year in the Life of Faversham.
How:
Composition: shot from down low which may appear a curious choice given that I knew I would need to deal with both keystoning and distortion in PPing, but it was a purposely choice as I wanted to remove distracting elements behind the garage in the final edit (I suppose I could have shot from a higher vantage point and cloned these out instead).
HDR: a handheld 5 shot HDR covering +/- 2 eV, as I wanted to get as much detail and pop out of this image as possible especially given that it was shot on a dull, flat day. The RAW images were adjusted in LR 3.6 first - this included recovery to ensure as much detail was retained, fill light and blacks, sharpening, noise adjustments, clarity and a little vibrance and saturation - before processing in Photomatix Pro with I hope a degree of subtlety.
Keystoning: the HDR image was then imported as the tif file into CS5 and the keystoning was addressed using a combination of the distortion and skew tools in the Free Transform mode.
Cloning: the telephone wires and street lamp were removed using a combination of the clone stamp tool and the spot healing brush in content aware mode. It was a case of empirically using each depending on the situation.
Removal of wires was made easier using the Pen Tool which by selecting two anchor points will draw a straight line - on a PC you can take your straight line and 'bend' it slightly by adding a third anchor point in the middle and then whilst holding the Ctrl key (to bring up a hand icon) you can then drag the third anchor point so that the straight line curves to match the drooping wires. This creates a path and if you then select the spot healing brush, you can stroke the path with the brush by selecting the Paths tab (to the right of your standard Layers tab in the bottom right hand corner of Photoshop) and clicking the "Stroke path with brush" icon at the bottom (where the "Create fill or adjustment layer" icon is on the Layers tab).
I found that where the wire crossed brick work, roof tiles and sky, it worked best if you dealt with the wire as if there were 3 separate wires rather than attempt to do it in one go.
Removal of the cars in front of the garage was a case of taking small sections and using the clone stamp tool to 'build' the garage door. The right hand side wall was cloned just using the clone stamp tool in small patches rather than resorting to the vanishing point clone tool as ably demonstrated by the excellent Gavin Hoey.
Dodge/burn: the final step was to lighten Rose Bank and darken the neighbouring house as the HDR process had made the two buildings look too similar in their vibrancy. This was a subjective choice, and is based on the several times I have stopped to look at Rose Bank during and following its renovation.
Learnt:
The varied ways of using the clone stamp tool as well as the excellent spot healing brush in content aware mode in my newly upgraded CS5.
How to remove keystoning in CS5.
A number of keyboard short cuts which I have overlooked as I don't tend to use Photoshop a great deal, preferring Lightroom as my standard tool of choice.
Improvement:
Sky. I am unsatisfied with the sky, particularly where the removal of the telephone wires has left some lightening in the sky (that may not be the case, and may be more my imagination).
Composition. I should have shot slightly wider to ensure that once I had removed the keystoning, I would retain the far left pillar of the front wall.
Dodge/burn. I should have applied a touch of the history brush to remove some of the haloing (at least to my eye) around Rose Bank following the dodging to help give the sense of how radiant the building looks next to its neighbour. I also appear to have failed to dodge a little of the top of the gable wall, and not dodged the chimney stack at all.
Distortion. I purposely did not want to shoot ultra wide as the distortion of the Olympus 7-14mm, although not severe, is somewhat complex and I did not want to have to try and correct that. However whilst I have successfully addressed the keystoning at the far left and right, there does appear to be some distortion remaining in the 'internal' edges of the two buildings.
Artistic licence. There was a big decision to be made in the presentation of this image. Whether for a historical 'record shot' of these buildings I should have included the street lamp and telephone wires of the original shot, or to offer an interpretation of the building when it was originally built without these items. I decided to go with the latter as I wanted to not draw the viewer's attention away from the comparison of the buildings which is the purpose of the image. I am very please with the final image, but will not be too distressed if it is not selected for the Faversham 365 as it is an artistic interpretation and not truth.
For reference, here is the base exposure used for the HDR:
Untitled by morganthecat, on Flickr
Last edited:
OP
- Messages
- 218
- Name
- David
- Edit My Images
- Yes
One in Six
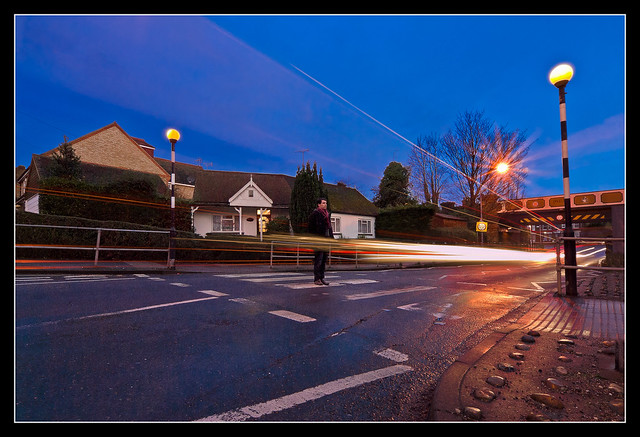
Week 45 - Safe by morganthecat, on Flickr
What:
Light trails of cars crossing the zebra crossing whilst I stand in the middle of the crossing.
Why:
One in Six is a reference to the 6 zebra crossings in the town, but also reflects the odds I feel of me being knocked down every time I cross at this crossing to and from work. It is absolutely shocking the number of drivers that fail to stop. I have even been on the crossing before and somebody has gone through. It isn't terribly well lit, and I do tend to wear dark clothes but nonetheless, most drivers are local and know of the crossing. It is just laziness, or plain bloody mindedness or poor driving that leads to this.
I envisaged this shot many months ago and finally committed to taking this as it was my last submission to the 2011 edition of A Year in the Life of Faversham.
How:
This is a composite of 5 photos; 4 were taken with the light trails in mind, whilst the fifth was taken of myself in the middle of the crossing. These were then blended in CS5 using a combination of the lighten blend modes (stacked as layers using Russell Brown's Stack-a-Matic script) for the light trails with the normal blend mode for shot of myself - this last one was added as a layer and the layer mask was applied to remove all elements other than myself from this shot. Some cloning was applied and then finally the usual adjustments in LR 3.6.
Learnt:
Use of Russell Brown's Stack-a-Matic script which I intend to use more extensively in 2012 as an alternative work flow for star trail photography.
Improvement:
Composition. Shooting wide angle means that whilst there are leading lines from the star trails and the road markings, the principal subject of the photograph (namely myself at risk of being run down) is not strong enough in the image.
OP
- Messages
- 218
- Name
- David
- Edit My Images
- Yes
That's all folks in terms of my submissions for my 52 during 2011. I will be carrying on though and hope to finish by the end of January.
Looking back on the year I have learnt a great deal, and I have achieved some shots that have really stretched me and pushed the boundaries. It is somewhat tinged with sadness that I didn't complete on time due to work and personal issues. I have made some compromises along the way but I have continued to shoot in sequence.
I apologise for not contributing more to others' 52s but once I have completed mine, I look forward to going back and looking at everyone else's contributions.
OP
- Messages
- 218
- Name
- David
- Edit My Images
- Yes
Living in a Box
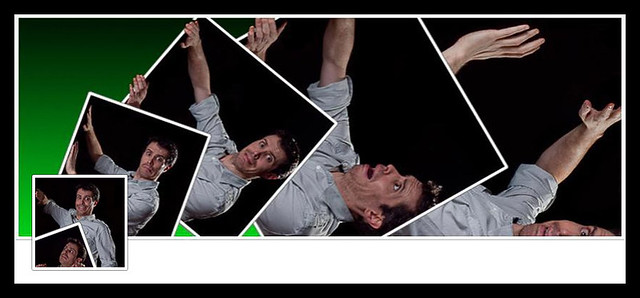
Week 46 - Living by morganthecat, on Flickr
What:
My current facebook timeline cover photo that extends the profile pic into the cover as one 'seamless image'.
Why:
The idea of "Living in a Box" had popped into my head and I decided I wanted to shoot a series of images in which I was trapped inside a box, in a Marcel Marceau mime kind of way.
Then along came the new facebook timeline and I realised I would be able to apply the idea to my new cover.
How:
Many shots of me in various poses against my bedroom wall were taken. My walls are Dulux Night Jewels 2 which is a dark grey.
Strobist info was as follows:
1. YN460-II (1/8 power) into a 30" reflector umbrella, 48" to the right of the subject and at 30 degrees in front of the subject;
2. Olympus FL-36R (1/16 power) bare, 18" to the right of the subject and at 30 degrees behind.
Both flashes triggered with a PT-04 wireless trigger.
The individual photographs were then combined in a composite using CS5 and arranged using Neal Campbell's excellent facebook timeline cover psd file.
There was quite a lot of light spillage on the walls which I dealt with by burning each individual photo once it was placed on the cover with the burn tool set to 100% exposure and set for shadows.
Photo frames:
The 'photo frames' were created in CS5 by first opening a new square layer with a transparent background that was 10 px larger than the final frame would be.
Onto this transparent background was placed a black square that was layered upon a white rounded square, that was 8 px larger than the black square and with a radius of 3 px, which in turn was layered upon a 50% grey rounded square that was 2 px larger than the white square and which also had a radius of 3 px. This was all done using the 'shapes tool' towards the bottom of the left hand tool bar below the Path Selection Tool.
This can be done haphazardly as the next step involves taking the various shapes and aligning them by selecting all of the background layer then selecting the three 'shapes layers' and using Layer>Align Layers to Selection>Vertical Centres and then repeating this using Layer>Align Layers to Selection>Horizontal Centres.
The black square was selected using the magic wand tool and deleted to reveal a transparent aperture.
Action:
Although the 4 layers had to be created manually because you cannot retrospectively edit the properties of a shape, the selection of the background layer together with the other layers, the alignment, selection of the black aperture and deletion could all be saved as an Action which made this process much quicker.
Saving transparent files as png files:
Each photo frame was saved as a png file to allow the transparent background to be used in the final image - transparent images cannot be saved as jpgs where the transparency will be saved as a white background instead. Useful to know when wanting to create 'borderless' buttons or for watermarks.
Gradient background:
In the final image a gradient background was created by adding a layer filled with green to which a gradient layer was applied.
Cropping:
For the cover:
I used Neal Campbell's psd file as a template for the crop then deselected the layers relating to the template and the 'profile pic' and saved the remaining merged layers for the cover.
For the profile pic:
I used Neal Campbell's psd file as a template for the crop of the layers relating to the profile pic and then deselected the layer relating to the template and saved the remaining merged layers as my profile pic (these are the layers relating to what's inside the box that crosses the main body of the image into the negative space). Although your profile pic is a 125 px square, facebook requires that the minimum size used is 180 px square. As a result the crop I used was a 180 px square to minimise the amount of compression that facebook would apply.
Learnt:
How to create more creative timeline covers.
How to create a transparent border.
Improved my understanding of how powerful and efficient Actions can be in Photoshop.
Improvement:
Lighting. The weakest part of this image is my lighting which was done fairly quickly in order to give me the bank of images to use in the final edit. In particular I have some harsh shadows on my hands and the 'hair light' doesn't provide a great deal of separation from the background. However, as a proof of concept, I am pretty pleased with the outcome.
- Messages
- 8,398
- Name
- Lynne
- Edit My Images
- Yes
Hi David....Happy New Year to you
Always enjoy reading your info ( though mostly it's all gone straight over my head - editing & me don't mix)....your Pair image was even better as you showed the start photo....gives me a much clearer idea of a) how much work you put in b) how much editing you can do to an image c) how flippin good you are at this lark
Been a great thread to follow , may not have commented much but always checked out your images & spiel....look forward to seeing the remainder of your project & hopefully one day, I'll be able to use some of the techniques you've talked about
Always enjoy reading your info ( though mostly it's all gone straight over my head - editing & me don't mix
)....your Pair image was even better as you showed the start photo....gives me a much clearer idea of a) how much work you put in b) how much editing you can do to an image c) how flippin good you are at this lark Been a great thread to follow , may not have commented much but always checked out your images & spiel....look forward to seeing the remainder of your project & hopefully one day, I'll be able to use some of the techniques you've talked about
drodd
Also loves to mass debate
- Messages
- 5,519
- Name
- Dawn
- Edit My Images
- No
Hiya David,
You are doing a great catch up here, don't give up you will make it! If anything, your Photo52 has been a prime example of how things should of been done, but heyho .... each to their own and I probably speak for many taking part in last year's 52, but each has their own way of presenting. I think you have done a fantastic job, and have always looked forward to seeing same.
My one question is .... with week 44 -Pair .... why did you clone the cars on the left but not on the right? :shrug:, just seems odd if you had gone to such an effort to remove same on the left.
Safe: absolutely brilliant I love the 'outside of the box' approach and I think you have executed same quite well. You have self critiqued that you don't feel you have portrayed the 'run down' effect well enough .... however, I think you have captured it well with the motion of the light trails.
Week 46: Living ..... I absolutely love the concept behind this shot, my only minor nit pick is that the white band below is not doing what you wanted it do. It is actually quite a bit of a mishmash (sorry) :shrug:
I really like the idea and concept, however, I think yourwould have been better opting for more of a 'box' shape rather than rectangle, and had a more consistent background. The white bar at the bottom really breaks it for me, and I have tried to view it threw different eyes, but it is just not working for me.
I am sorry
D x
You are doing a great catch up here, don't give up you will make it! If anything, your Photo52 has been a prime example of how things should of been done, but heyho .... each to their own and I probably speak for many taking part in last year's 52, but each has their own way of presenting. I think you have done a fantastic job, and have always looked forward to seeing same.
My one question is .... with week 44 -Pair .... why did you clone the cars on the left but not on the right? :shrug:, just seems odd if you had gone to such an effort to remove same on the left.
Safe: absolutely brilliant
I love the 'outside of the box' approach and I think you have executed same quite well. You have self critiqued that you don't feel you have portrayed the 'run down' effect well enough .... however, I think you have captured it well with the motion of the light trails.Week 46: Living ..... I absolutely love the concept behind this shot, my only minor nit pick is that the white band below is not doing what you wanted it do. It is actually quite a bit of a mishmash (sorry) :shrug:
I really like the idea and concept, however, I think yourwould have been better opting for more of a 'box' shape rather than rectangle, and had a more consistent background. The white bar at the bottom really breaks it for me, and I have tried to view it threw different eyes, but it is just not working for me.
I am sorry
D x
OP
- Messages
- 218
- Name
- David
- Edit My Images
- Yes
Been a great thread to follow , may not have commented much but always checked out your images & spiel....look forward to seeing the remainder of your project & hopefully one day, I'll be able to use some of the techniques you've talked about
Thanks Lynne, I don't feel so bad about my lack of contribution to others' threads if others have found my musings useful. Also a great aide memoire for me when I come to try these things again in the future by which time I will have forgotten how I did it.
And you have some great strengths too... your panning technique is second to none and you have some wonderful motorsport photos.
Well done for signing up for 2012 too!
They are 2 very good pics David, will have to have a proper read of that facebook time line and try and make sense of it.
Thanks Michael. Another one doing a 2012 Photo 53 - how brave.
If anything, your Photo52 has been a prime example of how things should of been done...
My one question is .... with week 44 -Pair .... why did you clone the cars on the left but not on the right? :shrug:, just seems odd if you had gone to such an effort to remove same on the left.
Week 46: Living ..... I absolutely love the concept behind this shot, my only minor nit pick is that the white band below is not doing what you wanted it do. It is actually quite a bit of a mishmash (sorry) :shrug:
You are too kind as always Dawn. I presume you're doing a 2012 52. I will be looking for another less consuming challenge for 2012.
Week 44 - The cars on the left covered background that could easily be constructed from cloning existing elements. Cloning out the right hand car required 'building' a cloned front door which is beyond my capabilities as there was no equivalent bottom section of the door to work from.
Week 46 - I have actually taken a screen shot of my facebook page and then removed the personal information. The composition was not of my own artistic choice but rather it was a demonstration of how such techniques can be used to generate more creative use of the new timeline cover feature. If you're not a facebook user, it wouldn't make much sense I admit
drodd
Also loves to mass debate
- Messages
- 5,519
- Name
- Dawn
- Edit My Images
- No
<snip> Dawn. I presume you're doing a 2012 52. I will be looking for another less consuming challenge for 2012.
Week 44 - The cars on the left covered background that could easily be constructed from cloning existing elements. Cloning out the right hand car required 'building' a cloned front door which is beyond my capabilities as there was no equivalent bottom section of the door to work from.
Week 46 - I have actually taken a screen shot of my facebook page and then removed the personal information. The composition was not of my own artistic choice but rather it was a demonstration of how such techniques can be used to generate more creative use of the new timeline cover feature. If you're not a facebook user, it wouldn't make much sense I admit
Hi David, yes I am a Facebook user, but have never posted from same here, purely because I don't know how to ...... and said pics were probably taken long before my DSLR days.
I can appreciate your reasoning behind not cropping the right car, I guess it would be tricky, but you have never come across to be defeated by same. On the other hand it is towards the end of the project and I can fully understand flagging at the end. I think we have all endured same (believe me the 2012 team don't know what they are letting themselves in for), and if they do make it to the end all singing and dancing .... they have missed something.
David, it has been a pleasure having you on our team this year, the effort you have put into your project is amazing and I have learned so much from you.
I will not be doing another Photo52 this year, however I will be concentrating on some personal projects ..... so watch this space
Happy New Year to you and all the best for 2012 ..... please keep in contact.
Cheers
Dawn