
and the site receives a small commission
You are using an out of date browser. It may not display this or other websites correctly.
You should upgrade or use an alternative browser.
You should upgrade or use an alternative browser.
Tutorial High Pass sharpening - my take on it,
- Thread starter Hacker
- Start date
- Messages
- 59
- Name
- stephen
- Edit My Images
- Yes
Excellent tutorial and technique.
And the creating an action out of it guide is well useful as well!
And the creating an action out of it guide is well useful as well!
- Messages
- 3,307
- Name
- Nick
- Edit My Images
- Yes
Why flatten the image? The changes are set in stone then
Can't save as a jpeg if its more than one layer, I usually save it before I flatten so I can still make changes and then flatten and resize to save as a jpeg
- Messages
- 651
- Name
- Christian
- Edit My Images
- Yes
Can't save as a jpeg if its more than one layer, I usually save it before I flatten so I can still make changes and then flatten and resize to save as a jpeg
Just save as.. Joe. Will flatten it due you
")
- Messages
- 1,372
- Name
- Matthew
- Edit My Images
- No
I much prefer to set the pixel radius roughly correct, usually around 1.2 but it depends on the image size, then set to overlay, and leave at 100%. Rather than horribly over sharpen and bring back, I like the grey to be just faint outlines, think it works a lot better.
You can then also mask it so it only sharpens subject etc.
You can then also mask it so it only sharpens subject etc.
- Messages
- 4,182
- Name
- Paul
- Edit My Images
- Yes
This is interesting... I actually use a variant of this technique to create a mask to apply to a highly sharpened version image. I hope @Hacker doesn't mind me posting my alternative technique here as it does use some similar features
The technique basically uses the existing PS sharpening tools (e.g. USM or Smart Sharpen) but by creating an automatic mask, the areas which are sharpened are strictly limited (and blended automatically) to those areas containing hard edges.
1. Create a new layer and use the High Pass filter (again, 10pix is good) to create a colour image of the "edges" - ensure this new layer is at the top of your layer stack
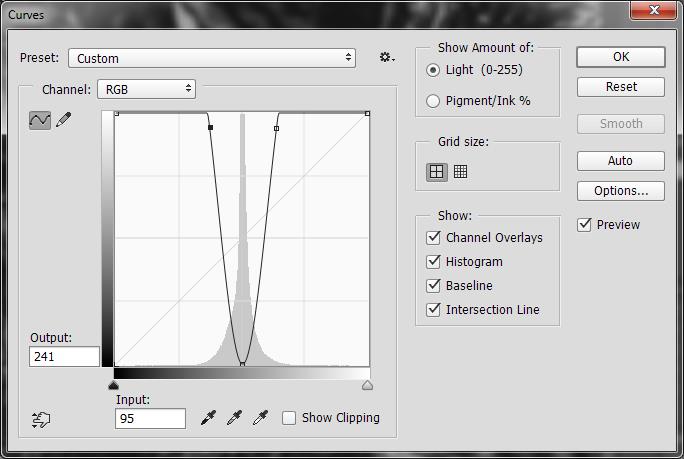
2. Desaturate this and then go to Image/Adjustments/Curves (which will just affect this new selected layer) and create a V-shape a bit like this (you want the width of the trench broadly matching the spread of midtones in your layer):
3. Go to your channels list and Ctrl+click on the RGB channel, which will turn your greyscale "edges" image into a selection. I tend to save this as a new channel by clicking the create channel icon
4. Now delete this edges layer because we've finished with it and clear your selection (Ctrl+D)
5. If your image has lots of layers, create a new merged layer to sharpen - I like to use Smart Sharpen - but the trick here is to apply quite a bit more sharpening than you usually would, because it will be tamed down in the next step
6. Ctrl+Click your saved "edges" channel to make that the current selection
7. Click on your sharpened layer and then click the create mask icon, which will then apply your current selection as a mask
You're done and you've basically just applied smart sharpening to the areas which really require it. You can further fine tune this by removing (painting with a black brush) any parts of the sharpening layer's mask you don't want sharpened, manually.
The great thing about this is it more or less prevents sharpening artefacts in areas which don't really require sharpening (OOF areas, solid colour - even if a bit noisy).
The technique basically uses the existing PS sharpening tools (e.g. USM or Smart Sharpen) but by creating an automatic mask, the areas which are sharpened are strictly limited (and blended automatically) to those areas containing hard edges.
1. Create a new layer and use the High Pass filter (again, 10pix is good) to create a colour image of the "edges" - ensure this new layer is at the top of your layer stack
2. Desaturate this and then go to Image/Adjustments/Curves (which will just affect this new selected layer) and create a V-shape a bit like this (you want the width of the trench broadly matching the spread of midtones in your layer):
3. Go to your channels list and Ctrl+click on the RGB channel, which will turn your greyscale "edges" image into a selection. I tend to save this as a new channel by clicking the create channel icon
4. Now delete this edges layer because we've finished with it and clear your selection (Ctrl+D)
5. If your image has lots of layers, create a new merged layer to sharpen - I like to use Smart Sharpen - but the trick here is to apply quite a bit more sharpening than you usually would, because it will be tamed down in the next step
6. Ctrl+Click your saved "edges" channel to make that the current selection
7. Click on your sharpened layer and then click the create mask icon, which will then apply your current selection as a mask
You're done and you've basically just applied smart sharpening to the areas which really require it. You can further fine tune this by removing (painting with a black brush) any parts of the sharpening layer's mask you don't want sharpened, manually.
The great thing about this is it more or less prevents sharpening artefacts in areas which don't really require sharpening (OOF areas, solid colour - even if a bit noisy).