- Messages
- 7,936
- Name
- Terry
- Edit My Images
- Yes
Correcting simple Stitching errors in Panoramas.
Small stitching errors are often found in handheld Panoramas no matter which software is used. They are most visible in the form of shifted and broken lines.
Telephone lines, roof lines and curbs are perhaps the most common visible stitching errors. Fortunately they are usually very easy to correct.
The following is the method I use to deal with the split lines as that is the most common
Method All the images are shown at 100% view
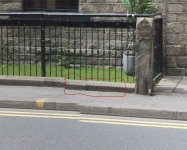
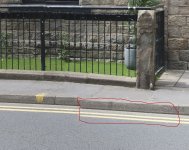
in these images Two areas of split lines are clearly visible
The First thing to do is to enlarge the image to 100% in photoshop.

Then with the lasso tool draw a free hand selection around the part of the image that you want to shift and distort to fit. Indicated by the red line, As I am going to move the patch upward I have given sufficient space at the bottom to cover the move. It is usually best to give less space on the opposite edge as you do not want to cover in more detail up than necessary.
You will note that I have extended the selection as far as I can to the right. This is because I want the correction to be a gradual as possible, so I will not move the extreme right of the patch at all. and move the left hand side to line up the image.
(a fairly random free hand selection is less likely to be noticeable in the finished image than a regular one, and takes less cleaning up.}
To move the selected area to line up, it is first necessary to make a copy of the selection.
So... Ctrl +C to copy the patch
And Ctrl+V to paste it back over the top of the image.
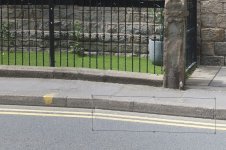
At that point Go to Edit- Transform- Distort. And you will then see a transform box around the patch area . You can then stretch move and otherwise distort the image to correct the image by dragging the various points on the box. In this instance I was able to cover up the faulty stitch in the stone railing curb and the railing to fit over the base image.
In the layers palette you will notice that you have created a new layer of the patch, so if you are satisfied with the change it is best to merge the layers by pressing Ctrl+E
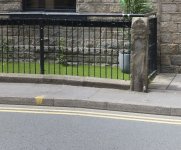
You can then do any minor detailed adjustments with the clone tool to hide any remaining tell tales.
I then went through the entire process again with the break in the double yellow lines and the curb. This time I needed to clone out some tonal differences in the stone work as the join line was still apparent.
I can do most simple corrections, like this, in under two minutes.
However if you have major stitching errors the fault probably lays in the software's choice of control points.
In soft ware like PTGui and PTAssembler this is reasonably easy to correct by removing the points with the highest distance errors, and replacing them with hand selected ones. Any points shown on moving objects such as leaves small branches, people, animals, clouds or water should be eliminated. As these are often the cause of the errors.
Unfortunately Adobe, and many other stitching programs, do not give you access to the control points. So you are Stuffed.
Small stitching errors are often found in handheld Panoramas no matter which software is used. They are most visible in the form of shifted and broken lines.
Telephone lines, roof lines and curbs are perhaps the most common visible stitching errors. Fortunately they are usually very easy to correct.
The following is the method I use to deal with the split lines as that is the most common
Method All the images are shown at 100% view
in these images Two areas of split lines are clearly visible
The First thing to do is to enlarge the image to 100% in photoshop.

Then with the lasso tool draw a free hand selection around the part of the image that you want to shift and distort to fit. Indicated by the red line, As I am going to move the patch upward I have given sufficient space at the bottom to cover the move. It is usually best to give less space on the opposite edge as you do not want to cover in more detail up than necessary.
You will note that I have extended the selection as far as I can to the right. This is because I want the correction to be a gradual as possible, so I will not move the extreme right of the patch at all. and move the left hand side to line up the image.
(a fairly random free hand selection is less likely to be noticeable in the finished image than a regular one, and takes less cleaning up.}
To move the selected area to line up, it is first necessary to make a copy of the selection.
So... Ctrl +C to copy the patch
And Ctrl+V to paste it back over the top of the image.
At that point Go to Edit- Transform- Distort. And you will then see a transform box around the patch area . You can then stretch move and otherwise distort the image to correct the image by dragging the various points on the box. In this instance I was able to cover up the faulty stitch in the stone railing curb and the railing to fit over the base image.
In the layers palette you will notice that you have created a new layer of the patch, so if you are satisfied with the change it is best to merge the layers by pressing Ctrl+E
You can then do any minor detailed adjustments with the clone tool to hide any remaining tell tales.
I then went through the entire process again with the break in the double yellow lines and the curb. This time I needed to clone out some tonal differences in the stone work as the join line was still apparent.
I can do most simple corrections, like this, in under two minutes.
However if you have major stitching errors the fault probably lays in the software's choice of control points.
In soft ware like PTGui and PTAssembler this is reasonably easy to correct by removing the points with the highest distance errors, and replacing them with hand selected ones. Any points shown on moving objects such as leaves small branches, people, animals, clouds or water should be eliminated. As these are often the cause of the errors.
Unfortunately Adobe, and many other stitching programs, do not give you access to the control points. So you are Stuffed.
Last edited:


