Light metering

Terry are you therefore saying that the highlights are not important? If you meter for the highlight being the brightest part of the image it makes sense that the rest of the image will fall into place. You can control the fall of light in other areas through the use of additional lights such as the fill light.

Also you may want to choose how bright the highlight is (again a creative decision)

Not at all. But a mid tone is more useful as a fix.
However the highlights and other tones are not produced by only the main light.
The other lights and fills also contribute to the total light received in the highlight and other areas. By pointing at the main light for your exposure you do not take this "extra light" in to account. The dome if pointed at the camera from the subject "sees" and adds and measures all the light from a 180° arc. Its translucence has been chosen to produce a standard tone in the resultant picture. This tone is not the same as a highlight.

It has a very similar resultant value to a standard grey card used with a reflected light meter. but takes into account that most subjects are not flat but are 3 Dimensional.
A standard grey card has the same reflectance as an average Caucasians skin. ( which is why it was first chosen.)

An Incident meter can achieve all this, with a single reading toward the camera.
Which is far simpler than using a grey card.

The highlight has never been used as the main reference in any Photography.

In all forms of photography one often need to sacrifice either extreme shadows or extreme highlight or both, for this reason nether is used as a reference. Detail in highlights are lost when they are closer than 5% of the base colour. (some might be there but you won't see them) the same applies to shadows.
 
Sekonic's own site states

"Advantages of Incident Meters

A better alternative to reading the light in many scenes is to use an “incident” meter. Handheld incident meters read the intensity of light falling on the subject and are usually taken from the subject position. Because they are not affected by variances in subject color or reflectance, incident meters accurately record the amount of light falling on the subject. In the majority of situations, an incident reading is extremely accurate and records tones, colors, and values correctly."

By metering anywhere other than to the light you are not metering the light falling "on" the subject.

Their diagram in the instructions show the meter pointing at the camera.
And it takes a reading of all the light falling on the subject that the camera can see.
 
Sekonic's own site states

"Advantages of Incident Meters

A better alternative to reading the light in many scenes is to use an “incident” meter. Handheld incident meters read the intensity of light falling on the subject and are usually taken from the subject position. Because they are not affected by variances in subject color or reflectance, incident meters accurately record the amount of light falling on the subject. In the majority of situations, an incident reading is extremely accurate and records tones, colors, and values correctly."

YOUR WORDS By metering anywhere other than to the light you are not metering the light falling "on" the subject


Their words go on to say

When you are taking an incident reading from the subject’s position, the meter should be held so that the white dome faces the camera lens, not the light source. This ensures that the light strikes the dome exactly as it is falling upon the subject.


.
 
Last edited:
But we're measuring light falling on the subject - you can't measure a mid tone as such with an incident flash meter. You are measuring light intensity at a particular point.

You make interesting points though.
 
Sekonic's own site states

"Advantages of Incident Meters

A better alternative to reading the light in many scenes is to use an “incident” meter. Handheld incident meters read the intensity of light falling on the subject and are usually taken from the subject position. Because they are not affected by variances in subject color or reflectance, incident meters accurately record the amount of light falling on the subject. In the majority of situations, an incident reading is extremely accurate and records tones, colors, and values correctly."

By metering anywhere other than to the light you are not metering the light falling "on" the subject.
Yes you are. The meter is as close to the subject as you can physically get it and is metering the light that reaches the subject.

As a lot of people have already pointed out, when the meter is at the subject position and pointing towards the camera, the meter sensor emulates the 3-dimensional qualities of the average subject and measures the amount of light that will be reflected towards the camera. And that's what you need to do because you need to meter the light as seen by the camera. That light is relevant, light that is bouncing off in other directions isn't relevant.

That's the crux of the matter.

Going back to the video you linked to, your source of misinformation is taking a meter reading from under the chin, in shadow. He is then reading to the light, which of course is wrong - but as he took the meter reading from the wrong place anyway the reading will accidentally end up about right.

Everyone has explained the principle to you many times over. Please stop arguing and actually carry out a simple test, because sometimes it's easier to learn by doing than to learn by listening to other people ...

Let's exaggerate things, for the sake of effect
Take a highly reflective flat subject as your rest subject - a 5 in 1 reflector, silver side towards camera, is ideal. Get the camera square to the subject.
Place a single light at an angle of say 45 degrees to the subject
Take a meter reading towards the camera, and take a shot
Now take a meter reading towards the light, and take a shot
Now post the results on here:)

Now, the error of metering to camera will be more obvious with this type of subject and with the light at an acute angle, but it should prove the principle to you.
 
Last edited:
But we're measuring light falling on the subject
Why do you want to measure the light falling on the subject? That doesn't really matter - it's the light that gets back to the camera that matters.

Do a very simple experiment and prove it to yourself.

Hold a torch vertically above the floor in a darkened room. You will get a circle of light of a particular intensity. Now move the torch from side to side in an arc. The round patch of light becomes an oval, and the intensity falls due to the same amount of light having to be spread over more and more area as you move the torch closer to the floor in your arc. Now, if you meter towards the torch, you will get a consistent reading - no matter whether the torch is pointing directly down or near enough along the carpet - it will say the same value. If you take pictures at that value, the pictures will all be of different. If you point the meter at the camera, as the incident light gets less, it will tell you to change exposure accordingly and the pictures will all be exposed the same.

The key thing to note is metering to the camera is telling you the exposure to set to get a consistent picture. If you point it at the light source, it will tell you the intensity of that light source, but tells you nothing of what the camera sees of that light source. This is the point of the dome on the Sekonics - to also put the angle of light in the equation.
 
Why do you want to measure the light falling on the subject? That doesn't really matter - it's the light that gets back to the camera that matters.
That's what I don't get

Do a very simple experiment and prove it to yourself.

Hold a torch vertically above the floor in a darkened room. You will get a circle of light of a particular intensity. Now move the torch from side to side in an arc. The round patch of light becomes an oval, and the intensity falls due to the same amount of light having to be spread over more and more area as you move the torch closer to the floor in your arc. Now, if you meter towards the torch, you will get a consistent reading - no matter whether the torch is pointing directly down or near enough along the carpet - it will say the same value. If you take pictures at that value, the pictures will all be of different. If you point the meter at the camera, as the incident light gets less, it will tell you to change exposure accordingly and the pictures will all be exposed the same.

The key thing to note is metering to the camera is telling you the exposure to set to get a consistent picture. If you point it at the light source, it will tell you the intensity of that light source, but tells you nothing of what the camera sees of that light source. This is the point of the dome on the Sekonics - to also put the angle of light in the equation.[/QUOTE]
 
Its not the same amount of light though as you move to an arc the light is further away but ill look at what you say
 
Its not the same amount of light though as you move to an arc the light is further away but ill look at what you say
No. Not if you keep it at the same distance with a piece of string. The intensity per unit area will fall as the same amount of light has a bigger area to cover. It is exactly the same phenomena which makes winters winter - the light from the sun is at more of an angle to us so is less intense, it's generally darker and colder because the intensity of both heat and light hitting each unit area of ground is less.
 
Cosine Law demo.

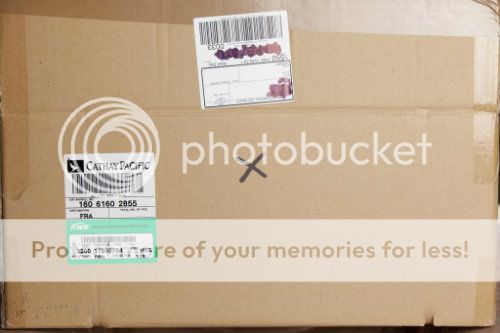
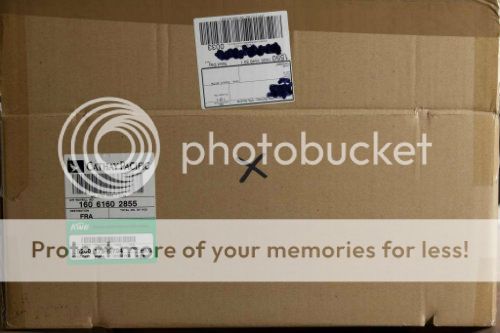
Cardboard box, quite similar tone and texture to skin with make-up. Bare skin is quite a bit more shiny and would show more difference - check out the shiny parcel tape along the top. First pic is with 80cm softbox right next to the camera, centre about 15 degs off axis. Second shot is with light moved round, about 75 degs off axis, so only 60 degs between the two.

In both cases, the centre of the light was exactly 1.2m from the centre of the box. Incident metering to the light showed f/4d3 in both cases, metering to the camera in the second shot showed a drop of 0.6 stops. Metering this differently, by taking a reflected light reading off a Kodak 18% grey card, the difference between the two readings was 1.2 stops. In fact, if the two images are exposed identically to match the tone in the centre of the box, the difference is 1.3 stops. And obviously enough, that was confirmed by the histogram ;)

Light close to camera axis
untitled-1661_zps5a738794-1_zpsd181b01e.jpg


Light moved round to the right, same distance, same camera settings. Subject brightness reduced by 1.3 stops
untitled-1660_zpsc9741084-1_zps2797fa93-1_zpsca58c2b2.jpg
 
Last edited:
But we're measuring light falling on the subject - you can't measure a mid tone as such with an incident flash meter. You are measuring light intensity at a particular point.

You make interesting points though.

All exposure meters are calibrated for a mid tone
Be they reflected light meters or incident meters.
Over the years that mid tone has varied slightly to keep pace with technology. It is often stated (inaccurately) to be an 18% grey.

An incident flash meter is no different.
If they were not, there would be no consistency between meters.
A spot meter records that spot (of what ever tone to be recorded as standard mid tone.)

From wiki
Exposure meter calibration

In most cases, an -incident light meter will cause a medium tone to be recorded as a medium tone, and a reflected-light meter will cause whatever is metered to be recorded as a medium tone. What constitutes a “medium tone” depends on meter calibration and several other factors, including film processing or digital image conversion.

Meter calibration establishes the relationship between subject lighting and recommended camera settings. The calibration of photographic light meters is covered by ISO 2720:1974.
 
Last edited:
All exposure meters are calibrated for a mid tone
Be they reflected light meters or incident meters.
Over the years that mid tone has varied slightly to keep pace with technology. It is often stated (inaccurately) to be an 18% grey.
An incident flash meter is no different.
If they were not, there would be no consistency between meters.
A spot meter records that spot (of what ever tone to be recorded as standard mid tone.)

From wiki

Yes, I didn't put this in my boxy post above so as not to confuse, but the difference between the incident reading and a reflected reading off a Kodak 18% grey card was 0.6 stops. It's always around that kind of difference, half a stop-ish, suggesting a calibration nearer 12-15% (Sekonic 308s). My camera appears to agree with those lower figures too.
 
One of the great things you can do with the Sekonic 358 is wind the dome in and out, very useful for when metering to camera.

Lastolite have changed their grey ezybalance from 18% to 12% to get a more accurate mid tone.

Richard I do wonder if some will believe you now that you have demonstrated it :)

Mike

Wouldn't count on it Mike :D TBH these threads always raise a few interesting questions - as in interesting to me, but of rather less practical significance ;)

I did some other tests too, that I won't bore anyone with showing, but shooting an identical set up at identical camera settings, but with six different lenses, all at f/8. Just to see how f/number translated to T/stop and all the other variables that a hand meter has no knowledge of.

I got variances that I would put at around 2/3rds of a stop with some lenses :eek: At lower f/numbers vignetting makes an even bigger difference over the frame as a whole, and at higher f/numbers there were greater variance too that I can only put down to slightly innacurate diaphragm settings.*

The LCD/histogram/blinkies reveals these things which is why I never set final exposure from any meter reading, not if I want the best posible result.

*Edit: which reminds me of mention above re cinematography and the high standards they have to work with. Their lenses are often marked with T/stops, and I notice that Samynag has just introduced a series of T/stop marked lenses for video.
 
Last edited:
Cosine Law demo.

Cardboard box, quite similar tone and texture to skin with make-up. Bare skin is quite a bit more shiny and would show more difference - check out the shiny parcel tape along the top. First pic is with 80cm softbox right next to the camera, centre about 15 degs off axis. Second shot is with light moved round, about 75 degs off axis, so only 60 degs between the two.

In both cases, the centre of the light was exactly 1.2m from the centre of the box. Incident metering to the light showed f/4d3 in both cases, metering to the camera in the second shot showed a drop of 0.6 stops. Metering this differently, by taking a reflected light reading off a Kodak 18% grey card, the difference between the two readings was 1.2 stops. In fact, if the two images are exposed identically to match the tone in the centre of the box, the difference is 1.3 stops. And obviously enough, that was confirmed by the histogram ;)

Light close to camera axis
untitled-1661_zps5a738794-1_zpsd181b01e.jpg


Light moved round to the right, same distance, same camera settings. Subject brightness reduced by 1.3 stops
untitled-1660_zpsc9741084-1_zps2797fa93-1_zpsca58c2b2.jpg

Richard you moved the light? We were talking earlier about the light staying in the same position and moving the camera!
 
Richard you moved the light? We were talking earlier about the light staying in the same position and moving the camera!

Come on Jim, give us all a break.

It doesn't make any difference - you can move the angle of the light, or the camera, or the subject. The difference is, when the angle of the light reflected from the subject changes, in relation to and as seen by the camera, the exposure changes. It's as obvious as the nose on your face.
 
I got variances that I would put at around 2/3rds of a stop with some lenses :eek: At lower f/numbers vignetting makes an even bigger difference over the frame as a whole, and at higher f/numbers there were greater variance too that I can only put down to slightly innacurate diaphragm settings.*

That sort of makes this whole discussion a bit pointless, doesn't it?


Richard, Just out of interest were these lenses all new enough to have been made with digital in mind?

I'm curious as to whether modern lenses are made with less attention to internal light absorption due to sensors being more forgiving?
 
Frankly, these T/stop figures surprise me.
There has to be some variation, if for no other reason than because some lenses are more complex than others, with more glass surfaces etc - and differences due to mechanical inaccuracies, especially when the aperture is physically tiny, are obvious.

And I suppose that if these lenses were new, there could be some initial 'tightness' that might prevent them from stopping down fully, but even so...

I can't help wondering though whether our modern DSLR cameras and their lenses just have to work too hard. Back in the days of twin lens reflexes and rangefinder cameras, and when SLR cameras had simple aperture preset lenses, the aperture mechanisms had a much easier life - and, with film, most photographers took far less shots anyway.
 
That sort of makes this whole discussion a bit pointless, doesn't it?


Richard, Just out of interest were these lenses all new enough to have been made with digital in mind?

I'm curious as to whether modern lenses are made with less attention to internal light absorption due to sensors being more forgiving?

If you were to go onto the Sekonic site you would find out how to calibrate a camera and many other useful things.
http://www.sekonic.com/

Now that digital (still) cameras are being used for cine work things have become more critical. In the past only Contax Zeiss ever bothered to mark "T" stops on their cameras. Still photographers have always been more interested in depth of field, than an accurate knowledge of the light transmission at a particular stop.

In real life, an exposure measured with in 2/3 of a stop is more than accurate enough out of the camera, and pre post production. It only becomes important when you are trying to balance one shot exactly with another.


If you go back 30 years all shutter speeds were set mechanically and were very inaccurate. magazines like AP always tested them for accuracy in their reports...( I never understood why, as they varied from camera to camera even in the same batch)

Today even after considerable technical advances, no two combinations of camera lens, shutter speed and aperture will match each other.

If it were sufficiently important and cost was no concern all cameras could be sold pre calibrated. but few still photographers would benefit or understand the implications.

The situation we have today is perfectly good enough except for some scientific work.

On your point about modern lenses... they outperform previous generations in terms of control of internal reflections, transmission of light and control of aberrations and sharpness by a country mile. The accuracy of the mechanical aperture still has the same restrictions it always has.
If people would put up with Waterhouse stops even this problem could be solved. ( It is very many years since I have used one.)

http://en.wikipedia.org/wiki/Waterhouse_stop
 
Come on Jim, give us all a break.

It doesn't make any difference - you can move the angle of the light, or the camera, or the subject. The difference is, when the angle of the light reflected from the subject changes, in relation to and as seen by the camera, the exposure changes. It's as obvious as the nose on your face.

I would use different words.....( same meaning)
If the angle subtended between the camera, subject and light changes, so does the exposure.
It does not matter "which" you move.
 
That sort of makes this whole discussion a bit pointless, doesn't it?


Richard, Just out of interest were these lenses all new enough to have been made with digital in mind?

I'm curious as to whether modern lenses are made with less attention to internal light absorption due to sensors being more forgiving?

Lenses were three Canon Ls, 50/1.8, 100 macro, and Tamron 70-200 VC. Modern digital lenses have more attention paid to coatings, especially the rear element to reduce flare and ghost reflections off the shiny sensor, and better internal baffling for the same reason. Folks often rave about the wonderful quality of heritage primes, but that's mostly an illusion and modern lenses are significantly better.

But these exposure variables have always been there. We don't notice them because exposure is generally not that critical - we can only adjust to the nearest 1/3rd stop and not long ago it was only half a stop - and TTL metering compensates automatically. You've got to do controlled side by side tests to see it, but then, so what? And what are you going to do about it anyway? Easily sorted in post processing, if needs be. But as I've said often enough before, it's one of the reasons I always check the histogram when seeking that extra last drop of exposure optimisation. BTW, in the last 40 years I've never seen a still camera lens marked with T/stops.

Those that know me won't be surprised that I've tested a lot of cameras for shutter speed accuracy. Back in the day I had a shutter speed tester on my desk. Those old horizontal-running cloth shutters could be all over the place, and with clockwork mechanical timing that drifted over time, though that was easy to adjust. Generally speaking, 1/000sec (top speed in those days) was very likely to be innacurate and more importantly, uneven over the frame. I never got a Hasselblad leaf shutter to go faster than 1/350sec at a marked 1/500sec.

Modern shutters are both extremely accurate and very even. I wouldn't be surprised if some wobble a bit at 1/8000sec (I've not seen it, though I've stopped bothering to test all that these days) but when you think of what they have to do - accellerate at the speed of a bullet, travel at 20mph while maintaining a perfect gap of less than 1mm, then stop and do it all again at 10fps - they are totally amazing bits of machinery.

But as others have said, all of this debate doesn't really matter that much. It's obvious that most people are getting perfectly good exposures, most of the time, by whatever method. And there is certainly no single best or perfect way of doing it.
 
Last edited:
In real life, an exposure measured with in 2/3 of a stop is more than accurate enough out of the camera, and pre post production. It only becomes important when you are trying to balance one shot exactly with another.

Absolute nonsense if you need to get your images right out of the camera and as an event photographer that is what I need. If however that level of exposure inaccuracy is consistent then at least you can adjust for it.

Mike
 
Absolute nonsense if you need to get your images right out of the camera and as an event photographer that is what I need. If however that level of exposure inaccuracy is consistent then at least you can adjust for it.

Mike

Not nonsense at all...
Very few of us ever do sensitometric tests to find out the accuracy of our equipment.

As Richard showed, he found errors of that order in his testing.

The normal event is for us to adjust our technique to give the results we need.
When using and processing film we called it establishing our own exposure index.

Some, otherwise accurate, exposure meters give readings that vary as to how you hold them. Weston's are very sensitive to this. (they should be held horizontally the difference is usually over 1/3 stop)
Now, in the digital age the standard PP we use can have an equally great effect.

There is no such thing as an "accurate exposure setting" there is only one that gives the finished result we want.

Any given scene can have numerous different technically accurate exposure readings, each differing to produce the particular result wanted.

One advantage of the incident light meter is that gives great consistency, but it may still require modification to achieve the tonal range required.

As few of us use lenses with "T" stops we can not know the true light transmission of any of our lenses at a given stop. One might be + 1/3 and another -1/3 stop. Even this minimal difference gives a 2/3 stop variation.

The fact that we are unaware of this difference shows that it is accurate enough.

Many photographers rely on TTL metering... have you ever looked at how the exposure changes as you swing the camera in even a small arc.
The lighting has not changed, but the subject matter has. This change is rarely noticed by Jpeg users straight out of the camera. But it would be a disaster to a panographer.
 
Last edited:
I do, as I can prove just how much difference 2/3 of a stop makes.

I think that Richard is talking about a difference of up to 2/3rds of a stop, not a variation.

i.e. extreme example 1 underexposes by 1/3rd stop, extreme example 2 overexposes by 1/3rd stop. Richard is a technical writer, this involves testing a wide range of different equipment, and of course he comes across things that aren't common in the real world.

Even if your Nikon lenses displayed the same characteristics, you wouldn't notice because you don't make a habit of swapping lenses all the time. If your standard zoom has an error then that error will make it deviate from "standard" (whatever standard is) by no more than 1/3rd stop, and you probably wouldn't notice that. And even if you did, somewhere in your subconcious you would know that when using that lens you know that the images are just a tiny bit darker or lighter than you expect them to be.

So, the variation between lenses does exist but, in practical terms, it isn't all that critical and most people wouldn't notice it so it doesn't matter.

Richard's comment about the old cameras rings very true for me. And shutters in particular - I had the misfortune to own an Edixa SLR at one time, it cost months of my wages but the cloth FP shutter was abysmal, and wildly inconsistent, as well as having wildly optimistic speed markings. And there used to be some British copies of the Leica that were so badly engineered that they usually failed within days in pro hands - the few survivors of those makes today are worth a fortune to collectors, probably because the original buyers gave up on them, stuck them in a drawer and so they stayed in mint condition:( Today's cameras are brilliant by comparison.

Back to the topic: Every metering method has both merits and demerits. But the fact remains that although metering to the light can create exposures that people will find acceptable when the lighting is bland and the subject has average reflectivity, in some situations the error can be enormous. I'm talking 4 or even 5 stops here - now that really does matter much more than a possible 1/3rd stop caused by a lens.
 
Phil Bennett said:
So, just to recap, which way do you point the light meter?

:LOL:

Just look at the picture on the back of your camera, save all this confusion and argument! ;)
 
I think that Richard is talking about a difference of up to 2/3rds of a stop, not a variation.

i.e. extreme example 1 underexposes by 1/3rd stop, extreme example 2 overexposes by 1/3rd stop. Richard is a technical writer, this involves testing a wide range of different equipment, and of course he comes across things that aren't common in the real world.

Even if your Nikon lenses displayed the same characteristics, you wouldn't notice because you don't make a habit of swapping lenses all the time. If your standard zoom has an error then that error will make it deviate from "standard" (whatever standard is) by no more than 1/3rd stop, and you probably wouldn't notice that. And even if you did, somewhere in your subconcious you would know that when using that lens you know that the images are just a tiny bit darker or lighter than you expect them to be.

So, the variation between lenses does exist but, in practical terms, it isn't all that critical and most people wouldn't notice it so it doesn't matter.

Richard's comment about the old cameras rings very true for me. And shutters in particular - I had the misfortune to own an Edixa SLR at one time, it cost months of my wages but the cloth FP shutter was abysmal, and wildly inconsistent, as well as having wildly optimistic speed markings. And there used to be some British copies of the Leica that were so badly engineered that they usually failed within days in pro hands - the few survivors of those makes today are worth a fortune to collectors, probably because the original buyers gave up on them, stuck them in a drawer and so they stayed in mint condition:( Today's cameras are brilliant by comparison.

Back to the topic: Every metering method has both merits and demerits. But the fact remains that although metering to the light can create exposures that people will find acceptable when the lighting is bland and the subject has average reflectivity, in some situations the error can be enormous. I'm talking 4 or even 5 stops here - now that really does matter much more than a possible 1/3rd stop caused by a lens.

Yes, a difference of 2/3rds of a stop in that quick test, ie +/- 1/3rd.

It's an interesting test though. A plain wall, evenly lit is a good target, set up 'correct' exposure and shoot it with all your lenses at all apertures (turn off vignetting correction, if you have it). Try it at different focal lengths, adjusting the framing each time. Every image should be identical of course, but they won't be.

Anyone that has bought an f/2.8 zoom expecting a full stop more light than f/4 might like to compare f/2.8 to f/4 :eek:

And at very high f/numbers like f/22, if you're unlucky you can get some quite big (mechanical aperture) variances and that might also vary shot to shot.
 
So, just to recap, which way do you point the light meter?

Depends on the Lightmeter and what you are doing.

A reflected light Spot meter
should, in general, be pointed at what ever you want to appear as a mid tone.
Though there are many exceptions.

A reflected lightmeter
these average the light of every thing included in their angle of view to a mid grey. such reading more often than not require some adjustment for subject matter.

An Incident light meter
to take an exposure reading Should be pointed from the subject to the camera. ( every subject tone will be recorded at its correct level)
to esatablish a light ratio Should be pointed to each light in turn, from the subject position. ( some meters can automaticaly calculate ratios from this, with others you are on your own.)
 
Last edited:
This older Sekonic webinar video may be useful to some. It clearly shows how to take readings from various lights, pointing the meter directly at the light and finally, at the camera to obtain the correct setting for the camera.

http://www.sekonic.com/Classroom/Webinars/live-control-light-part-3-studio-portrait-lighting.aspx

Hope it helps some of you .


Quite agree.
Shows clearly how to balance the lights and then take the exposure reading.

He thinks directly in F-stops,(as most expierienced photographers do) so does not have to waste time converting to a numerical ratio.
 
Quite agree.
Shows clearly how to balance the lights and then take the exposure reading.

He thinks directly in F-stops,(as most expierienced photographers do) so does not have to waste time converting to a numerical ratio.

Hi Terry,

yes, Joe Bradley has done several Sekonic webinars and I find them all highly informative. Mark Wallace has also done a few with Pocket Wizard on Adorama TV on lighting, all of which are helpful.

Have a good Christmas.(y)
 
Back
Top