- Messages
- 46
- Name
- Andreas
- Edit My Images
- No
I don’t want to turn this forum into a camera repair shop 
But I’d still like to say a few words about an electromechanical SLR, which is arguably one of the best cameras Nikon has ever built: the Nikon F4.
Unfortunately there's a problem that can severely limit the F4—one that isn't easy to fix but has a trivial cause.
Read more about this in the following article.
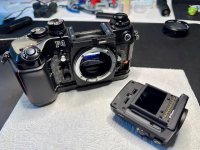
The Nikon F4, introduced in 1988, was Nikon’s first SLR in the flagship F series to feature autofocus. (I don’t want to get into the old debate about whether Canon, with its EOS, or Nikon had the edge back then.)
What remains today is an electromechanical SLR with excellent build quality and functionality, embedded in a system similar in size to its predecessor, the Nikon F3.
Issue with the aperture control
Over the decades, the F4 has revealed a weakness that limits its usability for photography. This concerns the aperture, which—especially at small openings—no longer closes completely and/or closes with a delay. You can find discussions of this issue online.
I don't know of any repair shop that accepts the Nikon F4 for service or repairs. Nikon itself stopped supporting its former flagship model long ago. But thanks to excellent technical documentation, the problem can be solved yourself, to professional standards.
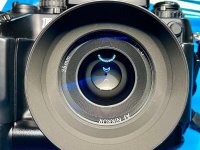
This is what the smallest aperture on a Nikkor AF 35/2.0 D should look like. If the Nikon F4 has the common aperture control problem, the aperture closes with a delay or not completely. This can result in exposure issues.
Lack of lubrication, no defect, no replacement parts required
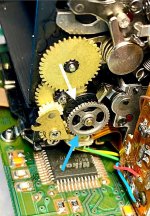
The cause is a lack of lubrication on a ratchet gear in the aperture control, which is located inside the mirror box on the wind side. This prevents the ratchet gear from turning freely and causes the aperture control electronics to receive incorrect values.
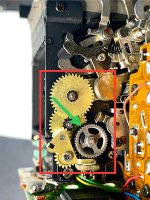
This ratchet gear in the aperture control of the Nikon F4 is missing a drop of oil.
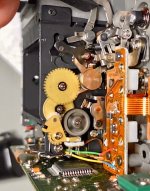
The connected aperture lever in the mirror box, which couples with the lens, then moves only slowly or not completely down when the shutter is released.
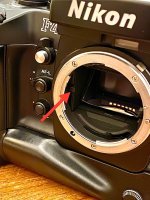
Aperture lever in the mirror box.
As a result, the aperture on the lens closes with a delay or not completely.
This is not a defect, and no replacement parts are needed to fix it.
Check a Nikon F4 to see if the problem is present
To check whether an F4 is affected by this, I recommend the following:
An additional indication of the problem is a screeching noise when the depth button is pressed. This causes the ratchet gear to turn quickly and the lack of lubrication causes the noise.
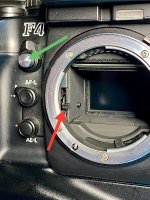
When you press the depth button (green arrow), the aperture lever (red arrow) moves down. This causes a connected lens to stop down to the set aperture value.
Sustainable solution: removal of the front plate and lubrication
To fix the problem, the front plate of the F4 with the mirror box must be removed and the ratchet gear lubricated.
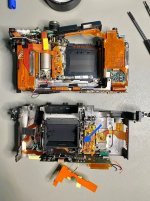
Front plate with mirror box removed (below in the picture, interior view). Blue arrow: position of the ratchet gear, wind side.
I have written a comprehensive article on this topic on PHOTRIO, which deals with the problem in detail and gives some background information:
Nikon F4: Mission Aperture Lever - two ways to fix the aperture problem
Among other things, a shortcut was also investigated that solves the problem from the outside without removing the front plate, but it is problematic (oil is introduced into the camera with insufficient control. This can lead to further problems).
Here, I will show you the sustainable and correct solution that we have already discussed on PHOTRIO.
Article in SPT Journal as a basis
Complete instructions for removing the front panel of the Nikon F4 can be found in the SPT Journal, which describes all the necessary steps in an understandable way and which we are working with here.
The problem and its solution are also described there. However, there is only a mention that the ratchet gear can be lubricated from the outside without disassembling the F4. Unfortunately, there are no instructions on how to do this. Therefore, the only option is the more laborious method of removing the front panel and mirror box to access the area and apply lubricant precisely.
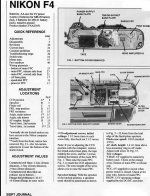
Comprehensive technical information on the Nikon F4 in SPT Journal (39 pages)
These instructions are a prerequisite. I am supplementing them with photos and comments and providing tips from my own experience.
The prerequisites for successfully fixing the problem DIY are:
 I strongly recommend reading the mentioned article on PHOTRIO and the article in the SPT Journal first and then deciding whether to do the work yourself or take your F4 to a qualified repair shop (if you happen to find one).
Fixing the aperture control problem involves the following steps:
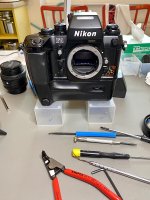
After this introduction, we will move on to the practical work and look at the individual steps on a Nikon F4.
A comprehensive hands-on report on this topic provided by me is available on PHOTRIO:
Nikon F4: Servicing and fixing the aperture control; adjusting/replacing the shutter
But I’d still like to say a few words about an electromechanical SLR, which is arguably one of the best cameras Nikon has ever built: the Nikon F4.
Unfortunately there's a problem that can severely limit the F4—one that isn't easy to fix but has a trivial cause.
Read more about this in the following article.
The Nikon F4, introduced in 1988, was Nikon’s first SLR in the flagship F series to feature autofocus. (I don’t want to get into the old debate about whether Canon, with its EOS, or Nikon had the edge back then.)
What remains today is an electromechanical SLR with excellent build quality and functionality, embedded in a system similar in size to its predecessor, the Nikon F3.
Issue with the aperture control
Over the decades, the F4 has revealed a weakness that limits its usability for photography. This concerns the aperture, which—especially at small openings—no longer closes completely and/or closes with a delay. You can find discussions of this issue online.
I don't know of any repair shop that accepts the Nikon F4 for service or repairs. Nikon itself stopped supporting its former flagship model long ago. But thanks to excellent technical documentation, the problem can be solved yourself, to professional standards.
This is what the smallest aperture on a Nikkor AF 35/2.0 D should look like. If the Nikon F4 has the common aperture control problem, the aperture closes with a delay or not completely. This can result in exposure issues.
Lack of lubrication, no defect, no replacement parts required
The cause is a lack of lubrication on a ratchet gear in the aperture control, which is located inside the mirror box on the wind side. This prevents the ratchet gear from turning freely and causes the aperture control electronics to receive incorrect values.
This ratchet gear in the aperture control of the Nikon F4 is missing a drop of oil.
The connected aperture lever in the mirror box, which couples with the lens, then moves only slowly or not completely down when the shutter is released.
Aperture lever in the mirror box.
As a result, the aperture on the lens closes with a delay or not completely.
This is not a defect, and no replacement parts are needed to fix it.
Check a Nikon F4 to see if the problem is present
To check whether an F4 is affected by this, I recommend the following:
- attach a lens (AF or MF),
- for an AF lens disable AF on the F4,
- select manual exposure mode (M),
- set the shutter speed to 1 second (or another value),
- select the smallest aperture on the lens,
- release the F4 and look into the lens from the front. The aperture should close completely to the set value without delay (compare the aperture opening with the lens removed from the camera).
- If it does not, the problem is likely to be present.
An additional indication of the problem is a screeching noise when the depth button is pressed. This causes the ratchet gear to turn quickly and the lack of lubrication causes the noise.
When you press the depth button (green arrow), the aperture lever (red arrow) moves down. This causes a connected lens to stop down to the set aperture value.
Sustainable solution: removal of the front plate and lubrication
To fix the problem, the front plate of the F4 with the mirror box must be removed and the ratchet gear lubricated.
Front plate with mirror box removed (below in the picture, interior view). Blue arrow: position of the ratchet gear, wind side.
I have written a comprehensive article on this topic on PHOTRIO, which deals with the problem in detail and gives some background information:
Nikon F4: Mission Aperture Lever - two ways to fix the aperture problem
Among other things, a shortcut was also investigated that solves the problem from the outside without removing the front plate, but it is problematic (oil is introduced into the camera with insufficient control. This can lead to further problems).
Here, I will show you the sustainable and correct solution that we have already discussed on PHOTRIO.
Article in SPT Journal as a basis
Complete instructions for removing the front panel of the Nikon F4 can be found in the SPT Journal, which describes all the necessary steps in an understandable way and which we are working with here.
The problem and its solution are also described there. However, there is only a mention that the ratchet gear can be lubricated from the outside without disassembling the F4. Unfortunately, there are no instructions on how to do this. Therefore, the only option is the more laborious method of removing the front panel and mirror box to access the area and apply lubricant precisely.
Comprehensive technical information on the Nikon F4 in SPT Journal (39 pages)
These instructions are a prerequisite. I am supplementing them with photos and comments and providing tips from my own experience.
The prerequisites for successfully fixing the problem DIY are:
- SPT article.
- Basic experience with servicing/repairing electromechanical SLRs and the necessary basic understanding; soldering skills.
- Tools for precision mechanical and electronic work, in particular: JIS crosshead screwdrivers, sizes 0, 00. Soldering iron or soldering station. Light oil for lubrication of fast moving parts, I use Nyoil.
I strongly recommend reading the mentioned article on PHOTRIO and the article in the SPT Journal first and then deciding whether to do the work yourself or take your F4 to a qualified repair shop (if you happen to find one).Fixing the aperture control problem involves the following steps:
- Removing release-side top cover
- Removing rewind-side top cover
- Removing bottom cover
- Removing front plate/mirror box assembly
- Lubricating the ratchet gear
- Reassembly
- Test
After this introduction, we will move on to the practical work and look at the individual steps on a Nikon F4.
A comprehensive hands-on report on this topic provided by me is available on PHOTRIO:
Nikon F4: Servicing and fixing the aperture control; adjusting/replacing the shutter
Last edited: