- Messages
- 12,303
- Name
- Garry Edwards
- Edit My Images
- No
This may interest a few people in this forum, and perhaps in the Film & Conventional forum too . . .
The history of these few shots is that I found a few transparencies in a box that I didn’t even know I had. I’m guessing that they must have been rejects that were shot again – the pizza one certainly will have been because the final shot showed it after cutting and with the slice in the act of being lifted out, with the cheese being stretched. And the shot of the soap products wasn’t right either, one of them was out of square.
But reject shots were rare, simply because of the cost involved. Shots were produced to the client’s or advertising agency’s brief, carefully planned and even more carefully executed. Normally, just one single shot was taken on film, although as many polaroids would be taken as needed.
Firstly, I must apologise for the quality. These are shots that hopefully show why a large format camera was used for them, they are far from examples of excellence! I don’t have a scanner but @RaglanSurf kindly scanned them for me, the quality of the scans is excellent, with each file coming out at very nearly a gigabyte each, but the trannies have suffered over the years, and some, which have spent many years in their little plastic sleeves in a cardboard box, have become damp, with the damp marks very visible.
Why large format? Various reasons . . .
Image quality was always an issue with film cameras, professionals always used medium format (6 x 6 or 6 x 7cm) as an absolute minimum, simply because the quality from 35mm was never acceptable – yes, I know that manufacturers of some 35mm cameras liked to describe them as “professional” but they must have been thinking of news or sports photography, they were useless for product photography.
Large format is 5” x 4” or larger. My cameras could take either 10” x 8” or 5” x 4”, we used 5” x 4” where possible but sometimes, for example with food photography, clients insisted on 10” x 8”. 5” x 4” was slow and very expensive but 10” x 8” had the same problems in italics.
Camera movements are only available on large format cameras and these movements are essential for a number of reasons, mainly to avoid converging verticals and to get everything in the shot in sharp focus. “Movements” involve moving the lens in relation to the film. Basically, the back of the camera will be straight and the front will be bent, moved up, down, to the side or a combination. I’m aware of 3 designs of large format cameras, field, technical and monorail (AKA View Camera). My own cameras had triple extension rails, to allow for close-up use. I’ve only used the monorail variant, which has a full range of movements. I believe that field cameras are fine for large format landscape photography and also for the upward shift (rising front) of the lens needed to avoid converging verticals on tall buildings, and that technical cameras are similar but perhaps with more options. Monorail cameras have both horizontal and vertical shift, the lens can also be tilted up and down and can also be tilted left and right (swing) but, most importantly, all of these movements are fitted to the back (rear standard) of the camera as well as to the sharp end (front standard). This can make them a bit tricky to use, but extremely versatile.

What these movements do is allow the lens to be pointed positioned somewhere different from standard, so that the film can be kept dead straight. Camera movements utilise the Scheimpflug principle. This link explains it to some extent, it does help to have an understanding of physics but trust me, it all becomes much easier to understand when we have a camera in front of us and we can try out the various movements for ourselves.
Up to a point, the very basic movements are covered by modern tilt / shift lenses, distorted perspective can be “fixed” in post processing and the need to manipulate the plane of sharp focus can be replaced by image stacking, but the results aren’t the same.
Image viewing
The transparencies would be put on to a lightbox, where the client would view and approve them. The larger the image, the easier it was. Photographers were OK with looking at fine detail through a loupe, clients less so.
Is large format now dead?
In this country, pretty much so. There are still high end clients who are prepared to pay for the results that only large format cameras can produce, and there are still photographers who know how to use them, but it has become a pretty specialised, niche market. And it’s expensive. These trannies will date from the late 90’s / early 2000’s, and the technical client costs alone for each shot would be around £40 . That’s £15 for the tranny, £10 for scanning it and £15 for 5 polaroid shots – plus of course the labour, which is very slow, and the capital costs were pretty high too, because very powerful flashes were needed.
But it's all about economics. An Ebay seller who wants to sell a few of his left-handed widgets may baulk at paying £4 per image, a large corporation or a government department that's spending millions on a campaign won't care about the trifling cost of even the most expensive product photography.
But in China, large format photography is thriving!
Polaroids:
Most people who remember polaroids will probably know them as a kind of instant snapshot camera, which pre-dated digital photography, and so they were – but it was also used with special interchangeable backs on both large format and medium format professional cameras. Back in the very earliest days of my career we used to use a substitute, before the Land Corporation (Polaroid) caught on to the need, using bromide paper in our plate cameras to get a negative pre-shot image – OK, it was a paper negative that only the photographer would ever see, and the bromide paper was very insensitive, but these “Polaroids” showed up any problems with lighting and focus.
Post processing:
There wasn’t any, the final shot was always straight out of camera, apart from any necessary cropping. People often say that Photoshop is just a modern version of darkroom image manipulation but that’s far too simplistic, because there were severe constraints on what could be done in the darkroom and anyway the process was incredibly time consuming and expensive, so we just had to get it right in camera.
If any post processing was carried out then it was the responsibility of the adverting agency, and they didn’t like paying for it. The first version of Photoshop was launched in 1990 and I bought my version a couple of years after that, but the computer hardware just couldn’t cope with the massive file sizes involved. Many a time I would tell Photoshop to do something last thing at night before going home, hoping that it will have done it by morning, only to find that the computer had crashed in the night
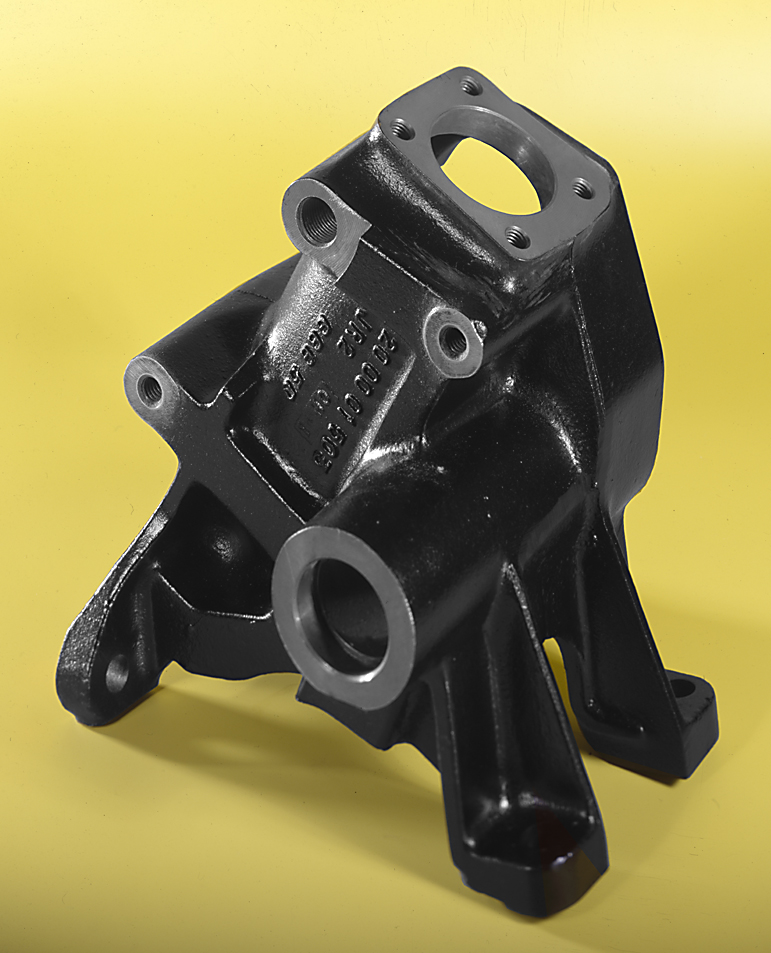
Ring compressor?
This shot of an engineering bit was fairly typical. Here, large format movement was probably limited to falling front – the camera was mounted higher than the product with the lens lowered so that the lens wasn’t looking down on the product, which would have created perspective distortion, with the verticals converging. I’m guessing that the client didn’t’ want the inside lit.
This particular movement is / was used more than any other, it’s invaluable. We use it when we need to show the top of the subject, and I remember when tin cans (baked beans and the like) started appearing with ring pulls in the top, we needed to show them and a falling front always had to be used, to avoid the perspective distortion that is inevitable when the camera is higher than the subject and pointing at a downwards angle.
The lighting here was very simple, as you can see from the shadows the lighting was mainly from the rear right, to create a bit of a glow on the edges, with a second light to camera front left. There was also a light to camera right and fairly high and there must have also been a light on the background.
This lighting would have been challenge-free, but lighting was often difficult with large format photography. The film sensitivity was just 100 ISO and the “normal” operating lens aperture on a 5” x 4” was f/45 (or f/90 on a 10” x 8”) so just getting enough power was often difficult. In my earlier days I had to use Bron and Bowens lights and they just didn’t have enough power, which meant that I often had to shoot with the shutter held open for several seconds while I fired off 8 pops, to create 3 more stops of light. Flash recycling was slow at that time, the shot had to be taken in total darkness and camera shake was a problem too – the camera would of course be bolted to a studio stand, but some creep was always possible and if someone slammed a door or walked around then the shot would be spoilt. The problem was of course exacerbated with close-up shots, using often double bellows extension, sometimes even more.
When I became more successful and richer I invested in 6 of the Elinchrom Chic 2 generator units (2400 W/s each) and one of their 6000 W/s generators, which made life much easier. Today, with digital and the ability to shoot at high ISO settings, most people want less power, not more.
Pizza

And this shot again used falling front but also used tilt on the front standard. The tilt allowed everything to be in sharp focus. Some people think that large format cameras have more depth of field than cameras that don’t have movements, but in fact they have very little – after all, the more or less standard focal length for a 5” x 4” is 210 mm . . .
Tilting the front standard allows the plane of sharp focus to move. On an almost flat subject like this one it’s easy, but on a more complex shape it would be out of focus somewhere else. The photo of the model train in this link illustrates it perfectly.
This will have been a setup shot. Food photography always involves producing a product to set up on, because long before the camera and lighting has been arranged and the food stylist has had a hissy fit and half a dozen fags, the food will look dreadful. The chef then produces a second dish for the actual photography. In these shots, the photographer is just a technical asset, it’s the chef and the stylist who make or break the shot.
The final shot will have been with the pizza cut into slices and with a slice being lifted, with cheese sticking to the food spatula. Sometimes, the “cheese” was actually latex rubber.
The shot will have been printed onto a box for supermarket sales, with the image running over the sides, which is why the background is black – which of course also adds drama. Contrasty, dramatic shots are essential for this kind of subject, competing with many others, and especially when they’re in the freezer section, covered with frost.
Let's move on to part 2, necessary because of the limitation on posting multiple images.
The history of these few shots is that I found a few transparencies in a box that I didn’t even know I had. I’m guessing that they must have been rejects that were shot again – the pizza one certainly will have been because the final shot showed it after cutting and with the slice in the act of being lifted out, with the cheese being stretched. And the shot of the soap products wasn’t right either, one of them was out of square.
But reject shots were rare, simply because of the cost involved. Shots were produced to the client’s or advertising agency’s brief, carefully planned and even more carefully executed. Normally, just one single shot was taken on film, although as many polaroids would be taken as needed.
Firstly, I must apologise for the quality. These are shots that hopefully show why a large format camera was used for them, they are far from examples of excellence! I don’t have a scanner but @RaglanSurf kindly scanned them for me, the quality of the scans is excellent, with each file coming out at very nearly a gigabyte each, but the trannies have suffered over the years, and some, which have spent many years in their little plastic sleeves in a cardboard box, have become damp, with the damp marks very visible.
Why large format? Various reasons . . .
Image quality was always an issue with film cameras, professionals always used medium format (6 x 6 or 6 x 7cm) as an absolute minimum, simply because the quality from 35mm was never acceptable – yes, I know that manufacturers of some 35mm cameras liked to describe them as “professional” but they must have been thinking of news or sports photography, they were useless for product photography.
Large format is 5” x 4” or larger. My cameras could take either 10” x 8” or 5” x 4”, we used 5” x 4” where possible but sometimes, for example with food photography, clients insisted on 10” x 8”. 5” x 4” was slow and very expensive but 10” x 8” had the same problems in italics.
Camera movements are only available on large format cameras and these movements are essential for a number of reasons, mainly to avoid converging verticals and to get everything in the shot in sharp focus. “Movements” involve moving the lens in relation to the film. Basically, the back of the camera will be straight and the front will be bent, moved up, down, to the side or a combination. I’m aware of 3 designs of large format cameras, field, technical and monorail (AKA View Camera). My own cameras had triple extension rails, to allow for close-up use. I’ve only used the monorail variant, which has a full range of movements. I believe that field cameras are fine for large format landscape photography and also for the upward shift (rising front) of the lens needed to avoid converging verticals on tall buildings, and that technical cameras are similar but perhaps with more options. Monorail cameras have both horizontal and vertical shift, the lens can also be tilted up and down and can also be tilted left and right (swing) but, most importantly, all of these movements are fitted to the back (rear standard) of the camera as well as to the sharp end (front standard). This can make them a bit tricky to use, but extremely versatile.
What these movements do is allow the lens to be pointed positioned somewhere different from standard, so that the film can be kept dead straight. Camera movements utilise the Scheimpflug principle. This link explains it to some extent, it does help to have an understanding of physics but trust me, it all becomes much easier to understand when we have a camera in front of us and we can try out the various movements for ourselves.
Up to a point, the very basic movements are covered by modern tilt / shift lenses, distorted perspective can be “fixed” in post processing and the need to manipulate the plane of sharp focus can be replaced by image stacking, but the results aren’t the same.
Image viewing
The transparencies would be put on to a lightbox, where the client would view and approve them. The larger the image, the easier it was. Photographers were OK with looking at fine detail through a loupe, clients less so.
Is large format now dead?
In this country, pretty much so. There are still high end clients who are prepared to pay for the results that only large format cameras can produce, and there are still photographers who know how to use them, but it has become a pretty specialised, niche market. And it’s expensive. These trannies will date from the late 90’s / early 2000’s, and the technical client costs alone for each shot would be around £40 . That’s £15 for the tranny, £10 for scanning it and £15 for 5 polaroid shots – plus of course the labour, which is very slow, and the capital costs were pretty high too, because very powerful flashes were needed.
But it's all about economics. An Ebay seller who wants to sell a few of his left-handed widgets may baulk at paying £4 per image, a large corporation or a government department that's spending millions on a campaign won't care about the trifling cost of even the most expensive product photography.
But in China, large format photography is thriving!
Polaroids:
Most people who remember polaroids will probably know them as a kind of instant snapshot camera, which pre-dated digital photography, and so they were – but it was also used with special interchangeable backs on both large format and medium format professional cameras. Back in the very earliest days of my career we used to use a substitute, before the Land Corporation (Polaroid) caught on to the need, using bromide paper in our plate cameras to get a negative pre-shot image – OK, it was a paper negative that only the photographer would ever see, and the bromide paper was very insensitive, but these “Polaroids” showed up any problems with lighting and focus.
Post processing:
There wasn’t any, the final shot was always straight out of camera, apart from any necessary cropping. People often say that Photoshop is just a modern version of darkroom image manipulation but that’s far too simplistic, because there were severe constraints on what could be done in the darkroom and anyway the process was incredibly time consuming and expensive, so we just had to get it right in camera.
If any post processing was carried out then it was the responsibility of the adverting agency, and they didn’t like paying for it. The first version of Photoshop was launched in 1990 and I bought my version a couple of years after that, but the computer hardware just couldn’t cope with the massive file sizes involved. Many a time I would tell Photoshop to do something last thing at night before going home, hoping that it will have done it by morning, only to find that the computer had crashed in the night
Ring compressor?
This shot of an engineering bit was fairly typical. Here, large format movement was probably limited to falling front – the camera was mounted higher than the product with the lens lowered so that the lens wasn’t looking down on the product, which would have created perspective distortion, with the verticals converging. I’m guessing that the client didn’t’ want the inside lit.
This particular movement is / was used more than any other, it’s invaluable. We use it when we need to show the top of the subject, and I remember when tin cans (baked beans and the like) started appearing with ring pulls in the top, we needed to show them and a falling front always had to be used, to avoid the perspective distortion that is inevitable when the camera is higher than the subject and pointing at a downwards angle.
The lighting here was very simple, as you can see from the shadows the lighting was mainly from the rear right, to create a bit of a glow on the edges, with a second light to camera front left. There was also a light to camera right and fairly high and there must have also been a light on the background.
This lighting would have been challenge-free, but lighting was often difficult with large format photography. The film sensitivity was just 100 ISO and the “normal” operating lens aperture on a 5” x 4” was f/45 (or f/90 on a 10” x 8”) so just getting enough power was often difficult. In my earlier days I had to use Bron and Bowens lights and they just didn’t have enough power, which meant that I often had to shoot with the shutter held open for several seconds while I fired off 8 pops, to create 3 more stops of light. Flash recycling was slow at that time, the shot had to be taken in total darkness and camera shake was a problem too – the camera would of course be bolted to a studio stand, but some creep was always possible and if someone slammed a door or walked around then the shot would be spoilt. The problem was of course exacerbated with close-up shots, using often double bellows extension, sometimes even more.
When I became more successful and richer I invested in 6 of the Elinchrom Chic 2 generator units (2400 W/s each) and one of their 6000 W/s generators, which made life much easier. Today, with digital and the ability to shoot at high ISO settings, most people want less power, not more.
Pizza
And this shot again used falling front but also used tilt on the front standard. The tilt allowed everything to be in sharp focus. Some people think that large format cameras have more depth of field than cameras that don’t have movements, but in fact they have very little – after all, the more or less standard focal length for a 5” x 4” is 210 mm . . .
Tilting the front standard allows the plane of sharp focus to move. On an almost flat subject like this one it’s easy, but on a more complex shape it would be out of focus somewhere else. The photo of the model train in this link illustrates it perfectly.
This will have been a setup shot. Food photography always involves producing a product to set up on, because long before the camera and lighting has been arranged and the food stylist has had a hissy fit and half a dozen fags, the food will look dreadful. The chef then produces a second dish for the actual photography. In these shots, the photographer is just a technical asset, it’s the chef and the stylist who make or break the shot.
The final shot will have been with the pizza cut into slices and with a slice being lifted, with cheese sticking to the food spatula. Sometimes, the “cheese” was actually latex rubber.
The shot will have been printed onto a box for supermarket sales, with the image running over the sides, which is why the background is black – which of course also adds drama. Contrasty, dramatic shots are essential for this kind of subject, competing with many others, and especially when they’re in the freezer section, covered with frost.
Let's move on to part 2, necessary because of the limitation on posting multiple images.
Last edited by a moderator: