What am I doing wrong here in manual mode rather than TTL

Messages
4,375
Name
Neil Williams
Edit My Images
No
Guys
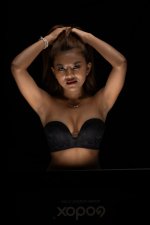
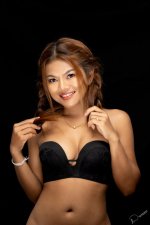
I set this portrait shoot up with one beauty dish above and pointing at the models face about 30 to 40 degrees, my second light was a strip box on the floor horizontally looking up and slightly looking at the model about 20 degrees.
I was trying to shoot in manual with these lights and it didn't matter what I did to the power of these lights I couldn't get rid of these 3 horrible highlights on her face. I switched to TTL and boom they were gone................apart from not starting in TTL mode (hahaha) what was I doing wrong with the light settings?
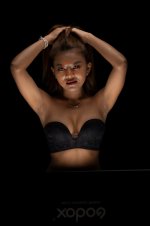
Below a screen shot of the bad light on my girlfriends face (with and without the red pen marks) and the second picture of the finished portrait shot in TTL modeScreenshot-2023-06-23-at-18.40.11.jpgNDW_7210.jpgNDW_7224.jpg
Camera settings F8 1/250 ISO64
 
Nope, that's not due to switching to TTL.

The first image is an example of "horror lighting"... you know; when you hold a flashlight below your chin telling horror stories around the campfire. Your strip light is stronger than everything else in that location.

In the second pose the strip light is farther away (less falloff/less dark shadows) and more forward/less under the chin. This is very evident by the lack of highlights/lighting underneath her bra/nose/etc. Which is also the primary cause for the lack of the offending highlights under her cheeks and forehead. Additionally, the change appears to have equalized/reversed the ratio between the strip light and the ambient/BD.

The only thing the switch to TTL did was bring up the overall exposure.
 
Last edited:
Nope, that's not due to switching to TTL.

The first image is an example of "horror lighting"... you know; when you hold a flashlight below your chin telling horror stories around the campfire. Your strip light is stronger than everything else in that location.

In the second pose the strip light is farther away (less falloff/less dark shadows) and more forward/less under the chin. This is very evident by the lack of highlights/lighting underneath her bra/nose/etc. Which is also the primary cause for the lack of the offending highlights under her cheeks and forehead. Additionally, the change appears to have equalized/reversed the ratio between the strip light and the BD.

The only thing the switch to TTL did was bring up the overall exposure.
Steven thanks for the feedback mate. Seriously I did not move either of the lights. I remember starting them both at power 6 and then bringing them up slowly via the trigger on the hot shoe as both were not accessible due to the confined space, I think I got messed up not remembering the power settings after the first few attempts.

After the shoot the beauty dish power setting was at 9.5, the strip lights battery was dead so I don't know at what level that was, but I'm guessing it was a lot higher than 6.

Is there a rule of thumb when trying to shoot using this clam shell method of the power ratios between the to lights?
Thanks in advance
Neil
 
The strip light is very clearly at/above her waist in the first example, and very close to her... you can see the edge of the striplight in the image. It is also very clearly below her waist and farther away in the second image.

It doesn't matter if you moved the lights relative to her position, or if she moved relative to the lights' positions. Just standing up from a seated position would move her head/chest closer to the BD and farther away from the strip light; completely altering the lighting angles, ratios, and relative folloff. And the closer the lights are (softer/more dramatic) the more significant changes of the model's position make to the lighting results.

The only "rule" I would say is that you do not want highlights from below; fill to lift shadows, but not be brighter than surrounding shadows.
 
Last edited:
Steven thanks for the feedback mate. Seriously I did not move either of the lights. I remember starting them both at power 6 and then bringing them up slowly via the trigger on the hot shoe as both were not accessible due to the confined space, I think I got messed up not remembering the power settings after the first few attempts.

After the shoot the beauty dish power setting was at 9.5, the strip lights battery was dead so I don't know at what level that was, but I'm guessing it was a lot higher than 6.

Is there a rule of thumb when trying to shoot using this clam shell method of the power ratios between the to lights?
Thanks in advance
Neil
Are the two lights the same power?
The digital scale on lights is not an 'absolute' power, it's and indication of the proportion of the lights full power that it will output.
So a 400w light on 6 will be outputting twice the light of a 200w light on 6 (approximately).
This is further complicated by using different modifiers - identical strobes set to the same power but using different modifiers (in your case a stripbox and BD) will give different levels of light on the subject (and if the distance from light to subject is different, this further complicates things).

I've not done a huge amount of work with lights, but my suggestion (as a relative novice), would be to start with ONLY the BD - get that to a suitable level, then bring the strip light in to fill, starting at minimum power and gradually increasing it until you get he look you want.
Once you've done this a few times you will hopefully get a feel for the relative levels you need from your lights.
Brilliant that sounds like a good plan. BD first then add fill light. When setting up the BD use TTL or manual?
 
Brilliant that sounds like a good plan. BD first then add fill light. When setting up the BD use TTL or manual?
If you want full control of the lighting start with a black frame in manual. For good results and less fuss, start with a base exposure in manual and then add highlights/fill.

The only time I would suggest TTL is when you cannot afford the time to adjust the lighting and the situation is variable (run/gun speedlight)... and even then it's usually best to give it control over the lighting power with a manual ambient/BG exposure set.
 
Last edited:
If you want full control of the lighting start with a black frame in manual. For good results and less fuss, start with a base exposure in manual and then add highlights/fill.

The only time I would suggest TTL is when you cannot afford the time to adjust the lighting and the situation is variable (run/gun speedlight).
Thanks Steve. I will do that next time.
 
Do you have a light meter in order to set the correct exposure ( power of the Indvidual lights) e.g main at say f8 ,fill at say f5.6
 
Do you have a light meter in order to set the correct exposure ( power of the Indvidual lights) e.g main at say f8 ,fill at say f5.6
You don't need a light meter, some people find it easier though.
With digital, and (practically) zero cost to shots, you can simply use the camera to take test shots and adjust until you get what you want - what a light meter allows you to do is to is potentially get there quicker.
 
Nope, that's not due to switching to TTL.

The first image is an example of "horror lighting"... you know; when you hold a flashlight below your chin telling horror stories around the campfire. Your strip light is stronger than everything else in that location.

In the second pose the strip light is farther away (less falloff/less dark shadows) and more forward/less under the chin. This is very evident by the lack of highlights/lighting underneath her bra/nose/etc. Which is also the primary cause for the lack of the offending highlights under her cheeks and forehead. Additionally, the change appears to have equalized/reversed the ratio between the strip light and the ambient/BD.

The only thing the switch to TTL did was bring up the overall exposure.
Correct
Are the two lights the same power?
The digital scale on lights is not an 'absolute' power, it's and indication of the proportion of the lights full power that it will output.
So a 400w light on 6 will be outputting twice the light of a 200w light on 6 (approximately).
This is further complicated by using different modifiers - identical strobes set to the same power but using different modifiers (in your case a stripbox and BD) will give different levels of light on the subject (and if the distance from light to subject is different, this further complicates things).

I've not done a huge amount of work with lights, but my suggestion (as a relative novice), would be to start with ONLY the BD - get that to a suitable level, then bring the strip light in to fill, starting at minimum power and gradually increasing it until you get he look you want.
Once you've done this a few times you will hopefully get a feel for the relative levels you need from your lights.
Correct. The power setting on the lights is almost irrelevant because it takes no account of the distance travelled by the light and also doesn't know whether a modifier is fitted or not, or which type of modifier.
If you want full control of the lighting start with a black frame in manual. For good results and less fuss, start with a base exposure in manual and then add highlights/fill.

The only time I would suggest TTL is when you cannot afford the time to adjust the lighting and the situation is variable (run/gun speedlight)... and even then it's usually best to give it control over the lighting power with a manual ambient/BG exposure set.
I agree. You don't need TTL with studio lighting, always use manual.

It seems to me that, just because you have two lights you feel that you need to use both of them. The correct procedure (always) is to remember that on this planet we only have one light, the sun. Sometimes that's all that's needed but whether that's the case or not you should always start with one light, and adjust the position, height, distance and everything else to create the shadows where you want them to be. That's called the key light.
After that, add a second light if needed, at the lowest possible power setting, then increase the power if necessary to the point where it is lightening the shadows to the required effect. It's actually easier to learn if you switch off the key light when doing this.
Then, but only if necessary, add a 3rd, 4th or a 99th light, each time turning off all other lights while adjusting position and intensity.

What you're doing is the opposite!

One further point - don't practice on a live model, I'm sure that you want to photograph her but she's human and will change position. Try photographing subjects such as tins of baked beans, you'll learn much faster and much better.
 
Yes I do.........I will try that (y)
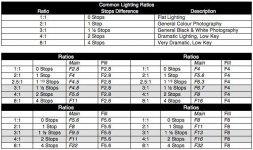
This might help
Try ISO 200 SS at or below sync speed ,aperture as shown and adjust lights to give required aperture ( This chap calls the Key light the main light)
This is a good reference for lighting ratios in studio lighting.jpeg
 
Last edited:
This might help
Try ISO 200 SS at or below sync speed ,aperture as shown and adjust lights to give required aperture ( This chap calls the Key light the main light)
View attachment 393459
It's a pity that he confuses focal length (F) with aperture (f/) and that he confuses low-key with ratio, but some people do find this type of chart useful.
Do you have a light meter in order to set the correct exposure ( power of the Indvidual lights) e.g main at say f8 ,fill at say f5.6
Yes I do.........I will try that (y)
A light meter (flash meter) is a tool that will allow you to set a ratio if you really think that this will help, and will also tell you what that ratio is, but it won't help in any other way.

What you actually need to do, as I outlined earlier, is to completely change the way you do things, you need to understand the role of lighting and you need to understand that the key light does 90% of the work and that extra lights are used only if necessary and only to mitigate the effects of the key light.
 
Well, the OP doesn't seem to want to address his lighting issues, judging from his lack of replies.
We might put this down to lack of time or lack of practice, if he didn't continue to post in the nude and glamour section.

I don't know about the rest of you, but I find it frustrating to give considered, correct advice to people who need to learn the absolute basics, only for that advice to be ignored. Perhaps we should just tell people what they want to hear?
Sorry if I p***ed you off for not responding but I actually thought I had replied. I’ve taken all the advice from above and used that advice whenever I use the lighting in my studio……….., I really appreciate everyone’s feedback and help with this stuff and I’m now seeing the results in my lighting setup at home. Thanks again Neil
 
If you want full control of the lighting start with a black frame in manual. For good results and less fuss, start with a base exposure in manual and then add highlights/fill.
:agree:

Work one light at a time. Be really clear in your own mind what each light is intended to do. That's usually only one thing, though sometimes we might try to get clever and have a light do more than one job.

Get the ambient exposure where you want it - which may well be black. Turn only your key light on and get that working as you like. Identify the things the key light isn't doing for you. Turn the key off, turn the next light on & get its power & position correct. Rinse & repeat. Only then turn them all on together.
 
Last edited:
You could have her facing the other way, that might work ? :headbang:
 
Last edited:
Back
Top