Hi Stu,
Not seen the RAW yet but a few thoughts as I had a bit of spare time.
First up, shooting into the sun, the RAW file is going to look awful. They pretty much all do, as there will be limited detail in the file at this stage. What is important is you think about the finished shot prior to pressing the shutter button
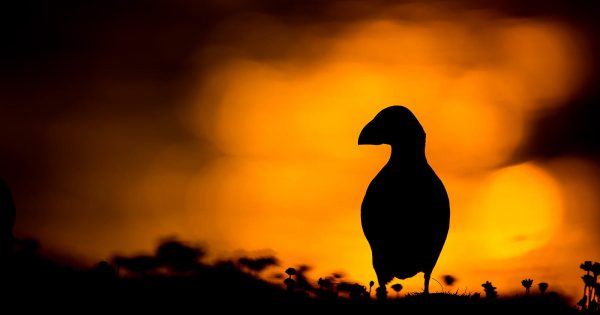
There are 2 main ways go shooting into the light. The hardest way is to shoot direct at the setting sun and get your subject in between you and the sun. Pretty much guaranteed a silhouette here but by playing with white balance and curves layers later you can get a great shot. Not easy to do in fields because of the trees, and even harder with unpredictable and easily spooked subjects.
The more normal way is to have the sun just out of frame. If the above silhouette scenario had the sun coming at you from 12 o'clock on a watch dial, then you're looking more at having the sun at maybe 11 o'clock now.
Again, you/re not going to get the detail you will from the light coming from behind or side lighting, so don't expect the same levels of detail. then again, you have the opportunity now to drop your ISO and shutter speed as you will not be capturing ultimate detail), and close the aperture more if you want to go for a dark and moody frame.
For me though, it goes back to the same as almost any frame I shoot - expose to the right but try your best not to blow any highlights as that'll affect the colour in your rim lighting.
From then on, then you need to do a little in post - its unavoidable but actually quite easy - no posh techniques here.
First up, you are likely to get flare. Using a lens hood is a must and helps limit it. You then have 2 options - use it as a feature in the shot or clone it out. On the screenshots I'll put up below, all I did was duplicate the background layer, press J and got the spot healing tool and click once on each of the 2 flare spots at the base of the shot.
From then on its all down to personal taste.
I've used screenshots here rather than regular shots to show you the curves layers I used.
Option 1 - light and dreamy.

A single curves layer set to normal. The curve was lifted to right to push the highlights a little and if you look to the bottom left of the curve you'll see I also raised that to lift the darks and give some more detail there
Option 2 - dark and moody

On the same exact curves layer I left the top right adjustment in the same place and simply moved the lower left box to make an S curve leaving you with a dark rim lit shot with a tiny amount of detail left
Option 3 - really going dark

Doesn't show great here because its screenshots but this time I've added a selective colours layer, chose black, then boosted the blacks. Now its all about the rim light and nothing else
Option 4 - a hybrid.

I got rid of the selective colour layer I used in option 3 and returned a little more detail to the faces. All I did was use a dodge and burn layer and restore some detail so you can at least see the shape of the hares head.
To set that layer up, press 'alt' (option on some keyboards) and the icon on the bottom ro of the layers pane, second from the right - a box with a plus sign in it. Choose the mode as 'overlay' and tick the 50% box. Use a brush at 10%opacity, and paint white onto the layer to lighten the area you want to chance. More clicks equal a lighter area. you can do the same to darken by setting the brush box to black.
Hope that gives you a little starter - get the sun where you want it - control the flare unless its part of the shot - and protect your highlights to aid with the rim lighting
Mike

 _S2I2047 d 'n's smj tdn light 'n' hare by Stuart Philpott, on Flickr
")


 ).....................Mark it's still back lit it's where you suggested and where I mentioned I have some of those frames ( lol I'll never believe anyone actually believes me when I say that but hey) so here's dat............but it doesn't float my boat in the same way as maybe what I'll post in a while of same leveret working against that light.....................


