- Messages
- 6
- Edit My Images
- No
ALL I CAN SAY IS WOW AMAZING STUFF. VERY WELL EXPLAINED. JUST LOOK AT THOSE PHOTOS, THATS HOW THERE MEANT TO LOOK TO ME. BRILLIANT.

Just been looking through your Flickr site Ash and wow, what stunning captures you've produced. Love them.
On reading the set ups on some of them, you mention black water? Silly question but is that just dye you are using?
Di
Just found this thread. Great shots and great tutorial Just one quickie from me - are those home-made snoods on the flashes? What material have you used?
Ta.
Okay cheers. I have tried very basic droplet photography but I'd like to try for collisions - found this very useful.
Great tutorial. Thanks for sharing your secrets. I've just bought a timing machine with a phit gate ready for this type of stuff. Can't wait to get going now.
Gareth
")

Many thanks for the advice your images are sooooo impressive it just makes you want to have a go.
So I did. Would love to get some in colours like your though.
[/url] Collision] by seegarysphotos, on Flickr[/IMG]
Thought I recognised the Eye icon...
Nice tutorial Ash. To get a steady rate of drips try googling marionette syphon, and knock one up
Thanks. And yes, that is (was) what I use Not done drops for... dunno, a year or so now?Superb tutorial built it all with the help from my son, and this is the 1 and only shot out of 800ish that was close to something good

Nice one. Needs to be nearly pouring out Another few hours in the studio and 500ish images I have 1 keeper and 5 near misses
Looking at the height of that I still think you need tp up your drip rate?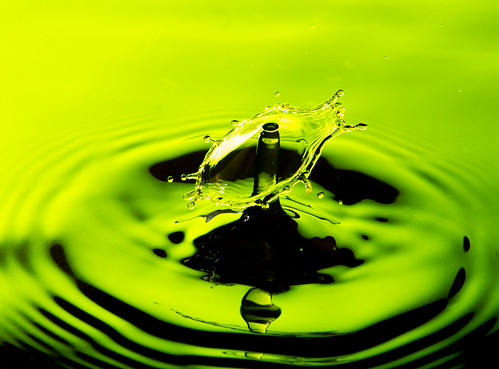
 I commented in macro too!
Finally got there! Having problems getting a high enough column of water - And how are the "mushroom" tops produced?
Rinse aid used as described allows taller collums and flowey collisions. Make sure your tray is deep enough. 

Hey Darren, I haven't been doing mine in the dark. As I understand it, if you take a picture without the flash at your your settings (say f11, iso 100 and 200/1) that should be fine as it's the flash that's ultimately catching the image.
I might be wrong though
Hey Ash, what sort of water to Rinse Aid ratio do you use? I think I'm off to buy some today along with some food dye I think
Wish i had read this tutorial before i attempted my water drops.
I am reading your tutorial right and you are shooting in the dark....
i did mine in daylight.......
Granted mine are not collisions or any near as good as some of the one poster in here.
Hey Darren, I haven't been doing mine in the dark. As I understand it, if you take a picture without the flash at your your settings (say f11, iso 100 and 200/1) that should be fine as it's the flash that's ultimately catching the image.
I might be wrong though
Can I ask what the rinse aid does please ?
Ta !
to get long, flowing collisions.
it produces long flowing collisions. It lowers the surface tension of the water allowing it to become more "stretchy".
Rinse aid used as described allows taller collums and flowey collisions.
AshMashMash said:You can...
AshMashMash said:I get quite a lot of questions about my droplet collision photos, so I thought I would include a tutorial of my method. I am sure there are other methods, but this is mine. It’s a bit wordy, sorry.
The basic theory:
The theory behind this sort of photo is to take a picture of something happening that only last’s for about, perhaps, 1/10,000th of a second or less. Of course shutter speeds don’t generally go to this speed, but flashes do. If you have a pitch black room and open the shutter on the camera, obviously the image will be black, at any shutter speed. If you fire a flash during that shutter speed, the image captured on the sensor will be only what happens during the duration of the flash, at any shutter speed.
So the theory is: use any shutter speed, a darkened room, and a flash to capture the moment of a splash. If you have a light(ish) room, a quicker shutter speed will eliminate as much stray light from possible from being captured on the sensor and adding unwanted motion blur to the image.
Exif and Flash Control:
The quicker the flash, the less motion blur there is, of course. External flash will generally have a “Manual” mode, and by using this you can alter the brightness of the flash. As you decrease the brightness of the flash, what is achieved is making the flash quicker, which is desirable. Many flashes will go down to 1/8th or 1/16th power, and this should certainly be enough. Some go further down to 1/128 or so, which is even better. One or more external flashes is great for this sort of photography.
If you don’t have an external flash, the onboard flash can be used as well. Go into “Flash Exposure Compensation” (FEC) or similar in the menu, and lower the flash down to as low as you can while still achieving bright enough results. -1 to -1 2/3 should do.
Now, there are two basic methods:
1. Use an infra red flash trigger, or extension cable, but have it connected to the camera still. As you press the shutter button, it will fire. For this, use a quickish shutter speed (about 1/200th second). Do a test shot and ensure that without the flash, the image is black.
2. Use the flash “test” button to trigger the flash, without it being attached to the camera. For this no other wires/triggers are needed. Set the shutter speed to something with which you can press the shutter, then move your hand to the flash and press the button to fire the flash. Perhaps 2-3 seconds. Again ensure that without the flash the image captured is nothing but pure blackness.
For both, I would use about F/16 aperture – this gives you good depth of focus and stops the edges of collisions being out of focus. ISO 100 – use the lowest value possible to give you the best quality results when cropping down.
The Set Up:
You will need a base liquid, for the drops to fall into, and something to use as a dropper. I use Algarde Starter Valves, which give you a variable flow rate, attached to Aquarium Airline Tubing. Put one end of the tubing into a bottle with your drop liquid in, attach the valve to the other end, and fix above the base water on the end of a stick/spoon etc. Gently suck the valve end to start a syphon going.
Set your camera in front of the base liquid – if you have a UV filter be sure to put this on the front to stop any stray drops from getting on your lens!
Now, lighting: If you are using a mainly water drop, you will want to light it from behind, as water lit from the front will not show up properly. This can either by done by pointing the flashes onto a reflector behind the base liquid:
Or by placing them behind a translucent object like some plastic, and lighting that up:
If, however, you are using milk, at least some lighting from the front is perferable. If you have two flashes: one can be used to reflect off a reflector to light from behind, one can be used on front. The lighting from behind also serves to add a smooth, glossy, opaque surface to the water, which is preferable.
A combination of milk and water and food dyes can be used to get different forms and colours and consistencies. My recent development is using rinse aid in food-dyed water: about 1 drop per litre is enough (more is too much), to get long, flowing collisions.
The Technique:
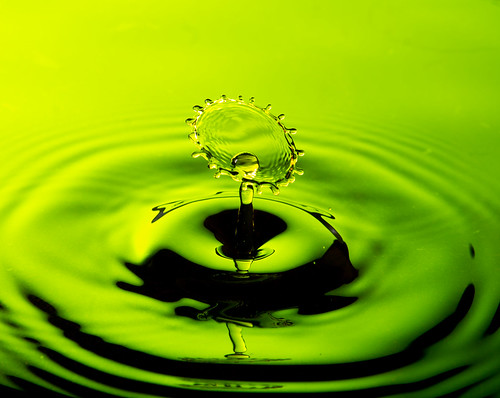
Droplet collisions happen when two drops collide. What happen’s is, one drop falls down, splashes in the water surface, making a small crater. Water rushes back in, filling the crater, and projecting a spout of water upwards. If you time it correctly, another droplet falling down after the first can hit the top of that spout, splashing outwards creating a “droplet collision”. Have a look here for a video of it.
The spouts only form perfectly when they land in water that is very still. Also the rate of the droplets coming down has to be correct. So:
[*]Set up the camera: put the camera into the settings outlined above, and the same with the flashes, and ensure you’re happy with the flash set up with some test shots. Manually focus onto a pen or similar at about where the drops are going to fall in the pan. Use as lower angle as you can get away with with your base liquid, for the best look.
[*]Set up the rate: for starting off, use a rate of about that just slower than which water pours out of the valve. This is a very fast drop rate: in the region of 10-11 drops per second or more. If you want to check, it’s about 10mls in 12 seconds, or even faster. It will also work at a variety of rates. I use a drop height of about 30-40cm or so, but slightly less or more will also work.
[*]Once this is flowing, hold a jug under the flow of drops to prevent any hitting the base water, allowing it to be still.
[*]Now is the tricky bit. Remove the jug quickly, and press the shutter button (or the shutter and then the “test” on the flash if using that technique) about 0.5 seconds later, when hopefully one drop will have come down and another will have collided into it. This takes some time and practice, and lots of luck. Don’t be disheartened if you get non after hundreds of shots... keep going!
Post Production
So, all going well, you will have taken a few hundred shots and got one or two (or more!) collisions. A bit of post production (admitdly not my best skill) will go a long way. I always shoot in RAW, then in RAW I maximise the sharpness, almost always to the maximum (+7). This is especially helpful if you’re focus is slightly off. Crop down the picture; I like to centre them bang on centre. The Rule Of Thirds doesn’t seem to work in my eyes with these. Alter the Hue if necassary to slightly change the colours, and often the Saturation: flashes really wash out colours in liquids. Also, increase the Contrast and possibly Brightness by a few points, this really gives it a sleak look.
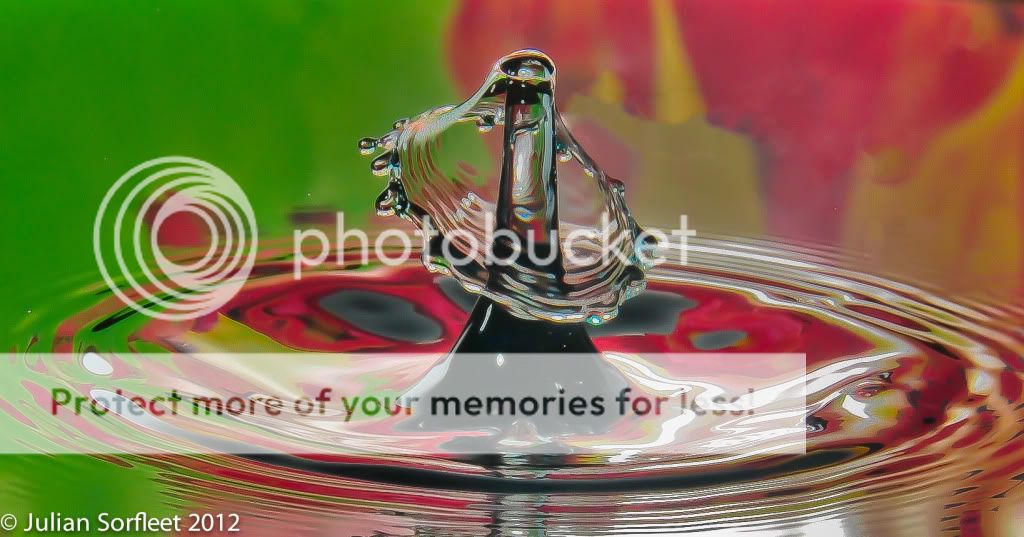
And there you go! Hopefully some pretty photos like ths following:
http://www.flickr.com/photos/44174060@N04/4398958181/sizes/l/
http://www.flickr.com/photos/44174060@N04/4399010949/sizes/l/in/photostream/
http://www.flickr.com/photos/44174060@N04/4401537696/sizes/l/
(Don't forget to post any results you get in here or Macro section for us to see
AshMashMash said:I get quite a lot of questions about my droplet collision photos, so I thought I would include a tutorial of my method. I am sure there are other methods, but this is mine. It’s a bit wordy, sorry.
The basic theory:
The theory behind this sort of photo is to take a picture of something happening that only last’s for about, perhaps, 1/10,000th of a second or less. Of course shutter speeds don’t generally go to this speed, but flashes do. If you have a pitch black room and open the shutter on the camera, obviously the image will be black, at any shutter speed. If you fire a flash during that shutter speed, the image captured on the sensor will be only what happens during the duration of the flash, at any shutter speed.
So the theory is: use any shutter speed, a darkened room, and a flash to capture the moment of a splash. If you have a light(ish) room, a quicker shutter speed will eliminate as much stray light from possible from being captured on the sensor and adding unwanted motion blur to the image.
Exif and Flash Control:
The quicker the flash, the less motion blur there is, of course. External flash will generally have a “Manual” mode, and by using this you can alter the brightness of the flash. As you decrease the brightness of the flash, what is achieved is making the flash quicker, which is desirable. Many flashes will go down to 1/8th or 1/16th power, and this should certainly be enough. Some go further down to 1/128 or so, which is even better. One or more external flashes is great for this sort of photography.
If you don’t have an external flash, the onboard flash can be used as well. Go into “Flash Exposure Compensation” (FEC) or similar in the menu, and lower the flash down to as low as you can while still achieving bright enough results. -1 to -1 2/3 should do.
Now, there are two basic methods:
1. Use an infra red flash trigger, or extension cable, but have it connected to the camera still. As you press the shutter button, it will fire. For this, use a quickish shutter speed (about 1/200th second). Do a test shot and ensure that without the flash, the image is black.
2. Use the flash “test” button to trigger the flash, without it being attached to the camera. For this no other wires/triggers are needed. Set the shutter speed to something with which you can press the shutter, then move your hand to the flash and press the button to fire the flash. Perhaps 2-3 seconds. Again ensure that without the flash the image captured is nothing but pure blackness.
For both, I would use about F/16 aperture – this gives you good depth of focus and stops the edges of collisions being out of focus. ISO 100 – use the lowest value possible to give you the best quality results when cropping down.
The Set Up:
You will need a base liquid, for the drops to fall into, and something to use as a dropper. I use Algarde Starter Valves, which give you a variable flow rate, attached to Aquarium Airline Tubing. Put one end of the tubing into a bottle with your drop liquid in, attach the valve to the other end, and fix above the base water on the end of a stick/spoon etc. Gently suck the valve end to start a syphon going.
Set your camera in front of the base liquid – if you have a UV filter be sure to put this on the front to stop any stray drops from getting on your lens!
Now, lighting: If you are using a mainly water drop, you will want to light it from behind, as water lit from the front will not show up properly. This can either by done by pointing the flashes onto a reflector behind the base liquid:
Or by placing them behind a translucent object like some plastic, and lighting that up:
If, however, you are using milk, at least some lighting from the front is perferable. If you have two flashes: one can be used to reflect off a reflector to light from behind, one can be used on front. The lighting from behind also serves to add a smooth, glossy, opaque surface to the water, which is preferable.
A combination of milk and water and food dyes can be used to get different forms and colours and consistencies. My recent development is using rinse aid in food-dyed water: about 1 drop per litre is enough (more is too much), to get long, flowing collisions.
The Technique:
Droplet collisions happen when two drops collide. What happen’s is, one drop falls down, splashes in the water surface, making a small crater. Water rushes back in, filling the crater, and projecting a spout of water upwards. If you time it correctly, another droplet falling down after the first can hit the top of that spout, splashing outwards creating a “droplet collision”. Have a look here for a video of it.
The spouts only form perfectly when they land in water that is very still. Also the rate of the droplets coming down has to be correct. So:
[*]Set up the camera: put the camera into the settings outlined above, and the same with the flashes, and ensure you’re happy with the flash set up with some test shots. Manually focus onto a pen or similar at about where the drops are going to fall in the pan. Use as lower angle as you can get away with with your base liquid, for the best look.
[*]Set up the rate: for starting off, use a rate of about that just slower than which water pours out of the valve. This is a very fast drop rate: in the region of 10-11 drops per second or more. If you want to check, it’s about 10mls in 12 seconds, or even faster. It will also work at a variety of rates. I use a drop height of about 30-40cm or so, but slightly less or more will also work.
[*]Once this is flowing, hold a jug under the flow of drops to prevent any hitting the base water, allowing it to be still.
[*]Now is the tricky bit. Remove the jug quickly, and press the shutter button (or the shutter and then the “test” on the flash if using that technique) about 0.5 seconds later, when hopefully one drop will have come down and another will have collided into it. This takes some time and practice, and lots of luck. Don’t be disheartened if you get non after hundreds of shots... keep going!
Post Production
So, all going well, you will have taken a few hundred shots and got one or two (or more!) collisions. A bit of post production (admitdly not my best skill) will go a long way. I always shoot in RAW, then in RAW I maximise the sharpness, almost always to the maximum (+7). This is especially helpful if you’re focus is slightly off. Crop down the picture; I like to centre them bang on centre. The Rule Of Thirds doesn’t seem to work in my eyes with these. Alter the Hue if necassary to slightly change the colours, and often the Saturation: flashes really wash out colours in liquids. Also, increase the Contrast and possibly Brightness by a few points, this really gives it a sleak look.
And there you go! Hopefully some pretty photos like ths following:
http://www.flickr.com/photos/44174060@N04/4398958181/sizes/l/
http://www.flickr.com/photos/44174060@N04/4399010949/sizes/l/in/photostream/
http://www.flickr.com/photos/44174060@N04/4401537696/sizes/l/
(Don't forget to post any results you get in here or Macro section for us to see