Bridge, MFT, achromats, dSLR, primes - a journey of exploration

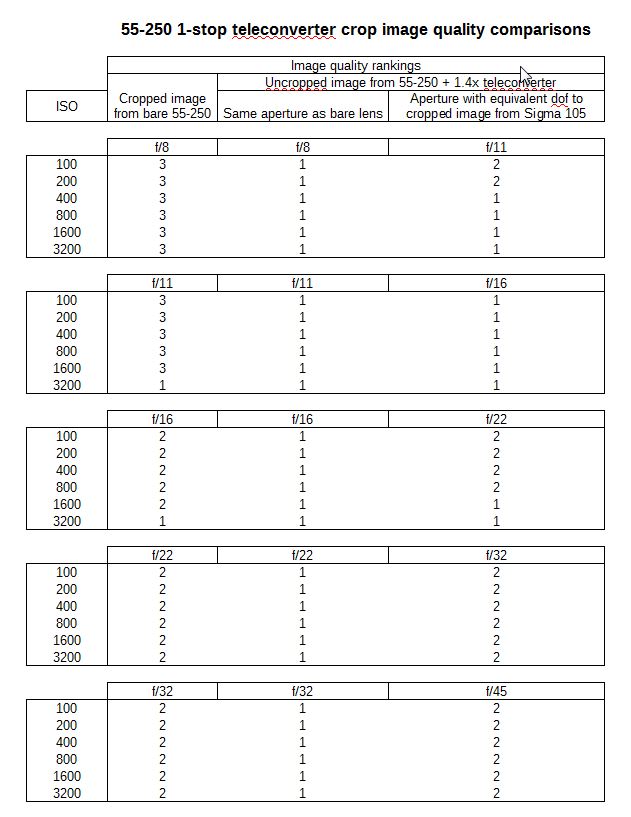
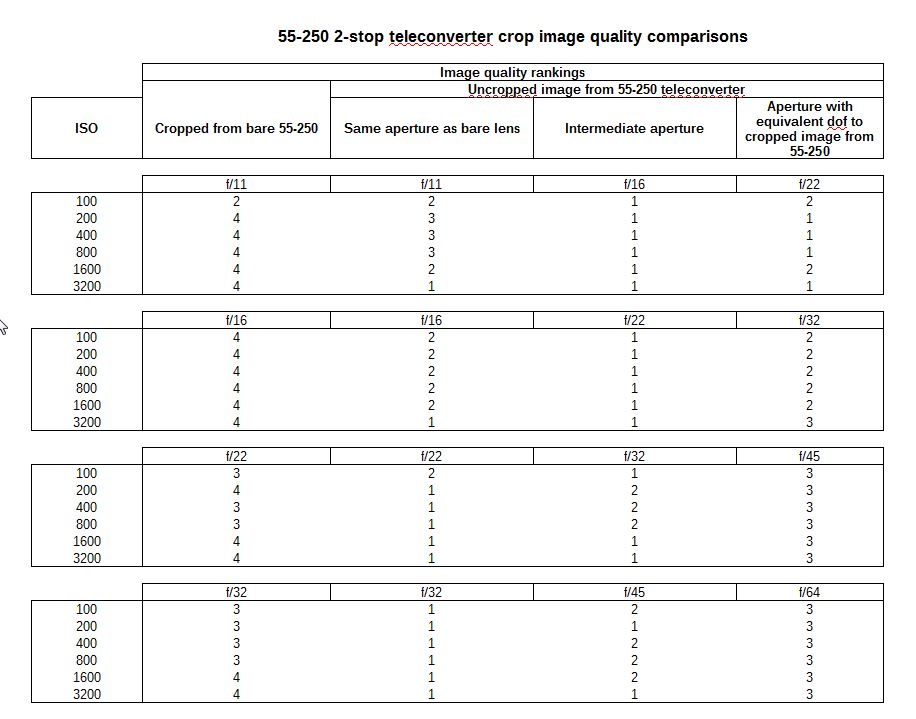
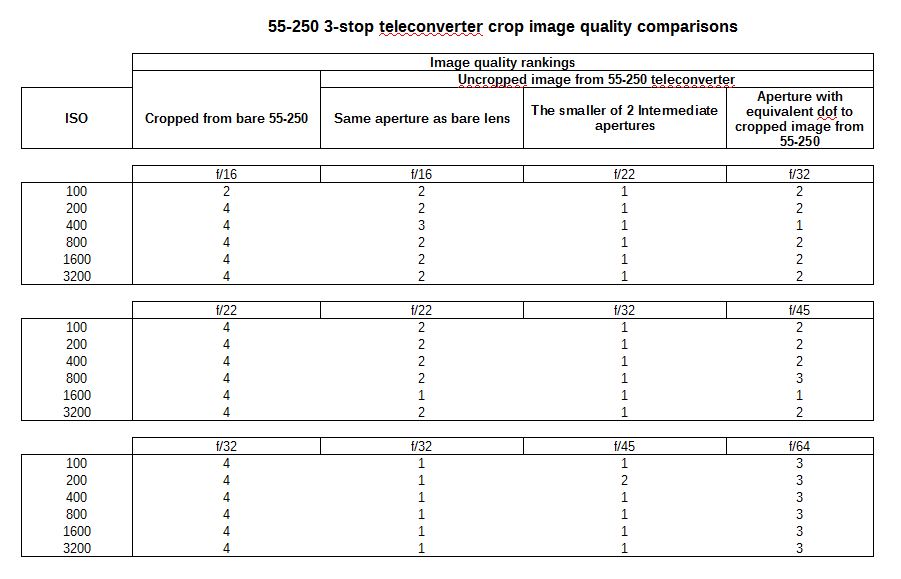
Indoor teleconverter comparisons

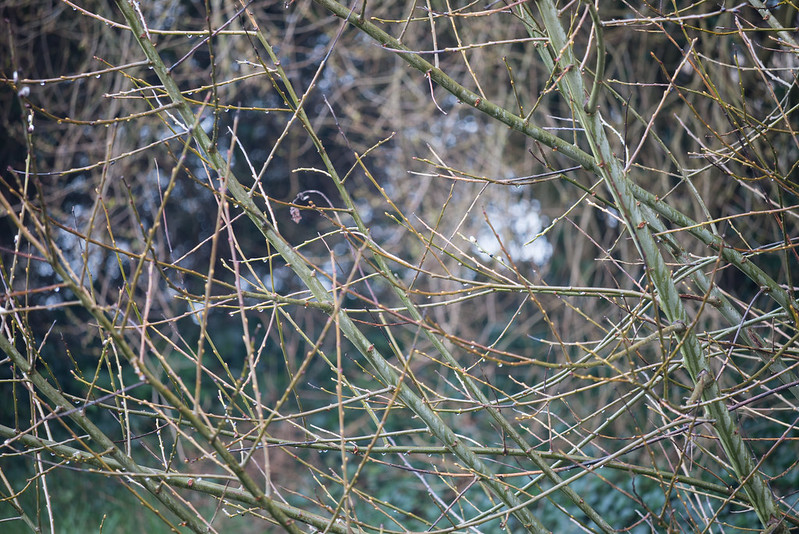
Having found this indoor subject so useful for looking at magnifications and cropping, I decided to use it to do some comparisons indoors of the type I had so much trouble with outdoors. The scene obviously doesn't have the subtlety or complexity of an outdoor scene, but I thought it might make the differences between setups clearer and easier to understand.

As with the outdoor comparisons, I photographed the scene at various apertures using both teleconverters stacked, and then moved the camera progressively closer to try to frame the same scene using the 2x, then the 1.4x and then the bare lens. I did this for both the Sigma 105 and the 55-250. There are 2000 pixel high versions of the captured images are here at Flickr. (I had trouble uploading the full size images, but I think these are large enough to see what is going on.)

These comparisons confirmed the findings and conclusions of the outdoor tests. They illustrated much more clearly and consistently than the outdoor tests that the image degradation increases as the strength of teleconversion increases.

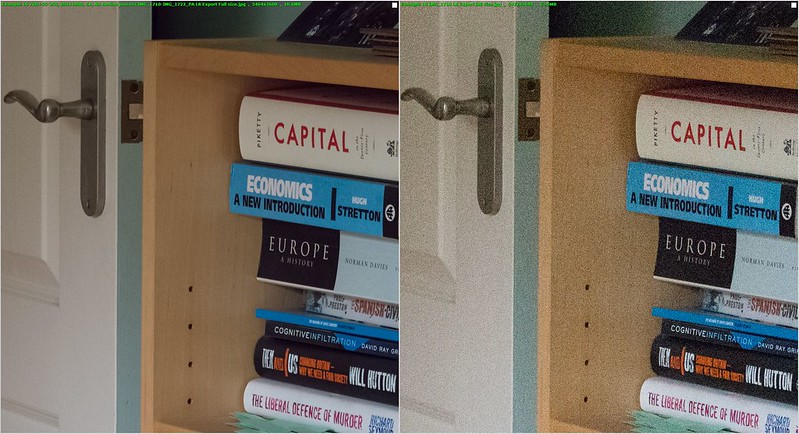
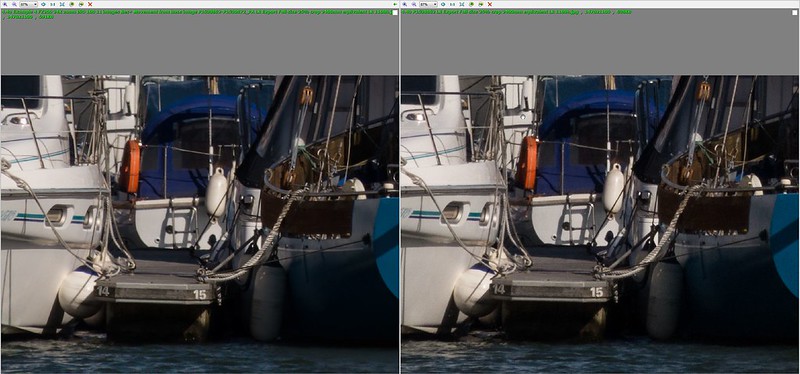
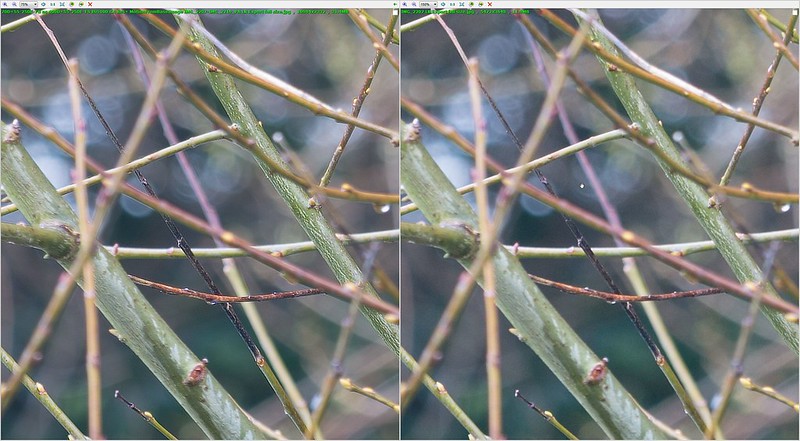
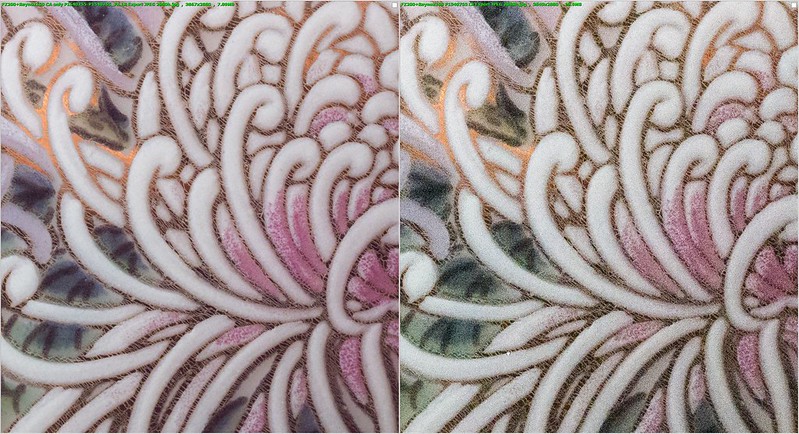
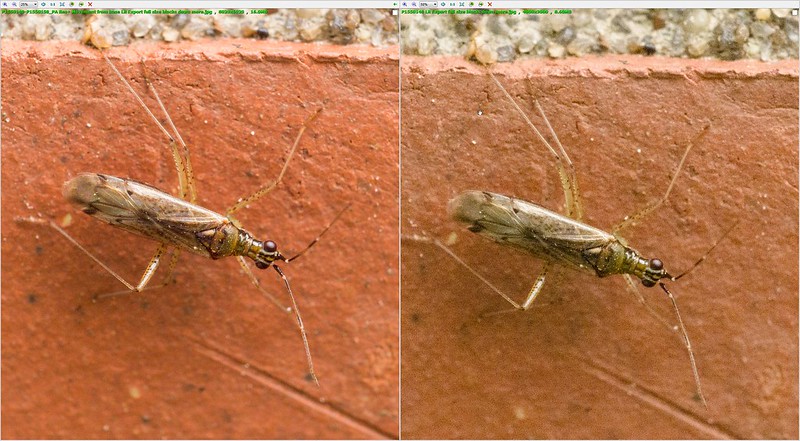
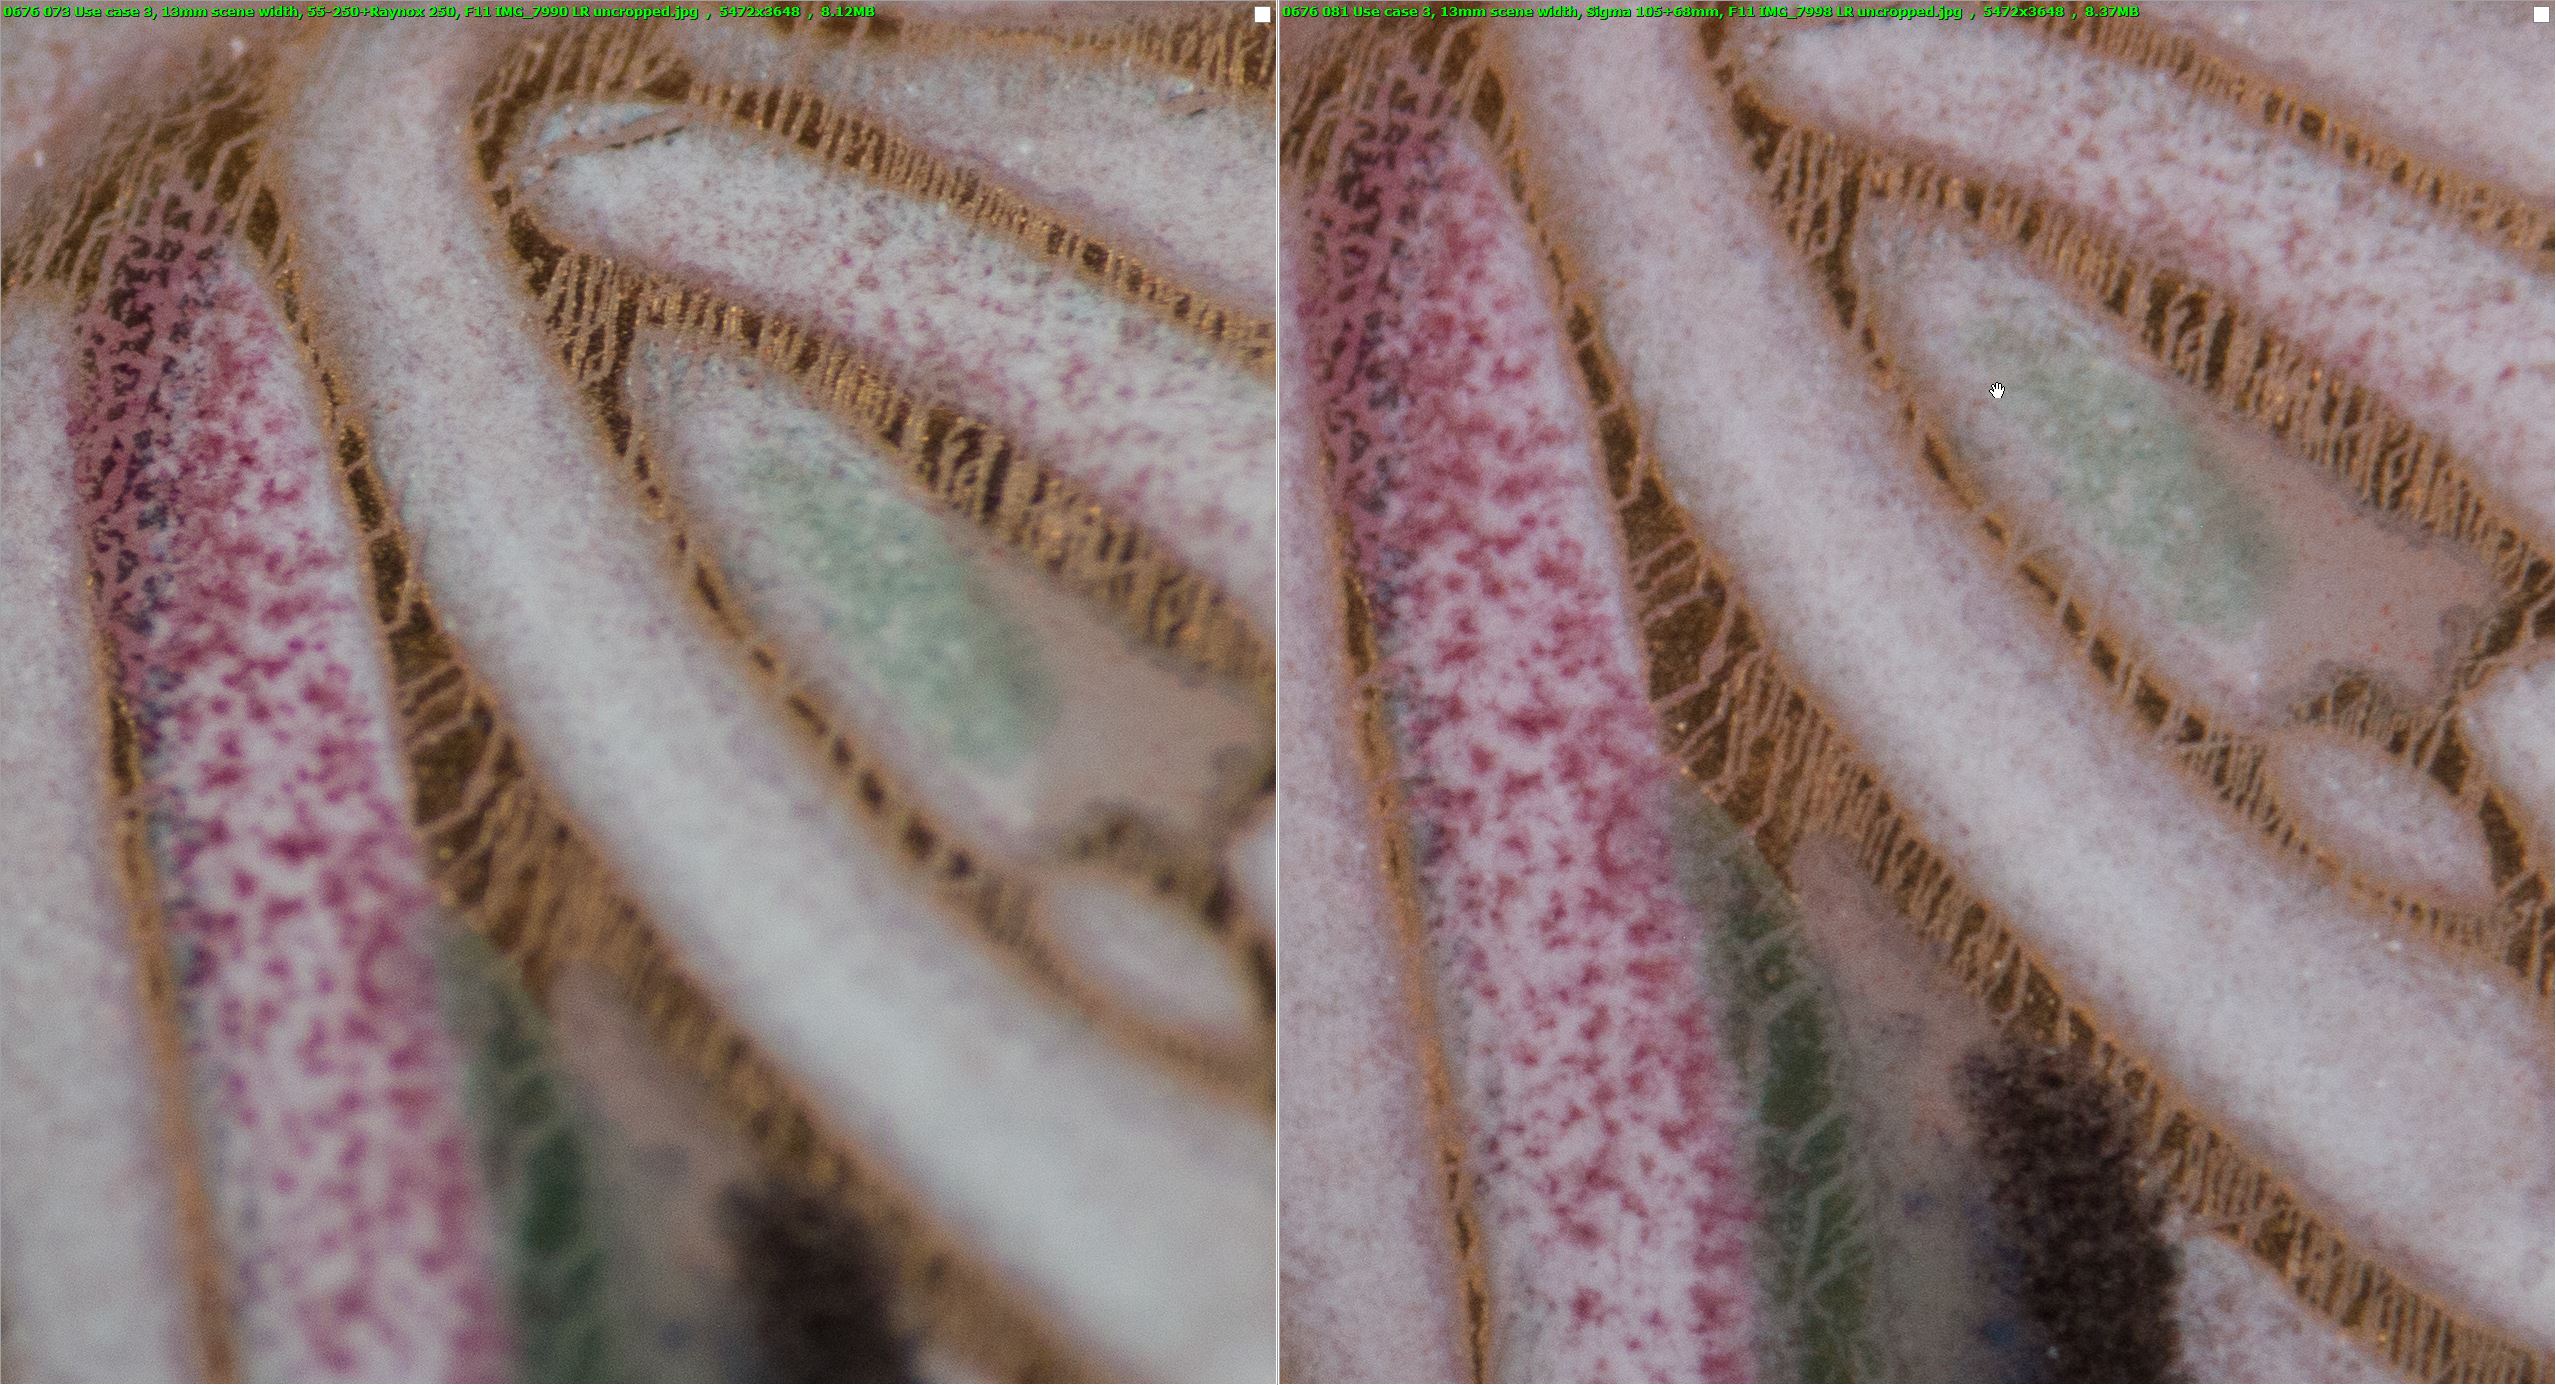
Here is a comparison set for the Sigma 105 at f/11, at around the 1100 pixel height that I normally use for images to be viewed on screen. These show about a quarter of the image for each of the four setups, which should give an indication of the practical implications for the type of outputs I produce.


0681 31 Sigma 105 F11 teleconverter sharpness comparison at around normal viewing size
by gardenersassistant, on Flickr

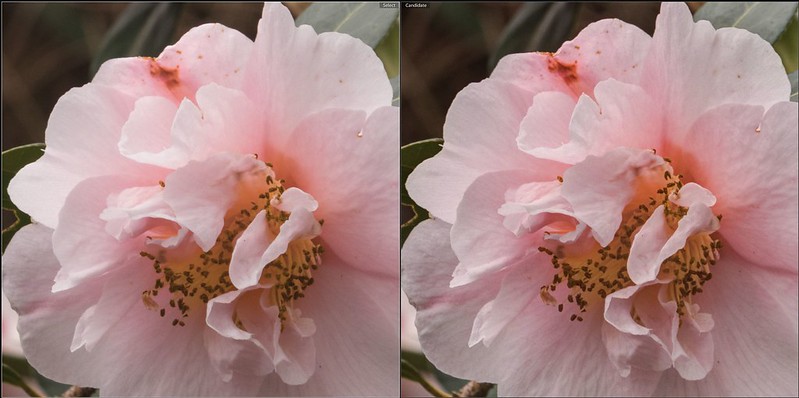
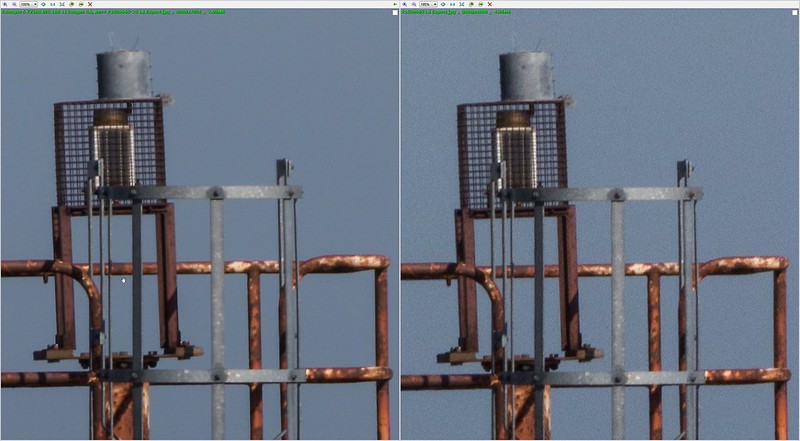
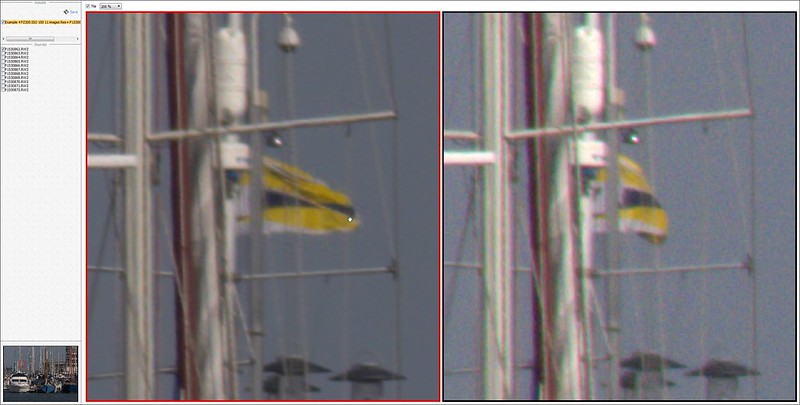
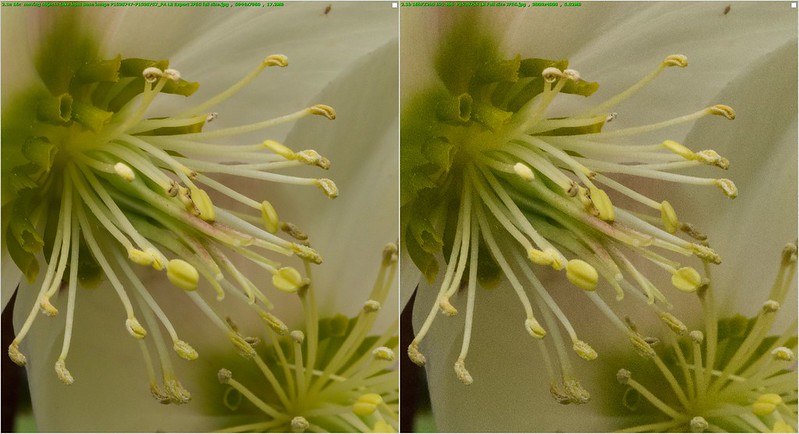
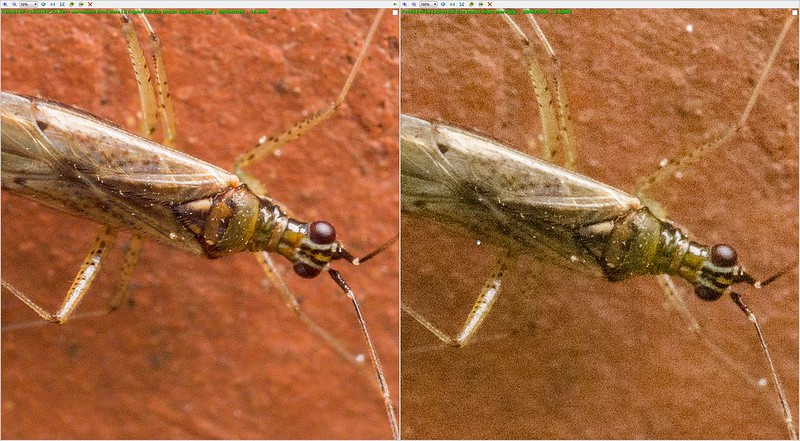
Next we pixel peep at a part of the image that has a type of detail that makes the image degradation easier to see.


0681 32 Sigma 105 F11 teleconverter sharpness comparison pixel peeping
by gardenersassistant, on Flickr

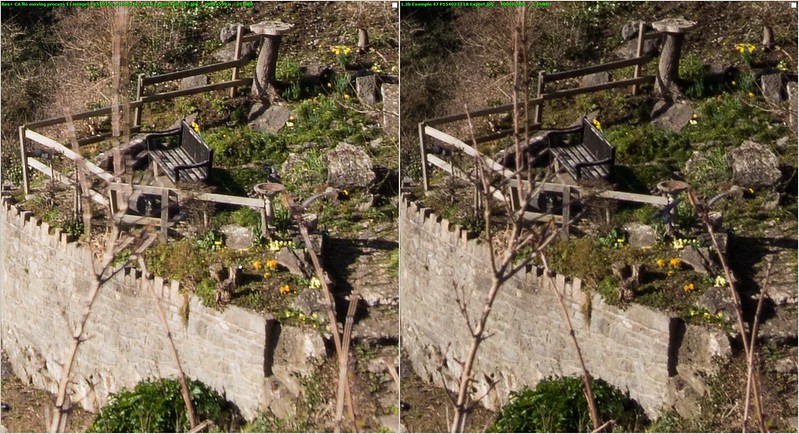
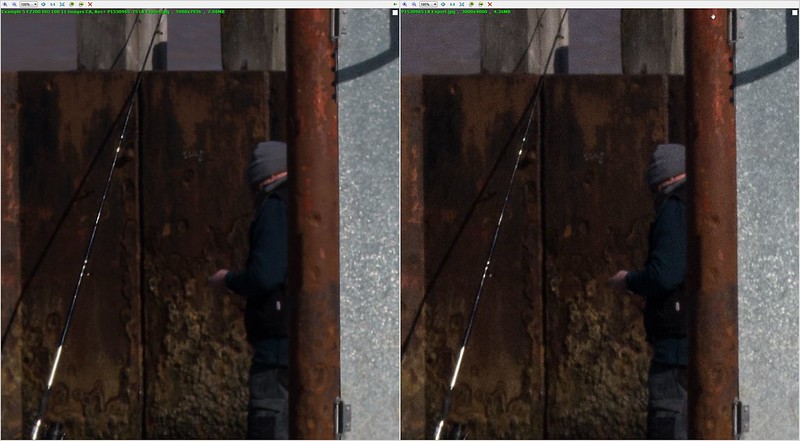
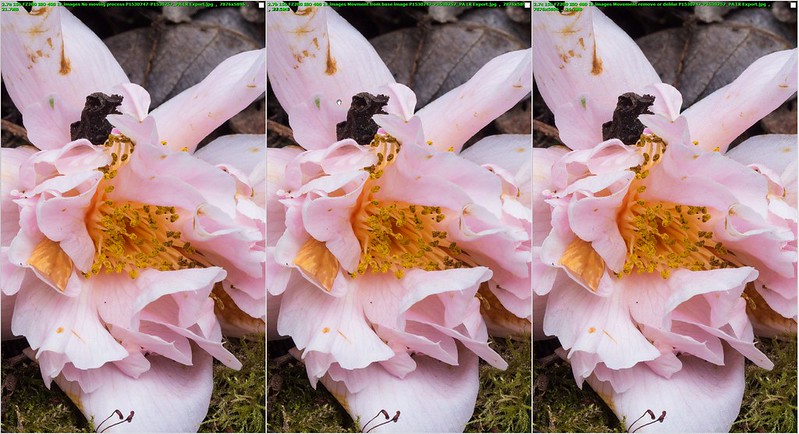
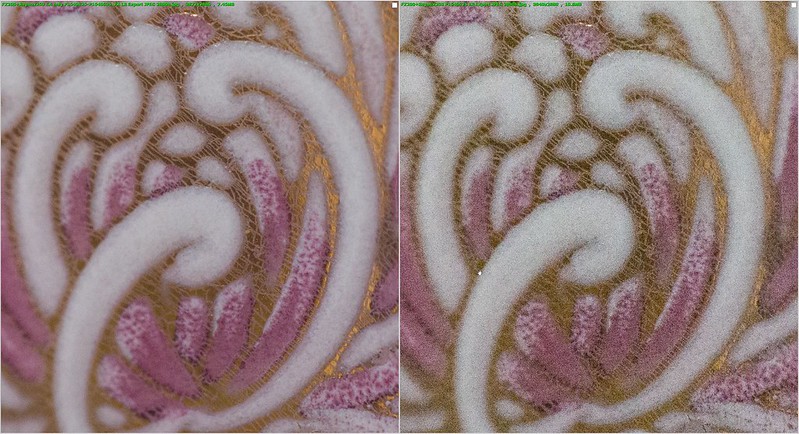
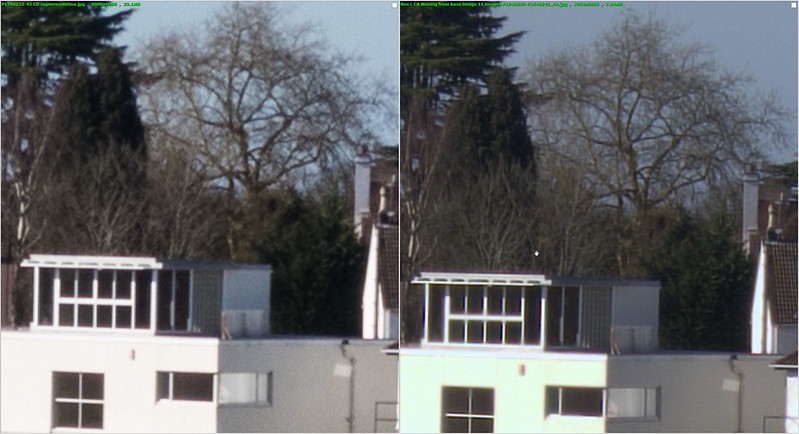
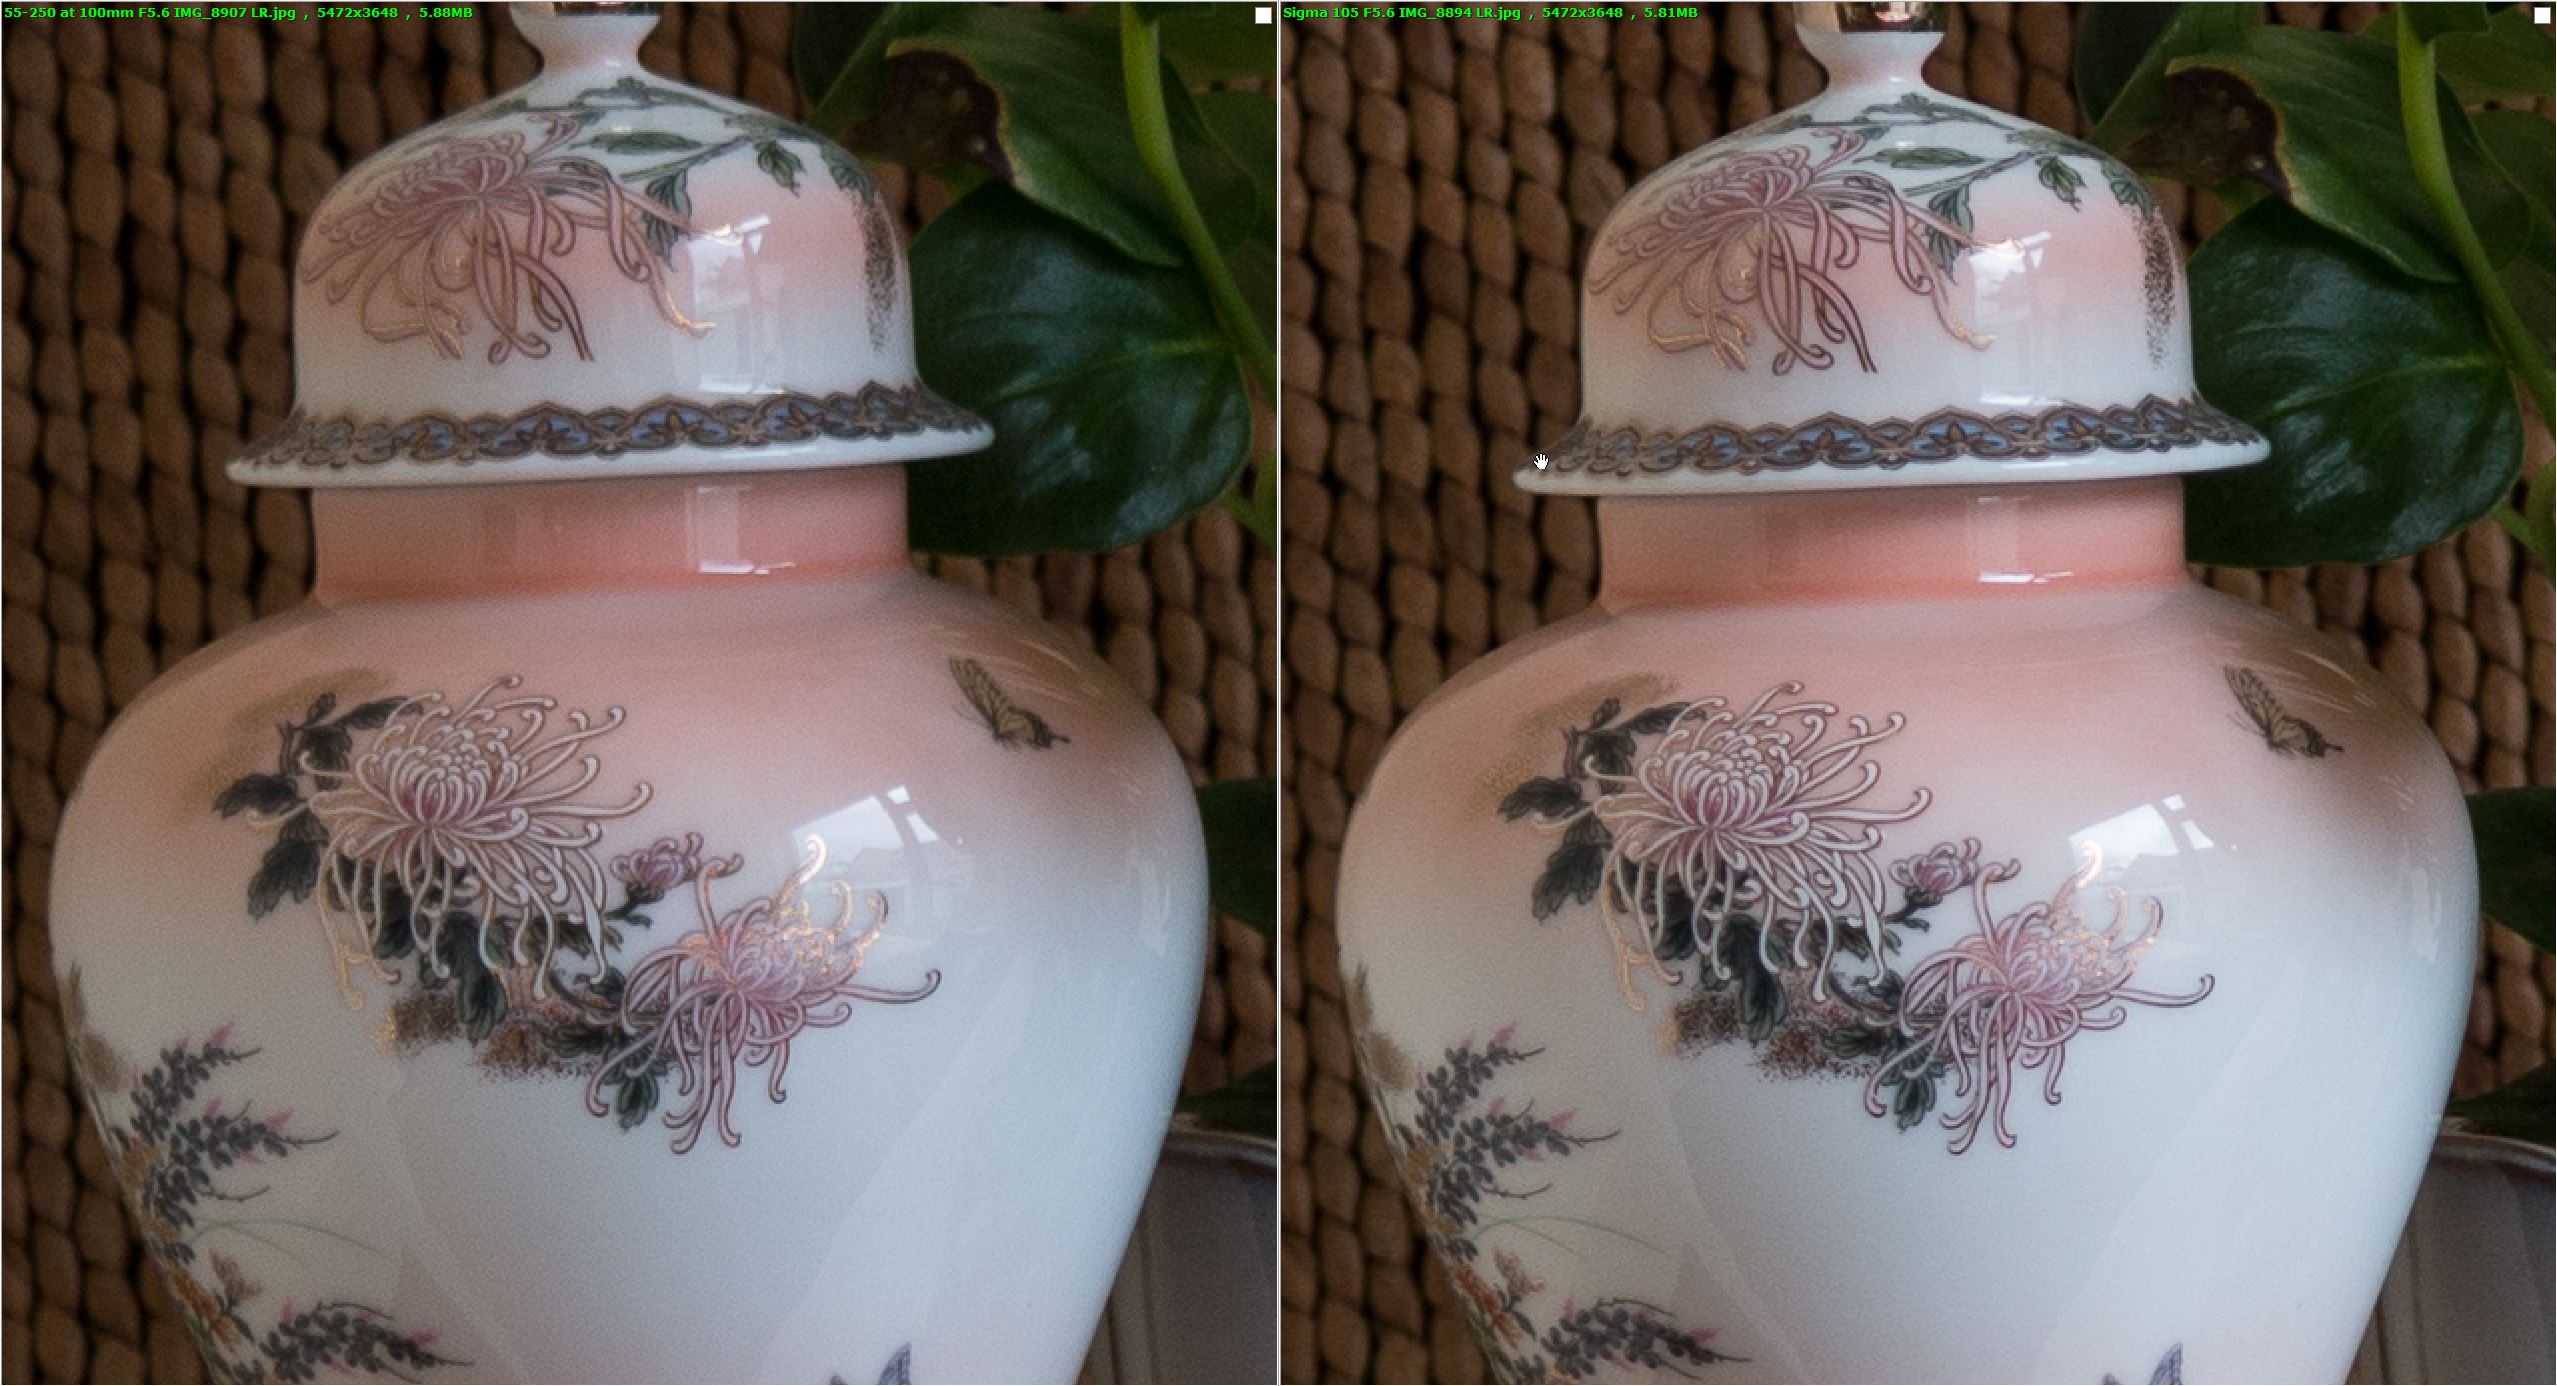
Here is a similar pair of illustrations for the 55-250, this time at f/16, because that is the largest aperture I could use at the focal length I was using with the 1.4x and 2x teleconverters stacked on the 55-250. (Bear in mind that stacking both teleconverters on the 55-250 and using it at maximum focal length turns f/5.6 and 250mm to f/16 and 700mm, which with the 1.6x crop factor is 1150mm in full frame terms.)


0681 33 55-250 F16 teleconverter sharpness comparison at around normal viewing size
by gardenersassistant, on Flickr


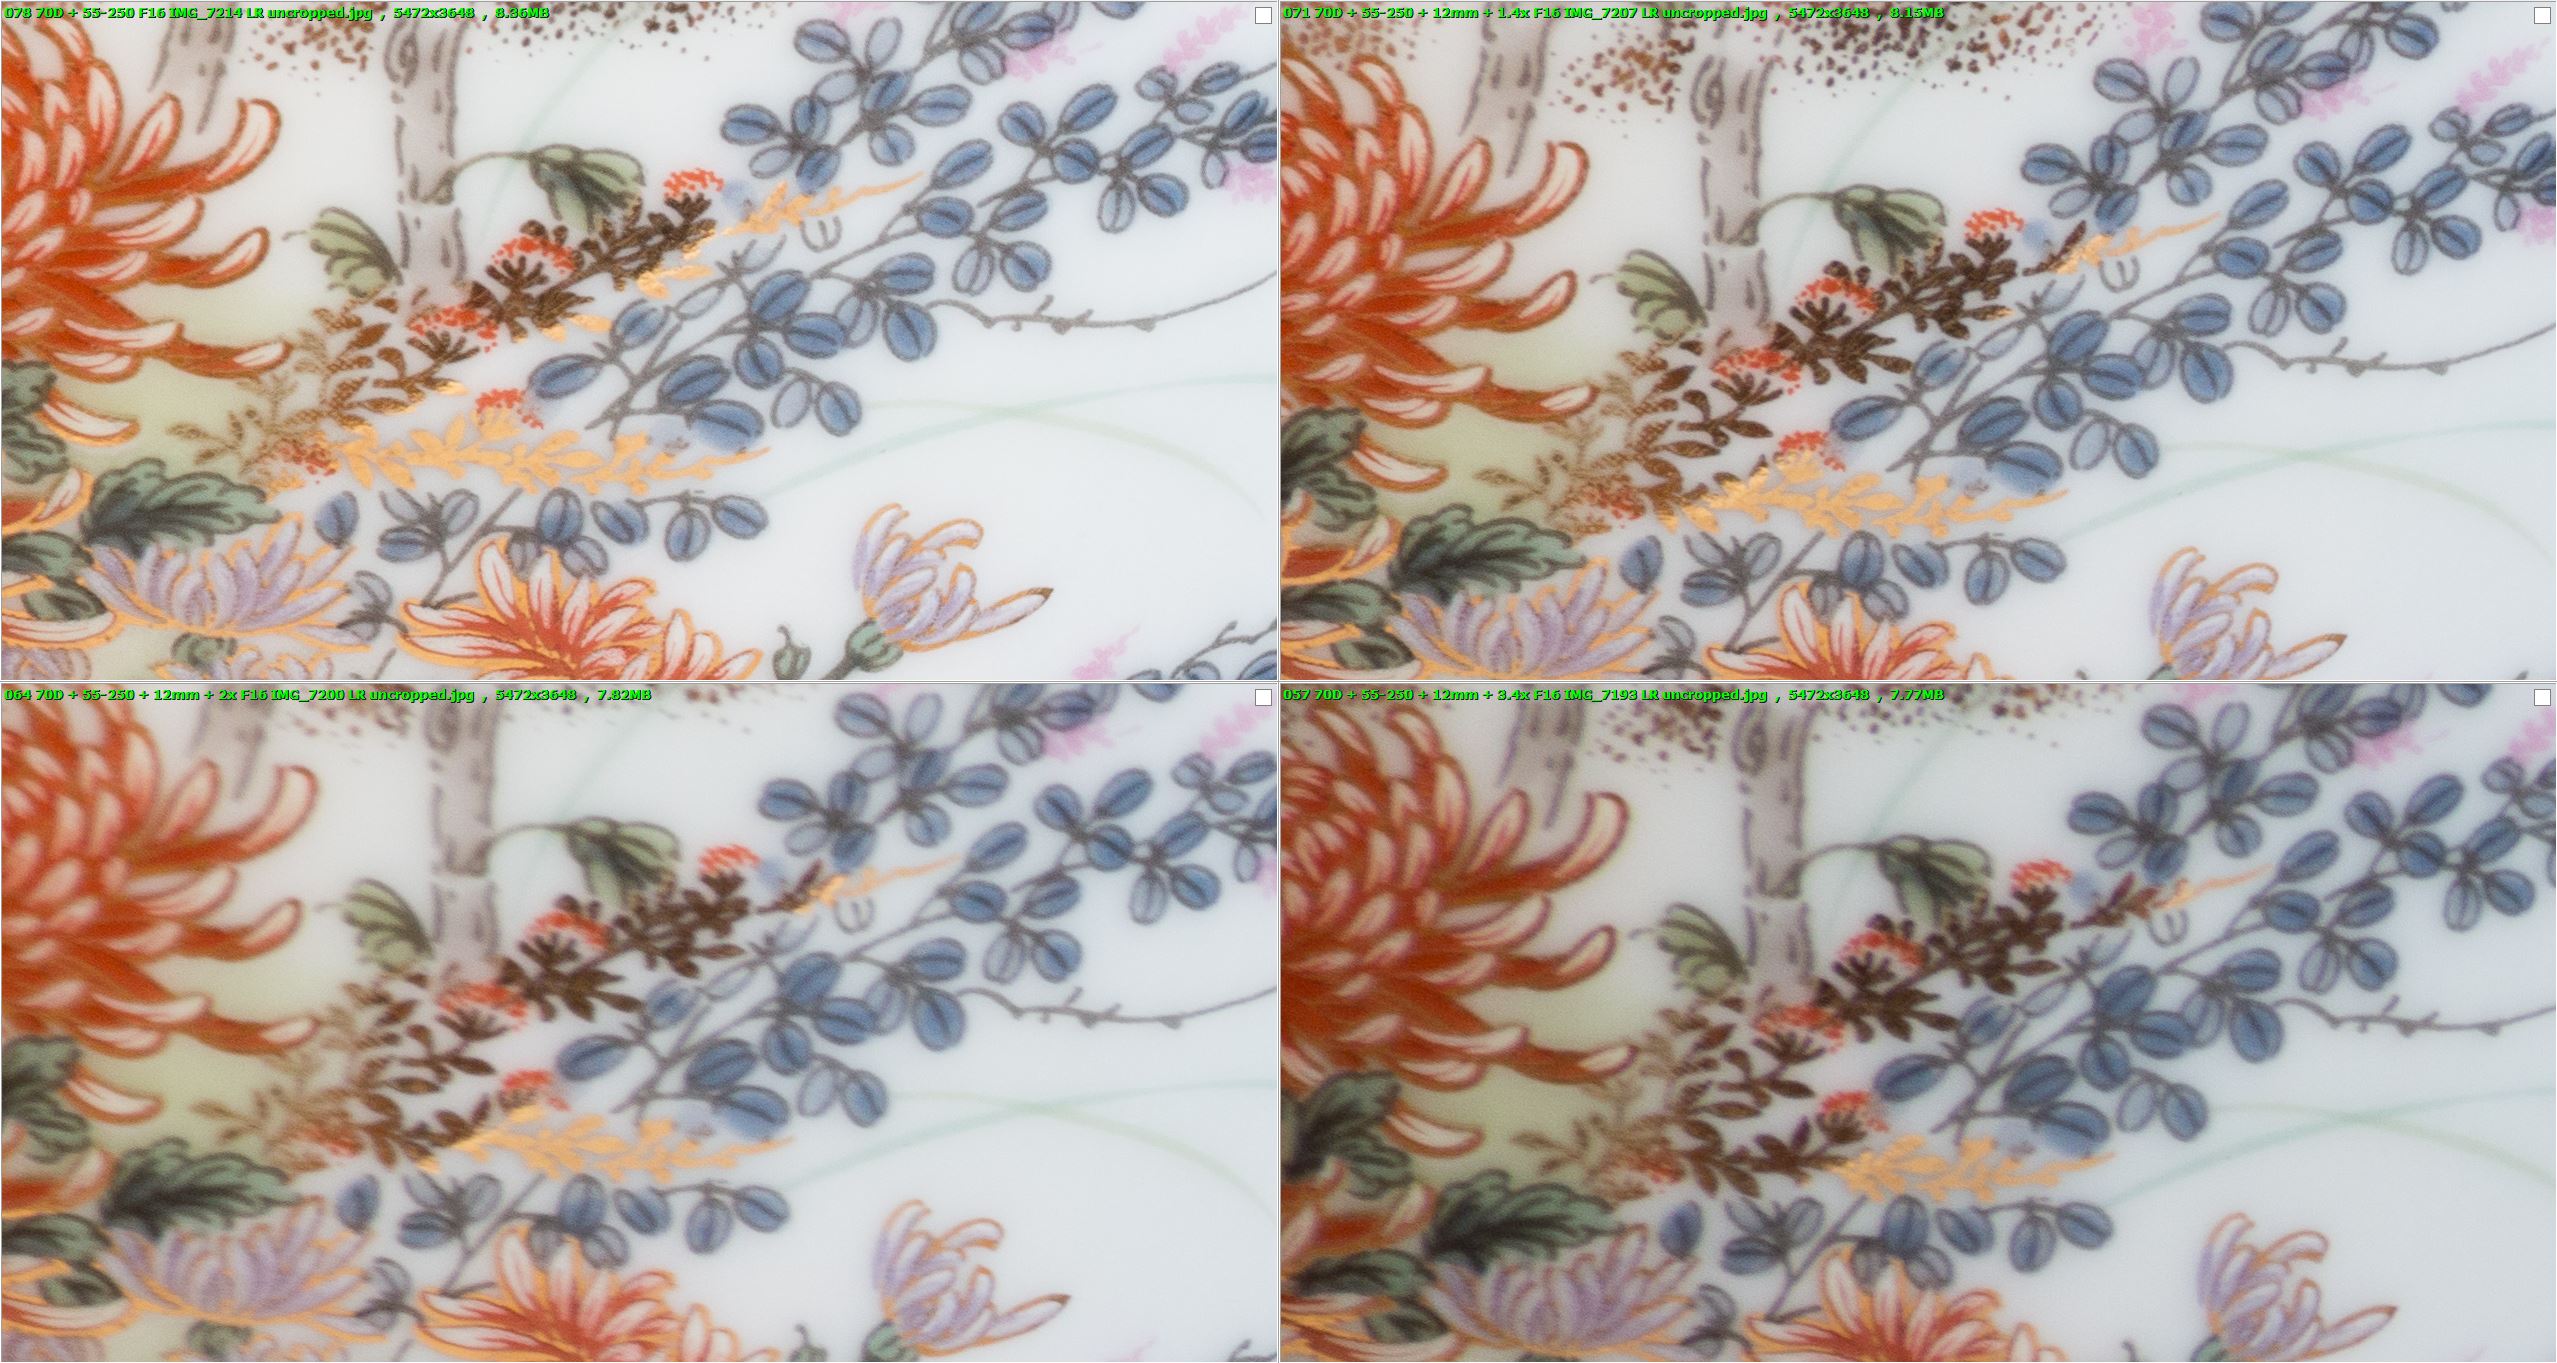
0681 34 55-250 F16 teleconverter sharpness comparison pixel peeping
by gardenersassistant, on Flickr

The image degradation is not so marked as with the Sigma 105. I wonder if this is because the 55-250 isn't as sharp as the Sigma 105 to begin with, but once a teleconverter is added to either lens the teleconverter becomes the limiting factor as far as detail/sharpness is concerned. This would be a bit like when you use a very small aperture difraction losses mean that the result is going to look similarly soft and lacking in detail no matter what lens you use.

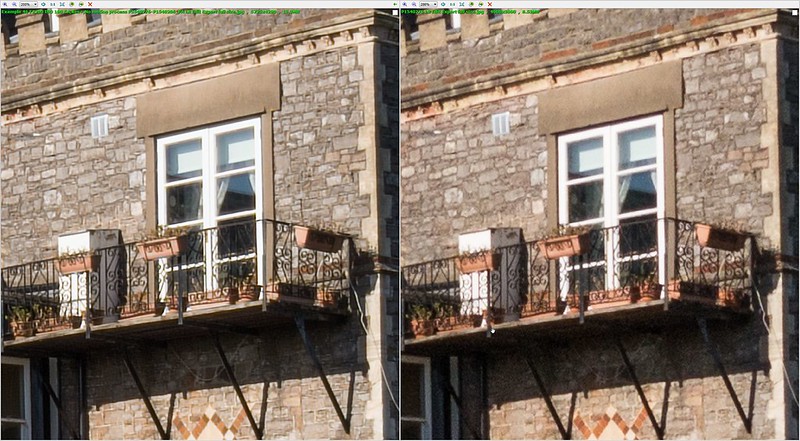
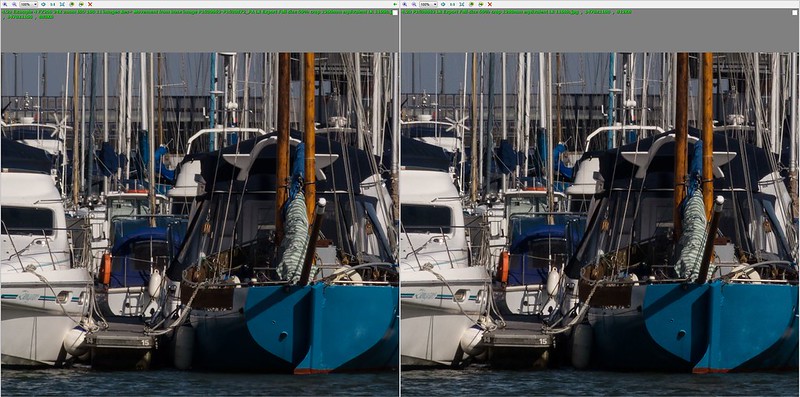
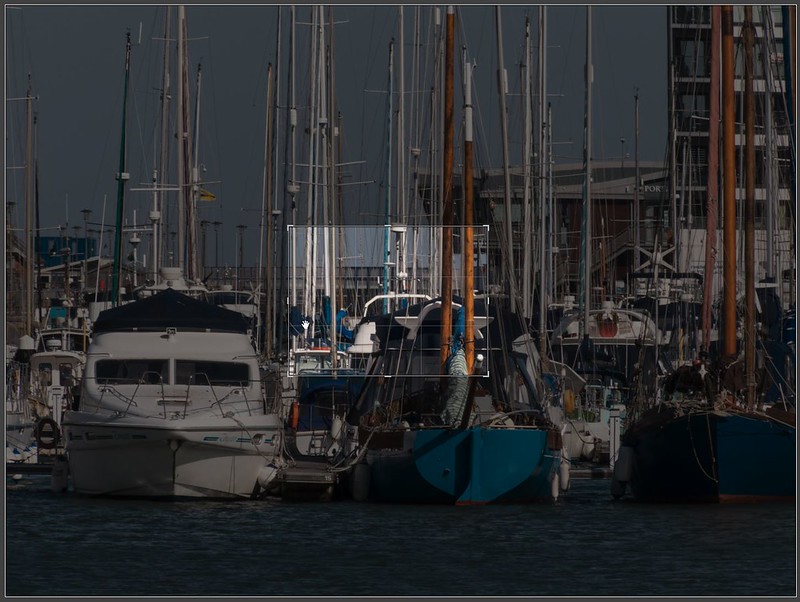
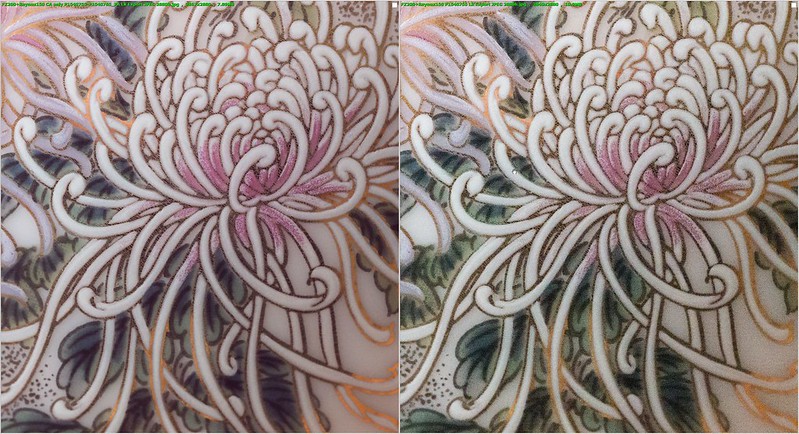
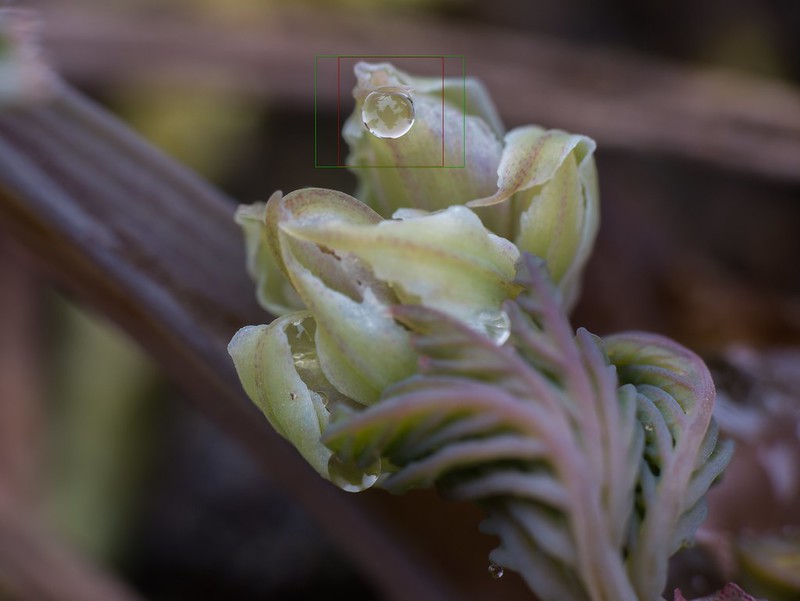
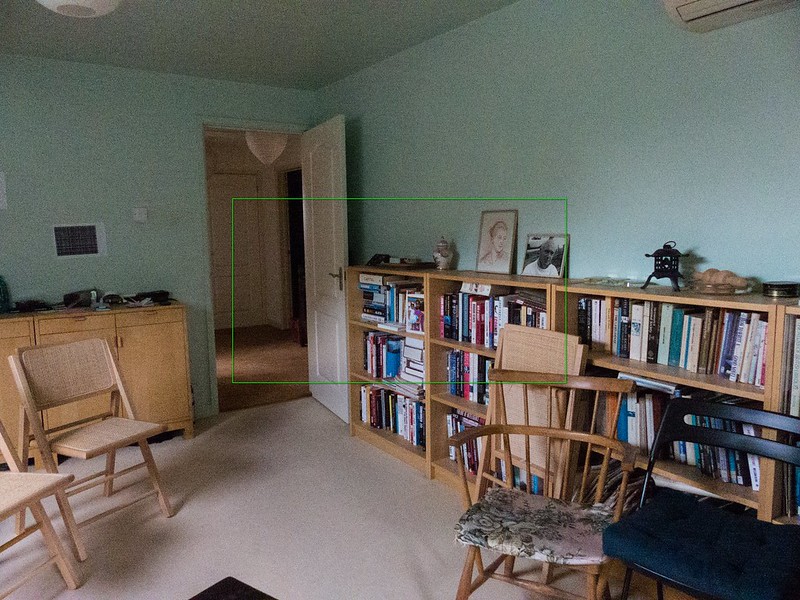
What makes me wonder about this is something I noticed while working through these comparisons. The scene size was different for the Sigma 105 and the 55-250, as illustrated here, which also shows the crop that the Sigma 105 image would need to get it to cover the same area as the 55-250 image. (These are both bare lens captures.)


0681 35 Sigma 105 at F4 vs 55-20 at F11 showing crop for equivalence
by gardenersassistant, on Flickr

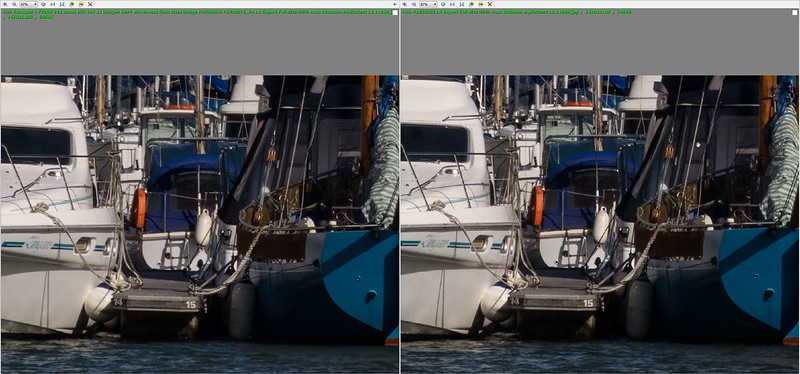
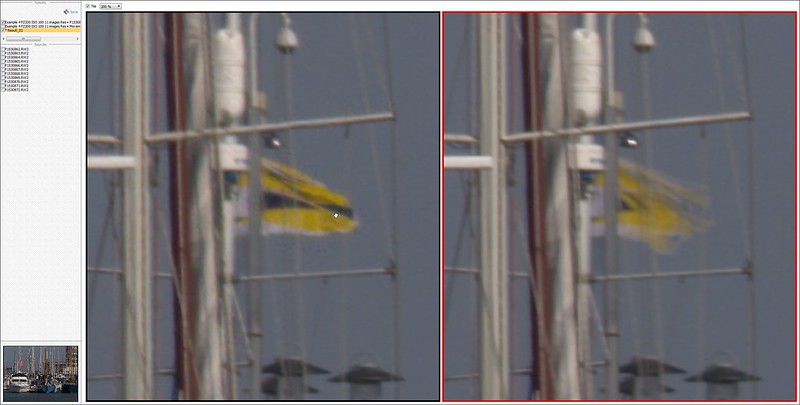
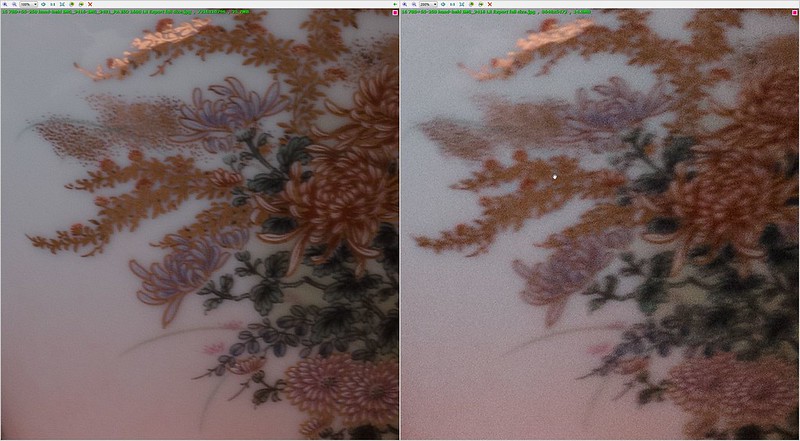
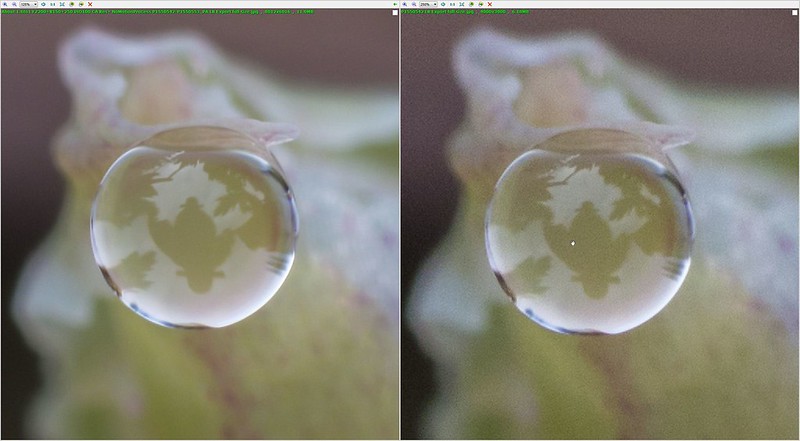
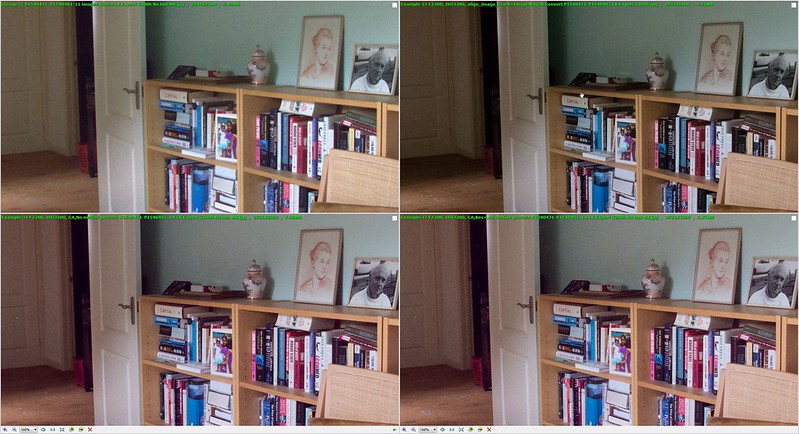
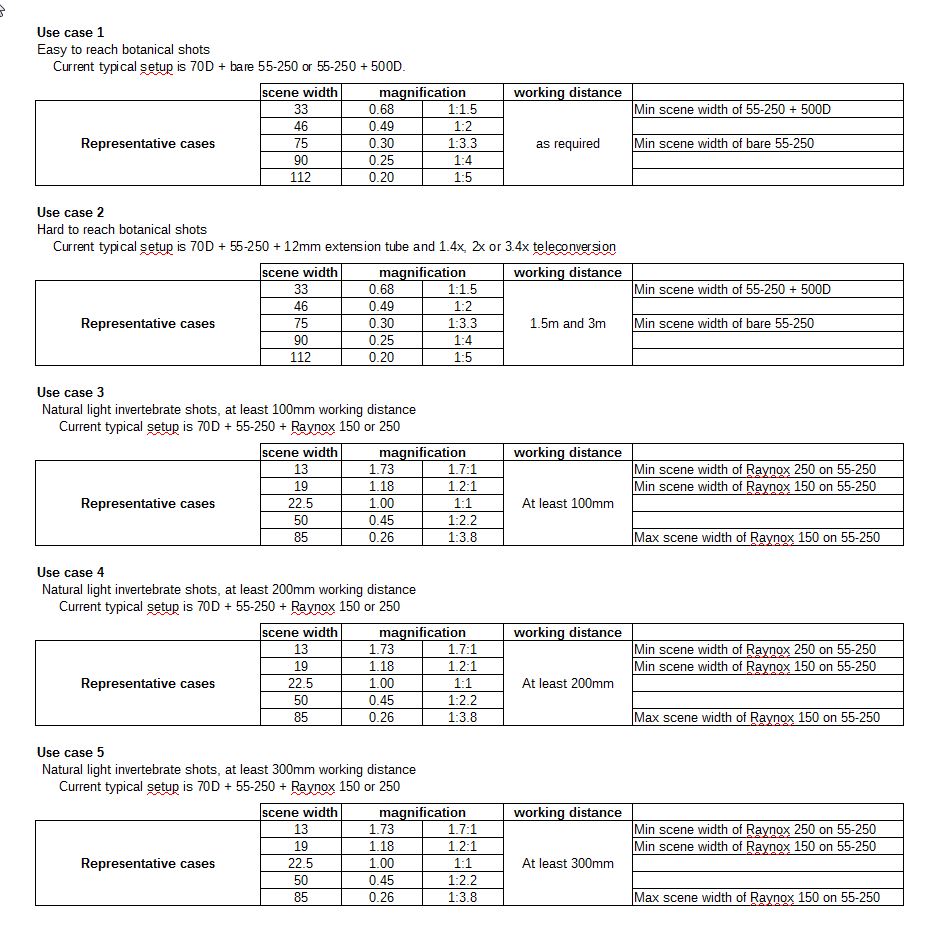
By a happy coincidence this crop is almost exactly a 3-stop crop as described in the Crop for magnification section above. It is therefore appropriate to compare the crop to an uncropped version with three stops smaller aperture. The following graphic compares the f/4 cropped version from the Sigma 105 with the uncropped f/11 version from the 55-250.


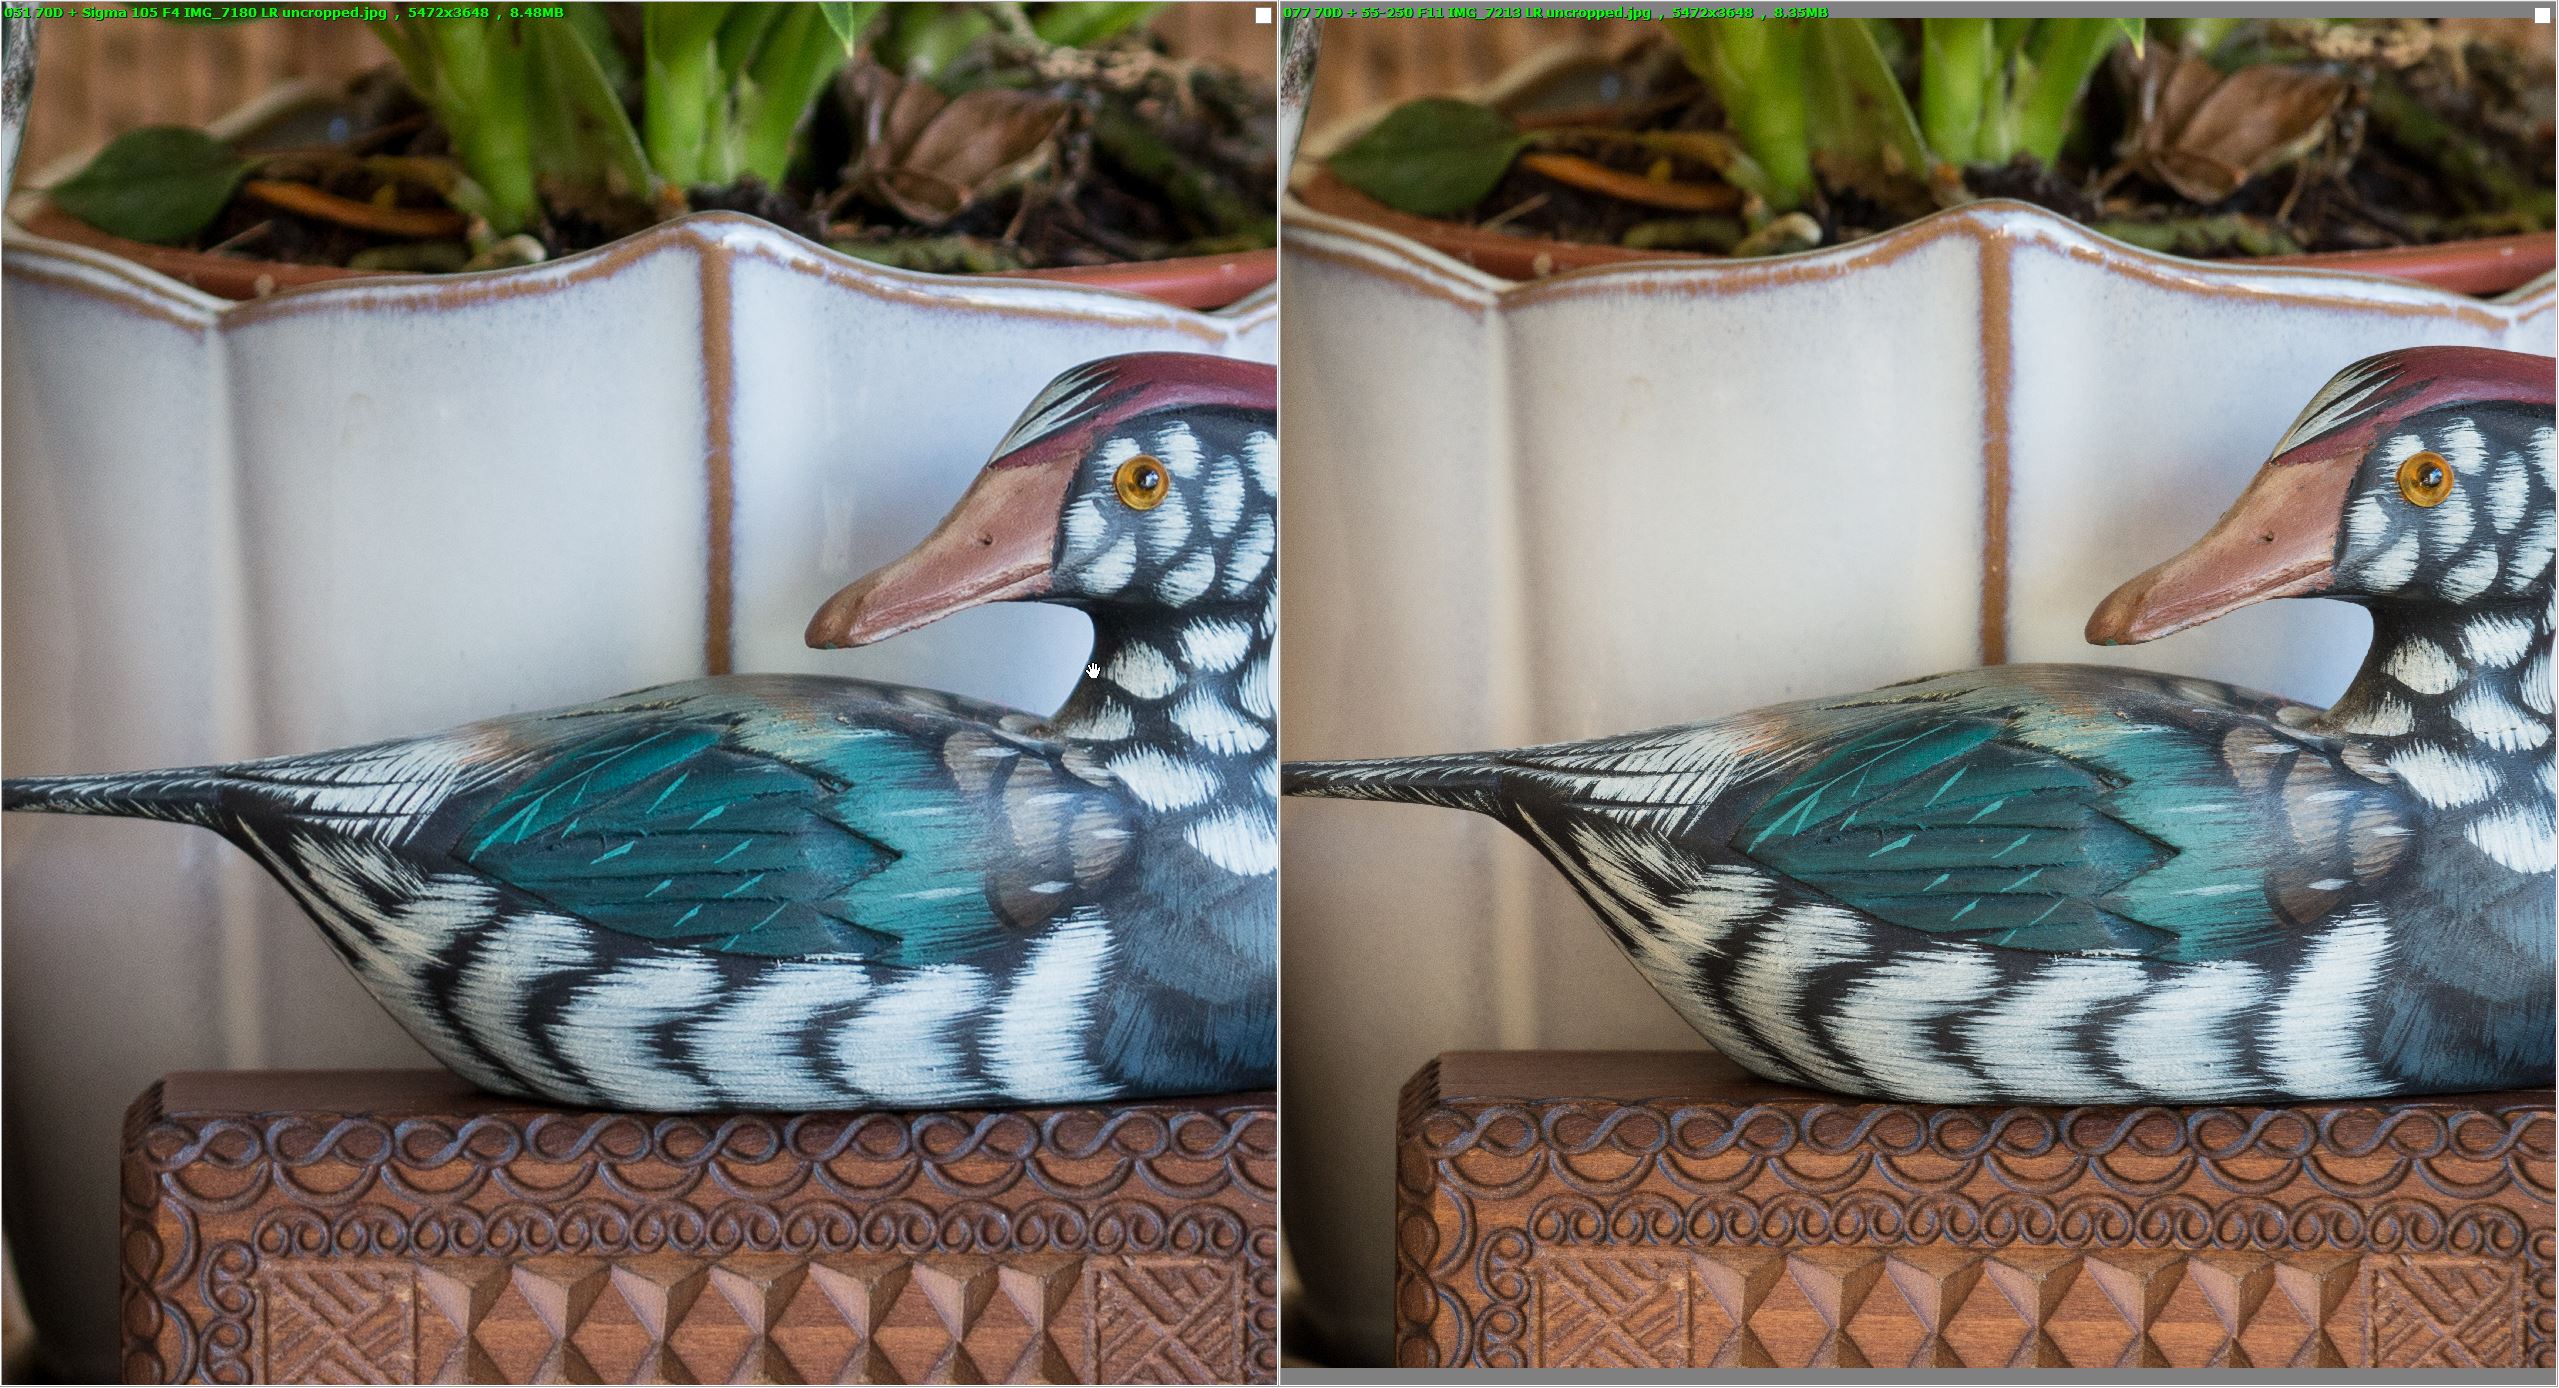
0681 36 Sigma 105 at F4 vs 55-20 at F11 pixel peeping 1
by gardenersassistant, on Flickr

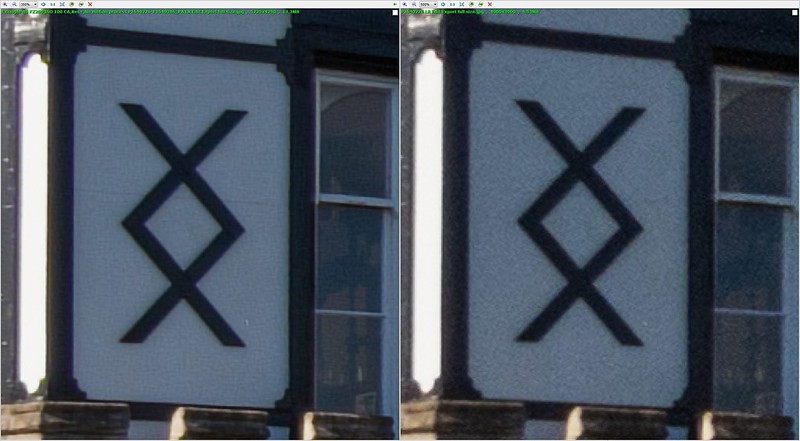
The next graphic compares another part of the scene at twice the magnification.


0681 37 Sigma 105 at F4 vs 55-20 at F11 pixel peeping 2
by gardenersassistant, on Flickr

They are not identical, but the fact that the Sigma 105 version looks so close to the 55-250 version after such a large crop made me think that despite my earlier tests not showning it, this comparison suggests that the Sigma 105 captures significantly more detail than the 55-250. I decided to have a closer look at this, as described in the next section.


Back to table of contents
 
Last edited:
Sigma 105 vs 55-250, extension tubes vs achromats

Following up on the Sigma 105's possible sharpness/detail advantage over the 55-250, I decided to concentrate on natural light, as I still haven't got the 70D to play nicely with flash. There were four natural light areas where I thought the Sigma 105 might be beneficial:
  • Easy to reach botanical subjects, where I can get as close as I need to use any chosen rig.
  • Hard to reach botanical subjects, where I can't get close enough to fill as much of the frame as I want to with the subject. The distance to the subject is typically in the 1 to 3 metre range.
  • Natural light invertebrate shots where the subject will let me use a working distance of around 100mm.
  • Natural light invertebrate shots where I need to keep further away.
For the first two areas I currently tend to use the bare 55-250 or the 55-250 with the Canon 500D on it. For the last two areas I need more magnification and typically use the Raynox 150 or 250 on the 55-250.

I worked up some representative “Use cases”, as follows:


0681 38 Representative natural light cases for Sigma 105 and 55-250 on the 70D
by gardenersassistant, on Flickr

I used this to help me decide what comparisons to attempt. (I say “attempt”, because I discovered that some of these Use cases don't seem to be achievable with any combination of my current kit, especially capturing the smaller scene widths from the larger distances.)

I ended up testing the following cases.


0681 39 Tested use case examples
by gardenersassistant, on Flickr

I used a small vase as the subject because it had very fine detail visible all the way down to 1:1 and beyond. For example, this screenshot shows, at 100%, part of an image with a scene width of about 13mm (i.e. approaching 2:1). It compares a capture using the 55-250 with the Raynox 250 with a capture at the same aperture using the Sigma 105 and all three extension tubes. There is a useful amount of fine detail to examine.


0681 40 Fine detail on vase on an almost 2 to 1 magnification use case example vase viewed 100pc
by gardenersassistant, on Flickr

I captured the scene at each aperture that was available for the rig concerned.

There are 2000 pixel high versions of the images here at Flickr.

I was even more careful than with previous test runs to try to focus on exactly the same part of the scene for each pair of captures. Even so, as you can see from the above screenshot for example, the focusing was often very slightly different for each pair, enough to put different parts of the image more or less in or out of focus. So for comparisons where it wasn't obvious that one of the pair was better I asked myself two questions:
  • When pixel peeping, are the sharpest areas in one of a pair significantly sharper than the sharpest areas in the other one?
  • When compared at slightly larger than my normal viewing size (to allow for the fact that that I often do some modest cropping for compositional reasons), does one of the images look better overall than the other?
I looked at examples at all available apertures so as to avoid being misled by the diffraction issues arising from the very small apertures that I use so often. (As aperture decreases diffraction effects increase, and the results in terms of sharpness and detail tend to converge on a similar and not very good image no matter how good the optics you are using.)

This time, with very carefully controlled captures, and ambient light that wasn't changing much as had previously been the case, and with some very fine detail to look at in great detail from optimal aperture captures of a static subject, I was sure that I would see a clear advantage for the Sigma 105.

I didn't.

The following table summarises what I did see when I looked closely at the pairs of images.

In the table “Y” means “Yes, in my judgement, on balance”. An entry such as “48mm” describes a length of extension tube. “1.4x” and “2x” refer to the teleconverters.

There are two columns in the table for aperture. Where only one aperture is shown, the same aperture was used with both setups. Where the setups had different effective apertures because of the effects of using extension tubes I applied a one-stop correction. This is very much an approximation. The difference would have been nearer to two stops in some cases I think.


0681 41 Four use case results
by gardenersassistant, on Flickr

A clear pattern emerged from the first and third use cases. It seems that the Sigma 105 (used bare and used with extension tubes) is sharper than the 55-250 (used bare or with an achromat) at the largest aperture(s). For the smallest aperture(s), the 55-250 is sharpest. This is consistent with the tests documented here where I wrote “In summary, when looking at the area of the images which is in sharpest focus, the 70D+Sigma 105 is sharper than the other rigs at large apertures, but is less sharp than them at smaller apertures.”

However, these new comparisons suggest that there may be a bit more to it than that. I had each image pair set up side by side in synchronised windows so I could move around the scene easily comparing like with like – and this time I had the alignments good enough in almost all cases for that to work well.

After pixel peeping quite a lot of these comparisons it dawned on me that the Sigma 105 images retained their sharpness better as I moved away from the centre of the image. This meant that for some of the image pairs shown in the central column in the table (“Too close or mixed to call”) the centre of the image was sharper in the 55-250 version, but the areas beyond the centre were sharper in the Sigma 105 version.

It was difficult to be sure about this, or the extent of it, because the effect was overlaid on a right/left pattern of sharpness where one of the images was sharper on the left and the other on the right. I think this was caused by differences in distance to the focus point coupled with the curved shape of the vase, and the fact that the area I was concentrating on was non-central so the distance to the camera decreased from left to right of the scene. Because the area of the vase I was concentrating on was curved both horizontally and vertically, this was all rather complicated.

I tend to be more concerned about the sharpness/detail in the areas towards the centre of the image, and so the possibly better radial sharpness retention of the Sigma 105 is not compelling from my point of view. On the other hand, the consistently better small aperture results for the 55-250 are highly significant for me as I tend strongly towards smaller apertures, and use the very smallest aperture available most of the time for invertebrates.

I think the second and fourth cases illustrate the image-degrading effects of too much teleconversion. I suspect that for both Case 2 sequences the first three entries are better with the 55-250 because it needed less teleconversion. I suspect that the other entries are too close to call because all of the images have very poor quality because they have large diffraction losses on top of the teleconversion degradation. It was similar but worse with case 4, where all the images were of very poor quality.


Back to table of contents
 
Last edited:
Another look at teleconverter image quality

I mentioned previously that it looked as though ISO could play a role in whether an image captured using a teleconverter would produce a better quality result than a crop of an image captured without using a teleconverter, or using less powerful teleconversion. I decided to investigate this further.

I did another test series with the same subject as the previous series.


0681 42 0678 121 Sigma 105 bare, F8, ISO 100 IMG_8462 LR Exp adjusted 1.4x or cropped to 1.4x 2323h
by gardenersassistant, on Flickr

The tripod was in the same position for all the shots.

I used the Sigma 105 using the bare lens and with 1.4x, 2x and 3.4x teleconversion. For each of these I captured images from ISO 100 to ISO 12800, and for each ISO I captured images at each available aperture. I then did the same with the 55-250.

The 416 images were captured in a single session lasting just under two hours.

I focused manually for each aperture at the beginning of each run through the ISOs. I used live view focusing with 10x magnification and used a wired remote release. I waited until I could no longer see movement at 10x magnification before taking each shot.

As usual the images were captured RAW and imported into Lightroom using my normal, mild import adjustments. The only other processing was adjustments to Exposure to try to equalise differences of up to almost a stop in brightness between some of the batches of images despite the fact that all had used (evaluative) autoexposure with 1/3 stop exposure compensation. Differences in scene coverage with the two lenses and four setups of bare lens, 1.4x, 2x and 3.4x teleconversion seem to have affected exposures. A change in the ambient light part way through the session may also have affected exposure evaluation.

I did the same sort of cropping and resizing as before (documented in this post).

The uncropped 1.4x images and bare lens images cropped to the same scene coverage as the 1.4x images are here. To ease comparison, the uncropped 1.4x images have been downsized to the pixel height of the bare lens images as cropped to match the 1.4x image scene coverage.

The uncropped 2x images and the 1.4x and bare lens images cropped to the same scene coverage as the 2x images are here. The uncropped 2x images and the cropped 1.4x images have been downsized to the pixel height of the bare lens images as cropped to match the 2x image scene coverage.

The uncropped 3.4x images and the 2x, 1.4x and bare lens images cropped to the same scene coverage as the 3.4x images are here. The uncropped 3.4x images and the cropped 2x and 1.4x images have been downsized to the pixel height of the bare lens images as cropped to match the 3.4x image scene coverage.

I did some image comparisons. I tried to rank images in terms of their image quality as I perceived it, using 1 for the best, 2 for the next best etc, and giving two or more images the same number where there were ties.

As before, there were complications, for example arising from the focus point being at very slightly different distances from the camera and making different areas of the image in best focus, and differences in the amount of noise and in the exposure, contrast and white balance. As before, I often had to use my judgement as to what aspects of an image seemed to matter most to my eye. For example, some of the rankings are based on very small differences, some of which I'm sure would appear inconsequential to most people. However, my aim was to so see if any patterns would emerge from the “noise” of complications, increasingly tired eyes, mistakes, tedium etc. (There were over 900 images/crops altogether, and I looked at a large number of them. When I started I spent a long time poring over each comparison, but as time went on I worked much more rapidly.)

Sigma 105 1-stop crop comparisons

The first comparison involved images captured with the Sigma 105. Each line in the following table compares two uncropped images captured with the 1.4x teleconverter to a cropped image captured with the bare Sigma 105 at the same ISO. One of the teleconverter images used the same aperture as the bare Sigma 105 capture, and the other used an aperture one stop smaller, so as to give the same dof as the bare Sigma 105 capture (a “dof equivalent” capture).

I added the same-aperture comparison because I been following a discussion at dpreview on the subject of whether it was better to use a teleconverter or to crop in order to get more reach, and in those discussions the same aperture was used for both the teleconverter and cropped images. It struck me that it would be interesting to add this comparison into the mix. However, do bear in mind that increasing the aperture of the teleconverter shot by one stop from the dof equivalent aperture so as to match the bare lens shot aperture results in a reduction of dof of almost 30%. (This may not seem right, given that I've previously said that decreasing the aperture by one top increases the dof by 40%. However, let's say we decrease the aperture by one stop and the dof increases from 40% from 10mm to 14mm. Then increasing the aperture again by one stop decreases the dof from 14mm to 10mm, i.e. by 4mm, which is 29% of 14mm.)


0681 43 Multi-ISO image quality comparisons of Sigma 105 1-stop teleconverter crops
by gardenersassistant, on Flickr

As far as the impact of ISO goes, this seemed limited to making cropped shots look sufficiently worse from around ISO 3200 to push them down in the rankings.

I was interested to see how the answer to the question of “is it best to crop or teleconvert?” altered as the apertures got smaller. At the larger apertures, in the first four sub-tables, the cropped image was best. The teleconverter image with the same aperture as the cropped image started out distinctly worse than the cropped image at the largest aperture, and got progressively better until at f/16 it swapped places with the cropped image and became the top ranking image.

For the most part the dof-equivalent teleconverter shots were either no better than the cropped shots or worse than them. The only exceptions were the ISO 3200 shots, where I judged the less noisy dof-equivalent shot to be better in every case.

These numbers suggest that (with this lens and teleconverter, and this subject matter, and my visual preferences), it would be better to crop than use the teleconverter up to f/11 or so, and would be better to use the teleconverter from f/16 using the same aperture (as long as you don't mind getting less dof). Or, if you want the same dof, from f/16 or so there doesn't seem to be much difference between cropping the bare lens image or using the teleconverter with the dof-equivalent aperture, apart from ISO 3200, for which the dof-equivalent aperture with the teleconverter would be better.

Sigma 105 2-stop crop comparisons

Next I tried bigger, “2-stop” crops, cropping images from the bare Sigma 105 to match images using the 2x teleconverter.

In this case I did a 4-way comparison.


0681 44 Multi-ISO image quality comparisons of Sigma 105 2-stop teleconverter crops
by gardenersassistant, on Flickr

As in the previous table, the bare Sigma 105 image that was cropped is in the left hand column. The other three columns refer to uncropped teleconverter images. In the second column is the teleconverter version using the same aperture as the bare lens crop. In the last column is the dof-equivalent teleconverter shot, which in this case is 2 stops smaller than the bare lens crop. The third column is the “Intermediate aperture” teleconverter shot with aperture between the other two teleconverter shots.

In this case the Intermediate aperture gives the best or equal best results, at all apertures. Up to f/11 The cropped bare lens shots are just as good, except at ISO 3200 or so, but significantly worse at all ISOs at f/16 and f/22. The dof equivalent shots are almost as good as the cropped shots and Intermediate aperture shots up to f/16, but at f/22 and beyond they are poor.

Overall, the Intermediate aperture gives the best results (as long as you don't mind losing the dof). In fact, even if maximising dof is important, the intermediate aperture still looks like the best bet as this will give up to f/32. f/45 with the teleconverter (or the dof-equivalent bare lens f/22 crop) is probably unusable.

Sigma 105 3-stop crop comparisons

Next, cropping bare Sigma 105 images to match images using 3.4x teleconversion.

This is a 4-way comparison like the previous one. The only difference is that there were two stops between the bare Sigma 105 aperture and the dof-equivalent aperture, and I had to choose which one to use (the software I used to do the comparisons only handles four images at once). Given the previous results, it seemed to make more sense to use the smaller of the two apertures, the one that was closer to the dof-equivalent aperture.


0681 45 Multi-ISO image quality comparisons of Sigma 105 3-stop teleconverter crops
by gardenersassistant, on Flickr

In this case too, the Intermediate aperture shots look best, with the best deep dof probably being f/32 with the intermediate aperture. Although the f/22 same aperture shots come out best in the bottom two sub tables, this is equivalent to f/45 and f/64 after allowing for the three stops of cropping, and it is probably the unusable (poor) best of a bad bunch.


55-250 1-stop comparisons


I did a set of 1-stop crop comparisons for the 55-250, using the 1.4x teleconverter (plus the 12mm extension tube, needed to attach the teleconverter to the lens).


0681 46 Multi-ISO image quality comparisons of 55-250 1-stop teleconverter crops
by gardenersassistant, on Flickr

In this case the teleconverter images using the same aperture as the cropped bare-lens images were consistently ranked top, or equal top (but with less dof than the other two of course). For maximum dof, for larger apertures the dof-equivalent shots were best, and for smaller apertures there was nothing to choose between the dof-equivalent shots and the cropped shots.

55-250 2-stop comparisons

Next, 2-stop comparisons, using the 2x teleconverter (plus the 12mm extension tube).


0681 47 Multi-ISO image quality comparisons of 55-250 2-stop teleconverter crops
by gardenersassistant, on Flickr

In this case the best results came from the teleconverter using the Intermediate aperture at f/16 and f/22, and the same aperture as the bare lens at f/22 and f/32. The dof-equivalent aperture was worse than the Intermediate aperture except at the largest aperture, f/22. Presumably this bad performance stems from the extremely small apertures needed for the dof-equivalent shots. The bare lens crops were bottom of the ranking, or joint bottom, in every case.

55-250 3-stop comparisons

Lastly, 3-stop comparisons using both teleconverters stacked (plus the 12mm extension tube). As with the Sigma 105 3-stop comparisons, for the Intermediate aperture I used the one nearer to the dof-equivalent aperture.


0681 48 Multi-ISO image quality comparisons of 55-250 3-stop teleconverter crops
by gardenersassistant, on Flickr

The results were similar to the 2-stop comparisons, except that the cropped versions were more completely and consistently the worst, despite the very small apertures being used by the dof-equivalent shots.


So what is best?

Crops or teleconverter shots?

It seems that it depends, on the lens, on the amount of cropping/teleconversion, the ISO, whether you are using large, small or middling apertures, your dof requirements, your attitude to noise and personal preferences as to which visual characteristics of an image matter most to you.

It would have been nice to have had a simple answer. But there we go. At least it is possible with tests like these to explore the characteristics of one's kit and then adjust one's techniques to take those characteristics into account.


Back to table of contents
 
Last edited:
Sigma 105 vs 55-250, edge sharpness and crop quality

I was intrigued by the finding that
  • For 1-stop and 2-stop crops, using middling and larger apertures, and excepting the highest ISOs, crops from the Sigma 105 were generally as good as or better than the uncropped teleconverter images.
  • For the 55-250, the crops were almost universally worse than, or no better than, the best of the uncropped teleconverter images.
I now suspected that the Sigma 105 had better edge sharpness than the 55-250, but that didn't seem sufficient to explain the cropping results. I decided to probe this a bit more.

I captured a test scene with the Sigma 105, at all the available apertures, at ISO 100. I then captured the scene with the available apertures on the 55-250, with the tripod and camera in the same position, trying to match the scene coverage of the Sigma 105 as best I could. (It turned out that I used 100mm rather than 105mm. I couldn't tell what the focal length was at the time.)

I then tried to get to around 210mm focal length on the 55-250. (It turned out to be 218mm) and captured the scene again with all the available apertures.

I then put the Sigma 105 back on the tripod and captured images at all available apertures with the 1.4x, 2x and stacked (3.4x) teleconverters.

In all these cases I manually focused at 10x magnification on the same area on the duck.

Here is the scene as captured by the Sigma 105.


0681 49 Sigma 105 F2.8 IMG_8892 LR 1100h
by gardenersassistant, on Flickr

The bottle and two little jars to the right of the pair of figurines were aligned to be in the same plane as the area of the duck on which I focused (although of course being at an angle, they were further from the camera than the duck). I wanted to use them to test edge sharpness.

The offcut of fabric with the fine threads and some texture in the material was, obviously, a bit behind the plane of focus. I also put some objects at intermediate distances in front of the plane of focus to check if there was anything interesting to be seen to do with dof.

Using the teleconverter images as templates, I produced 1-stop, 2-stop and 3-stop crops from the bare Sigma 105 and 55-250 images.

The full size images and the crops are here at Flickr.

Looking at the uncropped images, and comparing the bottle and rightmost little jar at f/5.6 at 200% it is clear that the Sigma 105 image, on the right, is sharper, shows more detail and has better microcontrast and clarity.


0681 51 Edge comparison at F5.6
by gardenersassistant, on Flickr

The same is true of the vase, so it is not just an edge issue.


0681 52 Non-edge comparison at F5.6
by gardenersassistant, on Flickr

The advantage for the Sigma 105 diminishes as the aperture decreases and by f/22 the 55-250 is possibly a little better than the Sigma 105.


0681 53 Non-edge comparison at F22
by gardenersassistant, on Flickr

But does it matter if the Sigma 105 has better detail etc if this can only be seen by extreme pixel peeping, and is only the case at larger apertures? For most of my images, I think not, because I tend to user smaller apertures. However, substantial cropping has the same effect as pixel peeping, so cropping to gain extra reach might bring the extra detail from the Sigma 105 images into visibility, and give them more detail than similarly cropped images from the 55-250. But if I can only see the extra detail when pixel peeping the larger apertures, then presumably only the larger aperture crops would be any better. And in fact this turns out to be the case.

When I compared the Sigma 105 and 55-250 1-stop, 2-stop and 3-stop crops at various apertures I saw that at the largest aperture the Sigma 105 crops are better, but for the most part the crops are very similar, and at minimum aperture the 55-250 crops may be slightly better. So the pixel peeping results and the cropping results are consistent.

I generally don't crop much, but when I do make substantial crops, for example with very small subjects, I am cropping middling to small aperture shots. So I don't think the Sigma 105's extra sharpness would have much impact on my photos.

Incidentally, the test shots described in this section were intended to help me understand why the cropped bare Sigma 105 shots were so much better in relation to its teleconverter shots than was the case for the 55-250. I think I lost the plot. I'm no further forward on that front. But at least I've got a clearer idea now about the sharpness of the Sigma 105 and its implications for my choice of kit. :)


Back to table of contents
 
Last edited:
Image quality and kit

So, where does all this leave me in terms of image quality, which I want to improve, and the kit that might help me to do that?

I have been looking back over this thread. I have been back and forth on this issue.

At one stage I managed to convince myself that the Sigma 105 results were better than the 55-250, but I subsequently realised that I wasn't taking effective aperture into account. Once I did, I wasn't at all sure that the Sigma 105 was better.

More recently the quite carefully done comparisons documented here didn't convince me that that Sigma 105 had produced better results than either the bare 55-250 or, even more surprisingly, the 55-250 with Canon 500D.

Now I think I understand better the ways in which the Sigma 105 is actually better than the alternatives (at larger apertures, and in terms of sharpness/detail across the whole image) and the way in which it is worse (very small apertures).

Previously I had used the G3 and FZ200 to capture images of small subjects like springtails and barkflies which seemed at least as good as anything I had achieved on that front with the 70D. In fact, in the one really like for like example of G3 vs Sigma 105 here the G3 version was much better.

Earlier again (back in May last year) as documented in this and subsequent posts I got pretty much indistinguishable results for larger subjects (a wasp, and a spider with prey) where I had plenty of time to do like for like comparisons using the FZ200 and the 70D, this time both with Raynox 150.

All of those previous cases might have been clouded by my using very small apertures. But these latest tests clarify that side of things somewhat.

And most recently, the stacked flower shot in this post suggests to me that a careful choice of aperture can make a much bigger difference than any differences I have (or haven't!) found as between the rigs I have been using. Also, developing my use of multi-image techniques such as stacks and exposure merging and improving my subject discovery, capture technique and post processing may have a lot more impact than kit differences too.

All this suggests to me that the issue of what kit to use seems now to revolve mainly around issues of usefulness and usability.


Back to table of contents
 
Last edited:
Usefulness, usability, and the implications for my toolkit

By “useful” I mean that a setup can be used to obtain a type of photographic capture that I am interested in. By “usability” I'm referring to how easy, or otherwise, a setup up makes it for me to do this.

Each of my rigs can be used for a wide variety of close-ups, but each has its own limitations as to its usefulness.
  • The usefulness of extension tube + teleconverter combinations is limited with the 55-250 because it cannot focus nearly as closely as the Sigma 105.
  • The usefulness of the Sigma 105 with extension tube + teleconverter combinations is limited by its short (and fixed) focal length compared to the 55-250.
  • The usefulness of the 70D in using flash, with both the Sigma 105 and 55-250, especially with extension tubes and teleconverters, is seriously compromised by the large variability in working distances at different magnifications coupled with my desire to use very small apertures.
  • The usefulness of the Panasonic G3 is somewhat, albeit less, compromised with flash. Even though I use it with achromats, which work with a limited range of fairly short working distances, the small aperture issue still turns out to be a significant constraint on the delivery of adequate flash light at times.
  • The usefulness of the FZ200 is seriously compromised by the noisiness of its sensor.
Capturing the images for these comparisons gave me some insight into the usability of the new setups, as did using them for non-test sessions out in the garden. I'm more relaxed now about changing lenses out in the field, and also adding and removing extension tubes and teleconverters as the need arises. As I handle the extension tubes and teleconverters more I find I'm developing routines for handling them safely and quickly and developing practical arrangements for storing them between uses. Extension tubes and teleconverters don't appear to present the usability barrier that I thought they might.

However, especially when used with the Sigma 105, which is a fairly heavy lens, the more complicated arrangements of extension tubes and teleconverters can make the 70D feel rather heavy and awkward to use, and a bit of a concern out on the end of the tripod arm. Nothing has given way so far, but I keep thinking that it might.

As far as the 70D is concerned, I find it highly usable for natural light work, and increasingly so as I get more experience with it. Like any equipment, it has its weaknesses, and for me one of those is the inability to define a small live view autofocus area while retaining compositional awareness. But I can live with that. By and large I am very comfortable using the 70D for natural light work.

Flash is another matter. If I could get significantly better results using flash with the 70D than with my other rigs then I would be prepared to put up with some additional hassle to get the improved image quality. However, I have seen no compelling evidence to date of better image quality using flash with the 70D, and so the flash hassles are simply not worth putting up with.

The FZ200 works effectively with flash and produces nice enough image quality with flash. Unlike the other rigs, with the FZ200 I can work with flash at base ISO the whole time. This is presumably because the FZ200 has a three or more stop advantage over the other cameras in terms of the illumination it needs (Shooting at minimum aperture with the FZ200 means shooting at f/8. With the G3, for the same DOF and using the same ISO, I need to use f/22, and f/32 with the 70D. I use the same power flash unit for all three cameras, and the same diffuser. So the flash unit needs to pump out three to four stops more illumination for the other cameras compared to the FZ200.)

Using base ISO with the FZ200 avoids most of the noise issues, and the residual issues which arise from time to time have to do with background noise which is fairly easy to manage.

The latest experiments confirm that achromats are just as capable as other optics in producing good image quality for the type of compositions I favour (where edge sharpness is not so important), and the FZ200 is highly usable with achromats, up to and including the MSN-202. For now I think the FZ200 and achromats will be my preferred kit for flash work.

Perhaps I shall use the G3 some of the time for flash work. It is pretty usable too; not so good as the FZ200, but close, and the post-capture usability is a bit better than with the FZ200 because the less noisy images are easier to deal with.

But I think it's time to give up trying to use flash with the 70D once and for all.

On the other hand, the usability of both the FZ200 and the G3 is compromised by problematic implementations of manual focusing. This is not so much of a problem with flash captures of invertebrates, for which I tend to use autofocus. And since these are mid to high magnification shots, when I do use manual focus I can use the rocking technique.

However, manual focusing is something that is becoming increasingly important to me for botanical work. I find the 70D excellent in this respect, using the focus ring, especially when used with the 55-250 which allows more subtle control using the focus ring, as described in this post.

The bare 55-250 provides much more flexibility for reach and composition than the Sigma 105. When used with teleconverters it can provide additional reach without being as cumbersome and awkward to use as the Sigma 105, and can provide a greater amount of additional reach than the Sigma 105, and additional reach that is easier/more flexible to use than with the Sigma 105. These latest experiments have confirmed my view of the 70D with 55-250 (and now with teleconverters when necessary) as the best tool I have for botanical work.

I have not yet found anything for which the Sigma 105 appears to deliver better quality for my purposes (i.e. putting aside any issues of edge sharpness) than I can achieve with the 55-250, so I think I will not be using it, at least for now. I won't get rid of it, as I did with the 100L, because I think I may find it useful for some things. Bees (and possibly some other insects) in flight is one thing I intend to try with it, that being something for which achromats have proved fairly ineffective. Using the viewfinder and phase detect autofocus should be a much more effective approach.

So, my kitbag for the new season will contain:
  • The 70D
  • The 55-250
  • Both teleconverters, with extension tubes to connect them to the 55-250
  • The FZ200
  • The Pansonic-fit flash unit and my current diffuser
  • All my achromats
  • Canon and Pansonic remote releases and batteries
  • The tripod
  • All the miscellaneous bits and pieces that I take with me, even when shooting in the garden
And the Sigma 105 kept in reserve for suitable occasions.


Back to table of contents
 
Last edited:
Wow! You have been busy!

Thanks for sharing this in such detail. In typical fashion I've taken all your hard work and used it to find ways to improve my own setup ;) I'm not sure I have reached any conclusions as yet (I have only read through the main articles, without following any of the links or analysing the data) as it is something I need more time to digest fully. I have, however, picked up on a few points which interested me.

  • Using Teleconverters to increase working distance. Previously I've always though of teleconverters as a way for me to increase magnification in a significant way without reducing minimum focus distance to something unworkable. I can see now there may be a use for these on larger subjects that have proved to flighty to get close to, especially on hot sunny days (I'm thinking here in terms of the MP-E, so less than 1X magnification. Certain members of the Diptera family spring to mind). It at least gives me something to play with when Spring arrives.
  • The use of teleconverters combined with extension tubes. As you know I do this frequently, but your experiments have given me a greater understanding of how the different components are at play. I've recently started to find subjects not visible with the naked eye (or at least many subject I would have overlooked previously) by using a small viewing loupe more frequently and this had made me realise I may need to start finding alternate methods to get higher magnification. I can currently get to 8.6X comfortably (by my calculations) through the use of the MP-E, 1.4X teleconverter and a 26mm of extension tubes (there's a whole story around the limitations I have found with extension tubes including issues with the connections, build quality, cost and availability for the different lens mounts I am currently using). If I want to look at getting more magnification, should I be looking at more extension tubes, maybe another teleconverter or even abandon the whole lens setup and look to start acquiring microscope objectives. The information you have provided will be invaluable in helping to decide an appropriate route, but as mentioned above, I will need more time to understand and analyse your results fully.
  • The impact of sensor size and resolution on what is achievable. Having switched between the 550D and EOS-M several times now for macro sessions I find myself wanting to use the EOS-M more and more. Although I have been able to use it successfully I notice the number of times I have failed to capture what I want increase compared to the larger camera. That said, I'm finding the 550D uncomfortable to use and much less enjoyable than the EOS-M (no doubt aligning with what you have previously concluded in your continued use of the FZ200 and G3). With this in mind, and for the first time ever, I've pre-ordered a new camera body. The EOS-M3 is released in about a month or so, and comes equipped with manual dial controls and reportedly much faster response times. Although these are the key features I am interested in, and willing to pay good money for, it also comes with a new APS-C sized sensor packing 24MP into it. How this impacts noise at certain ISOs is yet to be seen, but I am hoping to be able to get much better detail resolution as a result (I'll be going from 18MP to 24Mp, so a good third increase in pixel density). Ultimately this may enable me to look at more significant cropping to increase magnification, and again your analysis will prove useful here.

Anyway, I really just wanted to say thank you for taking the time and effort to publish your findings. I know you enjoy doing it (and will continue to experiment in such ways regardless) but I also wanted to let you know how useful it is to others when you do share this info (especially when it sparks off new thoughts or ideas on how to tackle various issues).

I do have one question, and it's something that has been bothering me recently but I don't think you've mentioned anything related to it above (apologies if I have missed it). Did you find the impact of using teleconverters had any significant impact on the appearance of Chromatic Aberration when pixel peeping your results? This is something I have been noticing much more recently (especially around the eye patches and setae of high magnification shots of collembola). I am not yet sure if this is just a consequence of getting higher magnification, using wider apertures as I am starting to be able to do, or the fact I am using teleconverters and the additional glass they bring into the equation. If you have any thoughts on that, or any suggested ways I can test with a mind to reducing the CA I am getting I will be happy to hear it (I haven't really got to grips with the best way to use CA reduction in Lightroom).

One small suggestion; you did mention that one of the limiting factors you find with using the 70D is that you can't get magnification in Live View whilst simultaneously assessing the scene for compositional reasons. Are you aware the Magic Lantern can provide this functionality? One of the configuration options is to have a small window appear on the live view which will automatically zoom in to a set amount (5, 10 or 15x IIRC) which can be used to perfect your focus whilst the rest of the LCD screen shows you the full image. The "zoom box" can be moved to either of the four corners of the screen as you prefer, and you can also add additional information such as luminance and RGB histograms that update in real time. Magic Lantern is something I have used a few times in the past, but have been able to get by with out it so currently don't have it installed. Anyway, may be something worth looking into if it will help you get the most out of your setup.
 
Thanks for the positive feedback Tim. It's particularly welcome because when I had finished posting all this I went over to dpreview and added a link to it in a thread I had been following which was explicitly about whether it is better to use a teleconverter or crop. I thought they might be interested in some data. Apparently not. I very quickly got this response, and then this one. I shall know better next time. :D Anyway, you made my day. Thanks.

Wow! You have been busy!

Thanks for sharing this in such detail. In typical fashion I've taken all your hard work and used it to find ways to improve my own setup ;) I'm not sure I have reached any conclusions as yet (I have only read through the main articles, without following any of the links or analysing the data) as it is something I need more time to digest fully. I have, however, picked up on a few points which interested me.

  • Using Teleconverters to increase working distance. Previously I've always though of teleconverters as a way for me to increase magnification in a significant way without reducing minimum focus distance to something unworkable. I can see now there may be a use for these on larger subjects that have proved to flighty to get close to, especially on hot sunny days (I'm thinking here in terms of the MP-E, so less than 1X magnification. Certain members of the Diptera family spring to mind). It at least gives me something to play with when Spring arrives.
  • The use of teleconverters combined with extension tubes. As you know I do this frequently, but your experiments have given me a greater understanding of how the different components are at play. I've recently started to find subjects not visible with the naked eye (or at least many subject I would have overlooked previously) by using a small viewing loupe more frequently and this had made me realise I may need to start finding alternate methods to get higher magnification. I can currently get to 8.6X comfortably (by my calculations) through the use of the MP-E, 1.4X teleconverter and a 26mm of extension tubes (there's a whole story around the limitations I have found with extension tubes including issues with the connections, build quality, cost and availability for the different lens mounts I am currently using). If I want to look at getting more magnification, should I be looking at more extension tubes, maybe another teleconverter or even abandon the whole lens setup and look to start acquiring microscope objectives. The information you have provided will be invaluable in helping to decide an appropriate route, but as mentioned above, I will need more time to understand and analyse your results fully.
  • The impact of sensor size and resolution on what is achievable. Having switched between the 550D and EOS-M several times now for macro sessions I find myself wanting to use the EOS-M more and more. Although I have been able to use it successfully I notice the number of times I have failed to capture what I want increase compared to the larger camera. That said, I'm finding the 550D uncomfortable to use and much less enjoyable than the EOS-M (no doubt aligning with what you have previously concluded in your continued use of the FZ200 and G3). With this in mind, and for the first time ever, I've pre-ordered a new camera body. The EOS-M3 is released in about a month or so, and comes equipped with manual dial controls and reportedly much faster response times. Although these are the key features I am interested in, and willing to pay good money for, it also comes with a new APS-C sized sensor packing 24MP into it. How this impacts noise at certain ISOs is yet to be seen, but I am hoping to be able to get much better detail resolution as a result (I'll be going from 18MP to 24Mp, so a good third increase in pixel density). Ultimately this may enable me to look at more significant cropping to increase magnification, and again your analysis will prove useful here.
Anyway, I really just wanted to say thank you for taking the time and effort to publish your findings. I know you enjoy doing it (and will continue to experiment in such ways regardless) but I also wanted to let you know how useful it is to others when you do share this info (especially when it sparks off new thoughts or ideas on how to tackle various issues).

I'm really glad you've found it useful. Like you said, I'd do it anyway - it's basically a fairly selfish activity aimed at helping me improve my understanding and make better use of my equipment. Writing it all up makes me think things through more thoroughly, and then one thing leads to another and I can get to new places sometimes. It's all very educational for me. But when it's helpful to others as well, that is definitely some very nice icing on the cake. I'll be very interested of course to hear how you get on with the new camera and new combinations of kit.

Thanks for the heads up on Magic Lantern. I've not come across it before. I have used CHDK with my Canon bridge cameras, so I'm familiar with the approach, and how very useful it can be. I went straight over to the site of course and was very excited when I noticed that as well as compositionally aware manual focusing, it had focus bracketing. Bliss! And then I read the small print - "Inactive ports (help welcome): 5Dc, 40D, 100D (SL1), 70D". That's a big pity.

I do have one question, and it's something that has been bothering me recently but I don't think you've mentioned anything related to it above (apologies if I have missed it). Did you find the impact of using teleconverters had any significant impact on the appearance of Chromatic Aberration when pixel peeping your results? This is something I have been noticing much more recently (especially around the eye patches and setae of high magnification shots of collembola). I am not yet sure if this is just a consequence of getting higher magnification, using wider apertures as I am starting to be able to do, or the fact I am using teleconverters and the additional glass they bring into the equation. If you have any thoughts on that, or any suggested ways I can test with a mind to reducing the CA I am getting I will be happy to hear it (I haven't really got to grips with the best way to use CA reduction in Lightroom).

Apart from very occasional backlighting issues (branches against a bright sky etc), I associate chromatic aberration with the MSN-202 and high magnifications, without really drawing a distinction between the two factors: glass and magnification. My work on tubes and converters was all pretty low magnification, and I didn't notice any chromatic aberration. However, you got me thinking. So, surprise, surprise, I did some tests.

Three factors that come to mind when I think about chromatic aberration are high magnification, high contrast and the optical characteristics of the lenses and addons used.

It is obvious that lenses can affect the outcome. I bought some cheap close-up filters just to see how bad the chromatic aberration was with them. It was really, really bad for some subjects which my achromats handled fine. And we know about high contrast being an issue because of the tree and bright sky problem. I have found that photographing a ruler provides enough contrast to make chromatic aberration appear. So I photographed a ruler at several magnifications and with the following setups, at one stop intervals for each setup and magnification.


0683 67 Setups and results for some tests looking for chromatic aberration
by gardenersassistant, on Flickr

There are 1100 pixel high versions of those images here, but of course you'll need to do your own tests because you need to know about the characteristics of your equipment, not mine. But this may be one way of going about it that you might want to try.

As to Lightroom. I have "Remove chromatic aberration" turned on in my import adjustments. However, it doesn't remove all the CA. In fact, I forgot that I had that set up and drafted all of this and posted the images to Flickr before realising I was using images with CA "removed", and so I had to delete them from Flickr, turn off the CA removal and reexport them from Lightroom to JPEG for reuploading to Flickr. With the first tranche (with CA removal turned on) I couldn't see CA at less than 5:1. Now, with the CA removal turned off, I think I can see CA in all but one of these test sets (although I had to look quite hard to see it for the ones marked "Just"). For the last one in the table I think there are some colour changes over on the right which I suspect are the beginnings of CA.

These examples suggest that CA increases as the magnification goes up. There seems to be one exception to that, the third entry, 2x+1.4x+68mm. At 5:1 it should show the CA more clearly if my thoughts on magnification are correct. However, it seems that CA shows up more in sharper areas, and that third entry doesn't really have much by way of sharpness, which could explain why I could only find a little CA (green, over on the right). I think the FZ200 + MSN-202 images show the relationship between sharpness and amount of CA rather nicely.

Comparing the best of the two highest magnification shots for the 70D and FZ200 (here, here, here and here) shows (or as at least compatible with) how the amount of CA can vary between optics. The MSN-202 was used in al four cases, and in addition the 70D used a teleconverter. Despite this disadvantage for the 70D, its images still show less CA.

The images also illustrate how CA varies with aperture, or sharpness. I don't know which would be the causative factor because in these images the aperture and sharpness move more or less in tandem.

One very strange thing is that as the aperture goes from middling to large the images, with all the setups, develop a strange misty-looking overlay. At first this suggested to me that the ruler markings hump up in the middle and so the middle of each vertical line is nearer to the camera than the sides, and what we see is the effect of increasingly tiny dof and possibly also increasingly rapid falloff to very much out of focus. But on thinking about some more it I'm not so sure about that. It would mean that all the images were focused on the very middle/nearest part of the lines. I don't think that could have been the case - I was using manual focus and the camera was on a table-top. The slightest push/nudge made the cameras jump a little way (sub-millimetre?) rather than sliding smoothly, which imparted a random element to the focusing. I don't think focusing was consistent enough to achieve the "middle of the line" focus point every time.

Besides which, I don't know about you but I don't actually see a sharp image that shows me what the image is going to look like - it is almost all very vague and misty, with some small area(s)/element(s) that are a bit sharper behind the mist. Presumably that is because I'm seeing the image at maximum aperture, and hence the misty/vague/unsharp appearance, as with the images actually captured at the largest aperture. Presumably it is the same using the viewfinder, as you do, as using the LCD, which I do.

My camera has a dof preview button. But it's useless, especially at these magnifications. It's in a really difficult to get at position on the front of the body, at the bottom pretty much underneath the lens. Just finding it is difficult enough, and contorting my grip to actually push it causes far more movement than is needed to push the image far out of focus.

Anyway, whatever the cause, these images makes me think that at higher magnifications I would want to be using a middling rather than a large aperture for stacking (not that I stack at this magnification, but of course you do so you might want to do some experiments on this front with your kit to establish the optimum aperture from this point of view for your particular kit).

It also seems that CA shows up more at the sides of the images than in the centre. Intuitively I would have thought it should also show up more at the top and bottom than the centre, but that's a guess not an observation, and I didn't see it in these examples.

You may find you can remove most of the CA that Remove Chromatic Aberration didn't get rid of by using Defringe in the Lens Correction section.

The rest of this is just rambling, and not really anything to do with chromatic aberration.

I picked what I thought was the best looking shot for each setup and magnification (those images are here - these are from the first tranche, and have had CA correction applied). Comparing the images from the different setups at each magnification made me wonder again whether using the 70D might give me better image quality. Of course the problem I've had for a year now is that I haven't got flash to work nicely with the 70D. Well, I started out this time with the Metz 58 AF2 flash, but it didn't seem to be working properly and I remembered that I had a Canon 430 exii. Not as powerful of course, but I thought it would do for these tests. What a surprise, it worked fine. Very nicely in fact. (And I later discovered that, apparently, it is only 2/3 stop less in maximum power than the 580. I can live with that.)

The 430exii is out of manufacture now, with no replacement model from Canon. If more testing confirms that it does work ok for what I want to do then I think I might buy one or two second hand just in case they get difficult to get hold of. This may of course change my thinking a bit as to what kit to use, perhaps using the 70D a bit more. My suspicion is that I might end up using it for the very small stuff (that I don't do much of) but continue with the Panasonics for the +/- 1:1 stuff. But that's something for another day.

I had to up the ISO as far as 1600 to get some of the shots, (Only a handful of the ISO 1600 shots really needed to be at 1600 - some of the time I forgot to take the ISO down in tandem with increasing the aperture. I don't really mind that I had to use ISO 1600 to get a shot at f/64 with an additional almost 2 stops loss of light from 68 mm of extension tubes. :)

I don't know whether this "working nicely" is actually a difference in the way the flash unit is peforming compared to the Metz or because (at last) I've got a better grasp of what is going on with flash, distances and ISOs. Anyway, I was happy that it was working and I did another set of comparisons, somewhat looser this time. I put some sugar, salt, instant coffee granules, small bits of apple waste, a couple of little mushrooms, a slice of red pepper and some tiny pieces of bread into a little saucer and captured images using all of the rigs I used for the ruler tests. I didn't go for exactly like for like, but near enough I hope to give me some indication if the 70D can do better at these magnifications.

There are 400 or so images to look at, and so far I've only had a quick glance at a couple of dozen and a cursory play with half a dozen or so. But even this seemed to confirm something I had noticed with the ruler shots - the ones that struck me as best (as in most usable for my purposes/tastes) are definitely the small aperture shots. Not necessarily the smallest - I don't think even I will be using f/64 for example, with or without additional extension tube losses of sharpness (caused by increases in the effective aperture - the "f/64" or whatever in these cases is a genuine (effective) aperture reported through the teleconverter(s), but that doesn't take account of any extension tubes).

I don't know how these other shots will turn out, or whether they will prove anything or change anything, but if nothing else it's quite interesting to see some day to day items at higher magnifications than I normally use. I think I might be able to get some quite pictorial effects. Something to play with anyway.
 
Last edited:
Nick just to let you know I always read your threads even though I am easily confused. I'm a great admirer of your ability to (very scientifically) thoroughly research your subject with such passion and it is clear you enjoy it but perhaps get a bit fed up now and again. Long ago I stopped posting on DPreview as I came to the conclusion no matter how tame the wording there's always someone out to 'spoil the party.
 
Nick your posts are most helpful, for me at the moment I have too much experimenting going on myself to get into the depths of your experiments though I do drop in here and there and sometimes come out with some additional ideas. :rolleyes:

I really do appreciate the effort you put into all of this it can be hard reading at times and lots of processing power is required but the results are outstanding and down in a very controlled manner. Wish you could sort my Glare issue on my new 7x Mag solution :naughty::naughty::naughty:
 
Nick just to let you know I always read your threads even though I am easily confused. I'm a great admirer of your ability to (very scientifically) thoroughly research your subject with such passion and it is clear you enjoy it but perhaps get a bit fed up now and again. Long ago I stopped posting on DPreview as I came to the conclusion no matter how tame the wording there's always someone out to 'spoil the party.

Thanks for the encouragement John. As for dpreview, you are right - and I've seen it get downright nasty at times. Thing is though, there is some good information and links to be had from there, assuming you can weave your way through the silliness, nastiness, trolling etc. One forum that I really like over there is the Panasonic Compact Camera Talk forum. Really pleasant people, very helpful, and polite even when disagreeing. One of the reasons I want to go on using the FZ200 at least some of the time is so I can have some things to post over there from time to time. The macro/closeup forum is ok too, but it doesn't have much activity unfortunately.
 
Last edited:
Nick your posts are most helpful, for me at the moment I have too much experimenting going on myself to get into the depths of your experiments though I do drop in here and there and sometimes come out with some additional ideas. :rolleyes:

I really do appreciate the effort you put into all of this it can be hard reading at times and lots of processing power is required but the results are outstanding and down in a very controlled manner. Wish you could sort my Glare issue on my new 7x Mag solution :naughty::naughty::naughty:

Thanks Bryn. Like I've said before, you make plenty of really good contributions. Just don't overdo it!.

I'll have to do some reading about your glare issue (not that I'd be able to help, but I'm curious anyway). I haven't been looking at posts here for a while now - a matter of priorities. Having finished the big heave with the tubes and converters, it's time for some catching up I think.
 
Nick just to let you know I always read your threads even though I am easily confused. I'm a great admirer of your ability to (very scientifically) thoroughly research your subject with such passion and it is clear you enjoy it but perhaps get a bit fed up now and again. Long ago I stopped posting on DPreview as I came to the conclusion no matter how tame the wording there's always someone out to 'spoil the party.


Definitely your posts are always helpful and interesting :)
We are lucky on here that you take the time to do your research
as for dp review you're better off on here its a great community on TP with none of that sort of unpleasantness
I only post on a few sites including here, Fred Miranda and UK Dragonflies
 
I did another set of comparisons, somewhat looser this time. I put some sugar, salt, instant coffee granules, small bits of apple waste, a couple of little mushrooms, a slice of red pepper and some tiny pieces of bread into a little saucer and captured images using all of the rigs I used for the ruler tests. I didn't go for exactly like for like, but near enough I hope to give me some indication if the 70D can do better at these magnifications.

There are 400 or so images to look at, and so far I've only had a quick glance at a couple of dozen and a cursory play with half a dozen or so. But even this seemed to confirm something I had noticed with the ruler shots - the ones that struck me as best (as in most usable for my purposes/tastes) are definitely the small aperture shots. Not necessarily the smallest - I don't think even I will be using f/64 for example, with or without additional extension tube losses of sharpness (caused by increases in the effective aperture - the "f/64" or whatever in these cases is a genuine (effective) aperture reported through the teleconverter(s), but that doesn't take account of any extension tubes).

I don't know how these other shots will turn out, or whether they will prove anything or change anything ....

I have looked at/played with a couple of the "scenes" more carefully in Lightroom. No firm conclusions yet, but as provisional observatons, I wasn't too keen on the shots using the 2x teleconverter, and one of the things that may be better with the 70D is the transitions from in focus to out of focus areas, particularly when compared to the fZ200. I need to look more carefully at both those areas to confirm, or otherwise.

Feeling as though I'm coming to the end of an experimental stage (ha ha, maybe, we'll see) and with the flowers starting to offer themselves up for photographing, I decided to check the sensor on the 70D. As you might expect, given all the lens, tube and teleconverter changing I've been doing recently, it had a lot of spots on it. Two goes with the sensor brush got rid of most of them, but it needed two wet wipes and another couple of sensor brushings to get rid of the more stubborn spots. This reminded me of the disadvantage of changing lenses etc out in the field, and coupled with my lack of enthusiasm for the 2x teleconverter images (whether justified or not doesn't matter at this stage), I thought some more about setups with the 70D. This included consideration of flash aspects, as it seems that with the 430exii I might at last be able to use the 70D for flash close-ups.

I have already concluded that the 1.4x teleconverter could be very useful with the 55-250. I wondered what It would be like if I used the 1.4x teleconverter for the Sigma 105 as well. To fit the 1.4x to the 55-250 I have to attach an extension tube to the teleconverter, and currently plan on using the shortest, 12mm extension tube for this. I wondered what the Sigma 105 would be like if I used the same arrangement for it. That way I would be able to simply swap the 55-250 as needed. And since the 1.4x and 12mm would remain attached to the camera during these swaps, the sensor would not be exposed.

It also struck me that since achromats don't seem to degrade image quality much, I might be able to extend the usefulness of these 1.4x+12mm+<lens> setups by adding achromats to get extra magnification.

Using these setups would:
  • Turn the 70D + Sigma 105 from 105mm, f/2.8 maximum aperture (to f/22 minimum aperture), to 210mm, and about f/4.5 (to about f/36), allowing a one stop increase in effective aperture from the 1.4x teleconverter and another 1/3 stop from the 12mm extension tube. The addition of achromats would not affect these numbers (and would not lose any additional light).
  • Turn the 70D + 55-250 from 55-250mm, f/4-5.6 maximum aperture depending on focal length (to f/22-f/32 minimum aperture depending on focal length), to 110-500mm, and about f6.3-f/9 (to about f/36-f/50).
These maximum apertures would not be good for those who like shallow dof. But I like deep dof (from single exposures), and so having fairly small maximum apertures shouldn't have much of an impact for me, while at the other end having some smaller apertures to play with may be useful. The one potential problem is with stacks, but I suspect the maximum apertures may be enough (for me) even for stacks.

Here is how it would look.

The 55-250, in this case with the Canon 500D attached.

0685 06 P1900160 LR 1100h
by gardenersassistant, on Flickr

The Sigma 105, with the Raynox 150 attached.

0685 03 P1900156 LR 1100h
by gardenersassistant, on Flickr


The Sigma 105, with more of the tripod arrangement visible.


0685 01 P1900154 LR 1100h
by gardenersassistant, on Flickr

And with just the 1.4x teleconverer and 12mm extension tube open to the elements, but not the sensor.


0685 04 P1900158 LR 1100h
by gardenersassistant, on Flickr

So how would these setups operate? I decided to start by collecting some more data about working distances and magnifications. I measured these for the bare Sigma 105 and with the addition of the Canon 500D and the Raynox 150, 250 and MSN-202. I measured the minimum and maximum scene width for each setup, and any intermediate magnifications from this list if a particular setup covered them: 1:7, 1:6, 1:5, 1:4, 1:3, 1:2, 1:1.5, 1:1, 2:1, 3:1, 4:1, 5:1. (I couldn't measure the maximum scene width for the bare Sigma 105 as it has infinity focus.)

I did a similar exercise for the 55-250, but it was more complicated because of the variable focal length. I did as described for the Sigma 105, but for each of 250mm focal length, 200mm, 135mm, 100mm, 70mm and 55mm.

This produced a lot of data which was pretty indigestible when presented as a table of numbers, particularly the data for the 55-250. So instead, here are a couple of graphs.

The first graph is for the Sigma 105. This shows the measured values for each setup. With the most powerful of the achromats, the MSN-202, working distances are very small, and the range of maximum to minimum working distance and scene size/magnification is also very small. As the power of the achromat decreases the working distances and the ranges increase in size, and are even larger with no achromat used. The ranges overlap so this setup gives coverage of all magnifications from 5.6:1 to 1:7 (and beyond).


0685 07 Magnifications and working distances for 70D+1.4x+12mm with Sigma 105
by gardenersassistant, on Flickr

The next graph is for the 55-250. It shows that each setup has an "envelope" of working distance/magnification combinations which you can use. You can move around in these envelopes by adjusting the focal length and the distance to the subject. This means for example that, without changing the setup, you can get the same magnification from different working distances. Alternatively, you can get different magnifications from the same camera position. How much latitude you have to do this depends on the size of the envelope. There is most flexibility when not using any achromat, and the flexibility decreases as the power of the achromat increases, down to the MSN-202 where there is virtually no latitude at all.


0685 08 Magnifications and working distances for 70D+1.4x+12mm with 55-250 STM
by gardenersassistant, on Flickr

The next graph shows the flexibility available for working distances, if you change setups, for 2:1, 1:1 and 1:2 magnification.


0685 09 Magnifications and working distances for 70D+1.4x+12mm with 55-250 STM showing working distance flexibility
by gardenersassistant, on Flickr

Here are some examples. With the 1.4x and 12mm,

  • With the Canon 500D on the 55-250 you can get to 1:1 at a working distance of 290mm.
  • With the Raynox 250 on the 55-250 you can get to 2:1 at a working distance of 110mm.
  • With the bare 55-250 you can get to 1:2 (45mm scene width, sufficient for a lot of my butterfly/damselfly shots I think) at 575mm.
  • If that isn't quite small enough for damselflies etc, you can get to 1:1.5 (33mm scene width) at 430mm.

These look like some seriously useful working distances to me.

One other thing. Autofocus seems to work with all these setups, right down to 8:1.

So, one camera, one flash, magnifications from 8:1 to 1:7 and beyond with autofocus, without exposing the sensor, with some very handy large working distances for flighty subjects, with nice (to my way of thinking) small apertures to play with.

Of course, the reality may turn out to shatter the dream. Wouldn't be the first time! We'll see what happens when I get out there and try these rigs for real. More in due course. :D
 
Last edited:
Definitely your posts are always helpful and interesting :)
We are lucky on here that you take the time to do your research
as for dp review you're better off on here its a great community on TP with none of that sort of unpleasantness
I only post on a few sites including here, Fred Miranda and UK Dragonflies

Thanks Pete. I've tried a number of sites over the years, but apart from an occasional post in the Panasonic compact cameras forum at dpr, this is the only place I post these days.
 
In this thread, Callum (@callumboath) asked an interesting question about extension tubes versus closeup lenses. I did some measurements and responded in Callum's thread. Because this information fits so well with what I've recently been working on I decided to copy it into this thread for ease of reference if I want to refer to it later.

I did a few measurements which I've documented in the tables below.

Notes on some terms used in the tables:
  • The "working distance" is the distance from the end of the lens (or filter if you are using one) to the subject.
  • "Achromats" are like closeup filters but are made from two or more pieces of glass so as to reduce chromatic aberration. The Raynox 150 mentioned by Bryn is an achromat. I use the Raynox 150 a lot, and also the more powerful Raynox 250 and the less powerful Canon 500D (a closeup lens, not a camera), both of which are also achromats. As well as achromats from Canon and Raynox, achromats from Marumi are quite popular I think.
  • All measurements are approximate, especially the smallest distances.
  • All magnifications are expressed in terms of Canon APS-C sensors, which are 22.5mm wide, so a scene of width 22.5mm is 1:1, a scene of width 45mm is 1:2 and a scene of width about 11.5mm is 2:1.
  • I don't own a 50mm lens, so I had to use my zoom lenses at around 50mm instead.
Extension tubes (see first table below) provide a lot of magnification with shorter focal length lenses, like your 50mm lens, but as Tim says the working distances get quite small. How much magnification you can get, and how small the working distance becomes, depends on how close the lens can focus.

For example, at 55mm focal length my 18-55 lens will focus at a working distance of 110mm. In contrast, at 55mm focal length my 55-250 lens has a minimum working distance of 680mm. This is why, as you can see from the first table, when used with extension tubes the 18-55 can achieve much higher magnifications at 55mm or so than the 55-250 at 55mm. The downside is that the working distances are much smaller.

Tim mentioned losing light. The "effective aperture" of the camera lens gets smaller when you use extension tubes, the more extension you use, the smaller the effective aperture gets (and the less light falls on the sensor). For example, using the 36mm tube may decrease the effective aperture by about a stop so if you set f/16 on the camera you will actually be using an ("effective") aperture of f/22. This means using a longer exposure or a higher ISO if using natural light, and it will also increase the loss of sharpness from diffraction.

Alternatively, you can decrease the aperture set on the camera. For example, if you want to use f/16 but are using 36mm of extension tube, you might set the aperture on the camera to f/11, and the 36mm extension tube will bring the actual ("effective") aperture back to f/16.

Achromats work best with longer focal length lenses. They work particularly well with telezoom lenses. I use my achromats with a 55-250 lens on my Canon 70D and as you can see from the second table you get a reasonable range of magnifications and quite manageable working distances, such as around 100mm working distances at around 2:1 magnification.

Achromats don't change the effective aperture and so they don't lose light and they don't increase the loss of sharpness from diffraction.


0689 01 Working distance and magnification with extension tubes on Canon 70D
by gardenersassistant, on Flickr


0689 02 Working distance and magnification with achromats on Canon 70D
by gardenersassistant, on Flickr


0689 03Minimum working distances on 70D
by gardenersassistant, on Flickr
 
What are the filters you've got on in this shot? Looks like you have a UV filter on the 550D, and another two on the lens itself???

The 55-250 lens has a 58mm filter thread. All my achromats are set up to work with 52mm filter threads, so the 55-250 has a 58 to 52 step down ring on it permanently.

It is a 58mm 500D, so to fit in with everything else it has a 52 to 58 step up ring on it.

Maybe it seems crazy to go 58-52 then 52-58, but by standardising on one thread size I can change achromats between any of my cameras without having to fiddle putting rings on and off.
  • The 45-175 on the G3 has a 46mm filter thread, so it has a 46-52 step up ring permanently attached.
  • The adaptor tube on the FZ200 is 55mm, so it has a 55-52 step down ring on it.
  • The Sigma 105 is 62mm, so it has a 62-52 step down ring on it.
  • The Raynox 150, Raynox 250 and the permanently stacked Raynox 150+250 have 52-43 step down rings and the MSN-202 has a 52-37 step down ring.
A side benefit of this approach is that I never screw achromats directly on to my camera lens' filter threads, So if I ruin a thread it will be on a £5 step ring or a £40-80 achromat rather than a £400 lens.
 
Last edited:
LOL, OK that makes sense and seems a very sensible approach. You've not explained the UV filter though; adding more glass onto the achromat? I would expect that to affect IQ, especially at very high magnifications.

I suppose you've tested that already though ;)
 
LOL, OK that makes sense and seems a very sensible approach. You've not explained the UV filter though; adding more glass onto the achromat? I would expect that to affect IQ, especially at very high magnifications.

I suppose you've tested that already though ;)

No I haven't. :) And actually I have been wondering about that recently. Perhaps I'll take the UV filters off, or maybe I'll test whether I can see any difference with/without them. Hmmm..... I think perhaps I'll just take them off. Not sure I can be bothered with (sigh) even more testing just at the moment.

Mind you, in respect of very high magnifications, that is (for me) the MSN-202 (I hardly ever use the 150+250 stacked). And the MSN-202 doesn't have a filter thread, so no filter on that one.
 
No I haven't. :) And actually I have been wondering about that recently. PerhapI'll take the UV filters off, or maybe I'll test whether I can see any difference with/without them. Hmmm..... I think perhaps I'll just take them off. Not sure I can be bothered with (sigh) even more testing just at the moment.

Mind you, in respect of very high magnifications, that is (for me) the MSN-202 (I hardly ever use the 150+250 stacked). And the MSN-202 doesn't have a filter thread, so no filter on that one.

I almost always have a UV filter on the macro lens, it's the only time I do use a UV though
for out and about at the nature reserves its often boggy and muddy and i often shoot in the rain with a UV I dont have to be too careful with cleaning the front glass
same in the butterfly tropical house it always steams up the front glass and the front of my sigma 105 is recessed with a filter on its easier to wipe

That's the general line of thinking behind my use of UV filters. However, I don't work anywhere steamy, and I put the kit away in even the slightest amount of rain. I've only very rarely got anything on the filter (e.g. by brushing against foliage, or putting a muddy finger on a filter), so for me I think that if there were a significant loss of image quality from using a UV filter then on balance taking them off would probably be best. But, I don't know if there is any discernible difference with/without a UV filter. Hmmm. Indecision (as usual :D). Maybe I'll do a test after all. :)
 
That's the general line of thinking behind my use of UV filters. However, I don't work anywhere steamy, and I put the kit away in even the slightest amount of rain. I've only very rarely got anything on the filter (e.g. by brushing against foliage, or putting a muddy finger on a filter), so for me I think that if there were a significant loss of image quality from using a UV filter then on balance taking them off would probably be best. But, I don't know if there is any discernible difference with/without a UV filter. Hmmm. Indecision (as usual :D). Maybe I'll do a test after all. :)

Sounds like a plan:D
I would be interested if you can see any difference with and without filter I so use a decent one though, Sigma DG on each of my macro lenses
dont do the testing just for my benefit tho as I will carry on using one anyway though for the reasons above (shooting in rain and mucky environments):)
 
One of the things I have planned to work on this year is multi-image techniques such as stacking. I have done a few stacks so far this year, and intend to do more. A technique I have only tried very occasionally over the past few years is exposure fusion, which melds two or more images captured at different exposures.. This is an HDR technique, but it doesn't use tone mapping, the procedure that can produce such odd looking images that some people love and others dislike intensely, and which I think for many people gives HDR a bad name.

An obvious use for exposure fusion (and in fact the only one I was previously aware of) is to handle scenes such as this one which have a larger dynamic range than can be captured with a single image.


0690 09 P1530389_91_90 PMaxPro LR 1100h
by gardenersassistant, on Flickr

For some time now I have wondered if this technique could help with some of my botanical stuff, for example backlit scenes, which I'm rather keen on. These can be difficult to handle without using fill flash, and I find it difficult to get a natural look when using fill flash.


0686 18 2015_02_28 P1530170_2 PMaxPro LR 1100h
by gardenersassistant, on Flickr

I also have problems on sunny days when parts of a scene, including quite often the subject, are in shade but parts of the scene such as background showing through foliage are in sunlight, and also when some parts of the subject (such as areas of petals at a certain orientation to the sun) are much more brightly illuminated than the rest.

These sorts of issues are the reason I so often underexpose my botanical shots, so as to preserve the often delicate detail, textures and colours in the brightest areas, because I have found that I often can't recover them by exposing normally and then bringing down the highlights even when shooting RAW, which I do with all my cameras now. Having underexposed, I then have to bring up the darker areas, which can in fact be most of the image if only small areas are highly illuminated. And of course bringing up the (possibly rather large) darker areas can introduce noise, and I suspect some microcontrast and subtlety of colours can be lost in this process too.

To get round these problems I have in the past tried to use Photoshop to merge botanical images. It worked, but I was never really happy with the outcomes, even after some quite careful post processing of the merged images. Eventually, several months ago, I purchased Photomatix Pro to see if that would help, but I got distracted and didn't get round to using it. In the past week I have been playing with it, and have found the results rather interesting.

The next post describes the workflow I have been using. The three posts after that give some examples captured with the Canon 70D, the Panasonic FZ200 bridge camera and my Panasonic TZ70 travel/point and shoot camera. (Incidentally, both the images in this post are examples of the technique too, so we're not talking wacky HDR here. :))
 
Last edited:
Exposure fusion - capturing the test images

I tried out the technique with images captured in the garden, mainly camellia flowers, because that is what is available at the moment. I had three sessions, on consecutive days, with the 70D on the first day, the FZ200 on the second and the TZ60 on the third. Where practical I captured some of the same flowers in each session. Some of the flowers were not perfect on the first day and got noticeably rougher looking from day to day, so you may see blemishes in the examples in the next post. From the testing point of view of course, blemishes add extra textures and detail, which is fine. Artistically of course - not so good. :)

You need two or more images with different exposures. With all three cameras I used three-shot exposure bracketing. That seemed to be enough for what I was doing. I imagine very high dynamic range shots like the first example in the previous post might benefit from five shots, or perhaps even more. In some cases I ended up using only two of the three shots because those two between them seemed to cover the dynamic range of the scene ok, and the third one looked so dark that it wouldn't contribute anything useful. I'm not sure that is actually true (more investigation needed), but I do think that three shots seem to be enough.

I captured RAW with all three cameras.

In my first outing, with the 70D, I altered the width of the bracketing and the exposure compensation quite a lot to try to get to an appropriate range. When I took the FZ200 out I was less fussy about trying to match the exposure level and range to each scene. For the final outing, with the TZ60, I left the bracketing on -1, 0 +1 the whole time, and I don't recall altering the exposure compensation either. Perhaps I did, but if I did, only once or twice in the session.

I used a tripod and wired remote release, image stabilisation off, with the 70D and FZ200. I worked hand-held, image stabilisation on, with the TZ60, including some one-handed stretching out over a bush shots. Only one of the TZ60 shots had any additional support (the ground).

It was breezy on all three days and the light was not very strong, which made shutter speed an issue:
  • With the 70D I used ISO 400 (which is fine) and shutter speeds as slow as 1/6 second.
  • With the FZ200 I used ISO 100 (which is almost as good as ISO 400 on the 70D) and somewhat faster shutter speeds, the slowest being 1/20 sec. However, this does not mean that it was a brighter day for the FZ200 because the FZ200 can get the same dof as the 70D with a three or four stop larger aperture.
  • With the TZ60 I used ISO 100, 200 and 400, to try to get the shutter speeds up a bit because I was working hand held. The slowest shutter speed was 1/13 sec, but I had my hand on the ground for that one. The next slowest was 1/30 sec, unsupported, at a 35mm equivalent focal length of 350mm.
These are shutter speeds for captures that "worked", at least in the sense that I thought them good enough to include in the session sets at Flickr. I did use some slower exposures, but they didn't work.

With regard to the TZ60, ISO 400 is asking quite a lot of a small sensor camera, and I generally reckon to denoise backgrounds at ISO 400, and often at ISO 200, and sometimes at ISO 100 (especially if I have been lifting shadows or similar). Interestingly though, according to the Photomatix FAQs, exposure fusion helps control noise. Given how the examples turned out I can believe this, because none of these images had any luminance noise reduction in Lightroom, either on the source images or the fused image, so the only noise reduction was Lightoom's default colour noise reduction on the source images and Photomatix's noise reduction on the least exposed image (that is the way I set up the options). Unsurprisingly the ISO 400 TZ60 images have visible noise in the background. I've included the worst of them in the examples. But I have definitely seen worse from small sensors.

As to apertures:
  • I shot f/2.8 the whole time with the FZ200.
  • With the 70D I use various apertures, from f/5.6 to f/22.
  • With the FZ60 I didn't have much choice about what aperture to use - at most of the focal lengths I was using the available apertures ranged from, at most one stop from f/5.6 to f/8, so it wasn't worth fiddling with it.

Exposure fusion - processing the test images


I used Lightoom 5.6 and Photomatix Pro 5.1. They integrate very nicely.

I imported the images into Lightroom using my normal, camera-specific import adjustments. I then did a session-wide adjustment of white balance and camera-profile.

For each view of each subject I had between one and ? six bracketed sets. I picked what looked like the best set and processed that.

First I selected the two or more usually three images I wanted to use from a bracketed set. I then used the menus ....


0690 01 Initiating Photomatix from Lightroom
by gardenersassistant, on Flickr

.... to invoke a Photomatix dialog box. (The reason I didn't use the Reduce chromatic aberrations option is that that is part of my standard Lightroom import adjustments for all of my cameras.)


0690 02 Setting Photomatix options in Lightroom
by gardenersassistant, on Flickr

Lightroom then converts the images to tiff format and hands them over to Photomatix, followed by this window appearing.


0690 03 Adjustments in Photomatix
by gardenersassistant, on Flickr

You can use this to make various changes (some of the options on the left aren't visible - you have to scroll down to see the ones at the bottom of the list). But for the most part I used the defaults. Brightness was pretty much the only option I changed, and that only some of the time. Mostly it was simply a case of clicking on the Save and Re-import button. Photomatix then does its stuff and passes back a tiff to Lightroom.

The (TZ60) example I was working on when capturing these screen shots only used two images. Here they are, on the left and right, with the fused image in the centre.


0690 05 New version between the two originals
by gardenersassistant, on Flickr

Here we can take a closer look at the fused image (on the right) compared to one of the source images which in this case happened to be of about the same brightness as the fused image, which helps with the comparison.


0690 08 Comparing similar brightness source image (on left, at 50% magnification) to exposure fused image
by gardenersassistant, on Flickr

What surprised me was that in every case, even when as was mostly the case with these test images there was no issue of excessive dynamic range, the fused images looked better to my eye, both as whole images and when examined in detail. I find it difficult to describe exactly what the difference was, but details and textures seemed a bit more in evidence, and overall clarity too perhaps, and there was something about the balance of bright and dark, and the rendition of the colours, that seemed to give the fused images more "presence". I tried with a few images to get the same effect by using my usual processing of adjusting Highlights, Shadows, Whites and Blacks and other basic stuff, but I couldn't reproduce the effects of the fused image from any of the single images. This really was only a very few attempts, so I'd need to try harder to be sure about this, but my overall impression is of images that I like the look of, produced with very little fiddling on my part. At least for these examples.

It was breezy, and so in some cases various parts of the subject had moved in relation to one another. You can let Photomatix try to sort this out automatically, but I preferred to do it manually in the few cases where the issue arose. This is quite easy to do using the following window. Well, it is quite easy to do when it will work ok. With the first example in the previous post there was an issue with the back of the chair that I couldn't sort out, automatically or manually. Otherwise the corrections I attempted worked ok.


0690 06 Selective doghosting
by gardenersassistant, on Flickr

Working hand-held it is possible for the source images to be poorly aligned. Here is an example where the images were very significantly unaligned. Photomatix handled this fine. The fused image is one of the examples in the next post. (I've reached the maximum 8 images for this post.)


0690 07 Misaligned source images
by gardenersassistant, on Flickr


Now on to some examples, in the next three posts:
 
Last edited:
Panasonic TZ60 hand-held exposure fusion examples

Note: the shutter speed shown beneath each image is the slowest of the three shutter speeds used to capture the source images.

This is the example given above where the three images were badly misaligned.


0691 04 2015_03_01 TZ60 Hand-held natural light, 373 mm 35mm equivalent, 1-30 sec at f - 6.0, ISO 100, P1
by gardenersassistant, on Flickr


0691 06 2015_03_01 TZ60 Hand-held natural light, 185 mm 35mm equivalent, 1-30 sec at f - 5.6, ISO 100, P1
by gardenersassistant, on Flickr


0691 07 2015_03_01 TZ60 Hand-held natural light, 231 mm 35mm equivalent, 1-50 sec at f - 5.6, ISO 200, P1
by gardenersassistant, on Flickr

This is one of the images that had to be corrected because some of the flowers moved between shots.


0691 10 2015_03_01 TZ60 Hand-held natural light, 265 mm 35mm equivalent, 1-20 sec at f - 5.6, ISO 200, P1
by gardenersassistant, on Flickr


0691 12 2015_03_01 TZ60 Hand-held natural light, 373 mm 35mm equivalent, 1-60 sec at f - 6.0, ISO 200, P1
by gardenersassistant, on Flickr

Two ISO 400 examples. I'm not sure which one has the worst noise, but given that both were captured in fairly poor light and neither has had luminance noise reduction (apart from Photomatix's noise reduction of the darkest of the three images), I'm not displeased with these.


0691 19 2015_03_01 TZ60 Hand-held natural light, 322 mm 35mm equivalent, 1-40 sec at f - 6.3, ISO 400, P1
by gardenersassistant, on Flickr


0691 25 2015_03_01 TZ60 Hand-held natural light, 537 mm 35mm equivalent, 1-40 sec at f - 6.1, ISO 400, P1
by gardenersassistant, on Flickr

This is the one where my hand was on the ground, giving the camera some support. This was the only one of the TZ60 captures for which this was the case. Not as interesting light as the 70D version of this scene unfortunately.


0691 29 2015_03_01 TZ60 Hand-held natural light, 347 mm 35mm equivalent, 1-13 sec at f - 8.0, ISO 200, P1
by gardenersassistant, on Flickr
 
Last edited:
Conclusions

I think exposure fusion could turn out to be something I use a lot for botanical subjects.

Given the cameras and software I am using, the technique is easy to implement both in the capture phase and for post processing.

It involves a certain amount of waiting around in the post processing phase. On my PC it takes about 30 seconds for Lightroom to export three images to Photomatix and for Photomatix to do its initial processing. Once I have finished any adjustments in Photomatix, It takes about 15 seconds for Photomatix to produce the fused image and pass it back to Lightroom. Given that, at least for these examples, almost no fiddling with sliders was needed in Lightroom, and that I like the results, and that I couldn't reproduce the results when I did try fiddling with the sliders in Lightroom, a one minute or so round trip to Photomatix and back seems bearable to me.

The possibility of reducing noise by using multiple images is another thing that is on my list of techniques to try. However, I've been doing some research and some experiments this evening and the results are not promising so far. As far as research goes, I remember downloading an application a year or two ago that, as far as I recall, made it simple to stack multiple images to reduce noise. I can't find it on my PC now and I can't remember it's name, and I can't find it or anything like it on line, which is a bit of a surprise.

I've tried giving Photomatix multiple high ISO images to merge, but in all three attempts I had at this the results were very bad. A great deal of sharpness was lost. It's as if Photomatix can't align noisy images. I sent multiple high ISO images to Autopano Pro, and that produced a much cleaner result, just what I wanted. However it wrecked the geometry of the image no matter which of its mappings I used.

You can use Photoshop to do this, but all the descriptions I've read have made it look pretty fiddly and time-consuming.

I think I'll put this on hold for the moment.

The other conclusion I drew from looking at the images produced in these tests is that, much as I was pleased with some of the results from the two Panasonics, I very much like the output from the 70D, and these tests reinforced my feeling that it is the right tool for my botanical work.
 
Last edited:
Series - Using image bursts to reduce noise and increase resolution


Recently I started making greater use of exposure blending and focus stacking. I have spent the past three weeks looking at another multi-capture technique - stacking a burst of natural light images to reduce noise and/or increase resolution.

With exposure blending and focus stacking you capture two or more different images of a scene - different exposures for exposure blending, and different planes of focus for focus stacking. For noise reduction and resolution enhancement you use two or more images with the same settings and plane of focus.

You don't have to use a continuous burst of shots, but that seems the natural approach and that is what I used in all that follows. It was generally 11 RAW shots in a 12 fps burst with the FZ200 and 12 or 13 RAW shots in a 7 fps burst with the 70D. For each camera these are the fastest burst rates, and the image buffer filled with these numbers of shots, at which point capturing stalled. Autofocus was used for all the examples, with the camera focusing once at the beginning of the burst.

This series of posts starts by considering large-scale subjects. A poorly lit interior is used to demonstrate noise reduction, and several well lit landscapes are used to demonstrate various aspects of increased resolution and some associated issues. Examples are then given of attempts to use this technique for the increasingly demanding tasks of closeups, macros and high magnification macros.

You may notice that in these posts of examples I don't mention the name of the software I used to prepare the examples. This is because there are serious issues to do with that software (and in fact all the software I have used, or tried to use, for these investigations). I wouldn't want anyone who happens upon one or other of these examples out of context to rush off and purchase the software I used (which isn't cheap) without being aware of these issues.

The two posts following the examples explain the product issues and compare the products that I have used, or tried to use, for these tests and experiments.

The final three posts consider some practical issues involved in using this multi-image technique.

I have kept to the site guidance of no more than 800 pixels on a side for the posted images. You will need to look at a number of them larger to see what is going on. The album containing all these images is here at Flickr. Please be aware that some of the images are large - up to around 11000 x 7000.

Here are links to the other posts in this series.

Noise reduction and resolution enhancement
A building exterior
Fishermen on a pier
Boats at the marina
Working with the 55-250
Closeups of two flowers using achromats
Indoor macro examples
Outdoor macro examples
Higher magnification macro examples
Product options and comparisons
Product issues
Practical issues
Geometry adjustments, colour adjustments and speckling
Processing options
 
Last edited:
Noise reduction and resolution enhancement

Here is an example of noise reduction. The scene was captured in a low level of artificial light with the 70D and 55-250 STM lens at full wide angle.


0694 1.1a Example 10 70D+55-250, ISO12800, CA, No motion process IMG_1710-IMG_1722_PA LR Export Full size
by gardenersassistant, on Flickr

I captured a burst of 13 shots using RAW, ISO 12800, hand-held. (ISO 12800 is the highest ISO available on the 70D.) The shots used 1/400 sec at f/4.

On the left of the following screenshot you can see an area from the image formed by stacking the 13 shots. On the right you can see the area as captured by a single image from the stack. Neither version has had any luminance noise reduction. (As with almost all of the following examples, the images have had my usual default colour noise reduction.)


0694 1.2 Example 10 70D+55-250 ISO 12800
by gardenersassistant, on Flickr

The stacking has reduced the noise significantly.

With this example, as with others that follow, over at Flickr there are full size versions of the stacked image and a single image from the stack. Where resolution enhancement was turned on the stacked version can be up to twice the length and breadth of the single shot (about 11000x7000 for the 70D and about 8000x6000 for the FZ200).

The amount of the scene covered by the image (the angle of view) is generally less for the stacked versions than the single-image versions. This is because hand-shake meant that the software had to crop the stacked versions to lop off edges which were missed in some of the shots in a stack. The higher the magnification, the greater the impact of hand-shake, and the smaller the scene area covered by a stacked image.


Next is an example of resolution enhancement. The scene was captured in strong natural light with the FZ200 at close to full wide angle.


0694 1.3c Res+ CA Moving from base image 11 images P1540233-P1540243_PA LR Full size
by gardenersassistant, on Flickr

I captured a burst of 11 shots using RAW, ISO 100, hand-held. (ISO 100 is base ISO for the FZ200.) The shots used 1/640 sec at f/4.5.

In the following screen shot the stacked version is on the right.


0694 1.4 Example 47 FZ200 ISO 100 Screen 1
by gardenersassistant, on Flickr

The crop is severe enough to pixellate the 4000x3000 single-image version. The 7992x5992 stacked version is still showing detail, for example in the tree at the top left. Also, the sky and plain areas of the buildings look much smoother.

In the following screen shot the stacked version is on the left.


0694 1.5 Example 47 FZ200 ISO 100 Screen 2
by gardenersassistant, on Flickr

The distant electricity pylon shows more detail in the stacked version, and you can just make out the cables it is supporting, which can't be seen in the single-image version.

In the following screen shot the stacked version is on the left.


0694 1.6 Example 47 FZ200 ISO 100 No moving process Screen 4
by gardenersassistant, on Flickr

In this case some areas of the single-image version are more detailed than in the stacked version, although the difference in brightness may confuse that a little. What is very clear is that the stacked version is suffering from movement in the tree branches nearest to the camera.

The following screen shot shows, on the left, the impact of telling the stacking software to use a single image for areas where motion is detected. (The single image used happens to be the one shown on the right, as can be seen from the outline of a bird in flight in front of the bird bath to the bottom right of the bench. the bird appears in both these versions - but not in the previous stacked version.)


0694 1.7 Example 47 FZ200 ISO 100 Moving from base image Screen 3
by gardenersassistant, on Flickr

The moving branches now look better. But in addition, the whole image looks sharper, and sharper than the single image. I don't understand why this should be, as the rest of the image wasn't moving, but it does illustrate one thing that became apparent as I worked on various examples - changes to the settings that the stacking software uses can have a signficant impact on the results, and it isn't obvious to me which settings will work best in a particular case. This gives a somewhat "hit and miss" aspect to the technique. Perhaps it would become more predictable with more experience of using the technique.

Overall though, I think this looks promising. For example, the noise reduction technique might be useful for hand-held captures of poorly illuminated architectural interiors. Resolution enhancement might be useful for daytime landscapes.


Return to contents page
 
Last edited:
A building exterior

Here is another scene captured in good light, this time with a building much closer so we can get a better look at details and textures.


0694 2.1a Example 46 FZ200 ISO 100 CA,Res+,No motion process P1540276-P1540286_PA LR Edit Export full size
by gardenersassistant, on Flickr

This used a burst of 11 shots using RAW, ISO 100, hand-held. The shots used 1/1250 sec at f/4 at a smidgen less than full wide angle. The aperture is pretty much optimal for the FZ200. It has a constant aperture of f/2.8, so the sharpest aperture is around f/4. And 1/1250 sec removes any issue of camera movement, especially when combined with the wide angle.

Resolution enhancement produced a stacked image of 5725x4290. This is much smaller than the previous resolution enhanced image, which was 7992x5992. This is a result of a geometry issue. Both this image and the previous one used a wide angle. Because the software used to do the stacking does not fully understand the FZ200 RAW files both of the images had significant barrel distortion. However, because of the subject matter of the first image the barrel distortion isn't apparent and I didn't correct it. In this example the barrel distortion was much more apparent, and so I corrected it. This required a significant distortion of the image, and a lot of the pixels had to be thrown away, resulting in a smaller image. The following screenshot shows the amount of correction needed to match the scene coverage and geometry of the image produced in Lightroom from a single RAW file (Lightroom does understand the FZ200 RAW files and applies appropriate corrections.)


0694 2.2 Example 46 Maximum Lightroom barrel distortion correction - not quite enough
by gardenersassistant, on Flickr

In the following screen shot the stacked image is on the left. On the stacked image I have circled several of the areas that I thought looked a bit more detailed/had better micro-contrast when looking carefully at the image at normal viewing size.


0694 2.3 Example 46 Single-image Vs 11-image (1 - annotated) FZ200 ISO 100 CA,Res+,Nomotproc P1540276-P1540286_PA
by gardenersassistant, on Flickr

Looking at these areas in more detail confirms this impression, although in this first area the stacked version has some chromatic aberration on the vertical window edges which the single-image version does not.


0694 2.4 Example 46 Single-image Vs 11-image (1.1) FZ200 ISO 100 CA,Res+,No motion process P1540276-P1540286_PA
by gardenersassistant, on Flickr

The detail/microcontrast also looks better in this next area, and to my eye the clarity of/through the window glass looks better too. There is though I think a hint of chromatic aberration on the top of the horizontal divisions between the panes of glass.


0694 2.5 Example 46 Single-image Vs 11-image (1.2) FZ200 ISO 100 CA,Res+,No motion process P1540276-P1540286_PA
by gardenersassistant, on Flickr

The next area shows an improvement in the definition of grass and narrow stems/branches of a bush. Grass in particular is something which the FZ200 has a distinct tendency to show as a formless "mush", as seen in the single-image version. It also has problems with foliage seen at a distance, and these results suggest that this technique might help with this too.


0694 2.6 Example 46 Single-image Vs 11-image (1.3) FZ200 ISO 100 CA,Res+,No motion process P1540276-P1540286_PA
by gardenersassistant, on Flickr

Although we have been pixel-peeping to see what is going on, these improvements in detail/micro-contrast/clarity provide a discernible improvement in image quality to my eye at normal viewing size. I can't make out the additional chromatic aberration in the stacked version at normal viewing size.

There is another oddity that you may have noticed. Looking at the first of these detailed comparisons, the one showing the vertical chromatic aberration on the window, you can see that in the single-image version the right hand window has random splotches on all three panes. The stacked image has less prominent markings on those window panes, but they are comprised of short vertical and horizontal segments. This can be seen more clearly in the sky in the following, even more highly magnified, comparison.


0694 2.7 Example 46 Single-image Vs 11-image (5) FZ200 ISO 100 CA,Res+,No motion process P1540276-P1540286_PA
by gardenersassistant, on Flickr

At the same magnification, the same patterning can be seen on plain areas of wall.


0694 2.8 Example 46 Single-image Vs 11-image (6) FZ200 ISO 100 CA,Res+,No motion process P1540276-P1540286_PA
by gardenersassistant, on Flickr

I suspect this is a side effect of the method used to increase resolution. I don't think this is important for these particular images, given how far we have zoomed in with pixel peeping, but if it is an intrinsic property of the technique I suspect it may be more troublesomely prominent in some images. Even if not visible at normal viewing size it might put constraints on the extent to which cropping might be used. We shall see an example of this later.


Return to contents page
 
Last edited:
Fishermen on a pier

Here is another scene captured in good light, this time using full zoom on the FZ200, which is equivalent to 600mm in 35mm terms.


0694 3.1a Example 5 FZ200 ISO 100 11 images CA, Res+ P1530965-75 LR Export
by gardenersassistant, on Flickr

This used a burst of 11 shots using RAW, ISO 100, hand-held. The shots used 1/1600 sec at f/5.6. Resolution enhancement produced an image of 5988 x 7963.

The following crops show that the stacking produces a significant overall improvement in noise, clarity and detail. However, the improvement is not uniform. For example, the water in the second crop has patches of noise, although at normal viewing size they would not be visible. We shall see more of this sort of thing later.

The improvements in the stacked version, especially in the distance in the first and last crop, made me think that this technique could be useful for "crop for reach", to enhance telephoto capability. This in turn made me wonder if it could also be useful for closeups/macros, to enhance "crop for dof" capability. More on this later.


0694 3.2 Example 5 FZ200 ISO 100 11 images CA, Res+ P1530965-75 FS screen 1
by gardenersassistant, on Flickr


0694 3.3 Example 5 FZ200 ISO 100 11 images CA, Res+ P1530965-75 FS screen 2
by gardenersassistant, on Flickr


0694 3.4 Example 5 FZ200 ISO 100 11 images CA, Res+ P1530965-75 FS screen 3
by gardenersassistant, on Flickr


0694 3.5 Example 5 FZ200 ISO 100 11 images CA, Res+ P1530965-75 FS screen 4
by gardenersassistant, on Flickr


Return to contents page
 
Last edited:
Boats at the marina

This is another full zoom image using the FZ200 in good light, using a burst of 11 RAW shots, hand held, 1/1600 sec at f/5.6. Resolution enhancement produced an image of 7960 x 5956. There is plenty of detail here so it should be good as a test of "crop for reach".


0694 4.1a Example 4 FZ200 24X zoom ISO 100 11 images Res+ Movement from base image P1530862-P1530872_PA
by gardenersassistant, on Flickr

As it is a full zoom image, it uses a focal length equivalent to 600mm with a full frame, 35mm camera. The following three crops represent equivalent focal lengths of 1200mm, 1800mm and 2400mm. The stacked image is on the left in each case, compared to a single image from the stack on the right. The crops were exported from Lightroom using my normal viewing height of 1100 pixels. What we see in the screenshots is the full height of each crop and about 85% of the width.

1200mm equivalent crop


0694 4.2 1200mm equivalent comparison, rendered 1100 pixels high, viewed at 100%
by gardenersassistant, on Flickr

1800mm equivalent crop


0694 4.3 1800mm equivalent comparison, rendered 1100 pixels high, viewed at 100%
by gardenersassistant, on Flickr

2400mm equivalent crop


0694 4.4 2400mm equivalent comparison, rendered 1100 pixels high, viewed at 100%
by gardenersassistant, on Flickr

The following screeenshot shows the extent of the crop used for the 2400mm equivalent crop. (The size is correct, but the position is obviously wrong. This is because I had to move the crop to the middle of the image in order to get all of the image to scroll into view for the screenshot.)


0694 4.5 Size of 2400mm equivalent crop
by gardenersassistant, on Flickr

I can see a perceptible, but mild difference in each case, with the stacked version for the most part looking slightly less noisy and having slightly better sharpness and detail. I have noticed one exception though, and I expect there are others, especially if one did the same exercise with other parts of the image. There is a cable rising vertically behind the top of the oval white buoy at the back of the central boat, above the "15" on the jetty. It is better defined in the single image. It looks as though the software has messed it up in the stacked version.

I think it would be a judgement call as to whether the extra effort of using a stack to crop for reach would be worthwhile for the very minor benefits in cases like this. Given the clearer benefits in the previous examples, I suspect it would be a case of trying a stack in a particular case and seeing how it worked out. With more experience it might be possible to learn what type of scenes the technique would work best with. For example, I have a hunch that the differential movements of the boats on the water might be more problematic for the software to deal with rather than the mainly or entirely static scenes in the previous posts. (With the fishermen though, it was pure luck that both of them happened to stay still while the images for the stack were captured. In general, I think, people, dogs etc move, as with foliage, so I suspect there would be a significant element of luck in any scene that isn't entirely static in nature.)

This image illustrates another issue to do with movement. The following screenshot shows a flag blowing in the wind. Overall, the stacked image, on the left, is less noisy and clearer. However, it has a band of noise around the flag.


0694 4.6 Example 4 FZ200 ISO 100 11 images Res+ P1530862-72 FS screen 4 - noise around moving flag
by gardenersassistant, on Flickr

In this case the software used content from just one of the images where it discovered movement. The next screenshot compares this, on the left, to a stack on the right for which the software used its "remove or deblur" option for moving elements. This has not improved the situation around the flag, and has introduced noise in a lot of other areas.


0694 4.7 Example 4 FZ200 ISO 100 11 images Res+ Movbase Vs Mov remove or deblur P1530862-72 FS screen 5
by gardenersassistant, on Flickr

The next crop compares the "take moving content from one of the images" option to the "don't do anything about movement" option.


0694 4.8 Example 4 FZ200 ISO 100 11 images Res+ Movbase Vs Movnoproc P1530862-72 FS screen 5
by gardenersassistant, on Flickr

We can clearly see here that the flag was moving; it looks terrible. However, some other elements in the scene look clearer, for example everything at and above the level of the top of the flag. I think this reinforces the need for a "try it and see" approach as to which options to use for the stacking.


Return to contents page
 
Last edited:
Working with the 55-250

I sometimes prefer to work hand-held when photographing flowers as this opens up more creative possibilities by letting me explore different distances and angles on the subject with much greater speed and flexibility than when working with a tripod. However, shutter speeds are often too slow for this to be practical, either because of low ambient light levels and/or because I'm working in the shade. I most often use the 70D +55-250 for this sort of work.

Here is an example. This flower is in a very awkward position which makes it difficult to use a tripod. It is also in deep shade because it is underneath some decking. Just to add to the difficulty, this shot was taken on an overcast day I think. With f/13, which is the typical sort of aperture I use for this type of shot, using ISO 6400 gave a shutter speed of 1/125 second. I captured a burst of 13 RAW shots hand-held using a focal length of about 340mm in 35mm terms.


0694 5.1a 70D+55-250 hand-held IMG_2446-IMG_2458_PA ISO 6400 LR Export full size
by gardenersassistant, on Flickr

In this comparison we are looking at the image at close to my normal viewing size. The stacked version is on the left. This isn't an image I would want to use as I don't like the composition, but in terms of image quality I would find the stacked version usable with a normal amount of post processing. Given that I probably couldn't have used a tripod, using a burst might have been the only practical way of getting this image.


0694 5.2 70D+55-250 ISO 6400 14 images Vs single image
by gardenersassistant, on Flickr

The next example with the 55-250 illustrates resolution enhancement. The image was captured using ISO 100 and so noise was not an issue. However, at the full zoom of 250mm (400mm in 35mm terms) the maximum aperture is f/5.6 and this required a shutter speed of 1/2 second so I had to use a tripod. I captured a burst of 13 shots. Here is the full frame.


0694 5.3a 70D+55-250E-FS as 400D+55-250E-FS ISO100 CA Res+ MotionFromBaseImage IMG_2207-IMG_2219_PA
by gardenersassistant, on Flickr

And here is a detail.


0694 5.4 ISO 100 70D+55-250EFS as 400D+55-250EFS CA Res+ NoMotionProcess 13 image Vs single image
by gardenersassistant, on Flickr

We are looking at 150% for the 5472 x 3648 single image on the right, and at 75% for the 10984 x 7332 stacked image. The stacked version has more detail on the in-focus branches. This improvement may seem academic as we have zoomed in beyond 100% (on the single image) to see it. However, it does mean that, to produce a given image quality, the stacked image could take a greater crop. More interesting to me though is the fact that when I flip between the full size versions fitted to screen I can see, in the in-focus areas, more detail in the stacked version. the sharpness, microcontrast and clarity look better, and the colours seem more "solid". The effect is subtle, and most evident in the best-focused branch, which runs from half way along the top to half way down on the right. Overall, to my eye the image has more "presence", with the in-focus areas separated in a more "3D" way from the background.

The next image, an indoors test shot, illustrates how marked this resolution enhancement can be. Here is the whole frame.

0694 5.5a 15 70D+55-250 hand-held IMG_2416-IMG_2431_PA ISO 1600 LR Export full size
by gardenersassistant, on Flickr

This pot has become one of my favourite test targets because it has good detail at all scales down to the 8:1 maximum magnification that I can reach. I captured 16 shots using ISO 1600 at 1/30 second, again using full zoom (400mm equivalent). Here is a crop. We are looking here at the 7216 x 10796 stacked version, on the left, at 100%, and at 200% for the 3648 x 5472 single image version.


0694 5.6 70D+55-250 ISO 1600 1-30 sec 16 shots Vs single shot
by gardenersassistant, on Flickr

When I first looked at this comparison I found the increase in resolution astonishing. Looking more closely at the source images this is what I think was going on.

The shots were captured with the 55-250 STM on the 70D, hand-held using 1/30 second at 400mm equivalent focal length. This would need about 4 stops of image stabilisation to meet the 1/focal length guideline. Canon claims 3.5 stops of stabilisation (the only review I have found which looks at this in detail suggests it is less in real world use), and we are looking here at the single source file at 200%. It is therefore not surprising that some of the captures look rather soft. It turns out that the one I chose (the first in the burst) was one of the softest. Of the 15 shots in the burst 6 were of this sort of softness. Four were a bit better, four were a bit better again, and one was slightly sharper than the previous four. (This is examined in a bit more detail in Processing Options.)

It looks as though the alignment and merging process is "ironing out" the softness so as to reveal the underlying image more sharply. Or put another way, even though there are some very soft images in the burst the overall result is still very good. If this is what is going on then it could make it practical in some cases to use a burst with somewhat slower shutter speeds than with a single capture for hand-held images of stationary subjects.

Here is a hand-held example where I captured 16 shots at 1/160 sec using ISO 400 at 100mm equivalent focal length.


0694 5.7a 70D+55-250 hand-held IMG_2322-IMG_2336_PA ISO 400
by gardenersassistant, on Flickr

Here is a crop. We are looking here at the 7192 x 10816 stacked version, on the left, at 75%, and at 150% for the 3648 x 5472 single image version.


0694 5.8 70D+55-250 ISO 400 1-160 sec 16 shots Vs single shot
by gardenersassistant, on Flickr

The stacked version has a bit more definition/clarity in the in-focus areas and a bit less noise in the background This combination seems consistent with a higher than base but not extreme ISO (so there is noise that can be removed, but noise reduction doesn't dominate the outcome), with a middling focal length and a shutter speed (which may not be quite fast enough to avoid camera shake at the focal length when looking very closely at the image like this, allowing some scope for the multi-image alignment and merging to reverse some of the resultant softness).

Using a multi-image approach doesn't guarantee better image quality. Many, perhaps the majority of the shots I captured in a session devoted to testing the technique with hand-held shots with the 70D + 55-250 didn't show any improvement that I could spot. They were mainly shots of camellias captured using a lot of zoom at around ISO 400. Here too I think there is a judgement call as to whether it is worthwhile using the technique and dealing with the extra work and time involved in image management and processing.


Return to contents page
 
Last edited:
Closeups of two flowers using achromats

For closeups and macros I have concentrated on testing achromats as it looks as though achromats will be my preferred approach for now with both the FZ200 and the 70D.

I didn't know what to expect with closeups and macros using achromats. Since the software doesn't need to know about the camera and lens for noise reduction, I hoped that noise reduction would work when using achromats. It seemed much more doubtful that resolution enhancement would work as this depends on the software knowing about the camera and lens being used, and adding an achromat obviously changes the system's optical characteristics.

The software knows about the FZ200, but not about the 70D+55-250 combination. That doesn't rule out the use of resolution enhancement with the 70D+55-250, as we have seen, but you have to pretend you are using some other combination of camera and lens. I thought using the FZ200 for these tests would give the software the best chance of success with achromats. I could test the 70D later if it turned out that technique did work with achromats.

So all these examples used the FZ200.

Here is a hellebore flower captured using the least powerful of my achromats, the Canon 500D, on the FZ200, using ISO 400. The FZ200 is a noisy camera and ISO 400 is the maximum ISO I use with the camera, and I prefer not to use it unless I have to because of the post processing overhead in dealing with the noise and the implications for image quality.

The flower is in a shady spot and I captured 11 shots hand-held using 1/100 sec at f/5.6 (which is equivalent in terms of DOF and diffraction to somewhere around f/16-22 on an APS-C camera like the 70D).


0694 6.1a FZ200 ISO 400 11 images P1530747-P1530757
by gardenersassistant, on Flickr

The flowers were about 80mm from tip to tip of opposite petals.

In the following screen shot the stacked image is on the left.


0694 6.2 FZ200 ISO 400 comparison 1
by gardenersassistant, on Flickr

In this case the stacked version looks considerably less noisy and fractionally more detailed.

The stacked version also looks to have slightly better colour rendition, with the reds on the central stigma looking richer. Colours do deteriorate with higher ISOs, and in a number of cases I have noticed that stacked versions of higher ISO images seem to restore colours. Sometimes with higher ISOs than in this example the colour restoration can be very marked, as we shall see later.

The decaying camellia flower in the next example was about 100mm from tip to tip of opposite petals. Like the previous example it was captured using ISO 400 with the FZ200. The light was shady, similar to the previous example, which was only 18 inches or so away from it, and as in the previous example the 11 shots used 1/100 sec at f/5.6.


0694 6.3a FZ200 ISO 400 11 images No moving process P1530747-P1530757
by gardenersassistant, on Flickr

In the following screen shot the stacked version is on the left.


0694 6.4 FZ200 ISO 400 11 images P1530747-P1530757 Comparison 1
by gardenersassistant, on Flickr

In this case noise is less obviously an issue, but in the stacked version the subject has has significantly better clarity, detail and textures.

In this scene there is a detailed background, and as shown below this too is much better in the stacked version.


0694 6.5 FZ200 ISO 400 11 images P1530747-P1530757 Comparison 2
by gardenersassistant, on Flickr

And now an oddity. The bottom right hand corner, and as far as I can see only this area, is better in the single-image version. Flicking through the 11 source images did not reveal, to my eyes, any reason why this might have been the case.


0694 6.6 FZ200 ISO 400 11 images P1530747-P1530757 Comparison 3
by gardenersassistant, on Flickr

We saw in Boats in the marina how changing the processing options can change the look of a stacked image. In that case it was fairly obvious what was going on with the flapping flag. I have come across other differences that are more difficult to explain. There is a subtle example of this with the camellia flower.

Here are three views of the flower, produced using different options with regard to how any movement in the image was handled. The left hand version ignored any movement, so areas that moved will be blurred. The second one used the content of one of the images for areas in which the software detected motion. The third one used an option called "remove or deblur" for areas with motion. I have not found an explanation for what this does.


0694 6.7 Three options for handling movement, at about normal use magnification
by gardenersassistant, on Flickr

These three views are at the sort of magnification I often use, presenting the image so as to fill most of my 2560x1440 pixel screen, having typically cropped the image moderately. At this magnification they look rather similar, although I believe the differences we have seen above would give the stacked version slightly more "punch"/"presence", and for sharp eyes, more detail.

Looking more closely though, there is something odd going on, and although it doesn't make any difference at the magnification I typically use, it might limit the amount of cropping that could be done.

0694 6.8 Three options for handling movement, at high magnification
by gardenersassistant, on Flickr

The left hand image has faint, short, roughly vertical and horizontal lines visible in some of the low contrast areas. These lines are a bit stronger in some areas of the middle image. But in the right hand image they are very much stronger, and it wouldn't take much more cropping to make them an image killer.

Perhaps these are JPEG compression artefacts - but they look similiar to what we saw when looking very closely at the building and sky in A building exterior.

I've seen various oddities as I've been working with these techniques. This makes me think that these are techniques that may or may not work in an apparently somewhat random manner, so it may be a case of try it and see if it works, and look with a critical eye at the outcomes because (as with focus stacking) it is possible, and perhaps easy, to produce some results that look superficially ok but when examined by the more careful folk may turn out to be a bit embarassing.

This "maybe it'll work, maybe it won't" factor feeds into some other ifs and buts later on when considering whether these are techniques which will have any practical use. They are, I think, a bit of a curate's egg.


Return to contents page
 
Last edited:
Indoor macro examples

When I got to the stage of wanting to do some higher magnification tests we had a lot of rain, so I did some tests indoors. This included shots of the pot we saw in Working with the 55-250.

The examples in this section were processed using noise reduction but not resolution enhancement. This is because using resolution enhancement produced an ugly, speckly effect that made the stacked images worse than the single images.

The odd speckle can occasionally be seen in shadow areas of highest ISO image bursts, even when resolution enhancement is not used. The worst combination is shadow areas and/or underexposed shots where the highest ISOs are used in combination with resolution enhancement on the FZ200. In this case the speckling can be serious enough to make an image pretty much unusable in the absence of an inordinate amount of manual hot spot removal. I have not noticed the problem with the 70D.

As resolution enhancement was not used the stacked images are similar in size to the source images. However, hand-held stacked images are always a bit smaller than the source images because of the areas that need to be removed around the edges because of movement between captures. This issue becomes worse as magnification increases. For that reason, even when shutter speeds were fast enough for hand-holding, I used the tripod and remote release for the macro examples.

This first example used 11 images captured using the Raynox 150. The magnification is about 1:2. The captures used f/5.6, 1/125 sec and ISO 3200. This is a horribly noisy ISO on the small sensor FZ200. I have never found a use for it.


0694 7.1a About 1to2 magnification FZ200+Raynox150 CA only P1540755-P1540765_PA LR Export JPEG 2880h
by gardenersassistant, on Flickr

This first comparison is at roughly my normal viewing size. The stacked image is on the left. As well as the stacked image having less noise and better detail and clarity, the colours look richer. It is difficult to be sure because of the artificiality of the subject, but it does look to be of usable quality to me.


0694 7.2 About 1to2 magnification FZ200+Raynox 150 about normal viewing size, 50%
by gardenersassistant, on Flickr

The next comparison takes a closer look, pixel peeping at 100%. Given that this is such a high ISO on such a noisy small sensor camera, this result looks impressive to me (subject again to the qualification that it is difficult to "read" an artificial scene in terms of its implications for real world macros of natural subjects).


0694 7.3 About 1to2 magnification FZ200+Raynox 150 viewing size 1to1, 100%
by gardenersassistant, on Flickr

The next example used the Raynox 250 and is about 1:1 magnification. Like the previous example it used 11 shots at ISO 3200 and f/5.6. I must have moved the pot to get better light on it, because this time the shutter speed was over two stops faster, at 1/640 sec.

Here is the full frame.


0694 7.4a About 1to1 magnification FZ200+Raynox250 CA only P1540636-P1540646_PA LR Export JPEG 2880h
by gardenersassistant, on Flickr

As before, this first comparison is at around my normal viewing size. And as before, it looks better than the single image in terms of noise, detail, clarity and colour.


0694 7.5 About 1to1 magnification FZ200+Raynox250 about normal viewing size, 50%
by gardenersassistant, on Flickr

Here it is viewed at 100%.


0694 7.6 About 1to1 magnification FZ200+Raynox250 viewing size 1to1, 100%
by gardenersassistant, on Flickr

The next example is again 11 images at ISO 3200 and f/5.6 with the Raynox 250, this time at 1/320 sec. The magnification is about 1.5:1.

Uncropped image


0694 7.7a About 1.5to1 magnification FZ200+Raynox250 CA only P1540625-P1540635_PA LR Export JPEG 2880h
by gardenersassistant, on Flickr

80% crop


0694 7.8 About 1.5to1 magnification FZ200+Raynox250 viewing size 80%
by gardenersassistant, on Flickr

One needs to be careful about reading too much into artificial tests, but I did think this was looking promising. It is true that I had turned off resolution enhancement because I didn't like the results with it on. But even with it turned off the results looked good to me. This was promising not only for the use of the FZ200 with achromats, but also for the 70D with achromats. If resolution enhancement wasn't being used it wouldn't matter that the software didn't know about the 70D+55-250, which is the combination I use with achromats.


Return to contents page
 
Last edited:
Outdoor macro examples

In a gap between rain showers I happened upon two invertebrates right outside the back door. They were not moving around so I took the chance to take some photos of them to test macro stacking with a real subject. There were also some small flowers close by that I got a few shots of before the rain started again.

For one of the two invertebrates, shown below, stacking with resolution enhancement produced noticeably better results. For the other one, a woodlouse, the differences were minor. I have no idea why there was this difference, especially as the woodlouse was absolutely still but the successful subject was not.

For these three examples, despite using a very high ISO, resolution enhancement did not produce the horrible results that it did with the indoor tests, so all these examples were processed with resolution enhancement.

Here is the successful subject, in this case photographed with the Raynox 250 on the FZ200 with 11 shots at ISO 3200, 1/60 sec. The magnification was about 2.7:1.

0694 8.1a P1550148-P1550158_PA Res+ Movement from base LR Export full size blacks down more
by gardenersassistant, on Flickr

Here is a comparison at around my normal viewing size. As with the indoor test, I think the stacked version, on the left, is usable despite being ISO 3200 from a small sensor.


0694 8.2 ISO 3200 About 2.7to1 magnification Outdoor comparison 1 at about normal viewing size
by gardenersassistant, on Flickr

Here is a comparison at 100% for the single image and 50% for the stacked version.


0694 8.3 ISO 3200 About 2.7to1 magnification Outdoor comparison 1 at 100% viewing size
by gardenersassistant, on Flickr

The background is a bit noisy in the stacked version, and it has some bright speckles, although in this case they aren't prominent enough to be troublesome.

While the 11 images were being captured the top half of the right antenna moved sideways by more than twice its width. The images were processed with the option to replace moving elements with content from a single image, and that seems to have worked well in this case.

The next example is the same subject, captured with less magnification, again with 11 shots but this time using ISO 100, which needed 1/2 sec exposures. The antennae hardly moved during the captures, but the OOF springtail on the left did move quite a long way. The same option was used for handling movement and again it worked well.

The magnification in this case was about 1.9:1.

Uncropped image


0694 8.4 FZ200, ISO 100 Res+, 11 images at 1-2 sec, probably Raynox 250 at almost 2to1 P1550184-P1550194_PA Mov base
by gardenersassistant, on Flickr

Here is a comparison at around my normal viewing size.


0694 8.5 ISO 100 Outdoor comparison 2 at about normal viewing size
by gardenersassistant, on Flickr

Here is a comparison at 100% for the single image and 50% for the stacked version.


0694 8.6 ISO 100 Outdoor comparison 2 at 100% viewing size
by gardenersassistant, on Flickr

The stacked version clearly has better clarity, detail and sharpness.
The next example was captured at ISO 400. The stacked version is a little better than the single image in terms of noise and clarity, but the differences are less marked than in the two previous, higher ISO examples.

Uncropped image


0694 8.7a FZ200, ISO 400 Res+, 9 images at 1-100 sec, Raynox 250 at 1to1 P1550436-P1550444_PA Movement from base image
by gardenersassistant, on Flickr

Comparison at around my normal viewing size


0694 8.8 ISO 400 Outdoor comparison 3 at around normal viewing size
by gardenersassistant, on Flickr

From these tests it looks as though both multi-image noise reduction and resolution enhancement can produce useful results with achromats in real life use around and beyond 1:1. However, just as we saw previously, the technique only works for some images, and it remains unclear what the circumstances are that make it work or not work in particular cases.


Return to contents page
 
Last edited:
Higher magnification macro examples

I rarely use magnifications higher than those in the previous examples. I have found that flash seems increasingly essential as magnification increases. This burst stacking technique could be used with flash I suppose, but it would be a lengthy business waiting for the flash to recycle. I decided not to try that. This might have been a mistake of course, and I might try it in future. However, I did decide to try some natural light bursts at higher magnifications, out of curiosity rather than any expectation of success.

Lack of DOF is a big issue at higher magnifications and so I wanted to see if using resolution enhancement had any potential for allowing a more severe use of crop for dof. With this in mind, and wanting some residual sharpness to work with after severe crops, I dropped back from my normal use of the smallest aperture, which is f/8 on the FZ200, to f/5.6 , so as to reduce the loss of sharpness from diffraction. For the same reason I used ISO 100. This required the use of longish shutter speeds, from 1/30 down to 1/8 sec. I thought hand-holding these would be impractical because of softness arising from the slow shutter speeds and also because of the amount of the image I would lose from the edges because of the enhanced impact of hand-shake at higher magnifications. So I used the tripod in hands-off mode using a wired remote release.

I started with a session where I captured a dozen or so bursts using the Raynox 150 and 250 stacked on the FZ200.

I was disappointed when I first compared the stacks to single images. But then I looked more closely at this example. Although captured with the Raynox 150 and 250 stacked it is not particularly high magnification at about 1.6:1. It is a stack of 12 shots.


0694 9.1a About 1.6to1 FZ200+R150+250 ISO100 CA Res+ NoMotionProcess annotated with crop2 P1550542-P1550553_PA
by gardenersassistant, on Flickr

As was the case with the other test shots, when comparing the whole scene between the stacked and single image versions I thought the stack was slightly better in some areas, but in others I thought there was nothing in it, or perhaps the single shot was fractionally better. But it was all so slight as to be insignificant.

I was attracted by the area marked with the red box, so I zoomed in on it. This is what I saw.


0694 9.2 ISO 100 Res+deep crop FZ200+Raynox150+250
by gardenersassistant, on Flickr

To my surprise, the stacked version looked close to being usable to me. Perhaps with some post processing it would be (it has not been sharpened for example). And with a bit more capture magnification and a bit less cropping it should certainly have been usable.

The comparison shows the 8012 x 6016 stacked image at 125%, which equates to 250% for the single-image size of 4000 x 3000. Given that this is from a small sensor camera with a sensor 1/10th the area of an APS-C camera of the size most people posting on this forum seem to use, and a sensor reknowned for being noisy/smeary even at base ISO when you pixel peep, I find this result fascinating.

Looked at another way, at about 1.6:1 the scene was about 14.5mm across. The green rectangle shows a crop at the FZ200's native aspect ratio of 4:3. This about 18.5% of the width of the scene, or about 2.7mm, which makes the magnfication about 8:1.

I can, just, get to 8:1 using the MSN-202 on the FZ200. However, if I had framed the green area with the MSN-202 the image would not have been at all like that shown; only a slice of the droplet would be in focus.

I think this technique may have potential for higher magnification macros.

The next day I had a session where I decided to keep the MSN-202 on the camera the whole time. This forced me to look for smaller subjects, which was an interesting exercise in its own right because as I cast around looking for subjects I realised that there are interesting looking scenes out there at higher magnifications, but you have to explore with the camera in order to find them. You can't (well, I can't) with my naked eye get any idea what this very small-scale stuff is going to look like. (This reminds me of a quote a read recently in this thread over at dpreview, "Garry Winogrand: I photograph to find out what something will look like photographed.")

As to whether I could produce anything usable from what looked so appealing on the LCD screen is of course another matter. As always. That has often been a source of disappointment for me.

And when I processed the stacks I was disappointed. They didn't look any better than the single images. Perhaps there was extra detail that would be visible with harsh crops, but there wasn't anything at that highly cropped scale that looked interesting. I had framed the shots around what I had seen in the LCD that had caught my eye. I only wanted to do mild, compositional crops. So there didn't seem to be any point in doing stacks for this sort of high magnification shots (focus stacking looked more relevant, because of course the depth of field was very narrow, not having cropped for dof).

And then I made an interesting discovery. It turns out that with all the extra pixels of the enhanced resolution versions the images respond very gracefully to some quite hard processing, sharpening in particular. That could be rather useful I think.

These were test images, and most had no aesthetic appeal. It turned out though that I did find five of the images quite appealing, although as my wife said of the third one shown below, "don't you mind that it isn't in focus?" I pointed out that something was in focus, well, somewhat in focus anyway, on the large drop and the stem. I don't think she was convinced. I didn't mind. It was at the very least a promise of future possibilities to explore.

After including so many dry comparison images in these posts I thought I would just say rather than illustrate that the improvements are much the same as before in terms of noise, clarity, colour, microcontrast and detail. And instead of comparison images I'll show some processed images at my normal viewing size.

So, here are some images based on sets of 11 RAW captures with the MSN-202 on the FZ200. Each set of 11 was processed with resolution enhancement to produce a "double size" image of around 8000 x 6000 pixels, or 48 megapixels. These images were then mildly cropped, partly for compositional reasons, but mainly in fact to get rid of the vignetting that the MSN-202 causes at all magnifications, and heavily sharpened - much stronger sharpening than I normally use.

The dof is a bit lacking, but I'll know next time to compose with the vignetting and crop for dof in mind. For each image I have shown very approximately the magnification of the uncropped image from which the displayed image was created.

About 4:1


0694 10.1 FZ200+MSN202 Cropped from about 4to1 P1550683-P1550693_PA LR
by gardenersassistant, on Flickr

About 3:1


0694 10.2 FZ200+MSN202 1 CA GEO NoMove Blurry P1550782-P1550792_PA LR
by gardenersassistant, on Flickr

About 6:1

0694 10.3 FZ200+MSN202 Cropped from about 6to1 P1550749-P1550759_PA LR
by gardenersassistant, on Flickr

About 3.5:1


0694 10.4 FZ200+MSN202 Cropped from about 3.5to1 P1550841-P1550851_PA LR
by gardenersassistant, on Flickr

About 3:1


0694 10.5 FZ200+MSN202 cropped from about 3to1 P1560247-P1560257_PA LR
by gardenersassistant, on Flickr


Return to contents page
 
Last edited:
Product options and comparisons


Options for multi-image stacking for noise reduction

There are many software applications that can be used to stack images for the purpose of noise reduction. For example, it can be done in some photo editing applications, in panorama software and in specialised applications.

What I tried using for noise reduction
  • Multi-image noise reduction can be done in Photoshop from CS3 onwards. However, I only have CS2 so I couldn't use Photoshop.
  • I have AutoPano Pro panorama software, so I tried that.
  • I tried median blending as described here using a command line program that is included in the Hugin open source panorama application and then the open source ImageMagick application.
  • I tried Autostakkert!2
  • I tried Chasys Draw IES
  • I tried PhotoAcute

What happened when I tried using these applications for noise reduction


I used this indoor scene captured with 11 RAW images using the FZ200 at ISO 3200.

0694 11.1 Example 37 P1540471 LR Export full size Annotated
by gardenersassistant, on Flickr

AutoPano Pro and PhotoAcute read in the RAW files with no problem. I had to convert the images to tiff for Hugin/ImageMagick and for Chasys Draw. I couldn't get Autostakkert!2 to read the files in any format I tried.

Loading the files was a straightforward drag and drop operation for AutoPano, PhotoAcute and Chasys Draw. For Hugin/ImageMagick I had to write a batch file to load the files. This was ok (although tedious) for a one-off test, but would not have been practical for general use.

The following screenshot illustration shows four versions of the part of the image shown in the green box above. The versions are:
  • Top left, the first of the 11 RAW files after importing into Lightroom and exporting as JPEG with no luminance noise reduction. (It did have colour noise reduction as part of my standard import routine.)
  • Top right, as stacked in AutoPano Pro and exported to JPEG.
  • Bottom left, as stacked in PhotoAcute with noise reduction and resolution enhancement and exported to JPEG.
  • Bottom right, as stacked in PhotoAcute with noise reduction but not resolution enhancement and exported to JPEG.

0694 11.2 Example 37 Not noise reduced 1
by gardenersassistant, on Flickr

AutoPano and PhotoAcute both reduced the noise significantly. The Autopano version had a little less noise than the PhotoAcute versions, but the PhotoAcute versions were sharper/more detailed (see for example the vase and the word "CAPITAL" on the book at the top left of the bookcase).

The colours are better in all three stacked versions compared to the single image (see for example the vase and the portrait to its right). High ISOs "lose" colour and these three multi-image versions recovered the colour to a significant extent.

The following screenshot illustration shows four versions of the part of the image shown in the green box above. The versions are:
  • Top left, as stacked in AutoPano Pro and exported to JPEG.
  • Top right, as stacked in Hugin/ImageMagick and exported to JPEG
  • The next two are the opposite way round compared to the previous illustration.
  • Bottom left, as stacked in PhotoAcute with noise reduction but not resolution enhancement and exported to JPEG.
  • Bottom right, as stacked in PhotoAcute with noise reduction and resolution enhancement and exported to JPEG.

0694 11.3 Example 37 Not noise reduced 2
by gardenersassistant, on Flickr

The detail in the Hugin/ImageMagick version is very similar to that in the PhotoAcute version, but the colours were not recovered as in the PhotoAcute or AutoPano versions.

The following screenshot illustration compares the first of the 11 RAW files, on the left, with the ChaSys Draw version in the middle and one of the PhotoAcute versions (sorry, don't know which) on the right.


0694 11.4 Noise reduction - Compare Chasys Draw IES with PhotoAcute
by gardenersassistant, on Flickr

The ChaSys version is clearly inferior to the PhotoAcute version, and not a lot better than the single RAW file.

Conclusions of the noise reduction tests
  • Autostakkert!2 did not work.
  • ChaSys Draw did not produce an acceptable improvement.
  • Hugin/ImageMagick was very awkward and time-consuming to use and did not recover the colours.
  • AutoPano Pro and PhotoAcute produced different but overall similar results. Adding conventional noise reduction to the slightly noisier PhotoAcute version to get the noise to the same level as in the AutoPano version would probably make them even more similar, as the additional noise reduction would reduce the detail a bit in the PhotoAcute version, bringing it nearer to the level of detail in the AutoPano version.

Resolution enhancement tests


Only ChaSys and PhotoAcute offered resolution enhancement. The examples in these posts used PhotoAcute. Here is a crop from one of the examples used earlier in these posts, with the Chasys Draw version on the left and the PhotoAcute version on the right.


0694 11.5 Resolution enhancement - Compare Chasys Draw IES with PhotoAcute
by gardenersassistant, on Flickr

The Chasys version is clearly inferior. As we have seen throughout the previous posts, with some qualifications and complications, PhotoAcute does a pretty good job of resolution enhancement.


Return to contents page
 
Last edited:
Back
Top