

You are using an out of date browser. It may not display this or other websites correctly.
You should upgrade or use an alternative browser.
You should upgrade or use an alternative browser.
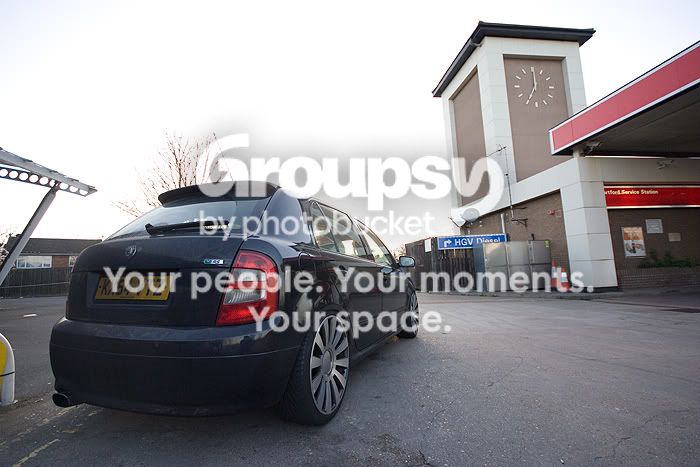
Capturing the sky whilst keeping the subject correctly exposed...
- Thread starter Kryptix
- Start date

chris321
I like the ginger one
- Messages
- 3,574
- Name
- Chris
- Edit My Images
- Yes
It's one of the reasons why people use HDR. Use a tripod, and the Auto Exposure Bracketing feature on your camera. You take one shot at the normal exposure, then one underexposed (but the sky will be correct), one overexposed (to retain detail in the car), and using some magical digital trickery all 3 get blended together to give you the correct exposure all across the board.
Either that, or get some graduated ND filters. They'll darken the sky, but not the subject, meaning you can get a good exposure for both!
Chris
Either that, or get some graduated ND filters. They'll darken the sky, but not the subject, meaning you can get a good exposure for both!
Chris

- Messages
- 7,179
- Name
- Edward Bray
- Edit My Images
- Yes
You have five options really:
1. Graduated filters (wouldn't work well on this image)
2. HDR, take a number of shots at various exposures (commonly +2, 0, -2 stops) and merge the images in software.
3. Digital Manipulation, take a nice sky image and merge it onto your main subject.
4. Wait to take the image until you have a good sky which is more balanced with the foreground (perhaps in the evening or early morning).
5. Depending on the foreground subject, expose for the sky and use artificial lighting to light the foreground!
1. Graduated filters (wouldn't work well on this image)
2. HDR, take a number of shots at various exposures (commonly +2, 0, -2 stops) and merge the images in software.
3. Digital Manipulation, take a nice sky image and merge it onto your main subject.
4. Wait to take the image until you have a good sky which is more balanced with the foreground (perhaps in the evening or early morning).
5. Depending on the foreground subject, expose for the sky and use artificial lighting to light the foreground!

- Messages
- 1,474
- Name
- Mike Whitmore
- Edit My Images
- Yes
Or you could expose for the sky and use flashes to illuminate the main subject. In this case, the car. Though how well it would work in this situation, I'm unsure :shrug:
Easiest option is probably a subtle HDR, as has already been suggested.
Easiest option is probably a subtle HDR, as has already been suggested.

- Messages
- 3,822
- Name
- Chris
- Edit My Images
- No
I always use ND grads and generally they give the results I want, HDRing seems like an real arseache to be honest.
If the sky is that much brighter than your foreground, it's difficult. Your options are:
-Compromise. Maybe there's a happy medium where the sky isn't too bright and your subject isn't too dark. If detail isn't entirely lost in either area, you could then selectively lighten and darken bits in photoshop. If there's too much difference between sky and ground then this probably won't work.
-ND grad filters. These have a dark portion fading downwards in to a clear portion, so they darken the upper part of your image. I don't think they'd work too well here though, as if you lined up the bottom of the dark area with the lowermost part of the sky here, it would darken the sky but also the top of the car and the building to the right. Probably not the effect you're after.
-Exposure merging. You can take 2 or more exposures so that all portions of the scene are correctly exposed in one of them, then merge them together on your computer
-Look for better light. Probaly not the answer you wer after but you might do better waiting for sunshine & a clear sky, or setting up the shot facing a different direction where the sky is darker.
-Compromise. Maybe there's a happy medium where the sky isn't too bright and your subject isn't too dark. If detail isn't entirely lost in either area, you could then selectively lighten and darken bits in photoshop. If there's too much difference between sky and ground then this probably won't work.
-ND grad filters. These have a dark portion fading downwards in to a clear portion, so they darken the upper part of your image. I don't think they'd work too well here though, as if you lined up the bottom of the dark area with the lowermost part of the sky here, it would darken the sky but also the top of the car and the building to the right. Probably not the effect you're after.
-Exposure merging. You can take 2 or more exposures so that all portions of the scene are correctly exposed in one of them, then merge them together on your computer
-Look for better light. Probaly not the answer you wer after but you might do better waiting for sunshine & a clear sky, or setting up the shot facing a different direction where the sky is darker.

Jimmy_Lemon
TPer Emeritus
- Messages
- 12,095
- Name
- Tom
- Edit My Images
- Yes
As above.
A lot of it depends on the shot too. Using a ND Grad for a shot like that would also cause the top of the clock tower (for want of a better name for it) to be darkened by the filter, which would then possibly require some tricky dodging when processing.
For a shot like that I would normally either wait for a better sky or go for the HDR approach.
A lot of it depends on the shot too. Using a ND Grad for a shot like that would also cause the top of the clock tower (for want of a better name for it) to be darkened by the filter, which would then possibly require some tricky dodging when processing.
For a shot like that I would normally either wait for a better sky or go for the HDR approach.
- Messages
- 7,179
- Name
- Edward Bray
- Edit My Images
- Yes
I always use ND grads and generally they give the results I want, HDRing seems like an real arseache to be honest.
So how would you use your ND grad to recover that sky?
If you use a strong one (which you would need, you would also be darkening everything else. Grads are great for almost straight horizons or when you have some silhouettes in the background, not great for large light subjects like this building.
Don't really understand your issue with doing HDRs, take three or more images (most DSLRs will do it automatically for you if you set it up) select merge to HDR in photoshop (or similar) and move a couple of sliders to get the result you require. Hardly a lot of arseache as you put it.

- Messages
- 595
- Name
- Steve
- Edit My Images
- Yes
A camera only has a limited dynamic range which means it is not able to capture the complete range of luminance from absolute darkness to absolute brilliance. As it can only capture a proportion of the range you have the choice of which end of the range you want to preserve : the detail in the dark bits which means the light bits will be blown (as in your shot), or the detail in the light bits and risk losing all detail in the dark bits. This gives you two options : you either make the dark bits lighter or you make the light bits darker. To make the light bits darker the most common 'tool' is the ND filter. To make the dark bits lighter there are numerous methods - flash, reflector, etc. Then of course there's multiple exposure...............
OP

- Messages
- 1,730
- Edit My Images
- Yes
Oh come on, you make it sound so easy. I didn't take a tripod with me when I took that shot, so just to get the sky I'd have to carry the tripod around with me -- that alone is enough 'arseache' to not bother IMO.Don't really understand your issue with doing HDRs, take three or more images (most DSLRs will do it automatically for you if you set it up) select merge to HDR in photoshop (or similar) and move a couple of sliders to get the result you require. Hardly a lot of arseache as you put it.

- Messages
- 956
- Name
- Andy
- Edit My Images
- Yes
Oh come on, you make it sound so easy. I didn't take a tripod with me when I took that shot, so just to get the sky I'd have to carry the tripod around with me -- that alone is enough 'arseache' to not bother IMO.
No. Shoot in raw and then manually adjust exposures to give you a 'fake hdr' effect.
Easy

- Messages
- 7,179
- Name
- Edward Bray
- Edit My Images
- Yes
Oh come on, you make it sound so easy. I didn't take a tripod with me when I took that shot, so just to get the sky I'd have to carry the tripod around with me -- that alone is enough 'arseache' to not bother IMO.
Well in that case you can't really complain when you do not get the effect you want, and why you may well never attain your potential in photography.
But after saying that, if you set the camera up to auto bracket keep the shutter speed high and set the drive to its quickest you should be able to take three shots within a second without moving too much (or is that too much trouble too?).
A tripod is not essential either, you can do it Albeit not as well with one shot if you shoot in raw, take a shot with about 2/3rds to 1 stop enderexposure(to protect the highlights), in the raw editor adjust the exposure to give you 3 images one of each, the correct exposure, well underexposed and well overexposed, save them then merge them.
PauloWanClift
Suspended / Banned
- Messages
- 917
- Name
- Paul
- Edit My Images
- Yes
When I import RAW into photoshop I sometimes import them twice and on the 2nd I put recovery to 100%, that sometimes gets a bit more detail in the sky, and then merge the images together.
- Messages
- 7,179
- Name
- Edward Bray
- Edit My Images
- Yes
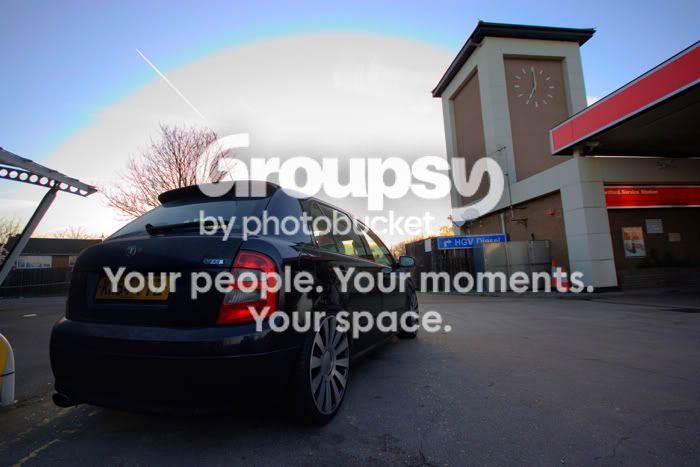
HDR'd...
Brings some sky out, but not much -- it was very blue in person.
This is the best I could get it. I even went -5 on one exposure to try and bring it out.
That is probably because you have not allowed for the sky when exposing, possibly too late to do too much about it now. When you take some single images that you may want to HDR in the future, try to protect the highlights a bit.


chris321
I like the ginger one
- Messages
- 3,574
- Name
- Chris
- Edit My Images
- Yes
If you want an even easier way to do a kind of HDR, you can do just 2 exposures. I used this for the photo below:
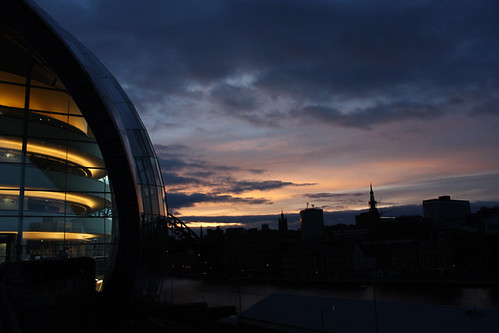
One shot got the sky how I wanted it, then another got th inside of the building (just the bit with the lights, nothing else). Then I just put one over the top of the other, and deleted the bits I didn't want. Very easy, only took a couple of minutes, and I like the result!
One shot got the sky how I wanted it, then another got th inside of the building (just the bit with the lights, nothing else). Then I just put one over the top of the other, and deleted the bits I didn't want. Very easy, only took a couple of minutes, and I like the result!

- Messages
- 5,450
- Name
- April 2008
- Edit My Images
- No
So how would you use your ND grad to recover that sky?
I'm no expert, but personally I'd go the GND route too. Soft edged, darkest portion at about 11 o'clock angled at about 20° to the horizon, just to give a bit of depth to the left hand side. Probably clip the top of the clock tower, and also that ugly lump of metal on the left. Reduce the exposure slightly too as I wouldn't really care about seeing the tread on the tyres.

- Messages
- 808
- Edit My Images
- Yes
being someone who has this problem too, I have just learned to deal with it really!
I take more street/architectural stuff atm, and using grad filters and HDR can't always been done (a tripod makes it that much harder!).
I did once manage to borrow a "spinning" grad filter (like a circular polariser but with grad filter...) that was useful in doing stuff, but sometimes by the time you lined up the shot right and the filter was moved to the right position, stuff had changed!
when I use B&W film it just doesn't cause much of a problem for me! But on digital it does make me go "incredible hulk" on anyone around me.
out of interest, when people do try to get both sky and foreground exposed in same image, what metering style do you lot tend to use? I flick through each one till i'm happy....
I take more street/architectural stuff atm, and using grad filters and HDR can't always been done (a tripod makes it that much harder!).
I did once manage to borrow a "spinning" grad filter (like a circular polariser but with grad filter...) that was useful in doing stuff, but sometimes by the time you lined up the shot right and the filter was moved to the right position, stuff had changed!
when I use B&W film it just doesn't cause much of a problem for me! But on digital it does make me go "incredible hulk" on anyone around me.
out of interest, when people do try to get both sky and foreground exposed in same image, what metering style do you lot tend to use? I flick through each one till i'm happy....
- Messages
- 808
- Edit My Images
- Yes
-Oh also, when using B&W, a circular polariser was useful too at times. didn't always create a super-amazing dramatic sky, but did give enough detail for a decent image (not just a huge white mass above some people on the street- makes it better if you want a border).
