David's Photo52 2011: Index Post 1: Weeks 44 to 46 belatedly added

Canterbury Cathedral Through the Morning Mist


Week 12 - Moderation by morganthecat, on Flickr

What:
A view of the Cathedral taken from the local university campus.
Why:
I had wanted to shoot The Great Hall of the Methodist Central Hall Westminster. It has just been refurbished but sadly this week the scaffolding was being taken down and so access wasn't possible. I was really struggling beyond some ideas of placing a glass of orange juice in amongst some alcoholic drinks. Saturday I had to go over to Canterbury early and although the mist did not match the wonderfully foggy mornings we have had all week down here in Kent I got this shot of the Cathedral and thought that as the seat of the Church of England moderation would still be applicable, just not as well as a Methodist church.
How:
I shot a 5 shot HDR +/-2 eV tonemapped in Photomatix to bring out the detail of the Cathedral amongst the mist. I took the HDR output and played around in CS3 with hue and saturation. This was an opportunity to improve my toning skills and use a much lighter palette than I normally end up with in my images. I am pleased with the depth of layers in the landscape stretching back into the mist.
Improvement:
Composition. I tried several crops but felt the letterbox was best as there was nothing of interest in the sky to balance the foreground and I wanted the eye to rest of the Cathedral. My only concern is whether the foreground is too strong and sharp that your eye doesn't lead on to the subject of the image.
Photoshop technique. My toning skills need improving but I am generally with what I have produced except for the sky. I have worked hard with the PP to make the Cathedral discernible but in doing so I have lost of the image quality. I have also possibly applied too much sharpening so the diffuse look of a typical mist shot is lost.
Lens. I only had my short zoom 12-60mm lens and think this image would have benefitted from my 50-200mm so that the Cathedral is more prominent in the shot.
Subject. AlthoughI find this a pleasing shot I should have worked harder to shoot something to ft the brief... perhaps the moderation was to be found in my saturation and PPing of the final shot :p
 
Hi, David, your delicate reshoot is much better and I really like the delicate border.

Your moderations is well framed and great depth. Nice subtle HDR. I'd agree with you that the sharp foreground does distract slightly.

Have you got a b&w version?

Cheers.
 
Hiya David,

A lovely photo for your week 12 and a different take on the theme which I like as it is thinking outside of the box.

I agree with you that the letterbox framing works well and homes one in on the actual subject, as does the darker trees below the cathedral.

Agree with you about the sharpening diffusing the misty look, although not too much as it still has the misty haze.

I have recently taken some misty morning shots, and find that it is not an easy subject to photograph (I need to do some more research on what settings are best for such photography).

What I like about your photo is the subtle HDR and I think you have done well with the application.

Cheers

Dawn :)
 
Kingsferry Bridge


Week 13 - Empty by morganthecat, on Flickr

What:
A view of the Kingsferry Bridge that connects the Isle of Sheppey to the mainland.
Why:
My original idea had been to shoot empty pockets. Then I woke up this morning and saw that there was a nice mix of cloud and sky and thought I would shoot an empty railway platform. Unfortunately the sky above Faversham station was flat and ominous so I decided to head over to the Isle of Sheppey to take some photos to submit for A Year in the Life of Sheppey.
I did shoot some photos on the platform at Swale Station (one of the most godforsaken and pitiful excuses for a railway station in the country) but they weren't particularly inspiring and Swale Station is on the mainland so I started to walk across the Kingsferry Bridge.
The railway runs along the right of this vertical lift bridge which was augmented 5 years ago by the opening of The Sheppey Crossing which can be seen on the left. Prior to the new fixed link, people wanting to cross the Swale would often suffer long delays as the bridge was lifted to allow cargo ships through.
Although the photo gives the impression that the old bridge is deserted it still surprisingly gets a lot of traffic crossing over it in spite of the new bridge.
How:
I shot a 5 shot HDR +/-2 eV tonemapped in Photomatix using details enhancer and custom settings. I took the HDR output and corrected some of the fisheye distortion to make it less fishy and finally played around in Lightroom with hue and saturation and some vignetting to draw the eye towards the Kingsferry Bridge just off centre in the shot.
Improvement:
Composition. I am pleased with this overall. The native 4/3 format of the Olympus means that you can place your horizon in the middle of the frame and avoid any distortion, whilst giving you plenty of foreground that can be cropped so that the horizon is placed on the third in the final edit. Similarly the lampost is fairly straight as it is close to the centre of the frame, but that has been at the expense of placing the bridge dead centre in the shot which might have been my preference. Curved distortion of the right hand pillars of the Kingsferry Bridge and of the pillars of The Sheppey Crossing on the left is noticeable but cannot be avoided when using this lens (unless you correct the distortion but then you lose a lot of the frame and it cease to be an ultra-wide angle shot. By cropping the bottom of the original photo distortion of the green railings is minimised and provides an acceptable leading edge. Distortion of the clouds is not generally noticeable other than in the top left hand corner. I am not sure if the vignette helps to hide this or draw your attention to it, but I could have taken the time to address this in PP. Similarly, although not a dominant feature, I should have cloned out the bridgekeeper's car parked on the pathway as the theme is Empty.
Lens. This demonstrates that with some forethought as to where the main elements will be placed, the fisheye can be used as an ultra-wide angle lens. However, it does suffer more from CA than a rectilinear UWA lens might and the HDR only accentuates that fact if you look closely at the pillars of The Sheppey Crossing.
Photoshop technique. I have applied a heavy dose of PP on this shot. Given the palette is predominantly blues and greys, I think the shot can stand up to the treatment but it is at the marmite end of the HDR scale and a more subtle approach could have been equally effective.
 
Hiya David,

Wow I really like your photo for Empty, well done :clap:

You have made good use of lead in lines and the sky looks amazing. The HDR processing has worked well for this image.

Good luck with this one being submitted into the 'A year in the life of Sheppey'.

Cheers

Dawn :)
 
Thanks Dawn

As it happens this one wasn't one of my submissions as it was taken from the mainland rather than on the island.

I went instead for this shot of the train crossing the bridge thus better illustraing the four forms of Sheppey crossings (road (x2), rail and foot) which failed this week's theme of Empty:


2011_04_03_02 Train Crossing the Kingsferry Bridge by morganthecat, on Flickr

as well as this panorama of the Hoo Peninsula taken from the shore at Queenborough:


2011_04_03_01 Hoo Peninsula by morganthecat, on Flickr

The Isle of Sheppey gets a lot of stick from the mainland locals, but I think it throws up plenty of photographic possibilities.

Now I really must take some timethis evening to see what everyone else has been up to and make some contributions with my comments - I have really been remiss on that side of things.
 
Last edited:
Hiya David,

Oh WOW the first photo in your reply really takes the cake, that is absolutely fantastic! :clap: It portrays so much of the character and the train adds life to the whole scene.

What I like most about your photos is that one can see the thought, research and passion for photography that you have and all these radiate through your images.

Well done and thank you, I am learning so much by following your project.

Cheers

Dawn :)
 
I'm a sucker for a great bridge shot and both of those fit the bill perfectly!
 
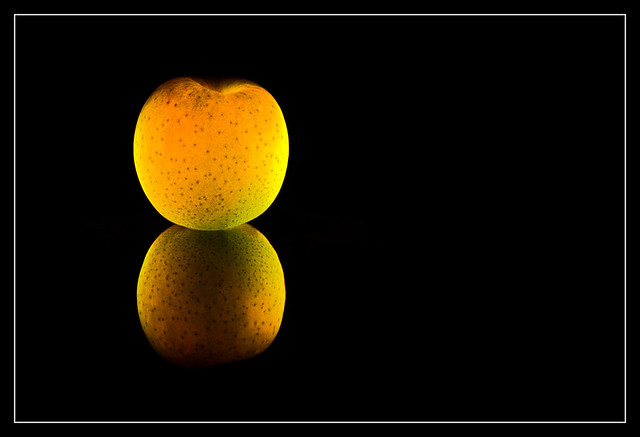
The Apple - a metaphor for an object of desire


Week 14 - Object by morganthecat, on Flickr

What:
An apple, representative of an object of desire whether it be in the Garden of Eden or an iphone 4 or ipad 2.
Why:
This is a recreation of one of the first shots that I saw with the wow factor when I first started following the King of Strobism, David Hobby's Strobist Blog... or should I say one of the first shots that I saw with the wow factor where I thought "I could shoot that". I'm a big fan of David Hobby's work, although this isn't one of David's shots but it was inspired by the strobist movement. Imitation is the greatest form of flattery.
How:
Half your apple, then in the back half cut out a YN460-II sized hole and reassemble the apple - some people use tape to do this, I used cocktail sticks to hold the two halves together. Place the apple on a polished black porcelain tile from Topps Tiles as this gives better reflections than laying on glass or a mirror, slide your flash head covered in clingfilm into the back of the apple and set your power (in this case 1/64). I triggered my flash with PT-04 wireless triggers.
PP in LR3 to boost saturation, adjust colouration, recover a blown highlight towards the right hand edge and add contrast and clarity. Finally PPed in CS3 to clone out any cocktail stick that had strayed into the shot and to tidy up the apple edge where the two halves didn't meet exactly.
Improvement:
Hmmmmm. This is probably the most difficult narrative to date. Perhaps it is easier to explain by directing you to browse through glowing apple shots on flickr. It will become apparent that there are better examples of the genre out there. This is a first attempt at this classic shot, but like water droplets or cream splashes if you are going to recreate a regularly shot photo you need to really up your game to be running with the best and not languishing at the back of the pack.
I particularly like panascape's photo with the light spill.
The daddy of them all is Masood Sharif's photo, and if you bother to look at his setup shot you will see that he has avoided inserting the flash into the apple but directs the light into the hollow. Much easier and cleaner, especially when your apples aren't big enough :)
 
Last edited:
Love the glowing apple shot, really doe give it a nice effect and well executed. In followed the flikr link and saw how it was done, quite simple really and I might give it a go as I need to experiment with my off shoe flash.

What sort ofpower were you using on the flash.
 
Great photograph and what make it for me is the reflection - icing on the cake, so to speak.

Might have to give this a try...:D

Cheers.
 
Hiya David,

Oh my word, you really do set the example for us 52'ers. Each week, without fail, you produce such a well thought out and composed presentation and I always look forward to seeing your posts.

The information and link you provide are fantastic and all add to our learning experience, so thank you kindly.

Once again, this week you have excelled with a brilliant photo and the reflection is amazing.

I have had a peek at some of the other photos via the links you added and WOW they are brilliant and your photo definitely fits with some of the top league posts.

When I get some time I will have to try this .... may be a bit too technical for me at the moment (especially as I don't have a flash gun), but is definitely a project I will add to the list to do in the near future.

I don't feel there is much I can critique on this, not having the experience of achieving such an accomplishment myself ... however my only observation would be regards the slight darkness of the reflection and think it would be fantastic if you could get an closer mirror reflection of the apple :shrug:

Well done :clap: you definitely need a pat on the back for this interpretation and photo for the theme.

Cheers

Dawn :)
 
Hi David


it may not have filled the theme of Empty but I really love the bridgel shot with the train it , absolutely great image :clap:

& the Apple shot....can't add anything to whats been said as agree with others comments , lovel the colors & refelction & the link to the theme :clap:
 
I like the train crossing image.
What PP have you done to it, it has like a CGI (is it CGI - that computer created feel) look to it?

It is a 5-shot HDR (high dynamic range, or strictly speaking I should say tone mapped - they are different, but people use the terms interchangeably) covering +/- 2 eV. A 'correctly exposed' shot either produces a nice sky but no detail in the road and rail tracks, or detail in the ground and a completely blown out sky. Alternatively look at AshMashMash's flickr for examples of his long exposure work where he takes one exposure metered for sky, and one metered for foreground and combines the two using layers in photoshop. This isn't tonemapping, and so doesn't give the overprocessed look, but instead produces an image that simply wouldn't be feasible from one shot. Essentially his approach is equivalent to using a graduated filter but with much greater control.

As for the apple, it's a nice effect, but one I'll have to wait on trying due to no off body flash unit!

Get a cheap Yongnuo YN460-II flash off eBay (~£40) and cheap eBay PT-04 wireless triggers. You will have to set your flash power manually, but most strobists like to work that way rather than using sophisticated TTL metering.

What sort of power were you using on the flash.

I always put strobist info on my flickr - 1/250 @ f/14 on camera and 1/64 power on the YN460-II, shot inside the apple.

I don't feel there is much I can critique on this, not having the experience of achieving such an accomplishment myself ... however my only observation would be regards the slight darkness of the reflection and think it would be fantastic if you could get an closer mirror reflection of the apple :shrug:

Given the lighting, and the use of a polished tile for the reflection I think this might be difficult (remember the darkness of the reflection is partly due to the fact the apple is curving 'away' from the mirror).

I will leave it for now, but I already have a reshoot of this shot in mind which if I can pull it off I am really excited about. Looking forward to our second reshoot card coming up in the not too distant future.

it may not have filled the theme of Empty but I really love the bridgel shot with the train it , absolutely great image :clap:

Thanks... and thanks to everyone for the kind comments on this week's photo. Having come back to it I am really warming to it, though I am looking forward to trying some other ideas out here.
 
gosh, I love your shots - the train bridge one is fabulous - i haven't had a chance to read everything written but will return here...

such good shots David - love love love the taxis and your reframing - apple is brill - can't say enough good things without sounding gushy and repeating myself - but keep going... following along (y)
 
Hi David, you have some great shots here. Apple shot is very good and if I could find the end of the cling film roll I'd give it a go!
 
Why is Mercury Wrong?


Week 15 - Wrong by morganthecat, on Flickr

What:
A reflection on Newton's Law of Universal Gravitation and why it fails to describe the precession of the perihelion of the orbits of the planets, especially of Mercury. Newton's Law is wrong as there is a 43 arcsecond per century dicrepancy between the calculation and the observed precession :wacky:
Why:
The idea was almost instantaneous that I wanted to approach the theme from a scientific or mathematical point of view, and that I wanted to include mathematical formulae in some form of layered montage.
The execution has been somewhat delayed and I am playing catch up. I had originally intended to write out some homework with corrections added, and then whilst doing my re-edit of my Week 14 shoot, I thought of apples and Newton and from there found from Wikipedia the shortcomings of Newton's Law of Universal Gravitation.
I am a kinesthetic learner (I learn by doing) and so I wanted a project to allow me to engage more with layers in CS3 which are still fairly alien to me.
How:
This week's photo was of handwritten formulae associated with Newton's Law of Universal Gravitation. I then inverted the colours in CS3, adjusted the levels and applied a burn brush to create a predominantly pure black background with white handwritten text. The paper on which I had written the formulae I had scrunched up as though thrown away workings, but this is not particularly apparent in the final edit. By having a pure black background I could blend using the Screen blend mode to overlay the text over my Week 14 shoot and Meredith Garstin's photo of Mercury used under a Creative Commons Licence. The principle of how to do this was taken from one of Gavin Hoey's excellent photoshop tutorials.
I played around with the layers, including duplicating the text several times to get different effects by using opacity and colorize to get to the final image.
Improvement:
Composition. This is a messy image, montages always will be complex and layered [pun intended], but I think there are two many elements going on that detracts from the narrative. But the intention of this photo, was to get me to try some new creative ideas and to that end I am pleased with what I have learnt.
 
Last edited:
Hiya David,

Wow this is absolutely fantastic ..... I love everything about it and well done on using the apple from Week 14.

I especially like how you have included the moon and also applied the burning, which has a great effect on the written text (great that it isn't all white).

The composition is spot on (y)

For me, this has to be the best photo of your project yet and I always look forward to what you produce for the weeks as I learn so much from your work.

Well done :clap:

Cheers

Dawn :)
 
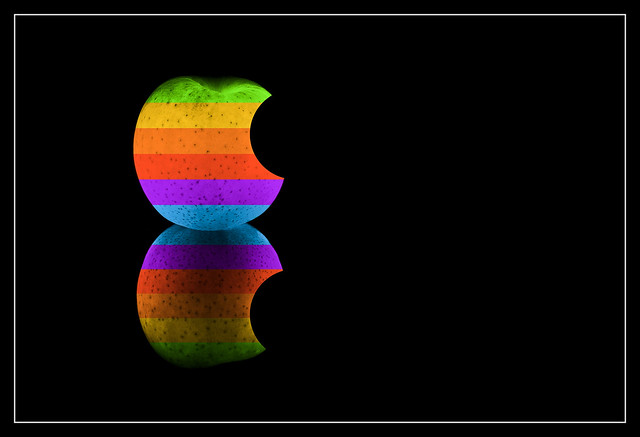
The Apple of Desire


Week 16 Re-Shoot (Week 14 - Object) by morganthecat, on Flickr

What:
An apple that has been colorized in layers to resemble the Apple logo - surely the greatest object of desire in today's society. A re-edit rather than re-shoot of my Week 14 photo.
Why:
Having presented my Week 14 shot, I knew that I wanted to reinforce the image of the apple as a metaphor for desire by colouring it to look like the Apple logo. I had also thought of re-shooting with a small snake so that the theme of desire in the Garden of Eden could have come through as well. I just haven't had the time to organize such a shoot.
How:
For the technical details of the shot itself have a look at my Week 14 photo. I then took this image and using guides in CS3 (Toolbar > View > New Guide) I sectioned up the image. I then made selections using the rectangular marquee tool (Toolbar > View > Snap To > Guide) and for each selection added a Hue/Saturation adjustment layer and selected Colorize before applying the appropriate hue and Saturation of 75. I used the Normal blend mode.
Improvement:
Original photo. The sectioning and colouring have worked very well, and the only changes would have necessitated an actual re-shoot, such as a more Apple-like apple (google the logo, it doesn't look anything like a Golden Delicious) that still had some stem and leaf remaining (not going to happen when buying from the supermarket, but as I live in Kent - known as the Garden of England - famed for its orchards and with the National Fruit Collection only just up the road, at Brogdale Farm I should have done better).
 
Last edited:
I especially like how you have included the moon and also applied the burning, which has a great effect on the written text (great that it isn't all white)...

For me, this has to be the best photo of your project yet...

Thanks Dawn, my favourite to date is still my Hard Hearted for the fact I invested so much in taking it and it was pretty much spot on what I wanted to achieve... plus none of the local judges can get their heads round it.

When I went looking for Mercury photos I was disappointed to find that Mercury does look very much like the moon. I was hoping for something more dramatic.
 
Hi David,

Wow, you have been busy. Just as I comment on week 15, you post week 16 :D

Once again well done, I think you have done well with the processing and love the colours.

Again, thank you for the details explanation of how you achieve this. I don't have CS3, but will make of note of all the tips for one day when I do.

Cheers

Dawn :)
 
Again, thank you for the details explanation of how you achieve this. I don't have CS3, but will make of note of all the tips for one day when I do.

I was thinking of you Dawn when I was playing with the layers and blending the images... your re-shot Style image is one of my favourites from the 52.

Most of my workflow is in Lightroom (particularly as it works so well with the Photomatix HDR plug-in) as I shoot raw. It's a pain to do my initial edits first, then export as a jpeg if I want to work in Photoshop. I find Lightroom conceptually easier to use as well, but occasonally I dabble in Photoshop. I am sure most of what I am doing is available in earlier versions. On this occasion I followed a Gavin Hoey tutorial that was on youtube - he has spoken at our local club several times and is a very engaging speaker. Recommended.

Hiya David,

Thank you, I'm happy to hear that my Style image is one of your favourites, I have to say that is my fav too, mainly because it took me so long to compose and was such a learning experience for me.

I have LR3, but very seldom use it ... perhaps because I find it a bit too technical at times and prefer to use more basic processing. Maybe I should learn more about it and use it more.

I will have to look at the Gavin Hoey tutorial you suggested, thanks for the recommendation.

Cheers

Dawn :)
 
Thanks as always for the comments. I'm really sorry I don't spend more time commenting and critiquing, and responding to those who have taken the time to offer comments and critique.

And well done to everyone for sticking the course so far, nearly a 1/3 of the way there!
 
iNeed


Untitled by morganthecat, on Flickr

What:
A human paradoxical illusion inspired by the paradox cube.
Why:
Another week where I knew the type of shot I wanted to take almost instantly but the execution of which has been delayed by other commitments. An attempt to create a paradoxical illusion that is inspired by the paradox cubes - a 2 dimensional illusion that invokes and breaks the 3 dimensional rules. It was also an opportunity to shoot the wonderful rape fields with a nearly clear blue sky; the paradox of agricultural over production in the UK versus global starvation - hence why I wore my iNeed t-shirt inspired by Mantis' wonderfully poignant graffiti stencil. I guess Mantis should release a new stencil with the starving child holding an iPad2, iPods are just not cool enough now.
How:
Set up the camera on the tripod and composed the background. Using the articulated screen of the Olympus E-30 (an essential piece of kit for the self-portrait photographer) I stood in the centre of the frame and using an IR remote triggered the shot after a 2 sec delay. Then repeated, but standing further back and turned to the side with the arms held to form the link. The 3 shots were then aligned in CS3 before careful use of the eraser and history brush to form the final image.
Improvement:
Composition. A good attempt but room for improvement in my positioning for the two 'rear' poses in order to create the illusion - the left hand side works well, the right hand less so as it looks more obviously photoshopped across the torso. Using the rape field to emphasise the position of the two 'rear' poses as being behind the main torso works well though; on a lawn of flat floor this may have been so obvious and failed to invoke the 3D nature of the illusion.
Shadowing. Possibly I should have attempted to create shadows so that the linked arms appear more realistic in front of the central torso. This was beyond my CS3 skills and I didn't attempt it.
Blending. My isolation of each body could be better - again a product of my inexperience with CS3.
Lighting. This image was taken at approximately 4pm in strong sunlight giving harsh shadows. Not an essential concern given the objective of the photo, but nonetheless it would have benefitted from being taken later in the day. That said, use of hard directional light does help to emphasise the illusion in particular the main shadow from the bottom centre of the image.
 
Last edited:
Excellent idea David. Couple of small points which I think would improve it are to remove the telegraph poles and lines, one of them is sprouting from your head. And there is a slight halo around your head on the centre image.
This has obviously been weel thought out (even down to clothing) and very well executed. The 3D effect really works and as you said the rape field makes it. Very well done .

Thanks Barry

Not sure what happened with the halo... I agree that it does appear to be there, but the sky is taken from the same layer as the central figure - there was no HDR or other processing that should have given rise to that.

Possibility for going further with the decluttering and cloning out the hedge row as well. I just couldn't get an angle yesterday where the field was backed purely by sky which I would have liked to do.

I won't make any amendments as my rules for the TP52 are to submit one image only once per week (I broke that in Week 5 as that was an image I really wanted to pull off). If I want to change things then it can become a subject for a re-shoot, but your comments are gratefully accepted and taken on board.
 
Dull and Grey in Herne Bay


Week 17 - Tropical by morganthecat, on Flickr

What:
A shot of the beach and pier at Herne Bay on a dull and overcast day with the globe turned to the tropical rainforests of South America as counterpoint.
Why:
What a difference a day makes - the gorgeous blue skies and warmth of a sunny Spring day when taking my Paradox shot yesterday, has all disappeared to leave a cold and miserable day on the seafront. I had hoped to take this shot on one of the brighter, sunnier days we have had this week - why travel to tropical climes when we are enjoying such wonderful weather? Well this is the answer... a cold, miserable April day. So off I went with camera and tripod under one arm, and globe under the other.
How:
Shot as a 3 frame HDR (to bring out some detail in the otherwise flat, uninteresting cloud) in blowy conditions, hence why there is some ghosting in the countries on the globe. Processing done in Photomatix and then further adjustments for clarity, sharpening, saturation, exposure etc done in Lightroom.
Improvement:
Composition. I was trying to stop the globe blowing over in one hand, and trying to shoot off the frames with the other. Consequently the composition has suffered, and the globe is further to the side of the frame than I would have liked. It was bitterly cold so I shot off the frames as soon as I could and rushed back to the car.
Overall. Not one of my better efforts, but it was shot to the brief and time to move on. A little later on I took this shot which I am much happier with as an image but in no way met this week's theme :(:


Herne Bay Pier by morganthecat, on Flickr
 
Hi, David, really like bot paradox and tropical and especially your explanations...wish I'd done the same...

Paradox, I agree, removing the poles and the bushs to the laft would improve on a well thought out and processed theme...(y)

Tropical, again well processed and composed; I really like that the globe is out of the frame. Nice and moody with dreams of being in a better part of the globe.

Cheers.
 
Think you may be doing yourself a disservice with the self-crit. Composition looks good to me and as Andy has said the globe going out of frame looks good. Even on the large image on flickr I'm having difficulty in seeing ghosting (maybe just the monitor i'm using)

Very nicely processed hdr without being obvious and no apparent haloing. The birds flying over the pier add to image and theme as if they are heading for a warmer climate.
 
Hiya David,

Wow you have been busy getting these two latest shots, which both fit their respective themes well.

Paradox: A very clever and original take .... and I like it. Thanks for the explanation of how you achieved this, which sounds quite a challenge, however I think you were successful at achieving. I agree with Colin regards the haloing and the telephone wires, however I don't find them as distracting as the shadow to the left of you (which I suppose is unavoidable when one has to consider the position of the sun). The clear blue sky and lovely yellow of the rape seed compliment each other. I can see you have given much thought to this photo and the shirt rounds it off. Well done :clap:

Tropical: Wow I can't believe you are having bad weather where you are, it is a glorious day here, clear blue sky and lovely sunshine (sorry to rub it in) :D. The HDR processing has worked well for this photo and I like the beach is bright in contrast to the dark sky which make the globe stand out. You have already mentioned about the position of the globe, which I agree could have been better positioned, but considering all the factors that were against you, I think you had done a great job. :clap:

I had to click on the second image to get a bigger picture ... it is also a lovely photo and a much calmer image than the first.

Overall you have done well on all three photos.

Cheers

Dawn :)
 
Hi, David, really like bot paradox and tropical and especially your explanations...wish I'd done the same...

Thanks Andy

Even on the large image on flickr I'm having difficulty in seeing ghosting (maybe just the monitor i'm using)

Colin, I think this may be a case of pixel peeping at 4:1 in Lightroom - a good example of the defects that we often 'know' are there but are not apparent at a viewing distance.

The birds flying over the pier add to image and theme as if they are heading for a warmer climate.

Colin, I am worried that the more 'artistic' I get with my explanations the more licence you all give me with my intentions. Agreed that the birds are appropriate to the image but I can assure you that I had no idea they were there whilst I took the photo. I was more concerned about getting back without losing my fingers to frostbite - it was bitter out yesterday. Just goes to show that a photographer should always be happy to let serendipity lend its hand.

Hi David, 2 excellent images there, well done with the processing, and the way you have brought your ideas across is excellent. (y)

Thanks Michael - great re-edit of your paradox shot. Typography is one of the hardest things to understand, I just know what I do (and don't) like and your final edit now enhances your wonderful sunset.

Paradox: A very clever and original take .... I agree with Colin regards the haloing and the telephone wires, however I don't find them as distracting as the shadow to the left of you (which I suppose is unavoidable when one has to consider the position of the sun).

I agree that such a brutal hard shadow is not pleasant and I could have deleted it out in favour of the non-shadowed field from the other layer. I consciously left it in as it served a purpose of giving some visual perspective further cementing the paradox of the image. I think it would be fair to say that I spent a long time adjusting the layers to get the paradox about right, and ran out of energy to tidy up the rest of the shot such as the shadow and the pole/wires.

Tropical:... I had to click on the second image to get a bigger picture ... it is also a lovely photo and a much calmer image than the first.

I only linked a small photo as it is not part of my 52, but it is interesting what a different feeling you get from that when the shots were taken about 15 minutes and 100 yards apart. Just goes to show you can never trust what comes out of a camera ;)
 
Hi David


I always love looking at your thread , you produce some seriously great work & Paradox & Tropical are no exceptions :clap:

Your processing is great , can't really add crit as not good at processing but I can definately learn loads from you (y)
 
Back
Top