- Messages
- 25
- Edit My Images
- Yes
Hello,
I'm a new member here and also new to film photography. I've done a bit of digital photography in the past but nothing very serious at all. I have a couple of questions that I hope you wont mind me asking on here.
Recently I've been able to make use of my fathers old Canon EOS 650 (with a 50mm lens) and I've thoroughly enjoyed getting through one film of Kodak Gold and Kodak Colour Plus in full auto mode.
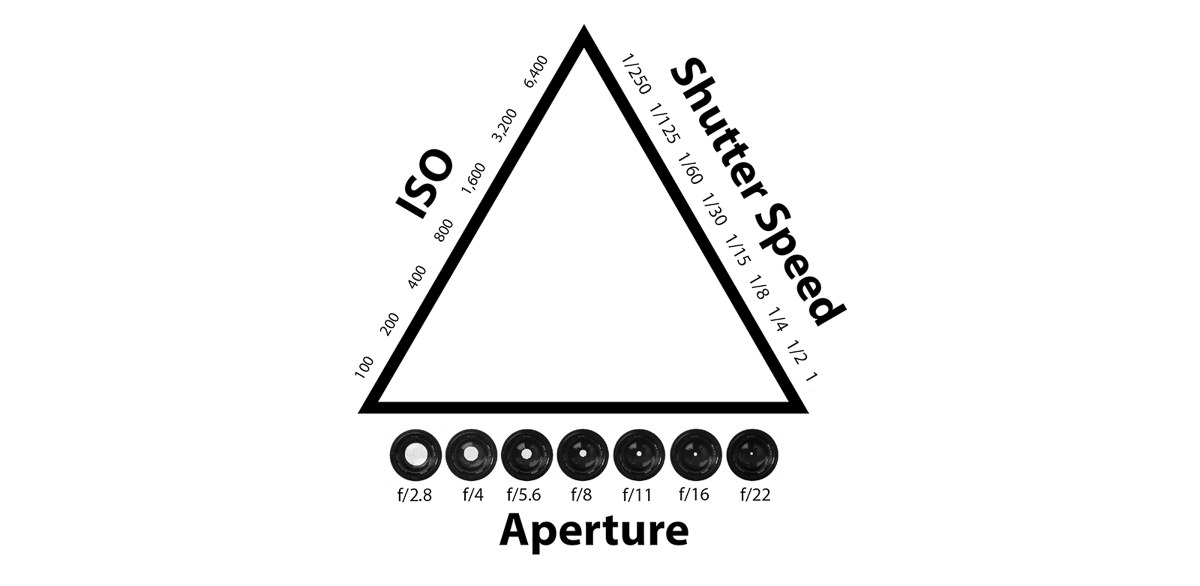
Firstly, I would like to be able to do all of my photography in manual mode so I can understand and learn how to do it properly. Are there any online guides or learning resources that anyone would recommend to a complete beginner?
Secondly, I need to get my film developed but I don't particularly want prints done. From looking around it seems that many companies offer a scanning service. I assume its common practice to have your negatives returned to you? It doesn't seem to make it clear on many websites (for example https://www.ag-photolab.co.uk/c41-process-only-35mm120220-optional-scan-463-p.asp)
Many Thanks,
WML
I'm a new member here and also new to film photography. I've done a bit of digital photography in the past but nothing very serious at all. I have a couple of questions that I hope you wont mind me asking on here.
Recently I've been able to make use of my fathers old Canon EOS 650 (with a 50mm lens) and I've thoroughly enjoyed getting through one film of Kodak Gold and Kodak Colour Plus in full auto mode.
Firstly, I would like to be able to do all of my photography in manual mode so I can understand and learn how to do it properly. Are there any online guides or learning resources that anyone would recommend to a complete beginner?
Secondly, I need to get my film developed but I don't particularly want prints done. From looking around it seems that many companies offer a scanning service. I assume its common practice to have your negatives returned to you? It doesn't seem to make it clear on many websites (for example https://www.ag-photolab.co.uk/c41-process-only-35mm120220-optional-scan-463-p.asp)
Many Thanks,
WML