Homemade Lens Callibration Tool

Messages
1,503
Name
Dale
Edit My Images
Yes
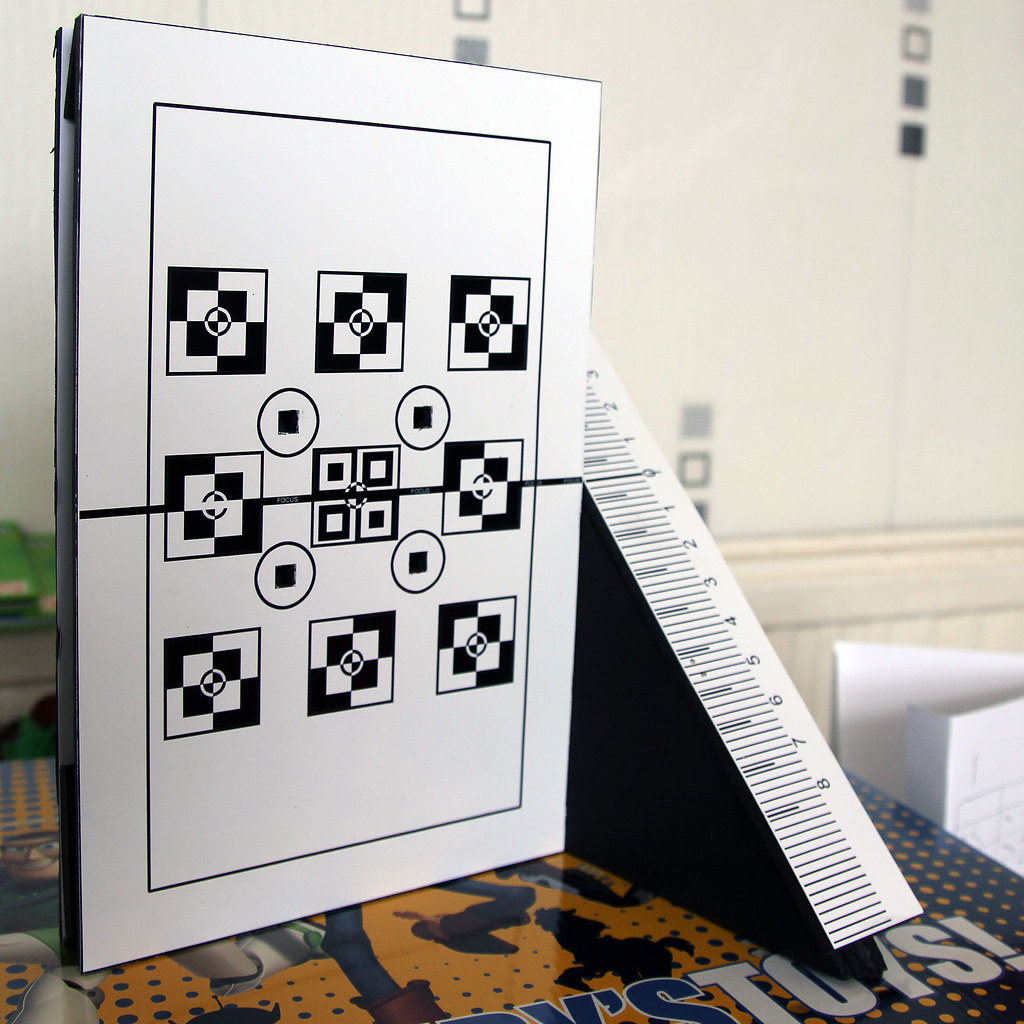
I was snowed in and a little bored today so I decided to see if I could make a lens callibration tool based upon images of a Lensalign that I had seen.
Now I know you can get the same results with a cereal box and a ruler but that wasn't going to do much for my boredom.
As you can see I kind of bodged together something that seems to do the job ok, I will test it out a bit more before I make another.
This cost me a total of £0 as I already had some scrap foamboard lying around.

mw2js.jpg
 
I made one a couple of weeks ago, works okay provided you can get enough distance for your focal length (should be a minimum of 50x focal length).

24mm minimum distance 1.25 mtrs
50mm minimum distance 2.5 mtrs
100mm minimum distance 5 mtrs
200mm minimum distance 10 mtrs
300mm minimum distance 15 mtrs
 
Sorry I just couldn't resist giving you a blue peter badge.

Just out of interest how did you print and on to what, the targets. I think it's top stuff.


2006_1189_lg.JPG
 
Sorry I just couldn't resist giving you a blue peter badge.

Just out of interest how did you print and on to what, the targets. I think it's top stuff.


2006_1189_lg.JPG

Thanks I've always wanted one of those.
I used photoshop to create some patterns then printed on glossy paper. I then stuck that to some foamboard with some permanent spray mount.
I then cut out the holes in the front board layed that over the back board and marked it with a red pen. I glued the rest together, all except the ruler (foamboard again) which is stuck on with blu-tak so I can remove it.

I'll do it again when I get some more foamboard but I'll be a bit more tidy next time.

The images I used for the front and the ruler can be downloaded from the following link just in case anyone else wants to give it a go.

http://imgur.com/JzRLQ.jpg
 
Should your camera body support AF micro adjust it allows you to fine tune the AF focussing of your lenses with that body.

You do this by focussing on a high contrast target and using the scale adjust the lens to be more accurate by a trial and error method.

One test target.
 
Been thinking of making one myself, but it seems to be just another one of those things I've been meaning to do LOL.

Fine work. I'll subscribe to this thread and keep up with you :D
 
Last edited:
Well I eventually got round to trying it out.
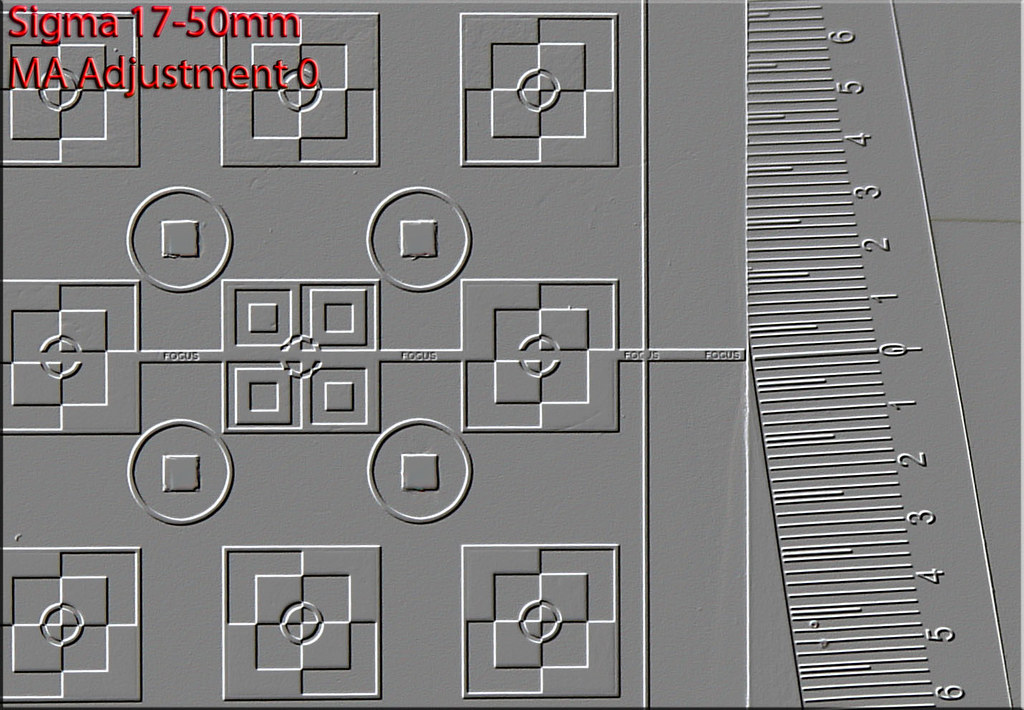
I had a go at calibrating my 85mm and as you can see the un-calibrated version is quite a bit off and the calibrated version whilst not perfect is certainly better. These were taken at f1.4 and at a distance of approximately 4m away.
The images are embossed to help identify the focus point better.


Q9hvv.jpg


kcfXD.jpg
 
Last edited:
Well, the card arrived, just waiting on the mount spray now :)
 
Well, the card arrived, just waiting on the mount spray now :)

Good luck, I never did get round to making my mk2 version as this one does the job ok.
Did you notice in post 5 I posted a link to the target image and ruler that I used, just in case you want to use that, you could of course do your own image.
Post a picture when you get it done.


Edit: Here are some more pictures of my attempt which may give you some ideas for your own build. As you can see its kind of bodged together a bit but as I said it does the job.

UqXID.jpg
 
Last edited:
Perfect timing, I've just printed your image (thanks for that !) on borderless A4 to match the A4 foamboard I got.

Thanks also for the extra images thats piecing it together in my head nicely :)

I tried a cropped version of your image to make the focus area the full A4, is that best or will it skew the ruler measurements or should I use the slightly smaller one and has the ruler correctly scaled?
 
Last edited:
Perfect timing, I've just printed your image (thanks for that !) on borderless A4 to match the A4 foamboard I got.

Thanks also for the extra images thats piecing it together in my head nicely :)

I tried a cropped version of your image to make the focus area the full A4, is that best or will it skew the ruler measurements or should I use the slightly smaller one and has the ruler correctly scaled?

What I did was resize the image to 300ppi instead of 72 which should make the whole thing A4. I then printed it all on 1 A4 sheet the focus screen is aprox 16x24cm in my version.
 
Thanks again for your help and here are some tips I found along the way for anyone trying this themselves who is as poor at crafts as I

1) Use the mount spray on the paper, not the foamboard as it warps it.
2) Mount spray stays sticky for ages, my cutting board is still sticky now half a day later.
3) Superglue dissolves the foam inner (but thankfully not the paper outside)
4) Cheap superglue can leak where you fingers are (I now have very sore fingertips, but at least they didn't actually stick!)
5) Buy white foamboard or you'll have to glue on some paper for the inner red dots (I got black because it was cheaper)
6) Get a metal ruler and GOOD knives (both my cheapie craft knives snapped so ended up just holding the blade, luckily my fingertips are like rock because of the superglue :D)
7) Find a way to cut everything straight (the ruler will probably help with this - I ended up using the edge of an old laptop screen I'd replaced) as I have wobbly bits where I thought they were stacked well and even, not so when putting the actual ruler on it its slipping.
8) If you end up using epoxy resin for glue (I ran out of superglue) then keep checking your ruler hasn't slipped!
9) If using expoy you WILL need to pin it in place (the ruler has fallen off four times now :bang:)

Still if this works (epoxy resin is still setting) then with Dale's help I've got a calibration device for £15 (plus superglue and two craft knives :eek:) instead of £60, so top marks :)
 
Last edited:
Thanks again for your help and here are some tips I found along the way for anyone trying this themselves who is as poor at crafts as I

1) Use the mount spray on the paper, not the foamboard as it warps it.
2) Mount spray stays sticky for ages, my cutting board is still sticky now half a day later.
3) Superglue dissolves the foam inner (but thankfully not the paper outside)
4) Cheap superglue can leak where you fingers are (I now have very sore fingertips, but at least they didn't actually stick!)
5) Buy white foamboard or you'll have to glue on some paper for the inner red dots (I got black because it was cheaper)
6) Get a metal ruler and GOOD knives (both my cheapie craft knives snapped so ended up just holding the blade, luckily my fingertips are like rock because of the superglue :D)
7) Find a way to cut everything straight (the ruler will probably help with this - I ended up using the edge of an old laptop screen I'd replaced) as I have wobbly bits where I thought they were stacked well and even, not so when putting the actual ruler on it its slipping.
8) If you end up using epoxy resin for glue (I ran out of superglue) then keep checking your ruler hasn't slipped!
9) If using expoy you WILL need to pin it in place (the ruler has fallen off four times now :bang:)

Still if this works (epoxy resin is still setting) then with Dale's help I've got a calibration device for £15 (plus superglue and two craft knives :eek:) instead of £60, so top marks :)

£15!! :) still very cheap though and also a nice little project, I'm lucky in that I work in an Art & Design dept so materials cost me nothing :clap:
I think I used epoxy and spray mount for mine apart from the ruler which I just stuck with blue tack. I forgot about the blue tack until I went to pick it up by the ruler just now. I think my thinking was it would be easier to store away without the ruler being permanently fixed.
Now watch your lenses will be spot on now with no need for calibration :)
 
I knocked my mark one vesion out a shoe box, but am thinking about a nice one out of foam board. Any excuse to make something! Where did you buy the foam board from John?
 
Euan, I got my foamboard from here, but its black.

The rod dots are for this: link

Hopefully I'll have some results and an image up tomorrow (got to work tonight - grr)
 
Last edited:
haha, you're right - it was sharper on 0!

Anyway here is the chart finished and my first result:

 
Back
Top