How does exposure compensation affect image quality ?

Messages
2,530
Name
Keith
Edit My Images
Yes
I don't really understand Exposure compensation, if you raise the ISO you can get poorer quality images but the EC seems to do the same.

TIA for any advice.
 
Exposure compensation is used to alter the cameras metered values. Sometimes a cameras metering system will be fooled by a scene and try to exposure it incorrectly ie under expose or over expose.

A good example is photographing snowy conditions. The cameras metering system will try to exposure the scene as 19% grey so it will under exposure the scene because the scene is too light. By adding positive exposure compensation the white snow is exposed properly.

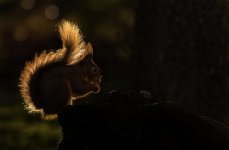
Its also useful to capture a high or low key photo or backlit subjects. Normally a camera will capture backlit scenes lighter so adding negative exposure compensation will darken the exposure to capture subject rim lighting with an overall dark photo.

For me exposure compensation will alter ISO as I use manual mode with auto ISO. I like to have full control of shutter speed and aperture as I’m not too worried about ISO as my camera can handle ISO up to 3200/6400 without too much of an issue (note I mainly photograph wildlife).

Example of positive exposure compensation added to get a ‘good’ exposure in snowy conditions.

68219C7B-0F27-4EAC-A1E0-C608A6440178.jpeg
Example of negative exposure compensation added to capture a low key backlit photo.

FFED0130-625A-46E3-831C-8B4E611275D7.jpeg

Both of these scenes wouldn’t have been metered by the camera for what I was trying to capture so exposure compensation allowed me to override the cameras metered settings to get the photos I wanted to get.
 
Last edited:
Normally the camera is calculating exposure assuming "middle" grey. Exposure compensation is for use when you know what you're pointing your camera at is not middle grey. It could be extra white, like a snowy mountain, or it could be extra black, like a dark theatre stage. Should not impact image quality at all, just helps you get the exposure correct in the camera.
 
Exposure compensation changes whichever variable the camera is in control of at the moment... I.e. if auto ISO is enabled it will change the ISO if it can (not already at a limit). If auto ISO is not enabled (or at a limit) it will change the shutter speed in aperture priority, or the aperture in shutter priority. If the camera does not have control of any variable it will only shift the exposure meter reading.

Whether that results in a better, or worse, quality image really depends on the situation; and the camera make/model to some extent (ISO invariant or not).
 
Exposure compensation is used to alter the cameras metered values. Sometimes a cameras metering system will be fooled by a scene and try to exposure it incorrectly ie under expose or over expose.

A good example is photographing snowy conditions. The cameras metering system will try to exposure the scene as 19% grey so it will under exposure the scene because the scene is too light. By adding positive exposure compensation the white snow is exposed properly.

Its also useful to capture a high or low key photo or backlit subjects. Normally a camera will capture backlit scenes lighter so adding negative exposure compensation will darken the exposure to capture subject rim lighting with an overall dark photo.

For me exposure compensation will alter ISO as I use manual mode with auto ISO. I like to have full control of shutter speed and aperture as I’m not too worried about ISO as my camera can handle ISO up to 3200/6400 without too much of an issue (note I mainly photograph wildlife).

Example of positive exposure compensation added to get a ‘good’ exposure in snowy conditions.

View attachment 356554
Example of negative exposure compensation added to capture a low key backlit photo.

View attachment 356555

Both of these scenes wouldn’t have been metered by the camera for what I was trying to capture so exposure compensation allowed me to override the cameras metered settings to get the photos I wanted to get.
Right, so it's not about adding light to a whole picture like ISO, more a case of achieving he right colour tones and natural outcome?
 
What the camera adjusts with Exposure Compensation/Value depends on what settings the camera is to.

This online camera simulator can help to understand how changing the Aperture, Shutter and ISO in different camera modes adjust other settings to remain with what the 'camera' measures as the correct exposure. Unfortunately it does not recreate the Exposure Compensation, and that has to be done manually.

There used to be a camera simulator that included an EV setting, but I can't find it online any :( more. Here's links to some more camera simulators.

To the OP, small changes to the ISO in the lower range (100-1600) should have minimal effect with most modern cameras over quite a large range. Most changes in EV are usually not large tgough, maybe 1 stop at most for a lot of people. Some people are more vigilant to increases in noise than others though. ;)

Changing ISO maybe should be the last thing to change though, if changing the Aperture or the Shutter does not have a detrimental affect on the image.

The times I use Auto ISO to compensate is when walking around on holiday 'snapping'. I set the camera to Aperture Priority, the shutter to a minimum speed before it starts altering the ISO. I will also use Exposure Compensation depending on the scene, and doing that will alter the shutter speed, unless that would force the shutter speed lower than the minimum shutter speed I set, and than it would adjust the ISO. I also set the Auto ISO to a set range. because above ISO 3200 I would not be happy with the noise from my camera. Rarely happens, because I have usually doing this in the day time.
 
Right, so it's not about adding light to a whole picture like ISO, more a case of achieving he right colour tones and natural outcome?
It’s just a way of manually overriding the cameras automatic metering as in certain circumstances it will incorrectly expose it due to the way the camera meters a scene as mid grey.
 
Exposure compensation changes whichever variable the camera is in control of at the moment... I.e. if auto ISO is enabled it will change the ISO if it can (not already at a limit). If auto ISO is not enabled (or at a limit) it will change the shutter speed in aperture priority, or the aperture in shutter priority. If the camera does not have control of any variable it will only shift the exposure meter reading.

Whether that results in a better, or worse, quality image really depends on the situation; and the camera make/model to some extent (ISO invariant or not).
So better to be in manual and keep control of the main factors?
 
So better to be in manual and keep control of the main factors?
Depends on circumstances. Sometimes light levels change quickly and sometimes you want to be fully in control possibly including lighting. If you know canon dslrs you will probably want to keep +2/3 as your generic starting point, but then your subjects may vastly differ
 
What the camera adjusts with Exposure Compensation/Value depends on what settings the camera is to.

This online camera simulator can help to understand how changing the Aperture, Shutter and ISO in different camera modes adjust other settings to remain with what the 'camera' measures as the correct exposure. Unfortunately it does not recreate the Exposure Compensation, and that has to be done manually.

There used to be a camera simulator that included an EV setting, but I can't find it online any :( more. Here's links to some more camera simulators.

To the OP, small changes to the ISO in the lower range (100-1600) should have minimal effect with most modern cameras over quite a large range. Most changes in EV are usually not large tgough, maybe 1 stop at most for a lot of people. Some people are more vigilant to increases in noise than others though. ;)

Changing ISO maybe should be the last thing to change though, if changing the Aperture or the Shutter does not have a detrimental affect on the image.

The times I use Auto ISO to compensate is when walking around on holiday 'snapping'. I set the camera to Aperture Priority, the shutter to a minimum speed before it starts altering the ISO. I will also use Exposure Compensation depending on the scene, and doing that will alter the shutter speed, unless that would force the shutter speed lower than the minimum shutter speed I set, and than it would adjust the ISO. I also set the Auto ISO to a set range. because above ISO 3200 I would not be happy with the noise from my camera. Rarely happens, because I have usually doing this in the day time.
Interesting. I set an ISO limit for the same reason which on my current bridge camera is a paltry 400, so in theory for general shots use Aperture priority, and for faster moving subjects use shutter priority (with the ISO fixed)
I need to learn this because tomorrow I unpack a Panasonic Lumix G80 and that's gonna be a big step up. A big investment for me, so I need to learn a few things. I have 14 days to return it if I don't like it, but if I don't know what I'm doing I won't know what it's capable of.
 
Normally the camera is calculating exposure assuming "middle" grey. Exposure compensation is for use when you know what you're pointing your camera at is not middle grey. It could be extra white, like a snowy mountain, or it could be extra black, like a dark theatre stage. Should not impact image quality at all, just helps you get the exposure correct in the camera.
It's more technical than I imagined, and not what I assumed.
 
It's more technical than I imagined, and not what I assumed.
it might be technical but it's easy to use. the best thing is to practice. for example, find a white wall and take a picture. you'll find the image comes out too dark. then see exposure compensation +1 and you will see it brightens up and looks better. experiment with the exposure compensation until it's looking right. that's basically it.
 
So better to be in manual and keep control of the main factors?
Doesn't matter what mode you're in so long as you are paying attention to what the camera sets for all three parameters. And you know how to tweak each of them to get the result you want.

It's more technical than I imagined, and not what I assumed.
It doesn't have to be technical. Look at the effect changing different settings make and remember them.When you turn one dial one way the picture gets darker, turn it the other way it gets brighter. No need to know why.

This insistence on understanding what all the technical stuff means in a scientific way is what baffles people and stops them taking better photos. Don't listen to it! K.I.S.S. ;)

it might be technical but it's easy to use. the best thing is to practice. for example, find a white wall and take a picture. you'll find the image comes out too dark. then see exposure compensation +1 and you will see it brightens up and looks better. experiment with the exposure compensation until it's looking right. that's basically it.
(y)
 
Firstly, experiment and have fun - pick differing subjects in varying lighting conditions until you have a good grasp of how to use your camera.
Like others have said, you do not need to understand the techy bits for proficient use, after all many of us drive cars without understanding the inner workings of the combustion engine.
Personally I set my camera to manual (with auto ISO) so that I can control aperture and shutter speed for my main subject which is wildlife. I nearly always have +1 exposure correction for shooting birds against a bright sky !
 
It's more technical than I imagined, and not what I assumed.
While 'behind the scenes' the workings of a digital camera are highly technical, using them doesn't have to be.
Camera manufacturers spend a lot of time and money developing systems which will analyse the scene and determine the 'appropriate' exposure value - and then use that to adjust Aperture / Shutter / ISO depending on which mode you are in.
All 'Exposure Compensation' does is AFTER the camera has calculates it's exposure value, to adjust it by your setting - then carry on as before.

@rob-nikon has given a couple of good examples of when you would want to do this - but there is also a third situation, which is when you are concerned about the the histogram (and this is perhaps a bit more technical).
Camera sensors can capture a limited range of brightness (called the Dynamic Range) - above this, you just get white, below, you just get black.
Sometimes you want to adjust the cameras exposure value to avoid this occurring - an example would be if you have a scene where there is a smallish very bright area in the scene.
If that bright area is something you want to preserve detail in (EG a swans feathers), then you might use negative exposure compensation to reduce the reduce the overall brightness, to prevent the swan becoming just a white blob.
If the bright area is the Sun, on the other hand, you might do the opposite, and use positive exposure compensation - the Sun will be a white blob regardless, so you can safely let that be white, and brighten the rest of the image.
 
So better to be in manual and keep control of the main factors?

I'd say no because in manual you potentially have to set everything, the aperture, the shutter speed, the ISO and keep an eye on the overall exposure, get the composition right and decide the best time at which to press the shutter button. That's a lot to do if your subject might get bored and walk away.

Personably I'm happiest in aperture priority but keeping an eye on the shutter speed and when falling light causes the shutter speed to drop too low I switch to manual and set both the aperture and the shutter speed and let the ISO float up and down leaving me to set the composition and decide when to press the button and of course decide if I should dial in compensation or not :D
 
@Crotal Bell maybe you could just look at EV Exp. Comp. wheel as a creative tool.

99% of the time camera metering should work fine, giving you the perfect exposure. But maybe HighKey or LowKey is more your thing. Play with it!
 
Well explained above - my 2cents..... depending on how you set your camera up - it can become the only dial you ever need to change.
Learning how your camera exposes for scenes in any 'auto' mode ,be it aperture, shutter or full auto is good to learn - with EV you are just overriding this by making the picture brighter or darker - depending on your desired result - to override what the camera sees as the correct exposure.
 
So better to be in manual and keep control of the main factors?
Not really, as the camera's metering system can change the shutter speed, aperture and ISO settings a lot quicker and more accurately (most of the time) than you can if you are in changing lighting conditions (a music concert with rapidly changing stage lighting, or outdoors on a day with lots of patchy clouds scudding over the sun, etc.). Using exposure compensation allows you to make an image consistently darker or brighter while still enjoying the convenience of using the auto exposure settings on the camera.

As others have said, EV Comp is most commonly used in situations where 'tricky' lighting conditions would fool the camera's metering system, such as snow or light sand or strongly backlit subjects. Learning how, and when, to use EV Comp is just another part of the art of photography, and it's well worth learning. One of the most important tips is to remember to turn it off once you've finished using it though! Not that any of us would be daft enough to do that, would we chaps? :whistle:
 
Last edited:
Right, so it's not about adding light to a whole picture like ISO, more a case of achieving he right colour tones and natural outcome?
Ironically the best way to see the effect of over or under exposure is on the screen in your camera. Try it in a scene that has light and dark and expose manually for each. You will hear ISO mentioned a lot by photographers on YT, particularly when the light is a problem.
 
Last edited:
Interesting. I set an ISO limit for the same reason which on my current bridge camera is a paltry 400, so in theory for general shots use Aperture priority, and for faster moving subjects use shutter priority (with the ISO fixed)
I need to learn this because tomorrow I unpack a Panasonic Lumix G80 and that's gonna be a big step up. A big investment for me, so I need to learn a few things. I have 14 days to return it if I don't like it, but if I don't know what I'm doing I won't know what it's capable of.
The G80 is a lovely camera.
If you have used any Lumix, the menu will feel familiar.
If you buy any extra lenses, make sure you get the Power OIS and not the Mega OIS, as using the Power OIS lenses will give you dual stabilisation, ie the stabilisation in the body will work together with the stabilisation in the lens, If you use Mega OIS lenses, you will only have the lens stabilisation, If you use a lens without stabilisation, you will have the body stabilisation.
 
Firstly, experiment and have fun - pick differing subjects in varying lighting conditions until you have a good grasp of how to use your camera.
Like others have said, you do not need to understand the techy bits for proficient use, after all many of us drive cars without understanding the inner workings of the combustion engine.
Personally I set my camera to manual (with auto ISO) so that I can control aperture and shutter speed for my main subject which is wildlife. I nearly always have +1 exposure correction for shooting birds against a bright sky !
That makes sense given the results I get when shooting birds against the skyline.
 
While 'behind the scenes' the workings of a digital camera are highly technical, using them doesn't have to be.
Camera manufacturers spend a lot of time and money developing systems which will analyse the scene and determine the 'appropriate' exposure value - and then use that to adjust Aperture / Shutter / ISO depending on which mode you are in.
All 'Exposure Compensation' does is AFTER the camera has calculates it's exposure value, to adjust it by your setting - then carry on as before.

@rob-nikon has given a couple of good examples of when you would want to do this - but there is also a third situation, which is when you are concerned about the the histogram (and this is perhaps a bit more technical).
Camera sensors can capture a limited range of brightness (called the Dynamic Range) - above this, you just get white, below, you just get black.
Sometimes you want to adjust the cameras exposure value to avoid this occurring - an example would be if you have a scene where there is a smallish very bright area in the scene.
If that bright area is something you want to preserve detail in (EG a swans feathers), then you might use negative exposure compensation to reduce the reduce the overall brightness, to prevent the swan becoming just a white blob.
If the bright area is the Sun, on the other hand, you might do the opposite, and use positive exposure compensation - the Sun will be a white blob regardless, so you can safely let that be white, and brighten the rest of the image.
Thank you
 
I'd say no because in manual you potentially have to set everything, the aperture, the shutter speed, the ISO and keep an eye on the overall exposure, get the composition right and decide the best time at which to press the shutter button. That's a lot to do if your subject might get bored and walk away.

Personably I'm happiest in aperture priority but keeping an eye on the shutter speed and when falling light causes the shutter speed to drop too low I switch to manual and set both the aperture and the shutter speed and let the ISO float up and down leaving me to set the composition and decide when to press the button and of course decide if I should dial in compensation or not :D
I'm forced to control the ISO with my bridge camera, because it needs to stay so low. That won't be the case with the new gx 80 I guess
 
Not really, as the camera's metering system can change the shutter speed, aperture and ISO settings a lot quicker and more accurately (most of the time) than you can if you are in changing lighting conditions (a music concert with rapidly changing stage lighting, or outdoors on a day with lots of patchy clouds scudding over the sun, etc.). Using exposure compensation allows you to make an image consistently darker or brighter while still enjoying the convenience of using the auto exposure settings on the camera.

As others have said, EV Comp is most commonly used in situations where 'tricky' lighting conditions would fool the camera's metering system, such as snow or light sand or strongly backlit subjects. Learning how, and when, to use EV Comp is just another part of the art of photography, and it's well worth learning. One of the most important tips is to remember to turn it off once you've finished using it though! Not that any of us would be daft enough to do that, would we chaps? :whistle:
I started experimenting with this a couple of days ago and yesterday I took photos completely forgetting that exposure compensation was still on plus two from the previous day :)
 
I'm forced to control the ISO with my bridge camera, because it needs to stay so low. That won't be the case with the new gx 80 I guess

I think it's the G80 you're getting? The SLR styled one? The GX80 is the RF styled one.

My GX80 has auto ISO and exposure compensation in all the usual modes but in manual although you get auto ISO you do not get the ability to dial in exposure compensation. I'd expect the G80 to be the same but you never know so you'll have to double check.
 
The G80 is a lovely camera.
If you have used any Lumix, the menu will feel familiar.
If you buy any extra lenses, make sure you get the Power OIS and not the Mega OIS, as using the Power OIS lenses will give you dual stabilisation, ie the stabilisation in the body will work together with the stabilisation in the lens, If you use Mega OIS lenses, you will only have the lens stabilisation, If you use a lens without stabilisation, you will have the body stabilisation.
Oh that's just great, I bought the camera second hand and I needed to get a lens. Just looked and its mega OIS !
so now i can't try out the in body stabilisation!
 
I think it's the G80 you're getting? The SLR styled one? The GX80 is the RF styled one.

My GX80 has auto ISO and exposure compensation in all the usual modes but in manual although you get auto ISO you do not get the ability to dial in exposure compensation. I'd expect the G80 to be the same but you never know so you'll have to double check.
Probably will be the same as it's like that on the FZ82 also. I'll be unpacking and charging it all up after lunch.
 
I don't really understand Exposure compensation, if you raise the ISO you can get poorer quality images but the EC seems to do the same.

TIA for any advice.
The problem here is you’ve heard a ‘truism’ and conflated correlation and causation.

Image quality is a function of sensor, lens and the clarity of the light reflecting off your subject.

The other thing that happens in camera is noise introduced when the signal is amplified (ISO raised) or indeed during post when an image is lightened.

But importantly, the root cause of any of that noise isn’t whether we raise the ISO, or in processing. It’s the actual lack of light reflecting off the subject.

In 2022 new photographers are disappointed in the IQ of images shot in conditions where photography was literally impossible 20 years ago.

There are ways to handle that better than others, but at the end of the day, you have to accept that you can’t expect a bright clear image shot at 3pm in October that you’d get at noon in July.

Understanding the fundamental quality of light will make you a much better photographer that agonising over the quantity of it.
 
Oh that's just great, I bought the camera second hand and I needed to get a lens. Just looked and its mega OIS !
so now i can't try out the in body stabilisation!
Don't worry too much. When you get the kit give it a try and I think you'll be impressed.

One thing to do is to see the lowest shutter speed you can get sharp shots with. I'm betting the IS will be very good and you'll be able to get sharp pictures at double digit shutter speeds but if this is the case remember that live subjects such as birds and squirrels and the like will need a faster shutter speed to stop subject movement blur.

In the old days with Canon DSLR's I was happiest with shutter speeds equalling or exceeding the focal length. With your 100-300mm lens on a Canon DSLR I'd convert that to FF equivalent and that would mean 1/150 at the shorter end and 1/600+ at the longer end. With your camera and lens and IS you'll very likely not need 1/600 or anything like it unless it's to freeze fast action. Lower shutter speeds could well mean a lower ISO so good IS will be a help.
 
Last edited:
Oh that's just great, I bought the camera second hand and I needed to get a lens. Just looked and its mega OIS !
so now i can't try out the in body stabilisation!
The Mega OIS is very good, but in does not play with the in body OIS, so don't worry too much.
If you want to try the inbody stabilisation just to see if it is working, se if you can borrow a unstabilised Olympus lens just to test it with, or a Power OIS to test with, though that is harder to see.

When you get it charged, reset all the settings, as there is a lot you can customise, if the previous owner has done that, you may find things don't quite go as you expect.
Download the manual and look at one thing at a time, although it does say "Please read these instructions carefully before using this product" All 338 pages :)
It is a very easy manual to understand, and the PDF has links to the relevant pages, look through the contents for the topic you want.
It's probably impossible to test a non stabilised lens, however, the camera was listed as "mint, no marks 10/10" so should be good. If I'm happy with the results over the weekend I'll contact the store on Monday and explain the situation. I'm sure the stabilisation will be covered by the 12 month warranty as the camera is being sold as fully working.
 
Hopefully you are now OK with exposure and exposure compensation but this may help:

EXPOSURE: Simplified & non-technical explanation.

The first thing to realise is that the light falling on a scene determines what the exposure should be, the light reflected from a scene varies according to what is doing the reflecting. As camera meters measure reflected light this can cause problems. If you were to measure the light falling on the scene, using an incident light reading, you would not have to worry about adjusting exposure for different scenes which reflect different amounts.

Your camera is taught that all scenes reflect 18% of the light falling on them (Digital cameras may be taught that it is 14% or 12% depending on the camera but I will continue with 18%)

First consider taking a picture of a landscape which, on average, is reflecting 18% of the light falling on it.

When your camera is pointed at the landscape it thinks ' That scene must be reflecting 18% of the light falling on it so I need to set an exposure to suit that light. '

If the light gets brighter the camera thinks ' That scene is still reflecting 18% but it is brighter now so the sun must have come out so I need to reduce the exposure to suit the new brighter light '

If the light gets dimmer the camera thinks ' That scene is still reflecting 18% but it is darker now so the sun must be behind a cloud so I need to increase the exposure to suit the new dimmer light'

So far so good but what about scenes which reflect more than 18% such as snow.

When your camera is pointed at the snow scene it thinks ' That scene must be reflecting 18% of the light falling on it but it is very bright so it must be very sunny so I need to reduce the exposure to suit the very bright light '

This means that, although the camera meter shows the exposure as correct, it has actually reduced the exposure and will cause the white snow to be grey.

A similar thing occurs when you photograph a very dark scene, a black horse for example.

Your camera thinks ' That scene must be reflecting 18% of the light falling on it but it is very dark so it must be very overcast so I need to increase the exposure to suit the very dim light'

This means that, although the camera meter shows the exposure as correct, it has actually increased the exposure and will cause the black horse to be grey.

Having read and hopefully understood all that, many digital cameras have an in-built library of shots which your shot is compared with, the camera can then think 'OK that shot is very like the snow shot that I have in my library so I will overexpose it a bit' I am only familiar with my Nikon and that compares shots with its library when it is in Matrix metering mode and not in the other modes.
 
In 2022 new photographers are disappointed in the IQ of images shot in conditions where photography was literally impossible 20 years ago.
Good though, ain't it? :D
 
your new lumix may hav a live view or wysiwyg viewfinder so you should be able to see the effect of adding or subtracting compensation, this is where mirroless cameras come into there own , especially for photographing birds in Flight
 
your new lumix may hav a live view or wysiwyg viewfinder so you should be able to see the effect of adding or subtracting compensation, this is where mirroless cameras come into there own , especially for photographing birds in Flight

Ah, that reminds me of something about dof in the evf. My Panasonic cameras only show the dof as you stop down in manual exposure mode and in the others they show the scene as if the lens is wide open. I'd be surprised if the G80 is different.
 
Back
Top