
- Messages
- 423
- Edit My Images
- No
A few people have asked me recently how I do my cloning technique, so thought I would put down a tutorial here. The images I used have been taken quickly (around 5 minutes tops) and so I haven't really concentrated on image quality rather than simply getting the images online for the tutorial.
Okay, so you need to get your image in your mind now and how you want the final result to be - where all the clones are sitting, standing etc. Any objects etc (best to try without
objects initially as these do take some thought!).
Meter your shot and ensure you are NOT shooting in RAW. You do not want to be editing each individual frame at this stage. Remeber the settings and then set your camera to manual
with these settings. The camera obviously needs to be mounted on a tripod and take a test shot to ensure you have your focus set. Make sure then the focus is set to manual also.
Now when you're happy change the camera to timer delay shot. Depending on the model of camera this should give you around 10 seconds to get into place - remember this when figuring
out where you are going to be!
Right then! Take the first shot. Think about your placements and then quickly move into place and pose for the camera! Then repeat for as many different poses as you want. In my
quick (very quick!) example, I chose to have three different poses and actually changed shirt etc for the effect!
Once you are happy with your shots then its off to the computer and Adobe PhotoShop CS2 (my example).
Load all pictures into PS - again in my example it means I have three.
Image 1:

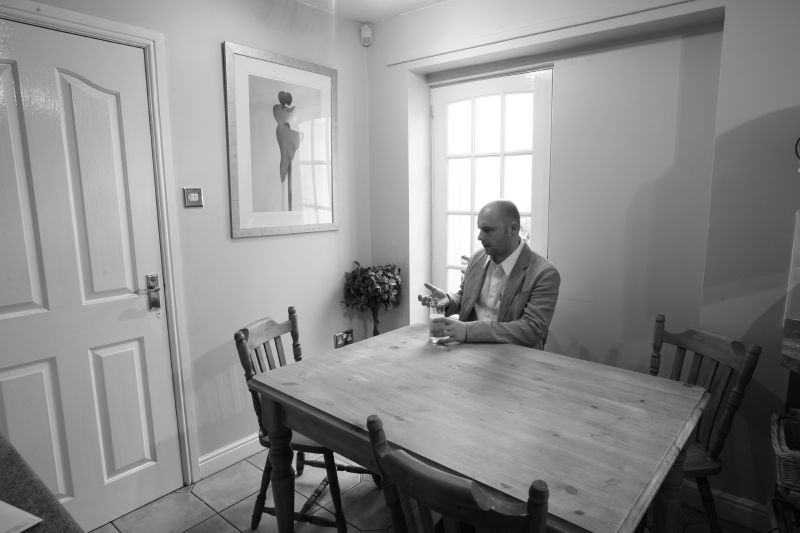
Image 2:
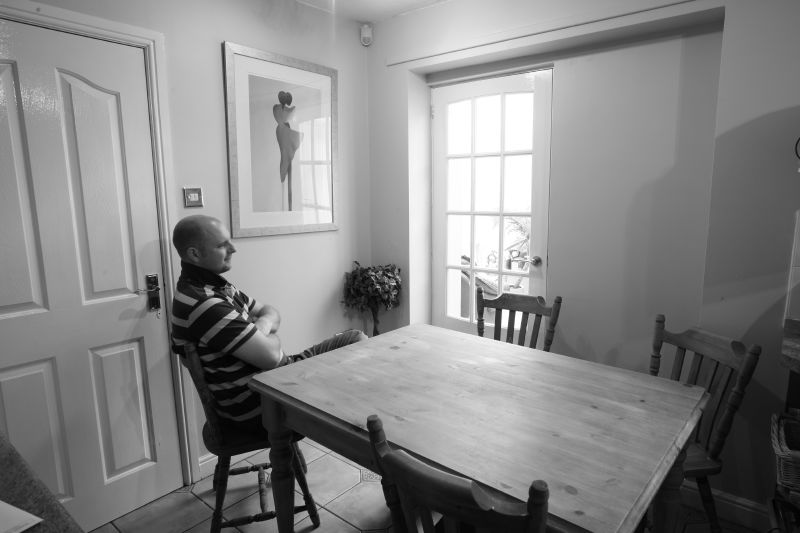
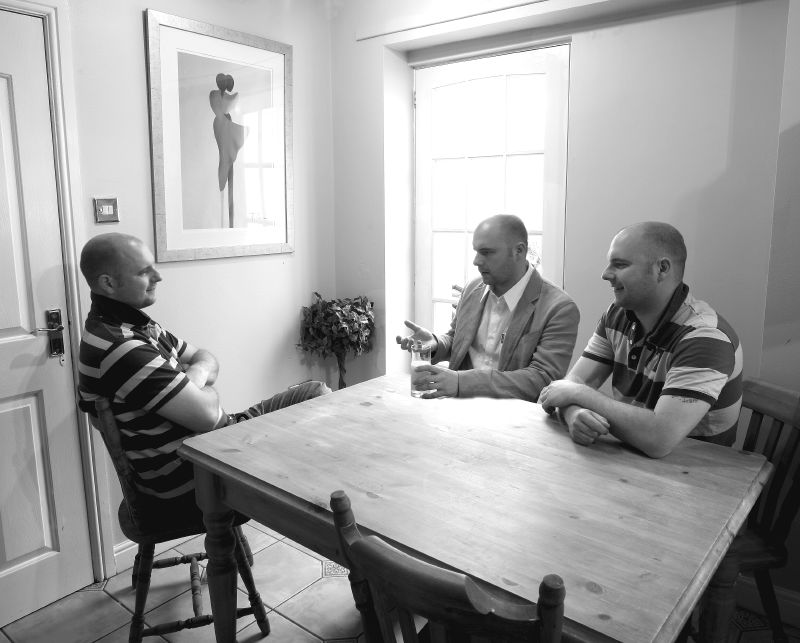
Image 3:
Use the Move Tool (V) and go to the first image. Press and hold SHIFT and move this image onto the top of another image. This will create a Layer 1 in the other image and this image
with multiple layers has become our working image.
Repeat with the next images adding them as layers to the working image. Once you have all your images as layers on the working image, then you can close them all so you only have the
working image open.
Your original image should be called the Background image and then above it Layer 1, Layer 2 etc, etc. Click on Layer 1.
At the bottom of the layers details you will see various icons. The square was a circle in it is "Add Layer Mask" and this is our friend. Click on it and a white box appears beside
Layer 1.
Above it you will see the colour tab - ensure that the top colour is Black and the bottom colour is White. Double click on each colour to set them if not.
Now if you have a Layer 2 and above, click on the eye(s) so that it is only Layer 1 and Background that have eyes. You can only view these two layers at the moment.
Select the Brush tool and make the size about 60. Roughly where you are in the layer below (in this case, the Background layer) start brushing. You should see the layer below coming
through. Try not to get the edges of you just yet but the middle bits - the edges may well be a different shade because of the lighting so we can erase them out after brushing using
the eraser tool.
When you are happy with the clone then click on the eye of Layer 2 and Add Layer Mask again - repeat as above only this time, you are adding in the layer below (Layer 1) which now has
the two clones in - so your adding both clones again. You can be much rougher with the brush though.
I only put three clones in this image but obviously you just keep going until you're done!
When finished then I click on Layer and flatten image and you now have a single cloned layer.
You can now play around with the image as you would any other (curves, levels, crop etc) and hey presto, you're done!
Now lets see what your creativity does ...
Okay, so you need to get your image in your mind now and how you want the final result to be - where all the clones are sitting, standing etc. Any objects etc (best to try without
objects initially as these do take some thought!).
Meter your shot and ensure you are NOT shooting in RAW. You do not want to be editing each individual frame at this stage. Remeber the settings and then set your camera to manual
with these settings. The camera obviously needs to be mounted on a tripod and take a test shot to ensure you have your focus set. Make sure then the focus is set to manual also.
Now when you're happy change the camera to timer delay shot. Depending on the model of camera this should give you around 10 seconds to get into place - remember this when figuring
out where you are going to be!
Right then! Take the first shot. Think about your placements and then quickly move into place and pose for the camera! Then repeat for as many different poses as you want. In my
quick (very quick!) example, I chose to have three different poses and actually changed shirt etc for the effect!
Once you are happy with your shots then its off to the computer and Adobe PhotoShop CS2 (my example).
Load all pictures into PS - again in my example it means I have three.
Image 1:
Image 2:
Image 3:
Use the Move Tool (V) and go to the first image. Press and hold SHIFT and move this image onto the top of another image. This will create a Layer 1 in the other image and this image
with multiple layers has become our working image.
Repeat with the next images adding them as layers to the working image. Once you have all your images as layers on the working image, then you can close them all so you only have the
working image open.
Your original image should be called the Background image and then above it Layer 1, Layer 2 etc, etc. Click on Layer 1.
At the bottom of the layers details you will see various icons. The square was a circle in it is "Add Layer Mask" and this is our friend. Click on it and a white box appears beside
Layer 1.
Above it you will see the colour tab - ensure that the top colour is Black and the bottom colour is White. Double click on each colour to set them if not.
Now if you have a Layer 2 and above, click on the eye(s) so that it is only Layer 1 and Background that have eyes. You can only view these two layers at the moment.
Select the Brush tool and make the size about 60. Roughly where you are in the layer below (in this case, the Background layer) start brushing. You should see the layer below coming
through. Try not to get the edges of you just yet but the middle bits - the edges may well be a different shade because of the lighting so we can erase them out after brushing using
the eraser tool.
When you are happy with the clone then click on the eye of Layer 2 and Add Layer Mask again - repeat as above only this time, you are adding in the layer below (Layer 1) which now has
the two clones in - so your adding both clones again. You can be much rougher with the brush though.
I only put three clones in this image but obviously you just keep going until you're done!
When finished then I click on Layer and flatten image and you now have a single cloned layer.
You can now play around with the image as you would any other (curves, levels, crop etc) and hey presto, you're done!
Now lets see what your creativity does ...


