Is this a failed CCD?

Messages
148
Name
John
Edit My Images
Yes
Just wondered if someone could confirm my suspicions. Does this look like a failed CCD in the scanniing head?

I'm scanning some old B&W negs and spotted a black line down the righthand side of the image (see attached image). It was not there a few days ago.


The scanner is a ProScan 10T.

Luckily it is off to one side, cropping may be the way forward, but still annoying.2024-01-18-0001.jpg
 
Last edited:
Can't you just use Photoshop, or some such to repair the picture?
 
Look at the scanner sensor very carefully. There may be a speck on the scanner head in that position. If nothing is there, you have a defect in one sensor pixel in that position. A crop is the easiest way to get around it, but with good photo editing software you should be able to just move the area to the right of the problem, over one or two pixels too. Doing this preserves the image to the right of the problem, and if just one or two pixel width, the merge will be almost invisible. Twenty three years ago I had this problem and these were my ways to fix it.

Charley
 
Thanks for the suggestion @CharleyL. I think I'll use a mix of cropping and patching depending on what's best for the image.
 
I've given the scanner a quick puff of air and it has made no difference. I'll have to conclude that some pixels have failed. I'm definitely going to look into your suggestion @RyanB, its going to be the only way to handle all the negs that I'm thinking of scanning.
 
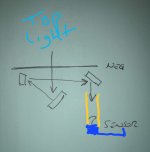
It's got dust somewhere along the light path, I don't know the ProScan but it can't be that different to an epson, they do the same job. A negative scanner will have a top light and a moving scanner head, at least having a line on your negative would suggest it's a moving scanner head.

The key here is getting access the the scanner mechanism to clean it.
I did a diagram of an Epson light path, getting access on them is easy but the scanner head itself can only be blown out as it's well buried, but that is usually all that is needed
 

Attachments

  • IMG_20201113_231022.jpg
    IMG_20201113_231022.jpg
    98.5 KB · Views: 20
Thanks for all the suggestions. I'm definitely going to test out automated correction.

However, I am left with a bit of a dilemma, do I......
- find a replacement scanner? A Reflecta Proscan or Plustek 8200i.
- edit every image generated by this scanner?
- switch to SLR scanning?

I'm not sure editting every image. It will require more manual attention. Repeated contrast adjustment could be slightly automated.

Perhaps trying camera scanning would be a way forward. Does anyone have any thoughts on whether this can give a resonable workflow when working through numerous negatives?
If the only editing you wanted to do was remove the line of missing pixels a simple way to do it would be with actions in PS and apply the actions to the scanned images as a batch.

I did play with making an action sequence to do exactly that last night using the spot healing brush.

  • Get one of your images up in ps and select the spot healing brush,
  • set its size to barely cover the width of the missing pixels.
  • Start recording the action sequence as per the tutorial.
  • whilst holding 'shift' right click(and hold) at the top of the missing line and drag the pointer down to the bottom of the line(release both mouse and shift)

This should have repaired the missing bits
  • Stop recording the action.
  • now apply the action to the batch using the tutorials instructions.

job done (you would have to save them all to make the changes stick)

There are probably other ways of doing this but its the quickest and simplest I could think of from my limited PS knowledge.
 
Last edited:
Thanks @RyanB for trying that out. I will give it a try this weekend and report back
No worries, I enjoy trying new stuff out so had fun seeing if I could get it to work. I think you can also either make the saving step part of the action or maybe a setting in the batch process to streamline it even more.
 
From the sounds of things you are reaching the point where you have nothing to loose with your current scanner. There is likely to e glass under the negative slot (between negative and scanner) so just blowing through with a rocket blower won't work. It will need opening up so you can blow over the scan head itself.
 
Thanks for all the suggestions. I'm definitely going to test out automated correction.

However, I am left with a bit of a dilemma, do I......
- find a replacement scanner? A Reflecta Proscan or Plustek 8200i.
- edit every image generated by this scanner?
- switch to SLR scanning?

I'm not sure editting every image. It will require more manual attention. Repeated contrast adjustment could be slightly automated.

Perhaps trying camera scanning would be a way forward. Does anyone have any thoughts on whether this can give a resonable workflow when working through numerous negatives?
The Big Scanner thread on here is weak for digital camera scanning, and I do intend to revise that part. The trouble is, I do have to base it on what I read, since I don't have a digital camera suitable for the job! I think it's reasonable to say however, that the workflow for large numbers of negatives is (or at least, could b) quite reasonable (even perhaps much faster than a film scanner), compared with repeatedly doing a few per session. It appears the setup time and effort for any session might be significant, unless you can leave it set up somewhere. An issue here is that you can go from completely DIY to very expensive!

Valoi sell very expensive kit for the job, but they do have a nice guide: https://www.valoi.co/how-to-scan-film-with-a-digital-camera

There are also a few vendors who sell kit you can attach to your camera or macro lens. Setup should be easier for these as they should be automatically preset to be parallel!

An issue that folk might not think about when doing a big scanning job, but might regret later, is finding a way to capture and metadata about the photos being scanned, eg notes, dates, film types etc on slide mounts or film packets or associated prints. I ended up using quite long and detailed folder names for my scanned images with as much info as possible in them, but I could imagine that being a lot harder if you were rattling through a few hundred on your digicam!
 
I used to use an Epson V500 and started to get something similar. It was suggested that I remove glass platen on the scanner and clean it on the underside. I did just that and problem vanished from the very next scan.
 
Last edited:
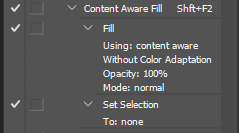
I have an action defined, as follows...

1707215429386.png

To use the action, make a selection, a long thin selection in yours case, then run the action.

I use this technique to spot negative and slide scans. It works almost every time and it's quick. I hardly ever have to use any other repair tools when I'm spotting. Occasionally you might get some smoothing out of grain, that's one slight defect in content aware fill.
 
Back
Top