IT8.7 Profiling - Before and After

Messages
2,104
Name
Samuel
Edit My Images
Yes
Hi,

To complement my recent purchase of a Reflecta Proscan 7200 film scanner, I decided to also get an IT8.7 calibration target to improve transparency scanning; after reading reviews etc of their high quality, I ended up getting a 35mm target for Kodak Ektachrome film from Wolf Faust (http://www.targets.coloraid.de/) for about £24 including postage from Germany. Four days after ordering it came and after using the profiling in Vuescan I can only say that it makes a massive difference, especially in the greens and reds so that the scans look exceedingly similar to the original transparency. But enough words, here are a couple of before and after profiling examples:

Kodak Elite Chrome Extra Colour 100:

Without Profiling:

Elite_Chrome_Extra_Colour_Without.jpg


With Profiling:

Elite_Chrome_Extra_Colour_With.jpg


Fujichrome Velvia 50:

Without Profiling:

Velvia_50_Without.jpg


With Profiling:

Velvia_50_With.jpg


Note that the highlights on the Velvia 50 slide with profiling do look slightly pink on my (currently uncalibrated, next thing on the list to get) monitor, this is likely because the gamut of Velvia 50 in the reds way exceeds that of even the most saturated Ektachrome so their clipped. Wolf Faust does also do a slightly more expensive target for most Fuji emulsions and a dedicated Velvia 50 one. Obviously this would get expensive so he also does a special offer box of all 6 slide and paper targets for only 70 euro which is the same price as only 2 of his Fuji targets and is fantastic value, I had already spent a bit too much on the scanner etc to justify getting that at this time!
 
Last edited:
To me it's looking like money well spent.

I'd like to see the result of the dedicated Velvia target.
 
Looking good :) And thanks for highlighting the special deal he does...
 
The results look good so I've taken the plunge and ordered from Mr Faust an IT8 target for Fuji slide film, 35mm format. I'll be intrested to see the results and if they're any good I'll post something up here.
 
Note that the highlights on the Velvia 50 slide with profiling do look slightly pink on my (currently uncalibrated, next thing on the list to get) monitor, this is likely because the gamut of Velvia 50 in the reds way exceeds that of even the most saturated Ektachrome so their clipped. Wolf Faust does also do a slightly more expensive target for most Fuji emulsions and a dedicated Velvia 50 one. Obviously this would get expensive so he also does a special offer box of all 6 slide and paper targets for only 70 euro which is the same price as only 2 of his Fuji targets and is fantastic value, I had already spent a bit too much on the scanner etc to justify getting that at this time!

I ended up buying the S1 target (a combined box from Wolf's site) in the end. To profile both Velvia and Ektachrome slides. I can confirm it does massive difference especially where tints are slight but very annoying. Having profiled my velvia and ektachrome I also would say that I would now recommend to get a target on the film(s) you are going to profile because I did have subtle but important differences in colour appearance using Ektachrome on Velvia shots. Tim Parkin in his blog was experimenting with these targets and he thinks that although in theory it should not be different regardless of the film you use (as you are profiling the scanner response) but in practice there will be a difference between the spectrum of light that was used to put the target on the film and the one used in scanner (and the film response to that for each of the colours). I would not say some of the films in the set were useful to me - I don't have Agfa slides so that was of no use but Wolf's price was good enough at that time for me to justify it.

Sadly I am no longer doing film (for personal matters) so my targets are not going to see any use (selling it here if anyone cares).
 
Last edited:
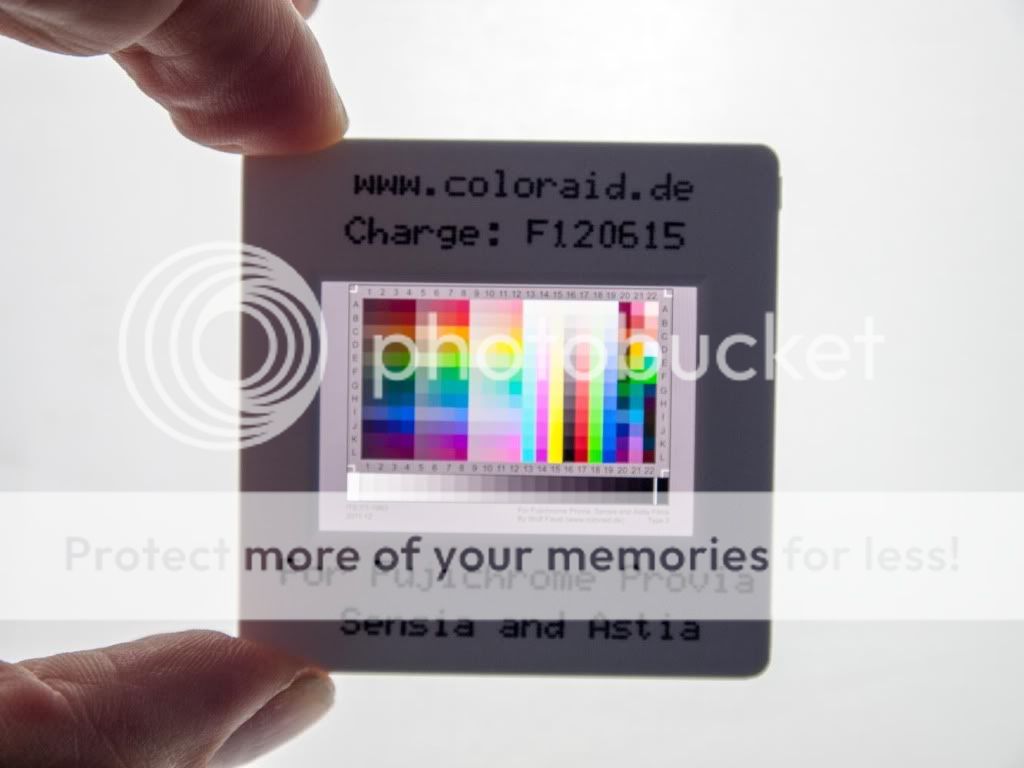
Bought an F3 target from Wolf Faust -
IT8TargetWB.jpg


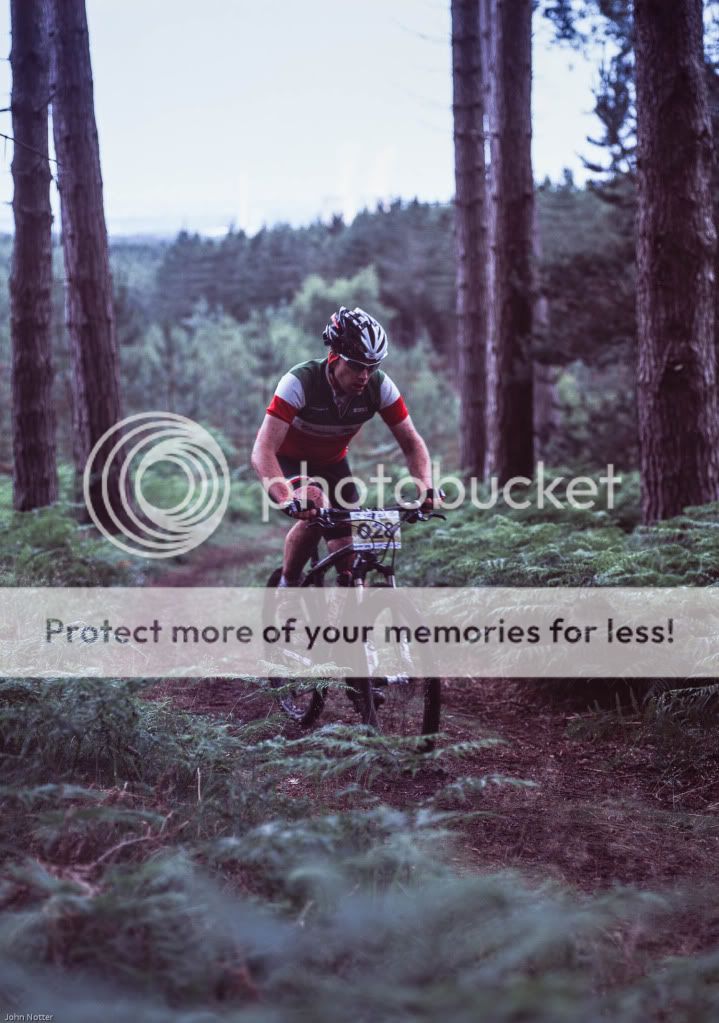
And I've tried it out with a photo of Edtog taking part in a mtb race at Cannock Chase, shot on Provia 100. The first photo is how it came out of my Polaroid Sprintscan 120 used with Vuescan, unprofiled and with no colour adjustment.-

EdMtbRaceOrgTP.jpg


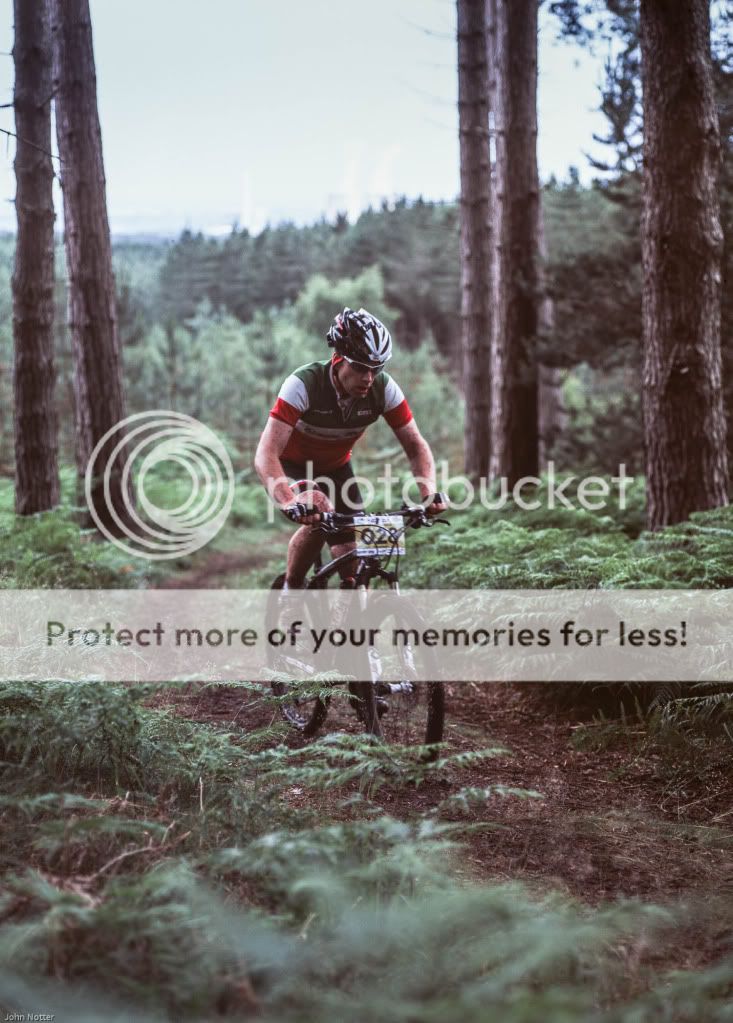
And then with profile added in Vuescan again no colour adjustment just exposure and levels so it's viewable-

EdCannock1bScan-120926-0001TP.jpg


Quite a noticable improvement, I think, making for a much cleaner scan and far less work needed in editing.
 
I finally got round to buying Vuescan last night and after a couple of frustrating hours trying to get the target square I must admit its worth it. Much easier to scan and no casts to try and filter out I still feel the need to tinker but that is as much due to inadequate shooting than the software.

Before:

Unprofiled by steveo_mcg, on Flickr

After:

View from the head of Loganlea by steveo_mcg, on Flickr
 
Last edited:
Steve thats better but to get the profiling correct you need to lock down the exposure value and keep it constant for all scans: in the 'profile scanner' mode preview the IT8.7 target (with the exposure lock off) then go to the 'colour' tab, set 'colour balance' to 'none' and turn on 'pixel colours', that way it will show you where there is any clipping.

Turn on 'lock exposure' on the 'input' tab and adjust the RGB exposure number up a bit then preview the target again, if any of the white patches on target are green (indicating overexposure clipping) then adjust the exposure value down a bit and preview again. Repeat until you no clipping is showing (or only a few tiny little pixels) and then adjust the grid over the patches and click 'profile scanner' under the 'profile' menu (thus generating the profile).

Keep all options about colour and exposure constant and that way you'll always get a constant exposure as you use the same exposure value for any slide to get a constant correct colour values. You can obviously change mulit-exposure, multi-pass etc, rotation etc off and on. Afterwards all you need to do is set the white level after in photoshope etc.

I am now using an external program called 'Scarse' to make a profile for my scanner (it gives an exposure dependent look up table (LUT) based profile which is a bit more advanced than the one vuescan generates) and you can clearly see from this how profiling makes a darastic difference:

Before:


IT8 standard unprofiled by s162216, on Flickr

After:


IT8 profiled by s162216, on Flickr
 
Last edited:
better than the manual snip

Urrgh, I don't need to get the target back on the scanner :bang:. They couldn't have mentioned all that in the manual.

Thanks Samuel, thats much clearer than tfm I'll go back and have another go. Of the 20 frames I've got back I only want to get a couple of frames right so it'll rescan them once I've got the profiling correct.
 
Steve thats better but to get the profiling correct you need to lock down the exposure value and keep it constant for all scans: in the 'profile scanner' mode preview the IT8.7 target (with the exposure lock off) then go to the 'colour' tab, set 'colour balance' to 'none' and turn on 'pixel colours', that way it will show you where there is any clipping.

Turn on 'lock exposure' on the 'input' tab and adjust the RGB exposure number up a bit then preview the target again, if any of the white patches on target are green (indicating overexposure clipping) then adjust the exposure value down a bit and preview again. Repeat until you no clipping is showing (or only a few tiny little pixels) and then adjust the grid over the patches and click 'profile scanner' under the 'profile' menu (thus generating the profile).

Keep all options about colour and exposure constant and that way you'll always get a constant exposure as you use the same exposure value for any slide to get a constant correct colour values. You can obviously change mulit-exposure, multi-pass etc, rotation etc off and on. Afterwards all you need to do is set the white level after in photoshope etc.

I am now using an external program called 'Scarse' to make a profile for my scanner (it gives an exposure dependent look up table (LUT) based profile which is a bit more advanced than the one vuescan generates) and you can clearly see from this how profiling makes a darastic difference:

Thanks for posting this information.

I own & use the Wolf Faust IT8 targets with Vuescan for all my slide shots, and been pleased with the results. I used the Vuescan idiots guide to create the profile so will try this out to see what difference it makes.

I will also take a look at Scarse.
 
Thanks Peter, I've found it does make a small but noticable difference where there for instance many bright highlights or dark shadows as it obviously alters the autoexposure which can then alter the colours.

Scarse is a little bit difficult to use if you don't know quite how, I was searching for how to get a good profile and found this useful guide:

http://www.jingai.com/scanningguide/profiling%20slides.html

If using it through you need a program which has the ability to assign profiles to images (i.e the full photoshop), as I only had elements which doesn't allow this (it only lets you select sRGB or Adobe RGB), I remembered that the freeware RAW editor 'RAW Therapee' does.

So now my scanning workflow for slides is:

  1. Scan in Vuescan at fixed exposure value (at 16/48 bit with multiexposure on and saving as a 16 bit TIFF)
  2. Import image into RAW Therapee, assign the scanner profile and export as 16 bit TIFF with Wide Gamut RGB output
  3. Import into Photoshop elements, convert to sRGB or Adobe RGB, downconvert to 8 bit (after doing the limited modifications I can in 16 bit)
  4. Set the white level
  5. Done!

Whilst this may sound like it takes a long time, it probably only takes about a minute longer than if I was able to just directly assign the profile in the full Photoshop. The reason that everything is kept in 16 bit until the end is simply because the otherwise you will need a profile for when the scanner is scanning in 16/48 bit and another for 8/24 bit (as putting a profile designed for 16/48 bit in a 8/24 bit file risks posterisation).

Hope you find this useful.
 
Last edited:
... to get the profiling correct you need to lock down the exposure value and keep it constant for all scans: in the 'profile scanner' mode preview the IT8.7 target (with the exposure lock off) then go to the 'colour' tab, set 'colour balance' to 'none' and turn on 'pixel colours', that way it will show you where there is any clipping.

Turn on 'lock exposure' on the 'input' tab and adjust the RGB exposure number up a bit then preview the target again, if any of the white patches on target are green (indicating overexposure clipping) then adjust the exposure value down a bit and preview again. Repeat until you no clipping is showing (or only a few tiny little pixels) and then adjust the grid over the patches and click 'profile scanner' under the 'profile' menu (thus generating the profile).

Keep all options about colour and exposure constant and that way you'll always get a constant exposure as you use the same exposure value for any slide to get a constant correct colour values. You can obviously change mulit-exposure, multi-pass etc, rotation etc off and on. Afterwards all you need to do is set the white level after in photoshope etc.

Sam, I've now had go at this, and re-scanned some of my first set of E100SW. I haven't got as far as importing them and putting them up yet, but will soon. Some of them looked much better than the initial Vuescan set I made; the jury is still out on the others.

I did find the whole process very confusing; particularly in the Vuescan guide there seemed to be a lot of flipping back and forward to try to understand it. I found your points above about clipping very hard to understand in the abstract, although in practice they became a little[/i[ easier. In fact I don't think I saw much brightness clipping even when I wacked the exposure gain right up, but about a tenth or so of the patches seemed to have "out of gamut" clipping whatever level of exposure! I didn't know what to do about this (it may have been caused by my reverting to sRGB after reading Rockwell's "advice"), and eventually ignored it and left the exposure gain at 1.

The main point of writing this, is that I'm just so puzzled at the idea of locking exposure for all slides. At least one of my frames seemed seriously over-exposed. And I obviously don't want to leave the exposure locked when scanning my next monochrome roll, so will I have to re-profile when I get the next transparency roll? And what would happen if I un-locked the exposure? (The Vuescan guide deosn't mention locking it, IIRC.)


You need to set the 'output colour space' to a wide gamut setting like 'wide gamut RGB' (and always use 16/48 bit scanning) as the targets gamut exceeds the sRGB gamut (or even better use the 'Device RGB' setting when outputting which outputs the full gamut of the scanners sensor). Then in Photoshop, Elements, Aperture etc or whatever you have convert it down to sRGB and then 8/24 bit.

Locking guarantees that the scan will always have the same colours as when you profiled it (as obviously exposure affects colour) and then you are effectively using a fixed exposure camera to take a picture of a slide (which in theory will look just like the slide whether its correctly exposed or not, adjust the exposure later in the editing as remember IT8.7 profiling is designed to get an as near perfect copy as possible, not to correct the original slide).

As for the locking on the next roll of B&W, unlock the exposure and next time you scan slide just relock it with the same value you used last time (by the way, every time you adjust the exposure lock value you need to press preview button again so that the scanner can expose the preview longer/shorter which is the only reason why it might not be altering when you change the value)

To be honest I found Vuescan's IT8.7 profiling procedure quite clunky and difficult to get right, so I stated using SCARSE as I mentioned above and after getting a good scan (the tough bit) then the rest is simple. Theres a very good and easy to follow guide here:

http://www.jingai.com/scanningguide/...%20slides.html

EDIT: His site appears to be down at the minute but you can find the guide at the internet archive here: http://web.archive.org/web/20101125172415/http://www.jingai.com/scanningguide/profiling%20slides.html

Just follow it to the letter and you'll be able to get a good scanner profile that you can then assign to a scanned image in an editor (if your one can't do that then you can do it using RAW therapee as it said above).

Hope this helps you.

Sam
 
Last edited:
OK yet another profiling question from me. I've profiled my Plustek 7500i, but I've just bought a V500. If I use Vuescan for the V500, it will surely pick up the scanner.icc file and use the wrong profile. Is there an easy way to get the right profile selected, or do I just have to remember to specify a filename each time?

(I presume there's no problem in using the 35mm IT8 target on the V500.)

Just rename the profile as 'Plustek' or something and then do the profiling again for the V500 and name it as 'V500' etc. Just select the profile you want when you use each scanner.

As obviously the locked exposure values will be different, input the settings (exposure, profile etc) for the individual scanner, then go 'file', 'save options' and you can save the configuration options for each individual scanner. When you next open vuescan and want to scan slide just load the options for the scanner your using.

Theres no problem with using the 35mm target on the V500, IT8 is IT8.
 
I finally got round to buying Vuescan last night and after a couple of frustrating hours trying to get the target square I must admit its worth it. Much easier to scan and no casts to try and filter out I still feel the need to tinker but that is as much due to inadequate shooting than the software.

Before:

Unprofiled
by steveo_mcg, on Flickr

After:

View from the head of Loganlea
by steveo_mcg, on Flickr

Much better... well I think any way.

View from the head of Loganlea- Reprofiled
by steveo_mcg, on Flickr
 
Much better... well I think any way.

View from the head of Loganlea- Reprofiled
by steveo_mcg, on Flickr

Looking good, but the clouds/sky looks quite blown out on my monitor (especially in the top right corner), is it like that before you apply the profile or are they like that as a result of you setting the white level after scanning? (I tend to decrease the white level until clipping starts and set it just below that as that usually gives the best result).

I've been playing around with my profile a bit and have now managed to get it to the best (I think and the dE says) yet. I'll post some up tomorrow.

Sam
 
I think that top right is gone on the slide too, it was just a big mass of white cloud. I'll take another look tomorrow, probably should have saved the raw scan.
 
Back
Top