

Keep blowing highlights

Messages
2,390
Name
Nick
Edit My Images
Yes
Hello,

Ive recently started taking landscape pictures and Im having real trouble with all my highlights being blown. Ive just been out this morning and taken around 200 pics, and unfortunately it looks like most of them suffer from the same thing.

What am I doing wrong?

Im using spot metering and AV mode.

This is a typical example from this morning, a lot of shots are similar in that the subject is exposed correctly but the sky is blown out
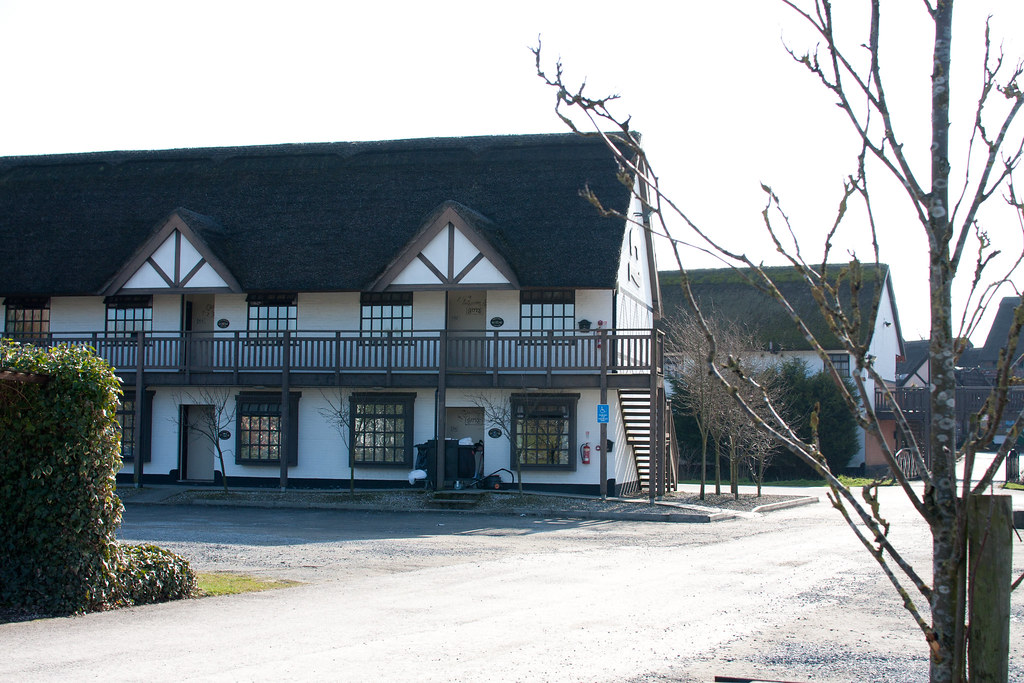

IMG_2279 by futureal33, on Flickr

And then others come out like this:
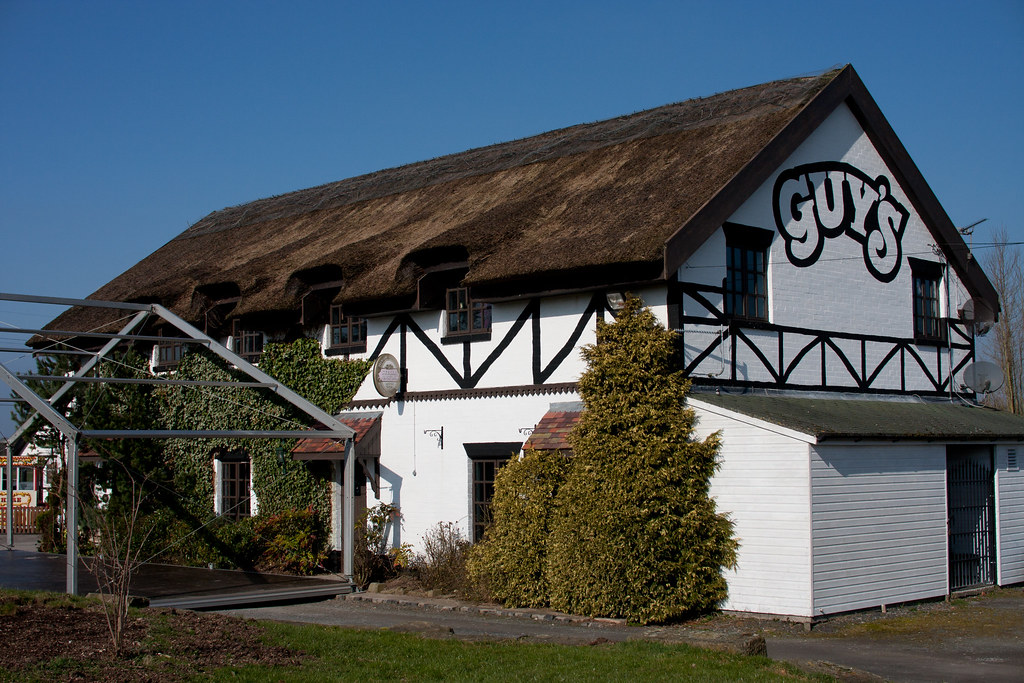

IMG_2282 by futureal33, on Flickr

Both unedited..

Thank you
 
Last edited:
I cant answer your question, sorry, im a beginner like yourself. Do you know what the ISO Shutter speed and aperature are set too in each of the images?
 
What spot were you metering on? might be worth trying a different metering mode.
 
The first shot it looks like the sun is behind the subject, this is always going to cause havoc with your exposure - you either shoot to preserve the sky and underexpose the house (and risk noisy shadows when you boost them) or shoot as you have done to expose properly for the house.

The second shot the sun seems to be a bit more side on, which will at least mean the sky isn't as bright and help a more balanced exposure. 2 has a better exposure than 1 in my humble opinion.
 
Understanding your meter is the first step. Using spot, you are going to get totally different readings from a white part of the wall as against the wooden railings or the tree in #2. The camera will try and average what it sees to 18% grey, so a spot area is going to possibly give a different answer to using evaluative where it is looking at the whole scene. Taking a reading of a grey card, green grass or tarmac makes a pretty good substitute will give you a better reading.

You just need to understand what the camera is trying to do, it is pretty stupid after all, and no match for a Mk 1 brain.
 
Why did you use spot metering? Try Evaluative metering. That's probably better for the sort of shots you are doing. The other thing is in shot #1, the building face is in shadow, so you have to choose whether to expose for that, or for the surroundings.

Remember the rule "sunny 16 and 1 over the iso", i.e. f16, and if your iso is 100 then use 1/125 ss. In shot #2 try that and then adjust your settings in manual (if overexposed try faster ss, ir underexposed, try wider aperture or higher iso. Learn to experiment.
 
YOU need to evaluate the lighting of the subject and scene as a whole and understand the problem it may present for your camera.

In the first image you are shooting into the shaded side of the building and the exposure has been increased by the camera to make the shadow parts look right. As a consequence everything that is sunlit, including the backlit hazy sky, is completely blown out. In the second example you have your subject and scene front lit and with no shade of any importance in your subject. The camera has exposed well for the sunlit scene and everything in the world is good. The blue, rather than hazy, sky has made life even easier.

For the first example you have several options....

- Don't bother with the shot. It will look crap.
- Turn around and shoot something else with the sun over one shoulder instead of in front of you.
- Shoot at a different time of day when the sun is coming onto the scene at a different angle.
- Shoot during different weather, when the light is less contrasty.
- Tighten your framing so that you exclude areas of the scene that are well beyond the dynamic range of your camera.
- Take two or more shots and blend them together so that you can mix exposures that are correct for both sunshine and shade.
- On a smaller scale than a whole building use fill flash or a reflector to bounce or throw light back into the shadow side of your subject.
- Use a graduated ND filter to reduce the brightness of the sky.
- Shoot raw and set your exposure very carefully to just clip highlight details a little and then with skillful editing adjust the image so that the balance between light and shade is more agreeable.

There may be other solutions, but those are off the top of my head.
 
Last edited:
YOU need to evaluate the lighting of the subject and scene as a whole and understand the problem it may present for your camera.

In the first image you are shooting into the shaded side of the building and the exposure has been increased by the camera to make the shadow parts look right. As a consequence everything that is sunlit, including the backlit hazy sky, is completely blown out. In the second example you have your subject and scene front lit and with no shade of any importance in your subject. The camera has exposed well for the sunlit scene and everything in the world is good. The blue, rather than hazy, sky has made life even easier.

For the first example you have several options....

- Don't bother with the shot. It will look crap.
- Turn around and shoot something else with the sun over one shoulder instead of in front of you.
- Shoot at a different time of day when the sun is coming onto the scene at a different angle.
- Shoot during different weather, when the light is less contrasty.
- Tighten your framing so that you exclude areas of the scene that are well beyond the dynamic range of your camera.
- Take two or more shots and blend them together so that you can mix exposures that are correct for both sunshine and shade.
- On a smaller scale than a whole building use fill flash or a reflector to bounce or throw light back into the shadow side of your subject.
- Use a graduated ND filter to reduce the brightness of the sky.
- Shoot raw and set your exposure very carefully to just clip highlight details a little and then with skillful editing adjust the image so that the balance between light and shade is more agreeable.

There may be other solutions, but those are off the top of my head.

Some interesting points there, thank you :)

I did infact shoot raw, and although those were the unprocessed images, I have since spent a few hours tweaking my 457 shots (200 was a slightl underestimation!!) in Lightroom etc. I still havent been able to fully rescue this shot, but have (IMO) made it much better, it seems some information was still there in the blown out highlights :)

I will try using evaluative metering for these kind of shots in future too!
 
The trouble with evaluative metering, especially if combined with one of the autoexposure modes, is that it doesn't really put you in full control. When you have difficult lighting like this and want to maximise the dynamic range captured then, IMHO, it is good to use spot metering and manual exposure. Then you spot meter your highlights at +3, or maybe a smidge more if you want to really push things, to achieve a robust ETTR exposure. That's my approach to a lot of my photography, particularly where a tricky sky is concerned. Nudge that histogram over to the right but keep an eye out for excessive blinkies indicating that you've gone too far. If you shoot at low ISO then you should be able to raise shadow areas a fair bit without insufferable noise.

Here's an example where I shot to hold highlights, knowing my foreground would be underexposed, but then rescued the image in PP. At 100 ISO it was not hard.

As shot : Note that the histogram is clipped at both ends because the scene has extreme dynamic range :
20110130_162020_000.jpg


After adjustments :
20110130_162050_000.jpg
 
Last edited:
Most cameras have a setting that shows areas with blown highlights as a "blinking" area - I normally try and check each shot if possible for blown highlights and reduce exposure settings accordingly till they go away - as others have said, if you are shooting towards the sky then if you expose for correct highlights the shadows will be too dark, so it gets pretty tricky.
 
Back
Top