You can't eliminate reflections, and if you could, then the result would be so dead and flat that nobody would want to look at the photograph - the trick here is to control the reflections. There are various ways of doing this, none of them are 100% satisfactory and we usually end up combining techniques.
Bearing in mind that what you have here is effectively a mirror, obviously it will reflect everything that it sees, so one method is to make sure that it can only see the things that you want to see, i.e. it can't see you, your camera, anything else in the room. A simple way of doing this is to stick it in a light tent/cube, light passes through the cube to produce soft, virtually shadowless lighting, and all that can be reflected is the walls of the cube. Get a light cube that has a translucent front panel, these have a small slit in them, the camera lens goes through the slit so the only external thing that can be reflected is the camera lens, and this is easily retouched out later. A more professional approach would be to use a tilt/shift lens, so that not even the lens is reflected.
Light tents de-skill the job but the results are usually pretty flat and uninspiring.
A more professional approach is to control the reflections by using a very large light source so that although you inevitably end up with a specular reflection (a reflection of the light source) that reflection is soft and diffused - the jargon term for this is a diffused specular highlight - and far from being bright and dominant, it is translucent, so you see through the reflection to the subject. I wrote an article showing exactly how this is done, and it's in our learning centre, but right now that section of our website is down. I'll post a link to it once that problem has been sorted out.
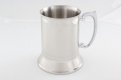
Your particular subject is a difficult one, in the article I photographed some shiny peppers and tomatoes, a difficult subject because, like your tankards, they have complex convex shapes, and what this means is that the light source needs to be several times the size of the subject.
In my article, I showed the shot without editing, because that's the only way there is of providing honest guidance, but in the real world you're going to have to do a bit of retouching as well.


")
")
")

