We had a new kitchen fitted about 2 years ago and everyone says how smart it looks. What I recommend is to have fitted
UPVC decorative internal wall panelling and the same type of material for the ceiling. Our ceiling is white..to reflect light. My recommendation is to go for light-coloured panels ..ours are light grey with short darker grey streaks to reflect as much light as possible. Light is king in a kitchen..especially natural light. Same goes for the worktops,too and the cupboards. Ours are light grey. Very smart. We went for a plain cupboard door..exactly the same as those in David's photos of his kitchen above. Even the same handles. Easy to grip and no sharp edges to hurt your fingers and room for your fingers to get behind it. The cupboard door are plain so there are no grooves where dust/dirt (cooking fats) can gather. Also, have slow-close hinges fitted to all cupboards and drawers. We also have a polar white floor with grey markings flooring..easy to clean. The worktop is light grey..marble effect and the splash back is just a few inches high.. If you're getting a new hob, (we have an induction hob..excellent)..get a large "plastic"..I don't think it's plastic..whatever..back panel..easy to clean.The sink is very light,too. We had six lights fitted into the ceiling , about 3"or 4" wide, once again, .just like those in David's post and also strip lights under the cupboards above the worktops to give you plenty of light where you're working. They are actually a strip of tiny lights..beaded
. It's essential to have one of these ceiling lights just a few inches away from the wall above your sink ..so above your tap...(in your photo) to throw light down into your sink. I say 2" (ish) inches because if you have it so that it's about 4 or 5" out from the wall (above the window) it will be behind you and throw your shadow down onto the sink..darned annoying. We had that in the old kitchen so were aware of that issue. The fitters got me to show them exactly where I wanted it..and they agreed with me re that issue but often fitters..of anything..will do what's easiest for them. All the material came from Howdens and the fitters gave us the discount that Howdens give tradesman..boogie man has mentioned Howdens in his post above.
I've read horror stories about the likes of Wren and B&Q. It's worth asking round friends who have had reliable fitters in, self-employed or,as we did with the bathroom, a wholly reliable, trustworthy local company.
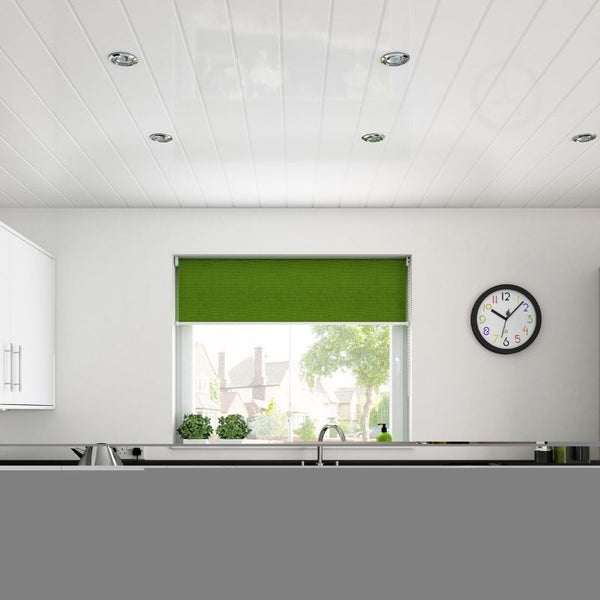
Our kitchen is pretty well identical to the one in this brochure BUT..look at those ceiling lights. The ones nearest the window will cast a shadow in the evenings when it's dark outside..ie no light coming in that window. Our ceiling is identical,too. By the way..I wouldn't recommend drilling a hole in the panel to fix a clock (as shown in the brochure photo) unless you can get a decent "sucker' hook like people have in their bathrooms to hang a hand-towel or the like, on.
Complete your interiors with white ceiling panels from The Panel Company. Featuring a repeated groove, shop gloss finish white v-groove ceiling panels online.

www.panelcompany.co.uk
@cambsno For reference:-
Our worktop is a sparkle type finish
Our units are a metallic grey finish, which actually changes with the light, appears lighter in natural light, gets darker under artificial
Our splashbacks are glass, with special heat resistant glass behind the hob
I used pelmet panels on their side to give a sleeker finish to the top of units
For the worktop lighting, I added recessed 3W LED lights under the wall mounted cupboards - I used side/end vanity panels cut to fit, and recessed the lights into these, routing channels for cables. This (to me) meant that it was sleeker than a traditional pelmut. Poor OOF phone image (and before splashbacks fitted)

As
@JohnC6 says it is important to give consideration to the lighting, and plan the electrical power/lighting installation carefully. Large Induction hobs can draw significant power and may require a new circuit back to the fusebox, our hob has power limiting modes - which in practice are fine as you never want all 5 zones on 'boost'.
I used an industrial design for the cabling, and ran industrial trunking around the kitchen at floor level like a skirting - so I can access it by removing the plinth - like this 6 inches high - mounted horizontally (this reduced significantly the amount of wall channeling, and the cables can be labelled for any future modifications)- and I also put in a grid isolator panel - example shown


The saving using DIY Kitchens allowed us to put in higher quality electrical appliances (and still save money) - I was canny about these as well, buying months ahead in sales to save money.
But don't forget in your budget planning to include:-
Flooring (my costs £600 for ceramic tiles)
Electrical/Lighting (my costs £1,300) - I used Lightwave modules to control the zones, and have remote switches on both the inside and outside of the kitchen, so you can select the lighting zone required before entering the room! That may look like a big number, but I wanted a quality finish in keeping with the rest of the kitchen. £850 of the £1,300 was spent on light fittings (downlighters, switches, pendant lights, under cupboard lighting, switches, remote switches) - the only real excess were the two custom yellow lights over the peninsula (these were £270) - sockets, grid switch, cabling etc made up the rest.
Handles (my costs £200 - local company)
Paint/Blinds (my costs approx £250)
Radiators (my costs £270)
These alone total £2,620 and could easily double if external labour is required.
I'm fairly comptent at DIY, so only spent £820 on labour (excluding the worktop/splashbacks for which we had a measure/made/fitted price) and that £820 was made up of a plasterer (I moved a door!) and a registered gas engineer to terminate the previous gas hob (he also fitted the new radiator, and capped the old outlets)
It took me approx 12 days from stripping out the old kitchen, removing previous tiled floor, altering doorway access, etc from start to finish. It was a lot of planning but we didn't go over budget (I had a small contingency which we did use some of for additional plumbing fittings, router bits, and I did add a Makita Multitool to my Makita toolset!)
DIY Kitchens support was very good, we had a couple of damaged panels which they replaced within 48hrs, and I damaged a door front (with a handle hole miscalculation!!), they got me a replacement for a very nominal fee within 48hrs.
I would definitely use them again. I designed the kitchen using their planner, then we spent a day at the showroom in Pontefract looking at the units (picking style/colour), feeling the quality and optimising the design. It is worth doing this, the costs for a day to Pontefract are insignifcant compared with the costs of the kitchen - and the local pub did a decent Sunday Roast for a tenner a head!! The range of unit sizes was a godsend, need a 150mm wide cupboard to fill a gap, they have it. (for non-basic range unit sizes, Wren push you to a different carcass range that is more expensive) The only flags I had on my design when ordering was the gap between the cooker hood and the wall cupboards, which was slightly tighter than their recommended distance, but I knew it would fit and I wanted the kitchen to look symetrical. Also I ordered less end panels as I worked out I could get move usable panels by cutting down the larger panels in a different way.
If I had a kitchen with less base corner cupboards, then I would get more bottom 2-drawer units (pan units) as these are much more accessible than regular kitchen cupboards.
For reference, old kitchen during dismantling - we sold this getting £350 for it (and they took it away) - someone wanted it to put in a buy-to-let. Note old carpet on the floor to save my knees! The absolute mandatory purchase if you are doing all this yourself is a decent set of knee pads.