
and please use their services
You are using an out of date browser. It may not display this or other websites correctly.
You should upgrade or use an alternative browser.
You should upgrade or use an alternative browser.
Northern Lights post process
- Thread starter Kondwani
- Start date
That’s quite a difficult question to answer as we don’t know what your raw files look like.
Might be an idea to upload one or two somewhere for people to download and play around with then they can give you details of the process they followed
Might be an idea to upload one or two somewhere for people to download and play around with then they can give you details of the process they followed
- Messages
- 2,480
- Name
- Steve
- Edit My Images
- Yes
First John congratulation on seeing them hope it was a great experience! I got hooked years ago, now go back when I can and its a long trip if you don't see them  .
.
Anyhow I have actually asked this very same question many times with few answer.
Here though it is little, is what i have discovered mainly by working it out for myself.
First the most difficult to work with are files that have a fair amount of light pollution, I had one particular shot that I really liked and I recall working on it for hours.
I basically duplicated the image and worked on one to try and get rid of the light pollution. I used a combination of careful adjustment of white balance then into the Hue / Saturation and adjusting, mostly the Reds / Oranges / Yellows.
After I had got as much of the pollution as I could removed then I blended the shots together using layer masks.
I have found that altering the colours in the Aurora a big mistake. If you make any changes to the hue or saturation they have to be very subtle or they will look awful.
On one shot I did have a number of exposures much the same so masking out the Aurora I stacked the image which greatly improved the look of the stars.
If you were in a dark sky area then I found that less is more when it came to processing. Gentle and careful adjustment of white balance. I found with some shots that using "fluorescent" or "flash" was the first step toward a better looking shot and makes a good starting point. That's about 4000K - 5000K.
I hope this is of some use, if I think of anything else I will add it to the thread.
.Anyhow I have actually asked this very same question many times with few answer.
Here though it is little, is what i have discovered mainly by working it out for myself.
First the most difficult to work with are files that have a fair amount of light pollution, I had one particular shot that I really liked and I recall working on it for hours.
I basically duplicated the image and worked on one to try and get rid of the light pollution. I used a combination of careful adjustment of white balance then into the Hue / Saturation and adjusting, mostly the Reds / Oranges / Yellows.
After I had got as much of the pollution as I could removed then I blended the shots together using layer masks.
I have found that altering the colours in the Aurora a big mistake. If you make any changes to the hue or saturation they have to be very subtle or they will look awful.
On one shot I did have a number of exposures much the same so masking out the Aurora I stacked the image which greatly improved the look of the stars.
If you were in a dark sky area then I found that less is more when it came to processing. Gentle and careful adjustment of white balance. I found with some shots that using "fluorescent" or "flash" was the first step toward a better looking shot and makes a good starting point. That's about 4000K - 5000K.
I hope this is of some use, if I think of anything else I will add it to the thread.
OP
- Messages
- 53
- Name
- John
- Edit My Images
- Yes
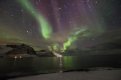
Thanks Steve for your comments and yes we were extremely lucky in seeing the NLs 4 out of 5 nights during our stay. Two of the nights after a Solar storm produced superb displays. As a newbe to photographing the NLs I made the mistake of focussing to infinity during the day rather than on distant lights on the night hence several images are out of focus. However I still have many to work with.
Fortunately light pollution was minimal and I had pre-set the white balance at 4000K on the camera.I take your point that only slight WB adjustment will be required to prevent the image looking too purple, although the intensity of the Lights produced a very green reflective hue to the surroundings.
Chris, I will attempt to add a few images and I accept that each image may require individual processing. My difficulty is that this seems to be a bit hit or miss without a basic workflow ......my knowledge of PS is not as good as it should be.
- Messages
- 2,480
- Name
- Steve
- Edit My Images
- Yes
Hi John, I see your focusing issue. But sounds like you have enough shots to make up for it") . Looks like you had a great clear night too. Last time I went I was gutted, 10/10ths cloud cover.
. Looks like you had a great clear night too. Last time I went I was gutted, 10/10ths cloud cover.
Where about's were you John?
Yes the problem with focusing at Infinity is .... It isn't! Back in the day, the lenses were made with some precision with regard to the etched markings on the camera barrel because we relied on them, and used them as a guide for Hyperfocal distance, before the days of autofocus.
Modern autofocus lenses generally focus breath (for this reason the end stop of the focus ring is past infinity to allow it to breath) so the focus ring effectively may travel past the infinity mark when auto focusing, if you focus on a distant object. So compared to a older manual lens infinity in many cases used to be the end stop, however on Autofocus lenses you can generally turn the focus ring beyond the infinity mark. If you just turn a focus ring around to infinity chances are you will not be focusing at infinity. The number of times I see articles on how to shoot Aurora and they recommend turning the focus ring to infinity!
You only really need to adjust the image if you need to. Sometimes some subtle adjustment can help. I have found you can very easily overcook the whole image and end up completing a full circle (as i did) and reverting back to the image SOOC.
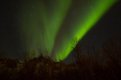
I would still say less is more with processing, perhaps a little touch of noise reduction if you need it, and perhaps a play with brightening the stars. Other than that looking at the 2nd shot the Aurora is looking good!
. But sounds like you have enough shots to make up for it. Looks like you had a great clear night too. Last time I went I was gutted, 10/10ths cloud cover.Where about's were you John?
Yes the problem with focusing at Infinity is .... It isn't! Back in the day, the lenses were made with some precision with regard to the etched markings on the camera barrel because we relied on them, and used them as a guide for Hyperfocal distance, before the days of autofocus.
Modern autofocus lenses generally focus breath (for this reason the end stop of the focus ring is past infinity to allow it to breath) so the focus ring effectively may travel past the infinity mark when auto focusing, if you focus on a distant object. So compared to a older manual lens infinity in many cases used to be the end stop, however on Autofocus lenses you can generally turn the focus ring beyond the infinity mark. If you just turn a focus ring around to infinity chances are you will not be focusing at infinity. The number of times I see articles on how to shoot Aurora and they recommend turning the focus ring to infinity!
You only really need to adjust the image if you need to. Sometimes some subtle adjustment can help. I have found you can very easily overcook the whole image and end up completing a full circle (as i did) and reverting back to the image SOOC.
I would still say less is more with processing, perhaps a little touch of noise reduction if you need it, and perhaps a play with brightening the stars. Other than that looking at the 2nd shot the Aurora is looking good!
OP
- Messages
- 53
- Name
- John
- Edit My Images
- Yes
Thanks again Steve and I'm sorry you had such a cloudy experience.
My wife and I booked a "winter package" at Mefjord Brygge (recommended) on Senja Island, Norway which included 2 nights of Aurora chasing. We had tried to convince ourselves that we may not see anything but as it turned out we didn't need to move far from our apartment to see them. We went to a few locations to get different viewpoints but from what I understand we were extremely fortunate to see as much as we did. Our last day in Tromso consisted of snow, snow and more snow preventing our plane landing and I felt so sorry for those people arriving for the next weeks Aurora chasing.
Would I go again ?.......you bet I would, however I may have to sell my car to do it
With regards to the images I do not think I can do much with the out of focus ones but I do accept that I may have tried to over process all of them , hence me asking the question on the forum.....I will have to control my urge to keep moving the sliders.
Cheers
John
- Messages
- 510
- Name
- Rich
- Edit My Images
- No
Hi John
I've shot the NL several times including up in Tromso. What Steve says about infinity focus is true so I used two methods to deal with this. One is to focus during the day on something on the horizon and either tape or remember where the barrel moves to. The second and more reliable is to use the 'live view' back screen and manually focus using that. A wide aperture lens has little tolerance for error!
With regard to processing, I've found the two most important sliders are the 'Clarity' slider as this brings out the stars and aurora better and the white balance sliders. All my cameras using auto WB metering, tend to get fooled and push the temps too warm (towards yellow). If you 'cool' the images down then the colours and the landscape look much more natural (IMO). Looking at your files the first isn't far off but the second seems too warm to me. It's difficult to get a reference really but my belief is that most shots you see of the NL are too warm in temp.
I don't noise reduce much at all as this interferes with the lights and stars and can create odd effects. Depending on where you wish to reproduce your shots leaving the noise alone makes little difference viewed on a screen or smaller print unless it's VERY noticeable.
As has been stated, pushing saturation too far just overcooks them and they look too overdone. The 'Vibrance' slider is your friend here but only if used gently and I'm not sure if Elements has this.
Sounds like you had a great trip and were very fortunate to see such a cracking display!
Last edited:
OP
- Messages
- 53
- Name
- John
- Edit My Images
- Yes
Thanks Rich.
Yes I agree that "live view" manual focus is the more reliable method and it was a pity that I didn't do this first. As I was using a f3.5 1-20mm lens I tried to reduce the exposure time to sharpen the Aurora but this resulted in quite dark landscapes, so I have tried to bring this up using exposure slider and white balance sliders....maybe I have gone too far with this.
I am using the Clarity and Vibrance sliders which are useful.
I think that we all perceive the end result differently and it was interesting that some friends preferred images that to my mind had been overcooked.
Thanks again
John
- Messages
- 2,914
- Name
- thomas
- Edit My Images
- Yes
A few comment thrown without specific order, I use lightroom but i hope it can help with photoshop too:
- WB is subjective to personal taste, for one night i think it is important to stick to the same, otherwise it look odd to look at the picture one after the other, for milky way you can go with a bluish sky but for northern light i prefer to have a pretty black sky.
- Clarity yes but with moderation, it can make dark area of the sky became very black and create vignetting.
- Vibrance yes but sometime not that much depending on how the shot are exposed, it can be very easy to have the green became a spludge of oversaturated mess, sometime i need to bring the vibrance down! Sometimes I go in the HSL panel in lightroom (not sure what is the equivalent in photoshop) and i work on the different colour individually, like pulling back a bit the green which jump out too much, and pushing out the purple which are usually more suttle. But always in a suttle way!
- I work in local adjustment, adjusting the foreground, the northern light, the darker sky in different ways.
- I am careful with noise reduction and particularly the "color" slider as this tend to kill the different colors of the stars thinking they are color noise.
If you're focus is out there is not much you can do, this first example is really out of focus! I also use the live view zoom in technic when shooting stars.
OP
- Messages
- 53
- Name
- John
- Edit My Images
- Yes
Thanks Thomas,
At times the intensity of the NLs were so great that all I got was a "spludge of oversaturated mess" but I must admit I hadn't thought of reducing the vibrance, so thanks for that tip.
Regarding noise reduction I used a recommendation (blind faith) and kept the same values for all images (colour slider set at 40, luminance at 70), maybe this is wrong but I couldn't visually notice much change when I moved the slider.
It is possible in PSE to adjust Red,Green and Blue separately using "Levels" .
I'm not sure I understand the "local adjustment" mentioned to adjust separate parts of the images which I'm sure would be beneficial so that's my next challenge to see if this can be done in PSE.
Cheers
John
- Messages
- 12,452
- Name
- Jeremy Moore
- Edit My Images
- No
One of the biggest "issues" with the regard to the northern lights is that the camera sees them more vividly than our eyes do. One of the reasons for this is the way the eye works. It has two types of sensors - rods and cones. Cones are sensitive to colour and produce a colour image; rods are sensitive to light only and produce a black and white image. The problem is that rods are more sensitive than cones so we tend to see less colour in a weak light such as the aurora than the camera does.
So which end result do we aim for? What the eye sees or what we "know" was really there, if only we were only able to see it?
So which end result do we aim for? What the eye sees or what we "know" was really there, if only we were only able to see it?
OP
- Messages
- 53
- Name
- John
- Edit My Images
- Yes
Interesting question Jeremy.
Although the camera enables us to appreciate the colours/hues involved are we misleading the viewer in producing an image that they would never experience in reality, or are we just interested in the art that technology allows us. Having experienced the natural wonder of the Aurora my personal opinion is that if we persuade others to see the Northern Lights then a little tweaking is acceptable.
Although the camera enables us to appreciate the colours/hues involved are we misleading the viewer in producing an image that they would never experience in reality, or are we just interested in the art that technology allows us. Having experienced the natural wonder of the Aurora my personal opinion is that if we persuade others to see the Northern Lights then a little tweaking is acceptable.
- Messages
- 12,452
- Name
- Jeremy Moore
- Edit My Images
- No
I was lucky enough to see the aurora myself over the winter and have a pretty good memory of what they looked like to the naked eye. The camera said differently and more vividly, though.
In case you're wondering, I don't have an answer to the questions I posed. I don't have a problem with tweaking the images, it's just that I don't know what we should be aiming for.
In case you're wondering, I don't have an answer to the questions I posed. I don't have a problem with tweaking the images, it's just that I don't know what we should be aiming for.
- Messages
- 2,914
- Name
- thomas
- Edit My Images
- Yes
In lightroom I use both color and luminance noise reduction for all my all my pictures at the expection for the northern light! I reduced drastically the color noise reduction. Has i said you loose the colors of the stars some are blue, some are orange some are red...
I would definitely be careful with this.
Yes sometime lowering the vibrance help, specially the green one. Then a little bit of clarity help with making the structure sharper.
When I talk about local adjustment, i mean i use the brush adjustement in lightroom. I guess in photoshop the equivalent would be to make the adjustement on layer and on these layer applying a mask??? I know nothing of photoshop way too complicated for me!!!