Open the image in Photoshop and then duplicate the Background layer twice.
Name the Middle Layer “Gaussian Blur” and the top layer “Select and Mask”
Now make the Background Layer and Gaussian Blur layer invisible by clicking on the EYE icon, and then select the “Select and Mask” layer.
From the Select Menu click on Select and Mask. Make sure that the VIEW mode is set to ONION SKIN ad set the TRANSPARENCY to about 50%. (These are at the top of the Properties panel)
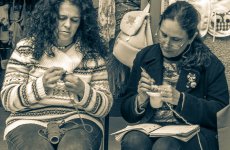
From the TOOLS pallet on the left select the forth tool down (the square with the arrow), and then draw a rectangle over the the head and shoulders of the woman on the left. Then click on REFINE HAIR, also adjust the REFINE EDGE sliders on the right, but only by small amounts, until you are happy with the result. You will then need to paint out any anomalies that have occurred in the masking using the third brush down in the tools pallet. This needs to be set to MINUS. Using this brush won’t automatically affect any other parts of the image as the other brushes will.
Now you need to select the LASSO tool and draw around the inside of the woman’s body, as close to the edge as you can. Once the selection is complete it will automatically fill in. All you need to do now is paint around the edge of her body with the first brush - the one at the top of the pallet. If you select something that you don’t want to be selected just switch the brush to MINUS and paint over the part that you want to remove.
You will just have to keep refining the edges until you are happy with them. If the brush at the top of the pallet keeps selecting items that you don’t want selected then use the third brush down.
Once you are happy with that repeat the process on the woman on the right of the image.
Now change the OUTPUT to Layer Mask - this is at the bottom of the properties panel on the righthand side of the screen - and click OK. There will now be a layer mask added to the Select and Mask layer.
Now select the Gaussian Blur layer and make it visible again by clicking on the EYE icon.
From the FILTER Menu navigate to BLUR > GAUSSIAN BLUR and adjust the slider as required.
Any anomalies can be tidy up by painting on the layer mask.
You will be able to achieve much better results by using the full size image.
View attachment 330506


")