Scanning unusual film format

Messages
1,356
Name
Peter
Edit My Images
Yes
Mysterious film size. Scanner holder for Epson V700 Film Area Guide.

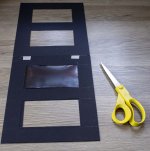
Negative dimensions, 5" x 3".

IMG_0840 copy.jpg

Three layer cardboard negative holder (to scan two negatives at the same time). The holder is made from thin black card. First layer is a mask, approximately the size of the exposed negative area. Next layer up is a frame to hold the negative. The negatives are almost of a uniform size, but, being cut from roll film, may vary in length, so It is possible that they may have to be trimmed lengthways to fit into the recess formed by the frame in the second layer up.

IMG_0829 copy.jpg

The negative holder, complete, with a negative.

IMG_0831 copy.jpg
 

Attachments

  • IMG_0830 copy.jpg
    IMG_0830 copy.jpg
    165.1 KB · Views: 0
Here we see a negative in the second, middle, layer of the holder. The top layer is the same as the bottom, lower, layer, which also masks the negative down to the exposed area

IMG_0830 copy.jpg

Taped the Epson guide to the scanner deck using masking tape.

IMG_0832.jpg

Taped the base, mask layer, of the holder stack to the scanner. Just to make sure that nothing moves, accidentally. Above you can see the middle layer, the receptor for the negatives.

IMG_0836 copy.jpg
 
Taped the negative stage, middle layer of the holder, down to the scanner, to receive the negatives.Here you can see a negative in place.

IMG_0837 copy.jpg

The top of the holder is turned down to 'trap' the negative. In the past I have assed some layers of foam to the holder to compress it. Might yet do that here, but these negatives are pretty flat and don't buckle too much.

IMG_0838 copy.jpg

Ready to go?

By the way, speaking of a recent post about 127, maybe it was 110 negatives, I made a similar holder which fits into the Epson 35mm standard holder, although it was only a two layer concoction as, luckily, all the negatives were very flat. I've done the same with 116 negatives in the 5x4 frame.
 
Simples! Except that I had to do it thrice because I wasn't aware that the source was of many different formats, even a couple of 5x4 sheets, unexpectedly. The negative holder is labelled Eastman Negative Album Capacity 100 Size 3 1/4 x 5 1/2. Formerly the property of H. S. Holmden. I will post some
scans in due course.
 
Last edited:
Fine work there Peter.

I often considered making a mask for sheet film negs for my scanner but never got round to it .
Not detrimental as it was possible to make scans by simply placing the neg directly on the glass without having any obvious issues from stray light.

Ironically I have had to make masks for my darkroom enlarger which will accept 5x4 and 10x8 inch nagatices

The enlarger being of French origin has holders in metric sizes ( 13x18, 20x24 and 24x30cm) and as such too large for some of my negative formats.
The stray light around the edges of the neg when in the holder does cause problems.

Simple masks made from thin mat black card with an internal cut out marginally smaller than the physical negative works might fine.
 
That's brilliant, Peter.

I tried making a mask for 4x5 negatives for my V500. The idea was that when pushed against the right hand side of the scanner it would cover the left hand frame, then slide across to the LHS for the right hand frame with a bit of overlap (had all the dimensions worked out to make this work). But I made the mistake of buying card about 1 mm thick, and found I couldn't cut it cleanly. In the end I just dropped the negs on the scanner directly. But I think thinner card would have worked well.

I did this recently for the same reason (except for my V550). The 1mm card worked well, but because I was scanning two areas of the same negative seperately, they needed to use the same settings to allow a clean stich in Lightroom / Photoshop. This meant that I couldn't expose the scan properly as, what would be the right settings for one part, would be incorrect for the other and I ended up with muddy tones in skies and so on.
 
The black card is a bit thinner than I might use if I do it again. It isn't as rigid as I would have wished. I had a problem even cutting the thinner card cleanly until I realised that I hadn't replaced the scalpel blade recently and then, no problem. I had a similar issue cutting some board for a couple of frames, once again down to not replacing the X-Acto blades.
 
Echoing Peters words about blades.
If they aren’t razor sharp then clean cuts, particularly internal corners, are simply not going to happen.
 
I did this recently for the same reason (except for my V550). The 1mm card worked well, but because I was scanning two areas of the same negative seperately, they needed to use the same settings to allow a clean stich in Lightroom / Photoshop. This meant that I couldn't expose the scan properly as, what would be the right settings for one part, would be incorrect for the other and I ended up with muddy tones in skies and so on.
I don't know if the V500/550 can do this, but with Vuescan Pro on the Plustek 7500i the trick would be to lock exposure on the first part-frame, then scan the second part-frame with the same exposure.
 
I don't know if the V500/550 can do this, but with Vuescan Pro on the Plustek 7500i the trick would be to lock exposure on the first part-frame, then scan the second part-frame with the same exposure.

The problem is that, if you only have part of the scan, you can't set the correct white and black points and modify the histogram accurately in the first place. The two parts of the scan are likely to have differing amounts of highlights and shadows, so you end up with dull highlights or washed out shadows depending on what the exposure settings were for the initial part of the scan. You need the entire image in order to get the settings right.

I guess you could preview both parts and then try an average things out, but it's too much of a faff for me and I still think the results might be sub-optimal.

Here's what I do, bare with me I'm typing on my phone.

Do a preview then select an area of the preview with highlights and shadows. Now adjust the sliders for a flat scan (fix this later). Note down the settings and delete the selection area. Now make a new selection the full width of the back light area and a fair bit of height either side of the negative.

Put the settings from the above into the histogram bit, now move the negative so your scanning one half and press scan. Move the negative, do not adjust anything, and press scan again. Now merge the two half's in ms ice and adjust the image to suit in your editor of the choice.

Thanks Steven. I think that, as my experiments in this regard were in support of my buying a large format camera, that my preference is going to be to get a scanner that will do the job "out of the box". I might be able to get decent results by stitching if I put in the effort, but if I'm going to spend the amount of money required to get going with a large format kit, I want to make sure that I'm going to be fully satisfied with the final results. Getting a dedicated scanner will increase the cost / time to get started, but will (for me) probably pay off in the end.
 
Thanks Steven. I think that, as my experiments in this regard were in support of my buying a large format camera, that my preference is going to be to get a scanner that will do the job "out of the box". I might be able to get decent results by stitching if I put in the effort, but if I'm going to spend the amount of money required to get going with a large format kit, I want to make sure that I'm going to be fully satisfied with the final results. Getting a dedicated scanner will increase the cost / time to get started, but will (for me) probably pay off in the end.
Yeah I'm not fond of this procedure either. I did consider using a dslr and taking a hit on the resolution not interested in taking loads of shots to stick together. I've also never found laying the negative on the glass to be that sharp but its fine for an inspection scan.

One of these days I'll send off the few sheets of 4x5 I'm really happy with for a professional scan.
 
Back
Top