Simplest setup for negative contact printing

Messages
254
Edit My Images
No
I have so far exclusively scanned my negatives. I enjoy the process, and I occasionally use some of my scans to produce prints.

I would now like to play with a new (to me) idea. I have a few 6x9 cameras and would like to arrange the negative strip from a 120 roll shot in a 6x9 camera (so four strips of 2 negatives each) on a sheet of photographic paper. It could be a way to describe a photographic 'story' or a small 'journey' set in a few frames for example. Could be fun. I would also like to challenge myself to expose all 8 6x9 frames equally well, because they'll be printed all together by contact, so no edits, no choice of different papers etc.

Now here's the challenge. I know absolutely nothing of the paper side of film photography. What will I need, minimally, to do the above? I'd imagine the following
  1. photo paper (eg Foma)
  2. paper developer, paper fixer
  3. Some trays
  4. Clips to hang the wet paper
  5. Some sort of negative holder to keep the three strips in place whilst they're being exposed
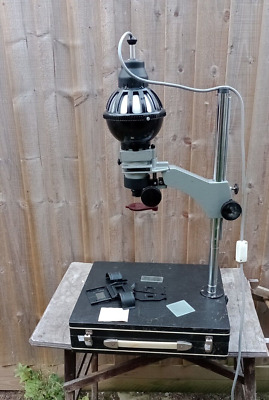
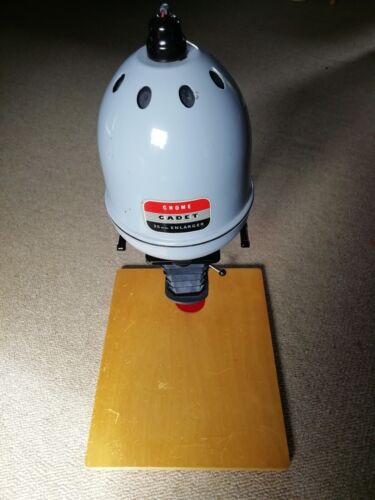
  6. Some sort of light source with a timer
I should say I do not want to, or can, purchase an enlarger at this time. I don't have the room, time, etc to play with new obscure equipment. So I guess my question in essence boils down to: is there a way to do good quality contact printing without an enlarger? Are there commercially available suitable light sources? How do people do this?

I can imagine that if the above were to work, nobody would stop me for purchasing a 10X8 Intrepid camera down the line and doing the same sort of thing with those huge negatives.
 
Last edited:
Just one thing missing - you'll need a darkroom or...

I started (with smaller negatives, one negative, one print) with a sheet of glass borrowed from a photo frame to hold negative and paper in contact and saucers as developing dishes (small negatives, remember!). I could get away with the dim light provided by a torch bulb because I was using paper designed for contact printing, which was less sensitive.

If you can't arrange a blacked out room to work in (thick curtains at night may be enough), possible something along the lines of a Stearman press developing tray, loaded in a changing bag, and quickly zipped/unzipped to make the exposure. Remove glass etc. and then use as a developing tray.

Edward Weston used a normal light bulb, height adjusted to make the exposure. He worked in an area without light pollution at night.
 
Less simplistic - substitute a Paterson (other makes available) contact printing frame for the glass; this will hold everything in place and make it simpler in a changing bag. But requires extra equipment.
 
7. Safelight

...Trying to place three strips of 120 film in darkness can be done but not something I'd do out of choice.
 
Thank you both. Good point about the need for a darkroom Stephen thanks. I have the sort of space one might use for tinkering as above, though sadly there is no water supply. Dang. Perhaps a night-time makeshift contraption in the bathroom.

Safelight - I'm going to fully expose my ignorance of printing here. Is this because printing paper is not panchromatic? Or some of it is? I thought you'd need full darkness throughout the process? But good point thanks.

Another thing I've been thinking is whether one would need especially exposed and/or processed negatives for this. Eg very dense negative perhaps? Unless one were to use an extremely dim light bulb...Just wondering here.
 
Last edited:
Is this because printing paper is not panchromatic?
Traditional bromide paper is orthochromatic, so doesn't respond to red very well. In practice, if you leave it out long enough, even a safelight will fog it. Multi-grade papers are effectively the same although the chemistry is a little different and a purist would want to use the recommended multigrade safelight.
 
I used multigrade for years with notmal safelights with no issues at all. I even did the test where you cover some part of the paper and leave the safelight expose for say 5 minutes (having preflashed the paper to get it over the threshold) and still nothing.
 
I use a Nova Darkroom Tent and can just fit a 4x5 enlarger in there. For contact printing with a light bulb there'd be loads of space. The tent is left up permanently in my garage. There is no water supply, but it's not much of an issue - just take jugs of water in to fill the trays and take the resulting prints to the nearest sink for washing.

The Ilford Darkroom Tent is a more recent product which is considerably cheaper than the Nova - https://www.harrisoncameras.co.uk/p...d0Z9OzUDZ71TcNPy2BgwLhImGUXZUak4aAiR4EALw_wcB
 
I use a Nova Darkroom Tent and can just fit a 4x5 enlarger in there. For contact printing with a light bulb there'd be loads of space.
I made my own tent out of 2x2 finished timber, 4 inch screws and builders' black plastic sheeting, which cost me less than £20. It was roughly 4ft x 4ft and this outfit fitted in very nicely (the table was 1 inch plywood on the chassis of a Xerox copier that I bought for £1 at a local auction) ...

Omega Prolab 45 enlarger and Nova processor.jpg
 
My dad made something very similar to Sirch's Paterson contact printer/safelight combo when he was doing his wood machining apprenticeship in the late 1940's. I just wish I still had it, but it disappeared years ago in the course of various house moves. Mind you, it was sized for 120-size negs one at a time, if I recall.
This thread has given me an itch to build something like Andrew's setup in my shed or garage, as I'd like to produce neg contact sheets the old way; For 35mm I do have the paterson contact proof printer thing though, which makes life easier. Various other ideas popping into my head though...
 
Thank you both. Good point about the need for a darkroom Stephen thanks. I have the sort of space one might use for tinkering as above, though sadly there is no water supply. Dang. Perhaps a night-time makeshift contraption in the bathroom.

Except for a brief time at university, I've never had a darkroom with running water. I had a bucket with water in it.

As an alternative, contact printed cyanotypes? The darkroom problem is because we're considering normal darkroom papers; change that and the game changes.
 
Nobody's addressed the hard bit.....lol
I like hard bits.
So eight 6x9's at once.
I'm guessing they are to be framed on that one sheet.
To make things simpler, they are all landscape orientation and to be equally spaced, ie uniform borders, that rules out strips unless the space between them is teeny camera spacing, in which case they can't be equal because the horizontal spacing will be wider.
I don't imagine we are including the sprocket edges ?
Its difficult to know what the intended finish print is to look like, because strips don't work very well and 8 at once is 4 strips of 2.
Fag packet calcs say 10mm border between frames and 20 round the edges might fit 9.5 x 12 paper with careful planning, but 11 x 14 will give more slack for spacing and set up..:)
And we haven't even got on to a printing frame.
 
My dad made something very similar to Sirch's Paterson contact printer/safelight combo when he was doing his wood machining apprenticeship in the late 1940's. I just wish I still had it, but it disappeared years ago in the course of various house moves. Mind you, it was sized for 120-size negs one at a time, if I recall.
This thread has given me an itch to build something like Andrew's setup in my shed or garage, as I'd like to produce neg contact sheets the old way; For 35mm I do have the paterson contact proof printer thing though, which makes life easier. Various other ideas popping into my head though...

There is something liberating about this isn't there. At least based on how I see it at the minute.

No enlarger
No scanner
No computer
No PS

Just a bunch of negatives and a bit of paper. Bare essentials. But I'm sure there is some source of endless frustration somewhere and I don't know yet :)

One question about exposing photo paper. My understanding is that paper is less sensitive than negatives and that a correct paper exposure is in the region of seconds, not milliseconds. Is this correct?

If it is, could one then do away with a timer and just employ a metronome or something? Or some kind of audible stop watch? Light switch on - tic - tic - tic Light switch off.
 
Paper is generally reckoned at about ISO 5 give or take. Aim for an exposure of around 10 secs and adjust the light to suit (dim light, variable distance).
 
I did manage (about 4- 5years ago) to get some contact prints using a 120 neg, some 3"X3" photo paper with piece of ordinary glass on top. I used a desk lamp with a 15w SES incandescent bulb at various heights and various exposures. The bathroom was made light tight. It was the first time I'd ever dev'd a print as well so it was a big learning curve. It can be done and cheaply but...

Just a few weeks after I bought an enlarger which of course gives a lot more control. I've still got about 80 sheets of the 3"X3" paper which I keep meaning to cut down for 120 paper negs. Unlike most other incandescent bulbs you can still get 15w SES as they go in things like fridges & cooker hoods.

EDIT - detailed in post 13 & 14 with contact prints here: https://www.talkphotography.co.uk/t...ilm-and-pinhole-plus-4x5.705563/#post-8594696
Was only 3yrs 8 months ago - I've come a long way since then :)
 
Last edited:
Apologies - what exactly are we looking at here please :)
As I said, it's a combined safelight and contact printer. There is a light bulb in the yellow plastic box which is translucent so when it is turned on it is a safe light. On top there is a a lift up black flap, hinged by the metal rods you can see. You lift up the flap and place a 6x6 negative on a white translucent plastic screen with a piece of photo paper on top you then cover that with the black flap. The yellow bar at the lower edge is controlls the exposure, push the bar down and the light is directed to the negative/paper, let go and the light is shielded. Probably easier to google it than describe it
 
My understanding is that paper is less sensitive than negatives and that a correct paper exposure is in the region of seconds, not milliseconds. Is this correct?

If it is, could one then do away with a timer and just employ a metronome or something? Or some kind of audible stop watch? Light switch on - tic - tic - tic Light switch off.
Many decades ago my first 35mm enlargements were made using an enlarger that didn't have a timer connected. It had an inline switch (just like a desk lamp) which I used to switch on and off and counted out the seconds in my head.
 
Many decades ago my first 35mm enlargements were made using an enlarger that didn't have a timer connected. It had an inline switch (just like a desk lamp) which I used to switch on and off and counted out the seconds in my head.
Until a year ago I didn't have a timer, my 2nd hand enlarger came with a simple dial timer but it didn't work. I was turning the enlarger on and off at the plug and using the red filter disc below the lens to control the exposure. I then bought a proper timer and fitted the appropriate plugs and sockets to my 35mm and 120 enlargers so the timer can be swapped between them

You can do a lot with simple or limited equipment. However the right kit gives a lot more control and makes life a lot easier!
 
As an alternative, contact printed cyanotypes? The darkroom problem is because we're considering normal darkroom papers; change that and the game changes.
I've made one contact printed cyanotype (plus various test strips). It's a lot of fun, but there are plenty of issues to consider. The dynamic range (???) of cyanotype paper is much less than most negatives (or prints); I used a digital inter-negative, but I've since discovered some resources including software that allows you to adjust your image to make an inter-negative that works better. Also, if using the sun, it's generally highly variable in this country, so guessing exposure is an issue; anyone wanting to go down this route would be likely to build/buy a UV light box sooner or later.

Nevertheless, it's entirely possible to buy some sheets of 11x14 paper and the cyanotype chemicals, mix up, brush them onto the paper, arrange your negatives under a sheet of glass, take it outside, and there you go! A thoroughly artisanal home-brewed print!
 
Talk of cyanotypes reminded me that I had made a couple of contact prints from 4x5 negatives using only the sun as light source. At the time I was making lumen prints with flowers and decided to experiment with negatives.

image_67142913.JPGimage_67172353.JPG

The paper used was Orwo BN113 fibre-base paper and the exposure time, under glass, was about 45 minutes. As you can see they are quite dull (more so after they have been fixed) and I didn't have a practical reason to take it further. They are not toned, they naturally came out with that colour.

Given that the only tools/materials required are a sheet of darkroom paper, a negative, a sheet of glass, and some sunshine, I think this must be the most low-tech way to make a contact print.
 
Last edited:
Not the simplest, but neither is it the most expensive

Cheaper and with an easel
 
Last edited:
Back
Top