Holga 120-WPC
Maker/Provider : Holga (various anonymous factories) / My version sourced via eBay ")
Product: 120-WPC (120 film, Wide Pinhole Camera)
Production Years: In Current Production
Price New: £30-£40 from eBay depending on "bundles" and country of source
Overall Rating: 3/10 with the head, 8/10 from the heart.
Overall Summary: Wide Angled plastic box with a hole at the front and a back that falls off if you don't hold it in place with Gaffa Tape. Needs a certain degree of modifcation "out of the box" but as with most of the Chinese Plastic Toy Cameras, can actually produce some very acceptable results if you work WITH the limitations of the hardware. Comes with film masks to produce either 8 - 6x9cm frames or 6 - 6x12cm frames per roll of 120 film.
-----------------------------------------------
Detailed Review
Lets just get this out of the way first of all... this is a cheap, plastic, mass produced toy camera - and conventional assessments of build quality and so forth are pretty much out of the window here. They are built in various factories using a cheap injection moulding process, and as such the sample deviation from one camera to another can be incredible. Some versions suffer horrendously with Vignetting - especially with the 6x12 mask, others suffer not at all. My particular example is somewhere in the middle - with the 6x12 mask fitted, there's a little light fall-off in the corners of the frame, perhaps half to one stop worth, but nothing that can't be "fixed in post" should you wish. The 6x9 mask just works.
So, to the camera itself... well - it's a pinhole camera, so there's no lens, just a plate with a 0.3mm diameter hole in it - this equates to something like f135, so, basically you can expect 2 things - 1) incredible depth of field, removing the requirement for actual focusing and 2) long exposure times, ideally requiring the use of a tripod.
As mentioned above, there's no requirement for focusing. Also, there's no real facility for completely accurate framing either! The top plate of the camera has a couple of guide lines that allow you to point the camera in roughly the correct direction, but it's something you sort of get a feel for after a couple of rolls anyway. Also on the top-plate is a embedded spirit-level to try and at least not get the camera on the squint as well. Other external features are
- a winder knob on the top panel
- an untimed "press and hold" shutter release (while ever you hold the shutter button in, the shutter is open) that's also compatible with a old-school bowden cable type cable release (generally bundled with the camera).
- Standard Tripod mount threading at the base of the camera
- A detachable camera back held in place with 2 metal clips (and plenty of gaffa tape if you don't want light leaks)
- A "sliding cover" red-window for viewing the film frame numbers (sliding to select depending on the mask used)
- A "exposure guide" on the back - a table giving estimated times. Don't trust this any further than you could comfortably spit out a large rat. Instead use a lightmeter and use the table on here instead
- A cheap and nasty nylon "strap" that attaches to the clips holding the back on, again, don't use it, it'll only unclip the back and ruin your film.
- A "press fit" cover for the pinhole "lens" area. Incredibly easy to forget to remove.
In Use
One slightly strange thing is that when a shot is taken, the film is then wound on to the next
odd number frame so for example when using the 6×12 cm mask, you would shoot at frames 1, 3, 5, 7, 9 & 11 (with the arrow pointing to 12 on the slider) or at frames 1, 3, 5, 7, 9, 11, 13 & 15 (with the arrow pointing to 16 on the slider) when using the 6×9 mask . Multiple exposures are possible (some would say inevitable at some point!) by not winding on between shots.
Loading the film is the usual routine for 120 roll film. The film is reasonably securely held, with the tension on the film maintained by the typical Holga method of a couple of bits of sponge. Eventually, these WILL become detatched and roll into the film, destroying/giving happy accidental effects (depending on your outlook on these things) to the images on that roll. After this point, it's probably a good idea to wedge a little bit of cardboard under the roll-spindles to provide enough drag to keep the film plane flat over the frame mask - it is after all a big old length of film to be left loose and flapping about. Set the "sliding window" to the appropriate frame mask as fitted, and wind on to frame 1. Ensure the lens cap is securely attached at this point.
Once loaded, the routine I normally take is this.
- decide on the "framing" (I use the term loosely)
- Attach the camera to the Tripod.
- Fit the cable release
- Tweak composition
- Take light reading and adjust via the conversion table as linked above
- once again check the lens cap IS IN PLACE
- take hold of cable release and verify that it operates correctly (including the "lock" if the timings are something silly like 30 minutes...)
- set timing device (or prepare to "count elephants"
 ) as appropriate
- REMOVE THE LENS CAP
- take the picture
- replace the lens cap
- wind the film onto the next ODD number
And that's pretty much it. Repeat a few times and wind to the end of the film. You'll probably forget something or other, either you'll leave the lens cap on and not realise, and get a blank frame. Or you'll wind to an even number and overlay one frame on another. Or you'll forget to wind on and get a double exposure. Or you'll possibly do something else that's dumb. That's okay - it's a Holga, there SHOULD be a sense of adventure when the film comes out of the soup.
One thing about processing. If you're getting them processed at a lab, it may well be a good idea to state very clearly in the processing instructions that the roll has been shot on a Holga Pinhole Panoramic Camera, and if at all possible, could the film be returned to you "uncut" in case of overlaps etc. At least that way YOU make the value judgements on where to separate frames...
Usability Modifications.
This is possibly half the fun of the Holga's - they're cheap, so you don't feel too bad about taking a Dremel to them if needed.
In the case of my camera, the Film Frames were very nasty indeed - not in terms of being out of square or anything, they were just covered in sharp "moulding flash" edges which required a little gentle application of 3200 grit wet-and-dry and a wipe with a tack-cloth to remove any dust.
Also, as said above, the back is poorly attached via 2 spring-steel external clips. I took the simple expedient of a couple of strips of black gaffa-tape, which pretty much also removed any potential for light-leakage.
The Lens Cap as supplied is AWFUL and falls off at the slightest provocation. I decided to kill two birds with one stone and create a more secure attachment for the lens cap AND a facility to mount filters. Obviously with such a wide angle setup it was key to get as wide a filter on there as possible - A 52mm-77mm filter adaptor ring like
this was purchased and attached to the front of the camera. It DOES slightly vignette on the 6x12 frame but works perfectly on the 6x9 - and allows me to use my existing contrast filters for shooting B&W film.
 Holga WPC120 Pinhole Camera
 by
The Big Yin, on Flickr
I also came up with a real cheap and nasty "lens cap indicator" which basically consisted of a black drinking straw taped to the lens-cap which stood up and was noticeable from behind the camera - reminding you to take the lens cap off... Here's a photo of Helga the Travelling Holga sporting a similar contraption...

Holga Lens Cap by
The Big Yin, on Flickr
As far as the "dark corners" or vignetting problems - my example didn't really suffer with it, however there are a number of guides as to what to do to fix the problem - here's
one of them.
Output
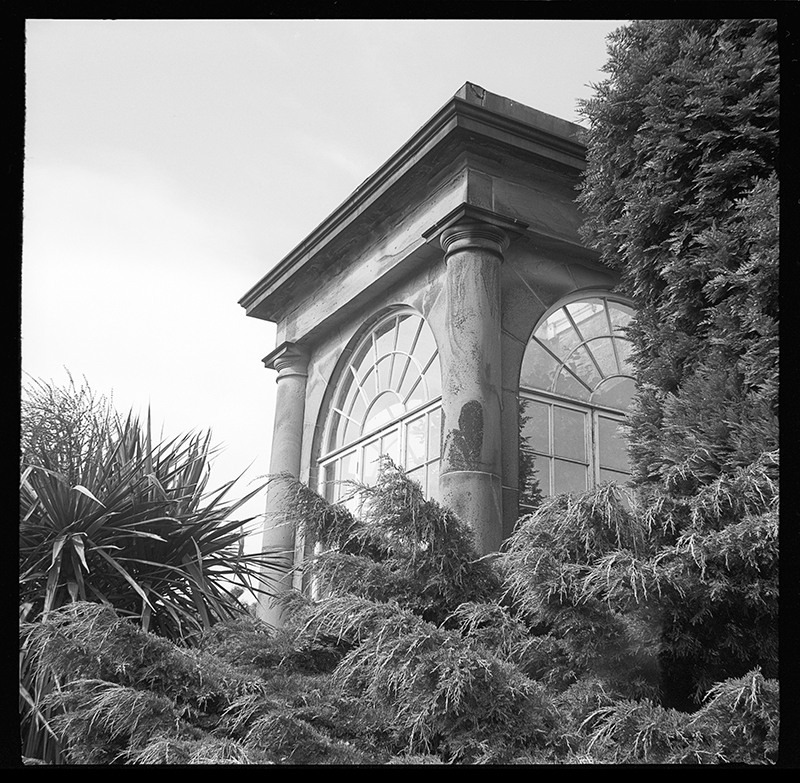
So, what can you expect in terms of output. Well - there are far better examples of the kind of things people have done with this little camera than anything I've shot, but even with my meagre allotment of talent and abilities I've come up with the odd enjoyable shot...

Spurn Point Pinholes by
The Big Yin, on Flickr

Ribblehead by
The Big Yin, on Flickr

Spurn Point Pinholes by
The Big Yin, on Flickr

Barlow Common by
The Big Yin, on Flickr


 DSCF4331
 Barge 1
 BM 3
BM 3 Esthwaite 2