A big film scanner thread

I was basically typing what Nige said. I too have the 8100. The IR Dust removal wasn't worth the extra £50 IMO.
 
Shooting b&w, so it isn't worth it then. Thanks for the input everyone.
 
Last edited:

..and also you should think what you would use a scanner for e.g. if you are going to just post here or on the web then a cheap flatbed would be more versatile as it can scan photos, scan 35mm and 6 X 6cm (medium format). But if you want large photos then a dedicated 35mm scanner would be better than a cheap flatbed scanner. But it's all subjective as would any of your family or friends care, seeing prints of them @ 8X10, if the print from a cheap flatbed scanner is slightly inferior to a print from a scan from a 35mm dedicated scanner.
 
..and also you should think what you would use a scanner for e.g. if you are going to just post here or on the web then a cheap flatbed would be more versatile as it can scan photos, scan 35mm and 6 X 6cm (medium format). But if you want large photos then a dedicated 35mm scanner would be better than a cheap flatbed scanner. But it's all subjective as would any of your family or friends care, seeing prints of them @ 8X10, if the print from a cheap flatbed scanner is slightly inferior to a print from a scan from a 35mm dedicated scanner.
Good point. Not buying anything at the moment. Still waiting for the first lot of negs to be developed and I need to make sure that my enthusiasm doesn't wain before I spend any more money. Nearly bought another film camera from Harrisons the other day. Luckily it was snapped up in double quick time, phew ... close call.
 
Small part of an image - some sort of developer mark?
 

Attachments

  • Nikon F 1st Roll-000006060003.jpg
    Nikon F 1st Roll-000006060003.jpg
    104.8 KB · Views: 19
Here's an example of a scan processed through Grain2Pixel, plus the version I got from Filmdev. Even at 1800dpi, my V550 scan is three times the pixel resolution of the lab scan. Both images have been tweaked a little, but I think I prefer my Epson /G2P version in this case. More experimentation is probably required though.

The Grain2Pixel plugin still doesn't work well on my PC though . It still locks up, but I've foind that clicking the layers panel when this occurs will kick it back into life for some reason. It also takes approx 15 minutes to process a single shot. I might contat the developed to see if they have any ideas. Apart from the performance issues I'm getting it looks to do a nice job.

1 - Epson V550 and Grain2Pixel

Cleethorpes beach G2P
by fishyfish_arcade, on Flickr

2 - Filmdev medium Noritsu scan

Cleethorpes beach FD
by fishyfish_arcade, on Flickr
 
After contacting the developer to ask abot the lengthy processing times I was having, it looks like two things were to blame...

1) Me. For not RTFM'ing the correct process. The bit where I thought it was hanging was because it waits for you to adjust the image crop area before it proceeds. Someone didn't realise this! :eggface:
2) My PC probably being a bit poorly. I've spent most of the day running checks to repair system files and then a 12 hour(!) chkdsk process to see if the hard-disk is ok. Things are now running noticeably smoother, although Grain2Pixel still takes around 3 minutes for a single image - much longer than the developer gets (he quoted 10 secs for his PC!), but still four or five times faster than before.

I think I still need to see if there's anything else I can do in terms of my PC's efficiency, but I'm keen to see how the plugin works on some other negatives. I'll either post my findings here or start a thread dedicated to the plugin.
 
Last edited:

Plustek have finally launched their 120 Pro 35mm + 120 scanner. This is on paper a much refined version of their old (and currently discontinued) Plustek 120.

If they've gotten this right (I'm eagerly awaiting for reviews) this could be the integrated solution many people need, and might make other options (such as buying rare and overpriced old Nikon Coolscan devices) completely redundant.

I'm moderately hopeful as the company has already shown it can be done - their 35mm scanners (7400, 7600, 8100, 8200) are imho great little devices.
 
Last edited:
H'mm we'll see:-
Plustek OpticFilm 120 Pro film scanner offers 5,300 dpi true optical resolution
 
Let me start by thanking @ChrisR for creating a very informative thread, a very valuable resource.

However one aspect of scanning that is eluding my understanding relates to the relationship between theoretical scanning resolution and effective resolution. I nearly get it, but not so I understand how to apply it in practice.

Can anyone shed some additional light on this element of scanning?

As mentioned earlier in this thread
............The Epson V600 flatbed claims a resolution of 6400 dpi, but FSI measure it at best 1560 dpi (set at 3200), while the V800 is measured at 2300 dpi (set at 4800). The Plustek 7500i that I use claims a resolution of 7200 dpi, but the best FSI could actually measure at that setting was 3500 dpi. The newer 8100 was measured at 3800 dpi (set at 7200), while oddly the 8200i only appears to get 3250 dpi. Meanwhile the Reflecta Proscan 7200 gets 3200 dpi set at 3600, and the RPS 10M gets 4300 dpi set at 5000. AFAICS the latter is about the best effective resolution of any available consumer grade scanner (although the Hasselblad Flextight X5 was measured at 6900 dpi, set at 8000!).

For example areal world resolution of 3800dpi is achieved by scanning at 7200dpi using a Plustek 8100 scanner. Does this mean that in general you need to scan at the higher setting to achieve your desired resolution?

But, then in other web articles (sorry, can't find references at the moment) I've seen it emphasised that scanning at a higher setting generates a larger file without adding any more real data and that you should re-sample the image to achieve the best resolution and reduce the file size.

Apologies if this seems a bit garbled, but unfortunately this is just a reflection of my confusion.

Any clarification of this aspect of would be much appreciated.
 
I'm guessing here, so accept anyone else's response in preference. I've not looked at references on claimed and real resolution, nor how they are determined. What seems to be a common factor is a need to halve the value; and this suggests to me that the underlying reason is the Nyquist limit. I just did a quick search, and there's a Wikipedia article that appears to explain it well, so I won't try. But a simple illustration: suppose you're scanning a test target of black and white closely spaced lines, and your sampling interval is equal to the spacing. If your sampling is unfortunate in how it lines up, you might happen to scan only white lines, the black ones "falling into the gap" and get a white scan as a result. Double up the scan interval, and you'll hit both black and white lines. That's Nyquist simplified without diagrams :)

I always scan at maximum resolution, and then generally "interpolate down" with the idea that this will eliminate scanning artefacts.

BUT what I do is determined by what looks good to me in the print; and if it is, I don't go any further in experimenting. I'm extremely lazy that way.
 
Well without knowing the technical side of how they test etc reviewers state the true dpi of a scanner and my understanding is, it is tied up with the optics, and above true dpi the scanner's software is used. e.g. the true dpi of my Epson V750 is 2400dpi but I can scan over 6400 dpi so there is a "fiddle" there. You can only get so much detail from a neg depending on the optics e.g. say using a 2400 dpi true scanner...but if scanning way above 2400 dpi you don't get any more detail but what it does is cram in more pixels per sq cm so the jpg should look better.or smoother (in theory). All subjective really as on the net they have shown the difference between a V750 and a Fuji Frontier (the labs use) and you would have to start looking very closely at the JPg or pixel peep to see the differerence, but a cheaper scanner would probably show more of a difference?
IIRC the scanners the labs use, which were very expensive new their true dpi, is about 2800 to 3,200 dpi so they should get more detail off a neg, the ultimate scanner is a drum scanner but erm don't know the true dpi that produces or even if you measure it with dpi...maybe someone here knows.
 
Last edited:
... and might make other options (such as buying rare and overpriced old Nikon Coolscan devices) completely redundant....

Seems a bit harsh.
 
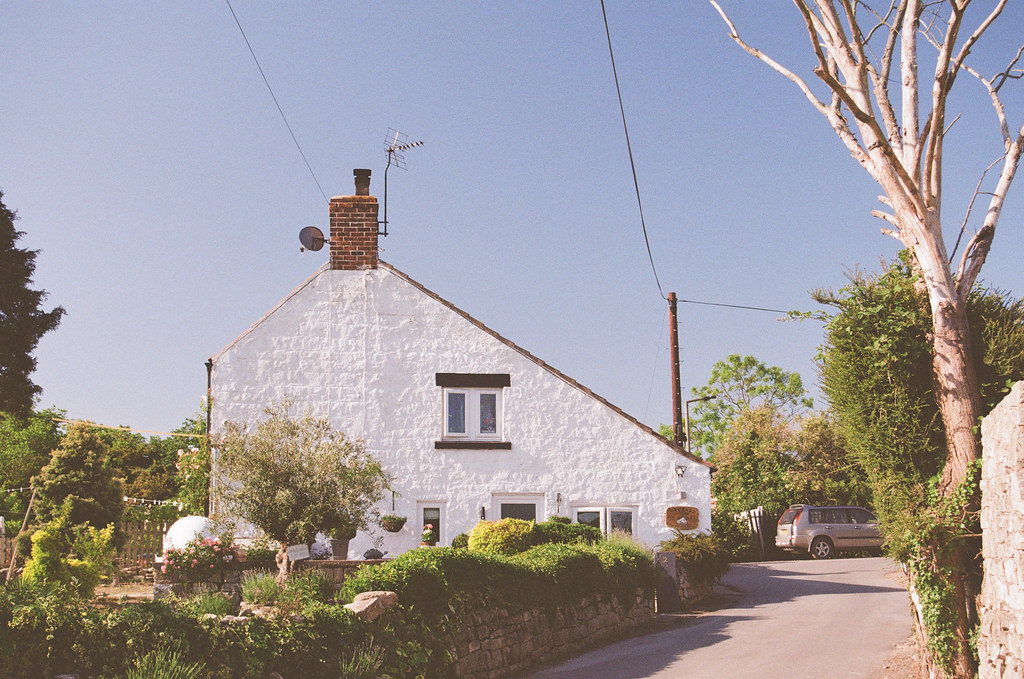
A bit more experimenting with colour negative conversions. The three scans below are conversions from Grain2Pixel, Negative Lab Pro, and a Noritsu scan from FilmDev. The film is Kodak Gold 200. The two converted negs were scanned on a Plustek 8100 at 1800dpi which results in a final image considerably larger than the lab scan. I normally scan at 3600dpi on the Plustek FWIW.

  1. Filmdev - untouched scan. Straight conversion to JPEG from the TIFF file they sent. No dust to deal with here.
  2. Negative Lab Pro conversion. Some tweaking took place as part of the conversion process, but the only other PP has been to sharpen the image and alter the saturation by a small ammount, oh and the color temp was adjusted. I also dust spotted it quite a bit which has produced some mottling in the sky. This was using the trial version of Negative Lab Pro. I think it's identical to the full version, but limited by the number of conversions you are allowed (just 12).
  3. Grain2Pixel - Again, just sharpening and minor saturation tweaks to the converted file. Dust spotting carried out again, which has let to mottling in this one too.
  4. The Filmdev scan again, this time the original TIFF put through the Autocolour option in Photoshop. No other edits.

It seems that all three probably need some tweaking to get them right. More experimentation needed before I decide whether to venture once more into scanning my own colour negs again.

1

1
by fishyfish_arcade, on Flickr

2

2
by fishyfish_arcade, on Flickr

3

3
by fishyfish_arcade, on Flickr

4

4
by fishyfish_arcade, on Flickr
 
Last edited:
I've yet to check the spoiler, but on my monitor, #3 is the best. It's better than #2 by a tiny margin - it took me a while to decide, but then I looked at the shadow areas on the white surface of the cottage. They are a more neutral grey in #3 compared to #2, where they verge ever so slightly towards red/magenta perhaps. Beautiful inversions both of them though, and I think I would be happy with both.

#1 is quite dreadful IMHO. Amongst other things, I seem to see some lilac in the sky.

Thanks for taking the time to doing this! Really interesting
 
Last edited:
With the filmdev one I just clicked auto color in Photoshop and it looks Ok..the sky looks more faded i.e. not so blue but as you were there, you might be able to remember how the sky looked.
 
With the filmdev one I just clicked auto color in Photoshop and it looks Ok..the sky looks more faded i.e. not so blue but as you were there, you might be able to remember how the sky looked.

I might try that later and add it to the post above for comparison. I’ve used auto colour in Photoshop before but find it can be very hit and miss In its results.
 
I might try that later and add it to the post above for comparison. I’ve used auto colour in Photoshop before but find it can be very hit and miss In its results.

Fimldev one shows less contrast (the others might have added it?) as there is a bit more shadow detail in the wall compared to others...but that's in Photoshop and after posting here might not show the difference.
 
Last edited:
Last edited:
Another post comparing different approaches to digitising film here: https://casualphotophile.com/2020/0...ods-and-results-dslr-vs-flatbed-vs-lab-scans/ . The flatbed scanner is a V550, while the DSLR is a tethered 70D with a Vivitar 55/2.8 macro lens

His TLDR...

"
  • DSLR/mirrorless scanning is much sharper than an entry-level flatbed for both 35mm and medium format, (can be) much more efficient, and is comparable in quality to lab scans. See our main image in full res here.
  • Cost of entry will most likely be higher with a DSLR/mirrorless, even excluding the camera body, though can be done more economically than my setup with a little creativity (possibly at the cost of efficiency).
  • Flatbed scanner results will likely be perfectly acceptable for most use-cases. Just make sure to set your expectations accordingly."
The post also contains some comments about adjusting the height of his Epson V500 standard holders in an attempt to improve focus. He was using "sticky notes" to raise the height ( claiming 7 notes were needed for 0.5mm, which seems a lot to me, though maybe they are thinner than our Post-it notes!).

Right, that's 2 more tabs I can get rid of!
 
Last edited:
Another post comparing different approaches to digitising film here: https://casualphotophile.com/2020/0...ods-and-results-dslr-vs-flatbed-vs-lab-scans/ . The flatbed scanner is a V550, while the DSLR is a tethered 70D with a Vivitar 55/2.8 macro lens

His TL:DR...

"
  • DSLR/mirrorless scanning is much sharper than an entry-level flatbed for both 35mm and medium format, (can be) much more efficient, and is comparable in quality to lab scans. See our main image in full res here.
  • Cost of entry will most likely be higher with a DSLR/mirrorless, even excluding the camera body, though can be done more economically than my setup with a little creativity (possibly at the cost of efficiency).
  • Flatbed scanner results will likely be perfectly acceptable for most use-cases. Just make sure to set your expectations accordingly."
The post also contains some comments about adjusting the height of his Epson V500 standard holders in an attempt to improve focus. He was using "sticky notes" to raise the height ( claiming 7 notes were needed for 0.5mm, which seems a lot to me, though maybe they are thinner than our Post-it notes!).

Right, that's 2 more tabs I can get rid of!

I'll read the article later, but on my PC the V550 scan in that test image looks awful - not in terms of resolution, but in tonality. The shadow areas are heavily blocked. That's not something I find with my V550 scans.
 
I'll read the article later, but on my PC the V550 scan in that test image looks awful - not in terms of resolution, but in tonality. The shadow areas are heavily blocked. That's not something I find with my V550 scans.

As another V550 user, I was about to post this. On my screen I see blocked highlights on the dog and terrible resolution. A V550 can do much better than that.
 
Last edited:
After contacting the developer to ask abot the lengthy processing times I was having, it looks like two things were to blame...

1) Me. For not RTFM'ing the correct process. The bit where I thought it was hanging was because it waits for you to adjust the image crop area before it proceeds. Someone didn't realise this! :eggface:
2) My PC probably being a bit poorly. I've spent most of the day running checks to repair system files and then a 12 hour(!) chkdsk process to see if the hard-disk is ok. Things are now running noticeably smoother, although Grain2Pixel still takes around 3 minutes for a single image - much longer than the developer gets (he quoted 10 secs for his PC!), but still four or five times faster than before.

I think I still need to see if there's anything else I can do in terms of my PC's efficiency, but I'm keen to see how the plugin works on some other negatives. I'll either post my findings here or start a thread dedicated to the plugin.

Quick update on Grain2Pixel...

I've now installed some new RAM (and also gone up from 8 to 16Gb) and Grain2Pixel now runs far faster. It's now taking approx 30secs to process a 300Mb 6x6 negative (scanned at 1800dpi).
 
AAMOI a good program for viewing your shots is fastone image viewer....I find win 10 viewer slow and crappy.
 
The 550 comes out of that surprisingly well. Although comparing small Frontier scans with large V550 scans and even larger Plustek scans, and then looking at detail, doesn't quite seem a level playing field to me. And I was bemused by him first editing the scans so they looked the same, though maybe I misread that bit!

EDIT: I don't think he says what software was used, either. I assume it was not Epson Scan, as that wouldn't be an even comparison with the Plustek, so I'm guessing Vuescan, but who knows?
 
Last edited:
The 550 comes out of that surprisingly well. Although comparing small Frontier scans with large V550 scans and even larger Plustek scans, and then looking at detail, doesn't quite seem a level playing field to me. And I was bemused by him first editing the scans so they looked the same, though maybe I misread that bit!

EDIT: I don't think he says what software was used, either. I assume it was not Epson Scan, as that wouldn't be an even comparison with the Plustek, so I'm guessing Vuescan, but who knows?

Well the link might be handy for someone who wants to scan negs and doesn't want to spend too much money....but for many of us it's just an interesting read as we already know about Epson V550 for 35mm and 120.
For me I've done quite a few tests comparing a V750 to Fuji Frontier results for detail from the neg for 35mm and can't see much difference which might explain why Epson continue with that range as they have done their own similar tests
OR
If you have a suspicious nature:- Epson are still trying to profit from old technology as they designed the original scanner years ago and just change the numbers from V700, V750, V800 to V850 with a few small changes like changing the light source...but then if it ain't broke why fix it ;)
To make the thread more interesting what about views from guys owning a Plustek compared to a Fuji frontier or Noritsu?
 
Last edited:
To make the thread more interesting what about views from guys owning a Plustek compared to a Fuji frontier or Noritsu?

It's a difficult comparison to make unless you have access to both scanners. I can get much higher resolution images from my Plustek than the Noritsu or Frontier lab scans I've had from FilmDev, but that's a limitation of the scanning resolution the lab offers. I suspect the Noritsu or Frontier would outperform my Plustek by some margin with like-for-like settings.

I've got some Fimdev large scans, so if I get the time I'll do a comparison against the same neg scanned on my Plustek at my usual dpi setting of 3600.
 
It's a difficult comparison to make unless you have access to both scanners. I can get much higher resolution images from my Plustek than the Noritsu or Frontier lab scans I've had from FilmDev,

erm but all Fuji Frontier and Noritsu have the same true resolution for detail for all labs so it doesn't matter mentioning Filmdev..it's like the C41 process is the same from any good lab using Kodak or Fuji chemicals.
But interesting you think that Plustek scans are superior (for detail) compared to Frontier and Noritsu.
 
erm but all Fuji Frontier and Noritsu have the same true resolution for detail for all labs so it doesn't matter mentioning Filmdev..it's like the C41 process is the same from any good lab using Kodak or Fuji chemicals.

But the labs choose to output the scans to a certain file size, e.g. FilmDev's medium scans all have a short side of 2048 pixels. This leads to the bizarre situation where a medium scan of a 35mm and 6x9 medium format negative would be the same size. A 6x45 medium scan would be smaller than a medium scan of a 35mm image.

But interesting you think that Plustek scans are superior (for detail) compared to Frontier and Noritsu.

I'm not sure how you read that from my comment of "I suspect the Noritsu or Frontier would outperform my Plustek by some margin with like-for-like settings."?
 
Back
Top