Bike Lighting Try_Updated Advice Please_Again

Messages
6,562
Name
Gary
Edit My Images
Yes
Hi all.

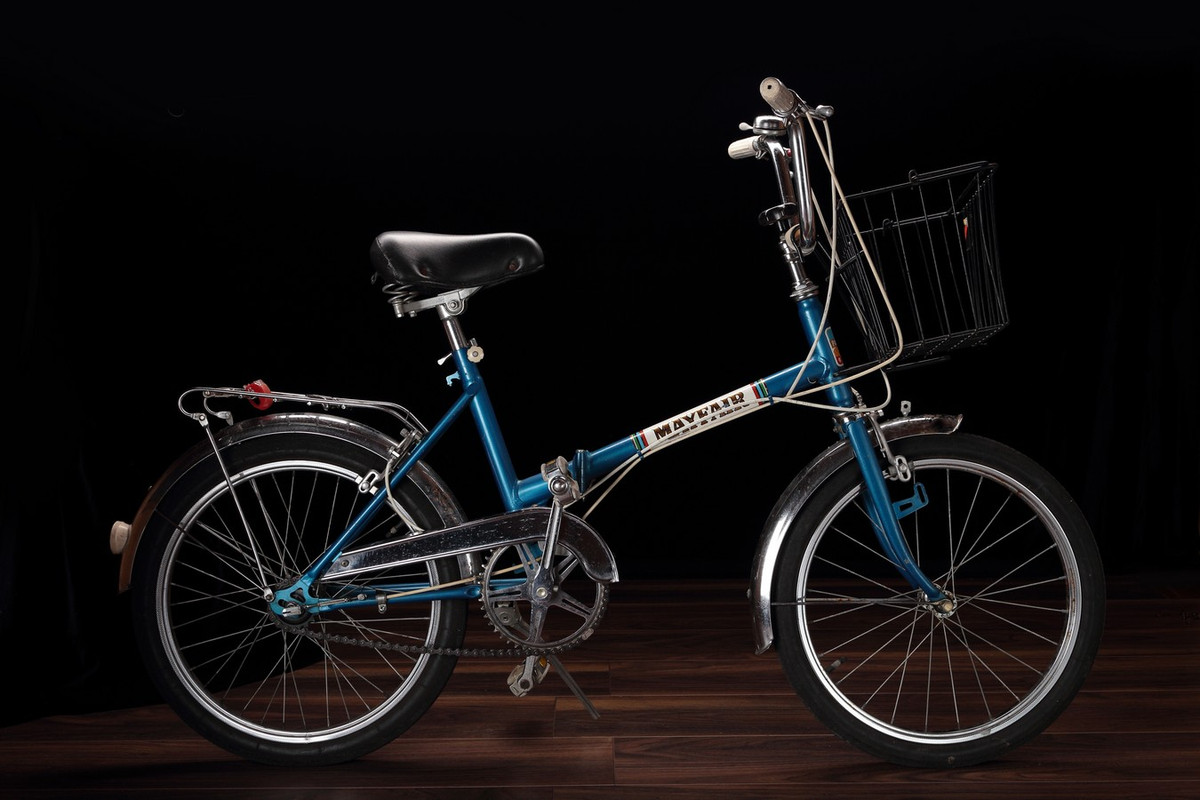
Some time ago my Daughter asked would I mind picking this bike up from her Uni accommodation. Obviously being a Dad it's the type of thing we love to do ;-)
This bike has been lurking around our shed for yonks plus said Daughter is skint and so suggested we try and sell it on you know where.
I took a few snaps on my phone as is the norm these would be fine I'm sure.

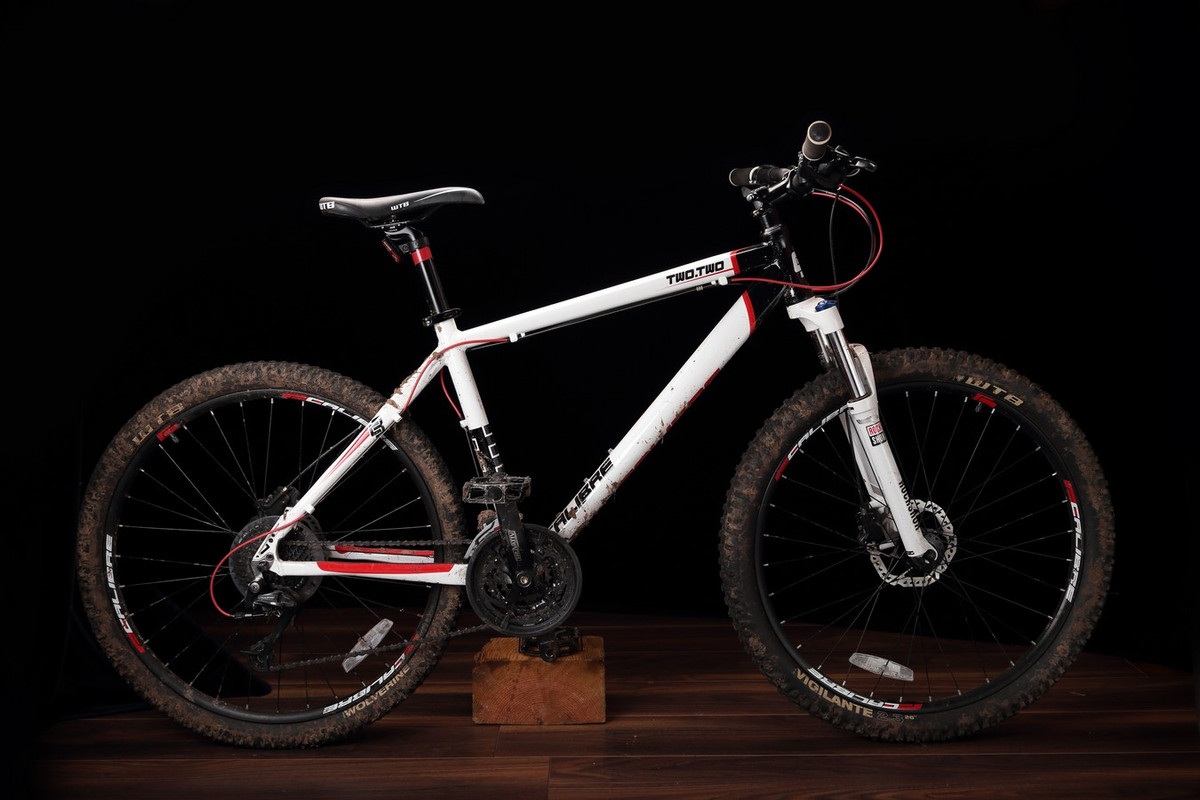
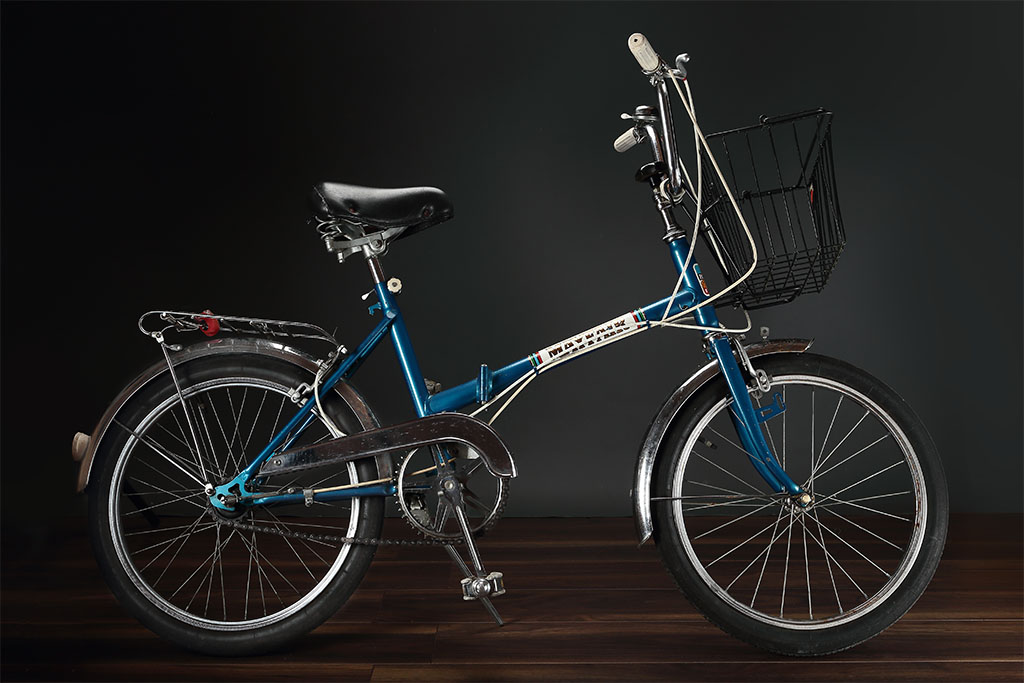
That said it occurred to me I could have a go at lighting it. I was time rich earlier today. This is the outcome of my efforts. I'm no expert by any means but enjoyed the challenge.

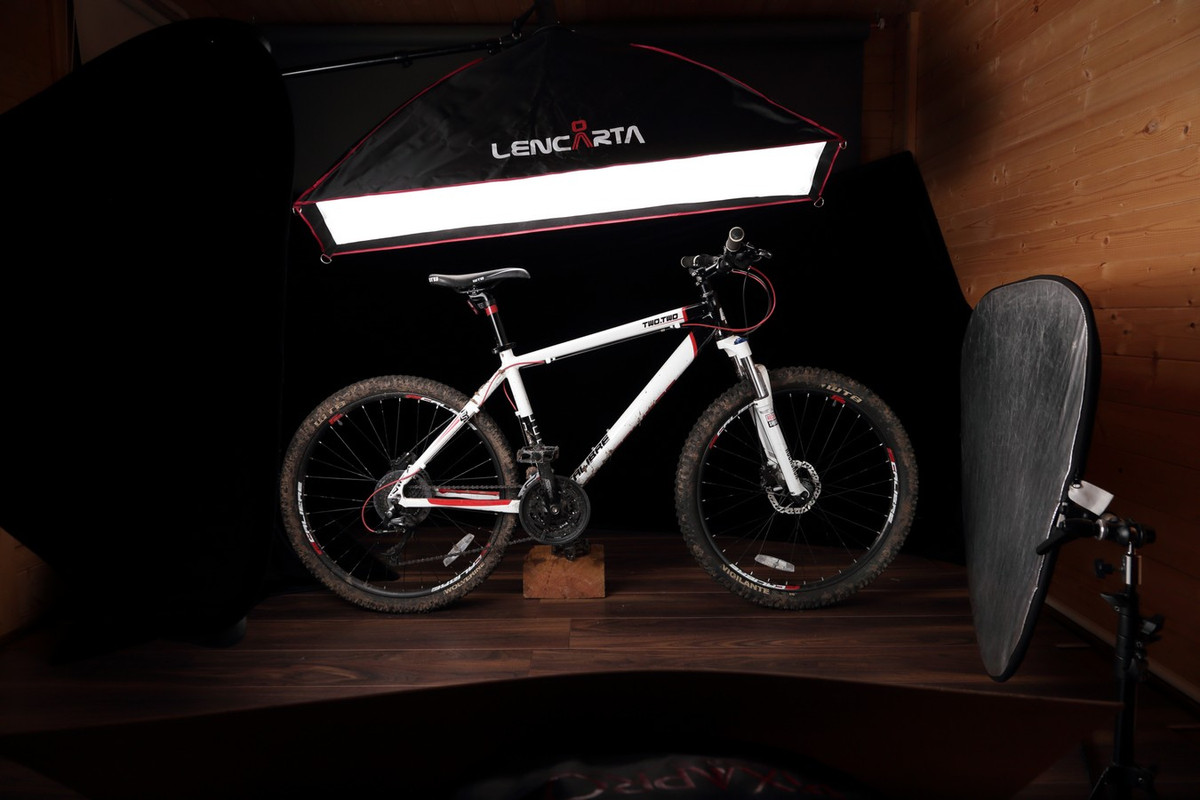
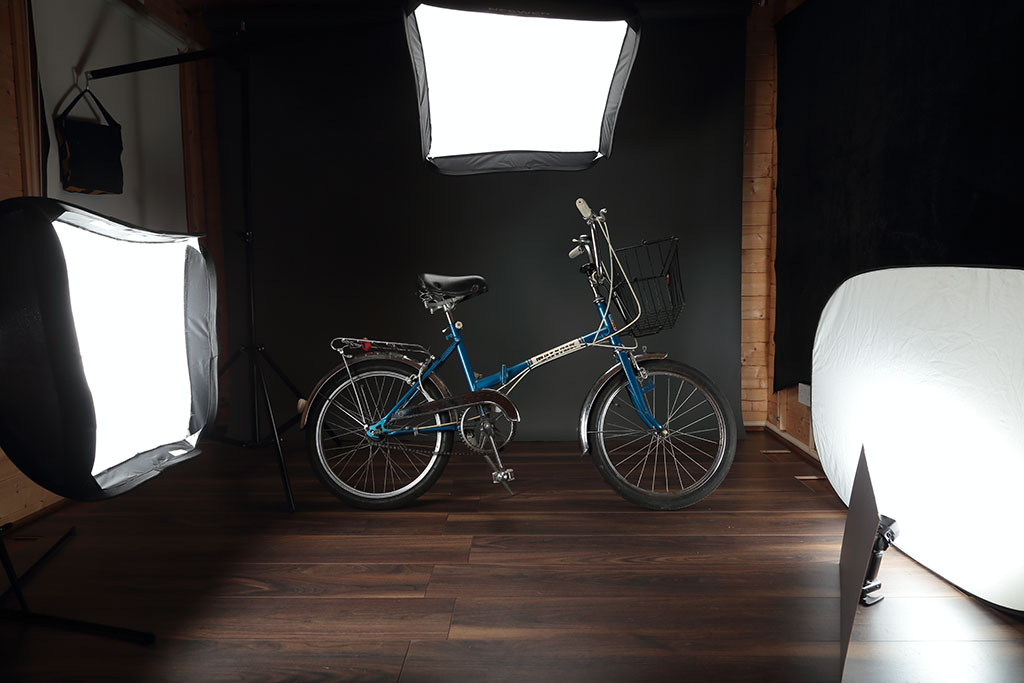
Off the reading I have done in the past it seems lighting from the top is a starting point so that's what I did. Then add the softbox to the left hand side and eventually the bounced speedlight to the right.
I was unsure how much I should be lighting really. That said whilst typing this out it feels obvious that everything needs to be lite ?

It would be great to get some feedback as to how I should have gone about it and how I could have improved the results.


Softbox at back as AD200
Softbox left 580ex
Bounced right side 580ex

bike-web.jpg

2
bike-web-2.jpg
 
Last edited:
It's a nice first attempt IMO.

There's a few things I think could use adjusting. The light on the left is feathered a bit too much which is causing a heavier vignette on the left side and dropping the left wheel a bit too dark. Secondly, the lights from the left and right are causing incongruent cross-lighting highlights and shadows (i.e. catchlights on rims).

TBH, your lights are a bit small for this subject. What I *think* I would do is combine the two softboxes overhead for a larger single effect; flatten them out a bit (angle) and move them closer (reduce power). You probably also need to angle them a bit to follow the overall angle/height of the bike (i.e. match the slope of the cross bar).
I would then use the large reflector from the front as bounce fill (probably use additional panels if avail). The remaining speedlight might be used for additional fill or to highlight something left out... if used at all it would likely be hard and at a very shallow angle from one side.
 
@sk66 Thanks that's really great information and the bonus is I actually understand most of what you have written. Often times the penny does not drop and I just don't get what people are trying to tell me. Yes the darker left hand side bothered me too. In my first few frames I didn't have the light feathered so much but I was getting a blown highlight on the front chrome mudguard. That said I still do but much less & yes I agree it did leave the rear tyre darker than I would have liked. Another reason I feathered the softbox that much was to try and spread the light right across the bike and then not need the bounced speedlight. I was most probably wrong in thinking that way ?
Not sure on the cross lighting thing. Do you mean on the right hand wheel the highlight should have been on the far right of the rim to look correct as though one light had been used ?
Things like the angle and placement of the lights makes sense to me, now you have explained. These are the things that make all the difference but a hard to learn.

Thanks
Gaz
 
Another reason I feathered the softbox that much was to try and spread the light right across the bike and then not need the bounced speedlight. I was most probably wrong in thinking that way ?
Raking one light across the bike at a shallow angle is not "wrong," it is useful in bringing out smaller details that flatter/diffused lighting hides. But there is no need for it to be so large/diffused... smaller/harder lighting placed at a greater distance is actually more beneficial for that. If you were to look back at that softbox from the perspective of the bike you will see that what you have done is create a smaller/harder strip box effect. And it's too far away from the rt side of the bike to be soft/diffused at that point, which is why it was causing blown highlight issues.
Not sure on the cross lighting thing. Do you mean on the right hand wheel the highlight should have been on the far right of the rim to look correct as though one light had been used ?
Yes, essentially that... Basically you generally want one key light (the overhead in this case, but it could be a different one) as the primary light providing the overall feel/direction. The other lights then add to it, but should not overwhelm the scene. In this example you essentially have 3 lights from 3 directions, all with relatively equal emphasis/impact.

Also note that with a "product" as large as this, and with the equipment/space shown, it might be easier to use just one softbox and the reflector to light smaller sections/areas at a time and then combine them in post (keeping in mind the overall direction/feel).
 
Last edited:
Have a look at member Garry Edwards tutorial on the Lencarta website.

It's lighting for a motorbike, so should suit your subject.

https://www.lencarta.com/studio-lighting-blog/tutorial-building-up-the-light/#.VyC_pnqGN-s

Dougie.
A bike would be far easier than the Bandit that I shot but yes, the principle is exactly the same.
The big problem with the motorbike is the very complex shape of the petrol tank, softboxes big enough for that aren't available. I did think about using a silk instead of a softbox for that but decided to keep it simple instead.

The earlier suggestions are correct, and you do need a much bigger softbox.

Also, and especially when selling second-hand items, you need detailed close ups showing any faults.
 
providing the overall feel/direction
That makes sense.
one softbox and the reflector to light smaller sections/areas at a time and then combine them in post (keeping in mind the overall direction/feel).
This could help too.
Thanks again Steven
@Snapper67 Thanks for the link.

Also, and especially when selling second-hand items, you need detailed close ups showing any faults.
Good point Garry.

I have watched your video. Great it is too. It seems I am on the right lines, obviously lots to learn and refine. That said it is only for myself so not ultra important but it's great fun to try and get the best images one can and put the speedlights to some use.

Gaz
 
That makes sense.

This could help too.
Thanks again Steven
@Snapper67 Thanks for the link.


Good point Garry.

I have watched your video. Great it is too. It seems I am on the right lines, obviously lots to learn and refine. That said it is only for myself so not ultra important but it's great fun to try and get the best images one can and put the speedlights to some use.

Gaz
Doing things just for yourself is a very good way of learning - no pressure to obtain a 'traditional' result, freedom to take your time and to experiment with things that shouldn't (and probably won't) work - don't knock it, and don't knock yourself:)
 
Thanks Garry

and don't knock yourself

I annoy myself as I say and wright such things. It's how I have always felt and it's hard to change.


Gaz
 
Last edited:
Hi everyone.

After the post above I have since purchased the 140x27cm stripbox from the advice given above it arrived yesterday. I realize that an even bigger one may have been better but for general use and the space/lights I have I thought this was a practical choice.

Eager to play I tried the box out last night. Going off the advice above and the video linked too I started with the stripbox above.
The light did stretch across the bike further as expected. Again going off advice above I decided not to use the speedlight bounced on camera right to omit the conflicting highlights.
That said I could not find a way of just using the srtipbox above and reflectors from the front due to my shooting position unless I'm just not understanding the advice given.
So I used a larger softbox to camera left 80x80cm largest I have. Not feathered anywhere near as much as last time. I'm still struggling to get light right across the length of the bike without having the near wheel and trim to bright even when feathering more. Is that the wrong approach?
I am thinking I could just use a fill light from above behind camera but my gut is telling me that would be flat lighting and sending the light everywhere ?

The image below is Stripbox above angled to follow the bar and flattened out more.
Softbox camera left moved many times to get light as far across as possible without blowing highlights on right rim.
Reflector camera right just out of frame to bounced light back onto far wheel.
Also hung some black fabric up for background.

I seem to be able to light things to get me going and a reasonable result but when it comes down to fine tuning I am struggling to see the changes in light and what effect they are having.
Would appreciate any input at all.

The Bike as had no editing done to it.


Gaz
IMG-7168.jpg
 
Last edited:
Well, that's a massive improvement isn't it?
Lighting with the right approach always has this effect, it's relatively easy to achieve this level of improvement but very much harder to get the extra 10% or so that produces perfection, it's the law of diminishing returns:)
You bought the right strip softbox. When I was with Lencarta I got the larger, 2m one made, it's a good product and especially for fashion photography in large studios, but it's pretty massive and very awkward to use in a confined space. Just for a start, it's much deeper, so needs a lot more ceiling height, then there's the problem of getting it up there and holding it in place safely.. I see that Lencarta no longer sell their heavy duty boom arm, I've looked at a couple on a competitors site and I wouldn't trust those models to hold a feather in place, let alone a 2m softbox, so you made the right choice.
An 80 x 80cm softbox is far too small to produce the diffused specular highlights that would be nice to have on the brightwork, 150cm would be much better but again would take up a lot of space in a home studio. A silk, something like a large shower curtain, and lit by a softbox, would be even better but again space is very likely to be an issue.

The Inverse Square Law has worked against you here, producing (inevitably) far more light on the saddle and other high items than further down. The quick and easy way of dealing with this is in PP, a simple job. The "lighting" way of doing it is to stick bits of neutral density gel onto the front softbox diffuser in the right places. I've always used masking tape for this, it comes off cleanly and has just about enough stickiness to hold the gel in place.
 
Nice progress IMO.
To get the result you want from reflectors can be very intrusive. There have been many times where I had to use the camera tethered and a remote release simply because there wasn't enough room for me... but it's a good practice anyway. If it's inefficient you might need to use silver rather than white... the results will/should be subtle but worthwhile in getting that last 10% (you may well need to bounce the spill of the feathered crossing light rather than the overhead).

The problem with your crossing light is that your space is too small. In order to get even light across the bike the light needs to be far enough away so that the length of the bike is not a significant difference in distance from the light source (ISL). I.e. if the bike is ~4ft long then the light would need to be 16-20ft away for ≤ 1/4 stop difference in power at both ends.
In your situation a more practical approach would probably be to use two lights from the same position at different power levels (and feathered appropriately).
 
Last edited:
Well, that's a massive improvement isn't it?
Thanks Garry. I can see that the light is different from my first attempt but was unsure wether it was for the better and for what reason.
The quick and easy way of dealing with this is in PP, a simple job
I am assuming just lowering the highlights where needed combined with raising them where needed (masked in) I withheld form adjusting the image so you could see what I actually shot.
A silk, something like a large shower curtain, and lit by a softbox, would be even better but again space is very likely to be an issue.
I do have a shower curtian. I am unsure wether I could get it in place though. Am I right in thinking the curtain needs to be as close as poss to the subject.
Does there need to be a lot of distance from the curtain to softbox ? I'm guessing a few feet to get the spread ?
(you may well need to bounce the spill of the feathered crossing light rather than the overhead).
Yes this was the only solution I could come up with.
I tend to start just moving stuff around randomly when things don't work out straight away, which is a bad thing as I loose all perspective of what i'm trying to acheive. I have to stop and really think about what i'm doing.
In your situation a more practical approach would probably be to use two lights from the same position at different power levels (and feathered appropriately).
I see what you mean there. I would struggle to get two lights from that position in my space but i'll try and remember that for future endevours

Thanks for your continued support guy's.

Gaz
 
Last edited:
Thanks Garry. I can see that the light is different from my first attempt but was unsure wether it was for the better and for what reason.
I am assuming just lowering the highlights where needed combined with raising them where needed (masked in) I withheld form adjusting the image so you could see what I actually shot.
Yes, that's how it's done. Your appproach, posting shots SOOC, is the right one and is the only one that works, because we need to see the shots as is.

I do have a shower curtian. I am unsure wether I could get it in place though. Am I right in thinking the curtain needs to be as close as poss to the subject.
Yes, to get the best possible diffused specular highlights, but it can't be done because of the effect of the inverse square law, which requires the light source to be as far away as possible to minimise the effect of the fall off of light over the width of the bike. What I've done here is to preach a counsel of perfection, i.e. what could be done if you had the space, which you haven't. Given the space, a large silk placed a long way away would still have enough size to produce reasonable diffused specular highlights.
Does there need to be a lot of distance from the curtain to softbox ? I'm guessing a few feet to get the spread ?
Usually a few feet, just whatever it needs for the light to very nearly reach the edges of the silk.[/QUOTE]
 
Last edited:
What I've done here is to preach a counsel of perfection,
I get what your saying now. I think iv'e gone as far as I can bar a bit of PP with this image. I might have a go with one of our mucky bikes whilst i'm at it. That said there larger so I quess i'll struggle again.

Thanks again Garry.


Gaz
 
@sk66 Thanks for that. Was a real niggle not having the room to get them legs out of the frame. Only dawned on me to drape a piece of fabric over the legs on this last frame.
Apart from removing that area I can see you have lightened the floor area made it more even lifted the tyres to make them visable. Did you lift all the lower highlights ? eg : rear mudguard. Also reduced the glare on the right mudguard ?

Gaz
 
Well, that's a massive improvement isn't it?
Lighting with the right approach always has this effect, it's relatively easy to achieve this level of improvement but very much harder to get the extra 10% or so that produces perfection, it's the law of diminishing returns:)
You bought the right strip softbox. When I was with Lencarta I got the larger, 2m one made, it's a good product and especially for fashion photography in large studios, but it's pretty massive and very awkward to use in a confined space. Just for a start, it's much deeper, so needs a lot more ceiling height, then there's the problem of getting it up there and holding it in place safely.. I see that Lencarta no longer sell their heavy duty boom arm, I've looked at a couple on a competitors site and I wouldn't trust those models to hold a feather in place, let alone a 2m softbox, so you made the right choice.
An 80 x 80cm softbox is far too small to produce the diffused specular highlights that would be nice to have on the brightwork, 150cm would be much better but again would take up a lot of space in a home studio. A silk, something like a large shower curtain, and lit by a softbox, would be even better but again space is very likely to be an issue.

The Inverse Square Law has worked against you here, producing (inevitably) far more light on the saddle and other high items than further down. The quick and easy way of dealing with this is in PP, a simple job. The "lighting" way of doing it is to stick bits of neutral density gel onto the front softbox diffuser in the right places. I've always used masking tape for this, it comes off cleanly and has just about enough stickiness to hold the gel in place.
Hi Garry bit off topic but is it the boom with the sliding weight Lencarta have stopped doing...? Been waiting for an email that they are back in stock for a couple of months now....?
 
Hi Garry bit off topic but is it the boom with the sliding weight Lencarta have stopped doing...? Been waiting for an email that they are back in stock for a couple of months now....?
No, they're still doing that one, and it's good. It seems crazy if it's been out of stock for that long, it might be an idea to ring them and see how much longer you will have to wait for it.
The one that now seems to be discontinued is its larger brother, which would be too large for a home studio but much better for the right size of studio.
I see Garry thanks for confirming......I was happy to wait as there doesnt seem much out there at that price that you could rely on.....I'll contact them.....[emoji106]
 
Had another little play before I tidied up. It seems every product reacts differently to light. It's a great skill you people have learned to be able to look at an object and instinctively know what type of lighting will work to bring out the best in your chosen subject.

Many thanks for all your advice on this topic.


Gaz
IMG-722-raw.jpg

set-up.jpg
 
@sk66 Thanks for that. Was a real niggle not having the room to get them legs out of the frame. Only dawned on me to drape a piece of fabric over the legs on this last frame.
Apart from removing that area I can see you have lightened the floor area made it more even lifted the tyres to make them visable. Did you lift all the lower highlights ? eg : rear mudguard. Also reduced the glare on the right mudguard ?

Gaz

Most of the editing was just lifting things in places a bit by painting white on a layer set to "soft light" mode. I did not edit the glare per se... I did do an overall levels adjustment and set the white levels to ~ 245 instead of 255.
 
It's a great skill you people have learned to be able to look at an object and instinctively know what type of lighting will work to bring out the best in your chosen subject.
It's more like an educated guess... ;)

I would say that is a very respectable result for a first attempt... I think it would be hard to get much better with the given limitations.
 
Had another little play before I tidied up. It seems every product reacts differently to light. It's a great skill you people have learned to be able to look at an object and instinctively know what type of lighting will work to bring out the best in your chosen subject.
It isn't really a skill, it's a combinatiion of experience and knowing what won't or can't work. To quote Arthur Conan Doyle, "Once you eliminate the impossible, whatever remains, no matter how improbable, must be the truth."
set-up.jpg
 
Last edited:
245 instead of 255.
Don't think i've ever typed numbers into them boxes.Something to remember.
I think it would be hard to get much better with the given limitations.
Thanks Steven.
experience
Yes this trumps everything. It would be great to see a professional go about there job on a daily basis.

@Garry Edwards
@sk66

Many thanks for sharing your knowledge. I would have never attained these results without it.


Gaz
 
it's ... knowing what won't or can't work. To quote Arthur Conan Doyle, "Once you eliminate the impossible, whatever remains, no matter how improbable, must be the truth."

This is so true.

I don't have the experience of @Garry Edwards et al, but I do have both a good technical and intuitive understanding of the underlying physics. That usually gets me out of trouble when I get stuck.
 
Hi Simon.
I think thats a big part of my problem. I know nothing about physics AT all. Was never taught it at school and being a Plasterer have never needed to know anything about it.
AS you say you may not have the lifetime experiance that Garry has but you sure do know how to light stuff.

Gaz
 
Just to bore you all a bit more with this.
It dawned on me last night before I took the lights down that maybe I could have placed the boom stand outside as there is a window right behind it's position in the photos.
So I gave it a try. Stand was at its limits and I had to add extra weight to hold it firm.
What it did though was to get the legs out of the frame,made so much differance as the image looked much cleaner straight out of the camera.
Managed to get a white card closer at the front too.

Did lighten the trye to camera right a tad and the pedal cog. Using @sk66 soft blend layer tecnique. I would normally have used a 50%grey soft light layer, painting with white of black as required.

Gaz

Kirsty-Bike-pink.jpg
 
Hi Simon.
I think thats a big part of my problem. I know nothing about physics AT all. Was never taught it at school and being a Plasterer have never needed to know anything about it.
AS you say you may not have the lifetime experiance that Garry has but you sure do know how to light stuff.

Gaz
And I'm not a plasterer. Various people who have far too much confidence in me have tried to teach me but I'm a complete failure.. You obviously know a lot more about lighting than I do about plastering.
You say that you don't know anything about physics, but is this actually true? Do you know how to play pool or snooker? Here's a brief extract from my new e-book, which of course is about lighting not pool:)

"Photography isn’t a true science, it’s just a set of craft skills that are based on established scientific principles. We don’t need to know the science in order to gain the skills, but it does help to understand why things work as they do, because once we understand that we save a lot of time and frustration by knowing what won't or can't work. To quote Arthur Conan Doyle, "Once you eliminate the impossible, whatever remains, no matter how improbable, must be the truth."


The analogy that seems to me to be most appropriate to this is playing Pool (or Snooker). To play these games well, we need certain mechanical skills, these are based on accuracy, bridge and pace etc. but the most important thing is an understanding of simple physics. Physics matters because it tells us exactly which way a ball will go when it is hit by another ball. Now, many of the really good pool players may not have heard of the immutable law of physics that states that “The angle of reflectance equals the angle of incidence” but they do understand it perfectly, and we know that because they are able to make the balls go where they want them to.


I use this analogy simply because light follows the same law of physics – its angle of reflectance (and refraction) equals its angle of incidence, and it travels in straight lines. Now, any physicist will tell you that it doesn’t actually travel in straight lines, and that the angle of reflectance or refraction only applies when it hits a smooth surface, and a quantum physicist would add even more complications, but if we understand and apply this basic law then we find it far, far easier to get our lighting right, simply because we will always know exactly what the light will do when it hits our subject.


And we need to have a basic understanding of the Inverse Square Law too. It tells us that the energy of light received at the subject location reduces inversely proportionally to the square of the distance to the energy source. What this means in practice is that if you move a light twice as far away from the subject then the light will cover a much larger area and ¾ of the lighting power will be lost in the process.


Again, this isn’t strictly accurate, because Newton was talking about a point source of energy (light, heat, sound etc.) in free space. Our photographic lights are not point sources, and we don’t take photos in free space (a vacuum with no reflective surfaces) so the Inverse Square Law doesn’t apply to photographic lighting in absolute, linear terms, but it’s near enough, and if we remember it then all that we need to know is that if we move a light twice as far away then we will lose ¾ of the power, and if the light happens to be, for example, a Softbox, then the effective size of that Softbox will only be a quarter of what it was before, which will dramatically change the quality and softness of the light.

And, another way in which we photographers use the Inverse Square Law is to sometimes place a light source very close to the subject, to create a dramatic fall off of light as the further away part of the subject receives substantially less light."


And that, in my opinion, is ALL that you need to know about physics:) Are you really telling me that you don't understand the simple physics that I've just explained and that we use in lighting? Don't knock yourself. And don't let a complicated Greek word, which simply means 'knowledge of nature' make a simple thing sound complicated. Years ago we had Mechanics Institutes, which set out to teach mechanics (physics) to uneducated but highly skilled craftsmen, and these institutes were enormously successful, possibly because they avoided using the word 'Physics'.

You've thanked everyone for the help that we've given here. Well, that is what this forum is for and maybe some of us are sick of the constant questions about whether or not the latest expensive flashgun has enough power to control outdoor lighting in bright sunlight (it doesn't) or how important it is for the latest radio triggers to set the power in 1/10th stop increments (it's of no importance at all) and it's good to actually try to do something useful. I did have some ideas for improving this forum but unfortunately when I raised it with the admins there was no reply.. I expect that they're very busy.
 
You've thanked everyone for the help that we've given here. Well, that is what this forum is for ... and it's good to actually try to do something useful.
I agree. It's really nice when someone actually listens and implements/tries/learns for a change... it makes me feel like my effort/time was well spent and that is more than appreciation enough.
 
Are you really telling me that you don't understand the simple physics that I've just explained and that we use in lighting?
Job done Garry. I do indeed get that. A nice little read you posted there. Thanks

Getting that stand out of frame is a big plus!
It was ! I was very pleased with the outcome of the last photo.

On reviewing the images and whilst plastering today ( the mind wonders ) when stroking walls :) It occured to me that I could have uesd my other two speedlights with grids or snoots to skim some light accross the rear gears/cogs and the main pedal cog. As those areas seemed flat. Do you think that would have been a good move and improved the images ?


Gaz
 
Most likely, but you will have to be careful to keep the light localized and at a low enough power... if it seems obvious then it's probably too much.
Point taken. I did sort of think that it would have to be subtle.

Thanks
Gaz
 
Job done Garry. I do indeed get that. A nice little read you posted there. Thanks


It was ! I was very pleased with the outcome of the last photo.

On reviewing the images and whilst plastering today ( the mind wonders ) when stroking walls :) It occured to me that I could have uesd my other two speedlights with grids or snoots to skim some light accross the rear gears/cogs and the main pedal cog. As those areas seemed flat. Do you think that would have been a good move and improved the images ?Gaz

I should work well, just try it. Get a reasonable amount of distance (6'?) between light and subject, to minimise the inevitable fall-off caused by the ISL. Your change to a different product does confuse things a bit but my instinct is that the strip softbox in its latest position does do a better job of lighting the odds and sods.
Incidentally, my new e-book (which is a work in progress) scores 60 in readability, about equivalent to the BBC news website, i.e. not designed for Daily Star readers, and the fact that you understand what I said is a good indication that you are much more capable than you think.
Most likely, but you will have to be careful to keep the light localized and at a low enough power... if it seems obvious then it's probably too much.
You're right, but my approach would be to start with a lot of light and then reduce it until it's subtle. The main reason for this is that it's a practical approach - with the lighting power too high you will also see any light that isn't going where it should be, and can then correct that, usually be sticking a bit of Cinefoil (blackwrap) over the snoot or whatever and cutting out the required shape.
The reverse approach though is best when adding a fill light, which should start at a very low power setting.
 
my new e-book
Hi Garry just those few words made me smile. I'm sure you never read any problem pages of the various newspapers but if you ever did the reply always consists of those words :)
I'll look forwards to reading this ebook.

strip softbox in its latest position
I agree I did think that the light position in the last photo was much better. I had it placed a bit higher flatter and more aboven & forward than previously.

I should work well, just try it. Get a reasonable amount of distance (6'?) between light and subject, to minimise the inevitable fall-off caused by the ISL.
I have cleared everything away now but I will give it a go. I think those area's really did need a lift as on the full size images I thought they were really flat the details should have been popping out.The teeny bit of light (due to floor reflector) I got on the pedal cog in the last photo proved that to me.
The main reason for this is that it's a practical approach
That makes lots of sense.
The reverse approach though is best when adding a fill light, which should start at a very low power setting.
This too.

Thanks

Gaz
 
On another note.
When taking these I set all lights to not blow any highlights. Apart from that problem I had with the very first image ( chrome mudguard )

Is that always the way ? For example in the white framed bike. Along the crossbar could that have been left to blow a touch to give the dimension (specular highlight) ?
There is dimension to it but I was thinking it maybe would have looked more 3d if there were a brighter specular hilight.
I am unsure as to whether it is the done thing (anytime) to allow the highlights to blow.

Gaz
 
Last edited:
I don't normally want things to clip to pure white unless it's a specular reflection on metal. Increasing the light/exposure on the crossbar (2nd bike w/ white frame) would not have caused more of a specular highlight/reflection... it would have increased the exposure more equally/entirely... to get a specular highlight and not increase the exposure would require 1. the light to be much closer (ISL), or 2. a light source farther behind (reflection along top edge, source not hitting front side).
Sometimes what you need to do is provide negative lighting (black panels) in order to increase the contrast in those areas.
 
[/ATTACH] superfast_300_threequarter_left_front_white.jpg
On another note.
When taking these I set all lights to not blow any highlights. Apart from that problem I had with the very first image ( chrome mudguard )

Is that always the way ? For example in the white framed bike. Along the crossbar could that have been left to blow a touch to give the dimension (specular highlight) ?
There is dimension to it but I was thinking it maybe would have looked more 3d if there were a brighter specular hilight.
I am unsure as to whether it is the done thing (anytime) to allow the highlights to blow.

Gaz
There aren't any rules about this.
Sometimes we want to create more psazz at the cost of detail, sometimes we want it to show more detail at the cost of psazz - whatever suits your purpose.
A specular highlight is just an (inevitable) reflection of a light source. A diffused specular highlight is one where the the specular highlight has been enlarged so that it is occupies a larger area, doesn't have hard edges and is translucent, so that we can see through it to the subject beneath. This is achieved simply by relative size, i.e. a big light source as close as possible to the subject.
For example, "ordinary" specular highlight,a standard reflector a couple of feet away
standardreflec.jpg
Diffused specular highlight, large softbox very close

Another diffused specular highlight, this time with a separate softbox for both top and bottom of the flash head, and more challenging to light
 

Attachments

  • largesoftbox.jpg
    largesoftbox.jpg
    69.9 KB · Views: 13
Last edited:
Hi Garry just those few words made me smile. I'm sure you never read any problem pages of the various newspapers but if you ever did the reply always consists of those words :)
I'll look forwards to reading this ebook.
No, can't say that I ever have:)
The e-book is a work in progress and it will be a while. It's very nearly finished, content wise, and in a couple of weeks will go off to be edited, where it will be torn to pieces by someone who is far better at writing than I am, then it will have to be formatted to work on Kindle, then I'm planning to start flogging it on Amazon. Hopefully it will generate profits, which will go to a charity that I support.

My plan is to offer it as a free pdf download to TP members for the first week or thereabouts, this will require permission from the site admins, I will approach them once it's good to go.
 
Back
Top