Chroma - Lasercut Acrylic 4x5 Field Camera

Cheers @trevorbray;)

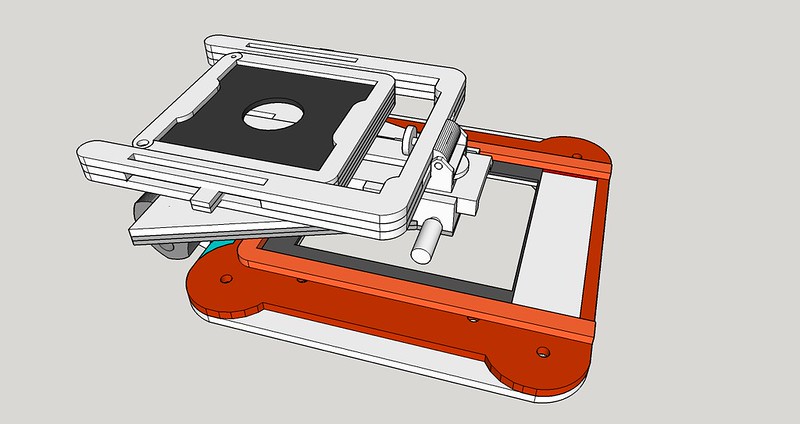
This is a render of the closed camera, including the new front standard design;

Working on the folding front standard to add independent movements. by Steve Lloyd, on Flickr
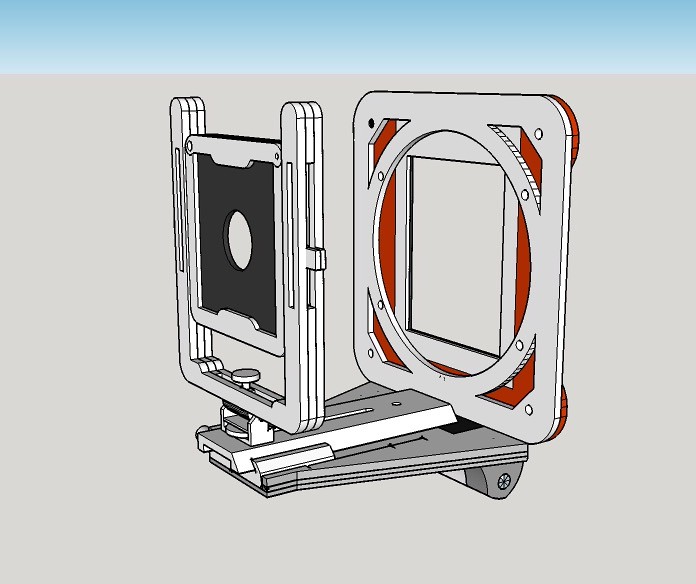
This is the camera ready to shoot;

Working on the folding front standard to add independent movements. by Steve Lloyd, on Flickr
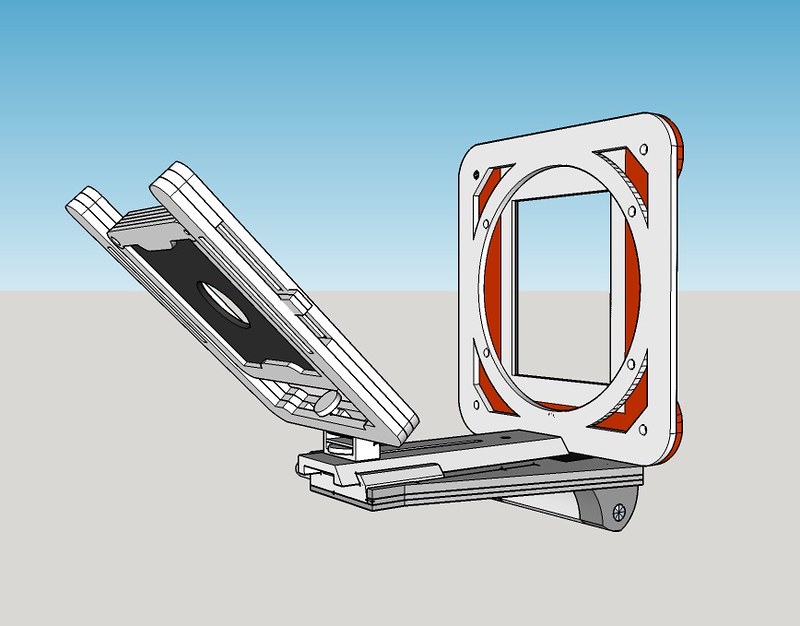
The new design standard is mounted to a printed support. The threaded knob on the base attaches the standard to the focusing rail and can be loosened to control swing. Above that there's a half-round mount that rotates on pins to control forward/backward tilt (I haven't drawn in the locking knob for that yet). Above that, there's a rectangular block which slides within the front standard with a locking knob to control left/right shift. Finally, the lens board mount has tabs either side that slot into the sides of the front standard and allow rise/fall to be locked in place (again, the locking knobs haven't been drawn on yet).

45 degree forward tilt;

Working on the folding front standard to add independent movements. by Steve Lloyd, on Flickr
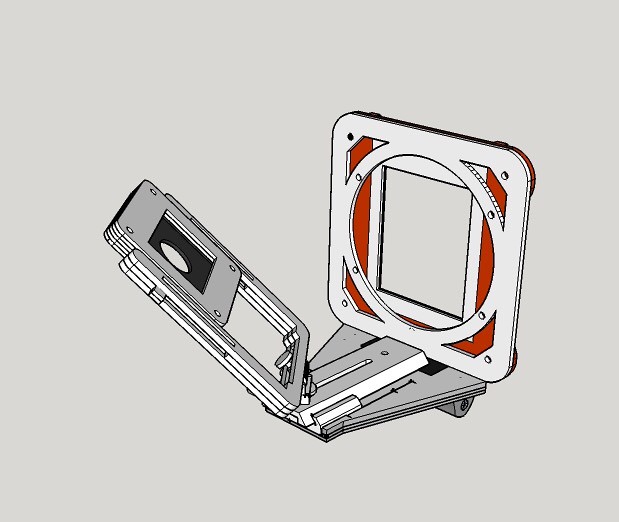
Backwards tilt is only limited by lens coverage as the whole standard folds backwards 90 degrees to close up.

Slightly excessive forward tilt, rise, swing and shift :0)

Working on the folding front standard to add independent movements. by Steve Lloyd, on Flickr
 
Last edited:
I've put the order in for my acrylic sheet. Assuming I don't mess up any of the parts, I should get everything out of;

2 x A3 5mm Acrylic
2 x A3 3mm Acrylic
1 x A4 5mm Acrylic
1 x A5 2mm Acrylic

s-l500.jpg


I've gone with a solid gloss blue for the first camera. I'm also going to fit some thick black card around the inside edges of the panels to make sure any stray light is well controlled. It's a bit a nervous time now waiting to see how stable this all is!
 
Haven't been around much recently but this looks like it's progressing really well!

If you are comfortable sharing the 3D files, I'd love to try making one out of aluminium sheet! I fully understand if you'd rather not share them however :)
 
Haven't been around much recently but this looks like it's progressing really well!

If you are comfortable sharing the 3D files, I'd love to try making one out of aluminium sheet! I fully understand if you'd rather not share them however :)

No problem Rob. I'll get the first one cut and make sure everything lines up then I'll send them across (so long as you promise not to start a Kickstarter before I do!). I reckon an aluminium camera would be an exercise in industrial design :0)
 
I think this project wormed its way into my dreams - last night I dreamt I was assembling a 4x5 camera out of parts, but my bellows were all saggy, like a stretchy old jumper.
 
I think this project wormed its way into my dreams - last night I dreamt I was assembling a 4x5 camera out of parts, but my bellows were all saggy, like a stretchy old jumper.

Ah, saggy bellows, doesn't sound good ;0)

I guess that's the next questions down the road of whether this would be better off as a flat pack kit to self assemble or to supply ready assembled cameras? If the cameras were sold ready-assembled, the final quality could be controlled but would mean more assembly time to produce them.
 
I'd be happy to assemble myself, but others might not be. Often with these things, they're offered in various stages, such as...

Basic kit of fabricated parts, do the gluing and sort the hardware and fixings out yourself.
Fabricated parts plus hardware and fixings.
Glued bits assembled, with or without hardware.
Fully assembled.

Assuming my current design is as stable as I'm hoping, there isn't a lot of assembly required although I would potentially have to supply an assembled bellows and printed hinge along with the focusing rail and ground glass. The main assembly required is;

1) Bond together 3 slices to create the camera bed
2) Bond the central hinge assembly to the rear standard then attach to camera bed
3) Bond together 3 slices to create the front standard
4) Bond together 4 slices to create the lens board surround and board itself
5) Bond together 3 slices to create ground glass holder

All of the bonding is done using a specialist acrylic adhesive which melts the faces slightly and creates a very strong joint. I guess a completely bare kit would just supply the acrylic pieces/ground glass/focusing rail and it would then be up to the buyer to supply their own bellows and assembly.
 
Ok, in my ongoing quest to constantly redesign (!), I've modified the hinge slightly to include a slot on the front face where I can embed a 40mmx10mmx3mm bar magnet. There's a matching magnet embedded into the middle layer of the camera bed too so that the read standard is locked in place.
 
I'd be happy to assemble myself, but others might not be. Often with these things, they're offered in various stages, such as...

Basic kit of fabricated parts, do the gluing and sort the hardware and fixings out yourself.
Fabricated parts plus hardware and fixings.
Glued bits assembled, with or without hardware.
Fully assembled.

For the un-assembled versions, doesn't that mean idiot-proof instructions? Think back to your first Ikea assembly...
 
I think this project wormed its way into my dreams - last night I dreamt I was assembling a 4x5 camera out of parts, but my bellows were all saggy, like a stretchy old jumper.

That's a bag bellows isn't it?
 
For the un-assembled versions, doesn't that mean idiot-proof instructions? Think back to your first Ikea assembly...

You mean you don't like a good flat pack challenge? Chris, you disappoint me. Where's your sense of adventure? ;0)

Also, I spend most of my days writing documentation and delivering training to my offshore support colleagues, so I reckon putting together a guide for a photographer should be easy!
 
After thinking about it today, I'm wondering if there's an advantage in having rear tilt, considering the rear standard is already rotating on the hinge? I'd just need to shorten the face of the hinge which currently houses the magnets and replace one of hinge pins with a bolt and an embedded thread. By doing that I could have forward tilt of up to around 30 degrees (guessing) and unlimited backwards tilt. Having the threaded knob would also mean that I could lock the rear standard in any position and keep it locked when closed. I've got a spare hinge here so I'll modify it and see how it looks. Should be a simple change to the design.
 
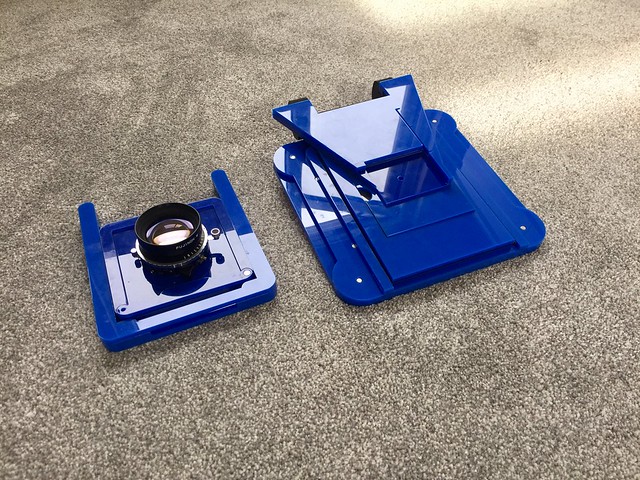
Main body folded up (minus the bellows) and front standard with lens in lens board frame

First assembly, sneak preview! by Steve Lloyd, on Flickr

Ground glass holder in place with integral cover fitted for protection

First assembly, sneak preview! by Steve Lloyd, on Flickr

Ground glass cover plate removed

First assembly, sneak preview! by Steve Lloyd, on Flickr
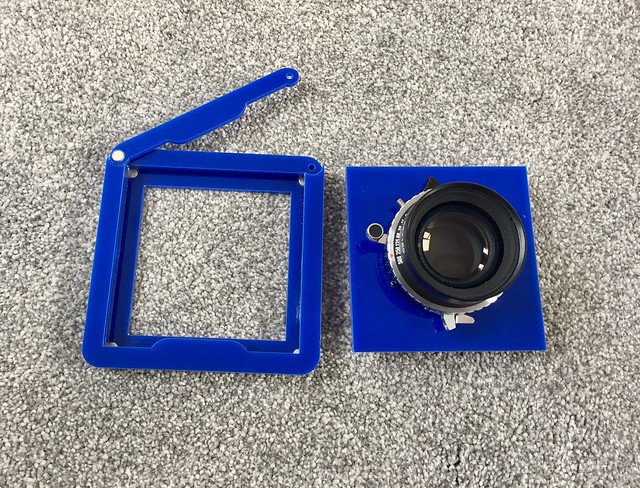
Lens board frame and board

First assembly, sneak preview! by Steve Lloyd, on Flickr

Jobs to do;

Fit hinge pin into lens board frame
Embed threads into lens board frame and fit threaded knobs
Embed thread into base for tripod mount
Fit bellows
Tap multiple 5mm threads into the focus rail so that the front standard can be mounted in different positions for different focal lengths (if anyone has a 5mm tap I could borrow I'd appreciate it!)

I'm waiting for my 5mm thread inserts to arrive seeing as the seller sent me a bag of 30 hex-head bolts instead randomly. I'm also waiting for another set of 6x3mm magnets that will be embedded into the rear bellows plate.
 
All in, without the ground glass holder, the camera weighs around 940g which I'm happy with. The acrylic is more dense than the MDF but is also much more rigid so I've got no concerns with the single piece rear standard. I also need to modify the model for my hinge piece and re-print that before I finish assembly.
 
Looking and sounding really top notch Steve!
 
http://www.toolstation.com/shop/p10128?searchstr=tap and die will cover your tap and die needs and would probably be cheaper than postage both ways as well as being available next time you need one.

Looking good so far! Is the interior going to be lined or painted to stop/reduce internal reflection?

Thanks for the link. I was just asking on the off-chance to save me buying a full set but like you say, at that price it's a no-brainer.

All of the inner edges of the light path have been painted black to stop any risk of flare/light leaks so I'm hopeful that I won't need to do any more. The proof will be when I've got the bellows fitted so fingers' crossed!
 
I've been following this for months.

Just want to say, I never fail to be impressed, thanks Steve, you're entertaining and educating lots of us.
 
Thanks for the link. I was just asking on the off-chance to save me buying a full set but like you say, at that price it's a no-brainer.

A set is definitely a good idea. If you only have an M5 tap, there's a risk of designing everything to use that size.

The small T-type tap wrench in the linked set will have poor purchase on tougher materials and/or larger threads. They have their place for smaller sizes and softer materials, but you really need the longer bar type that clamp onto the end of the tap as well. Also, a set that only has taper taps will limit you in a couple of ways: Can't make blind holes without having to make a lot of clearance when drilling, and the thread will narrow as you go in (so you need to go in deep enough with the non-tapered portion to suit the length of screw you want to use). And, although they can make the correct threadform all the way through when making a thru hole, they can end up not being long enough in some cases - on some taps, the shank is narrower than the tapping drill size, which is fine, but on others (the smaller ones), the shank is bigger, meaning the tap stops when the shank hits the surface of the material. A set with taper and finishing taps helps mitigate both of these issues.

Plenty of tap wrenches to be found here...

http://www.chronos.ltd.uk/acatalog/threading_accessories.html

Either get a set with the long tap wrench and buy a short one or a T-type, or get a long one separately. The 'traditional style' ones should be better to use (I have a quality one made by Presto tools, and it easily outclasses the ones you see in sets with the little sliding block in the middle - feels very solid and tightens well just with the hands). I also have the mini tap wrench there, and find that I always use it for the small taps rather than the T-type that came with the set (but I use a T-type at work and find that okay as well).

You also need tapping drills if you don't have the laser cutter making holes of the correct size to begin with (4.2mm for M5, etc). Depending on what you need and what you already have, it's potentially better value to get a set of 0.1mm increment drill bits instead of buying individual tapping drills. I have the 1-6mm HSS set from Chronos...

http://www.chronos.ltd.uk/acatalog/Engineering_Menu_Drill_Sets_177.html

...and they've been excellent (but currently out of stock). Sets up to 10mm are dearer, and it may be better to get those as individual drill bits (only 3 needed, for M8, M10 and M12, and you might not need them anyway). The little set of 1-6mm are very versatile - I use them loads.

Thanks for detailed reply. Just to confirm though, I'm tapping multiple threads into the metal focus rail itself so I can attach the front standard at different positions for different lenses. The slot in the focus rail is 4mm wide and the threaded knobs I'm using are 5mm so there shouldn't be too much resistance cutting the threads.
 
I've been following this for months.

Just want to say, I never fail to be impressed, thanks Steve, you're entertaining and educating lots of us.

Thanks a lot Phil, that's a very kind post. I'm glad you find my build threads interesting. I've always found it quite therapeutic to post my progress (good and bad!) :0)
 
Back
Top