

You are using an out of date browser. It may not display this or other websites correctly.
You should upgrade or use an alternative browser.
You should upgrade or use an alternative browser.
Focusing the View Camera
- Thread starter Barney
- Start date

sk66
Advertiser
- Messages
- 9,865
- Name
- Steven
- Edit My Images
- Yes
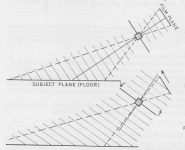
Envision that the plane of focus is like a book... it has a height, a width, and thickness (depth). Say it starts out as full image height/width and 3 ft deep. When you tilt the front standard (or image plane) the "book" leans with it. So it doesn't cover full height anymore unless the depth was very large. And to further complicate things, what was a fixed depth now becomes a wedge shape (shallower nearer to the camera).
OP

- Messages
- 4,331
- Name
- Wayne
- Edit My Images
- No
Envision that the plane of focus is like a book... it has a height, a width, and thickness (depth). Say it starts out as full image height/width and 3 ft deep. When you tilt the front standard (or image plane) the "book" leans with it. So it doesn't cover full height anymore unless the depth was very large. And to further complicate things, what was a fixed depth now becomes a wedge shape (shallower nearer to the camera).
Well how do you get everything in focus, rock in the foreground to sweeping mountain range? it must be possible there are lots pictures that are incredibly sharp everywhere.

Garry Edwards
Moderator
- Messages
- 13,688
- Name
- Garry Edwards
- Edit My Images
- No
It doesn't and can't increase or decrease the dof, all that tilt or swing of the front standard can do is to shift the plane of sharp focus.
It isn't complicated in terms of the physics, if it's a subject that appeals to you then just do some research on Scheimpflug and all will be revealed - this one is a starting point but is a bit basic - https://en.wikipedia.org/wiki/Scheimpflug_principle
The links at the bottom of the page are useful.
But, if you're the practical type who doesn't like equations, just experiment, all you need is a black cloth, the lens wide open and a bright light. And, when you've done that, set everything back to their starting positions and repeat, this time using the rear standard movements.
You really understand it now? Good. Now start again, using both standards both together and in opposition, it now gets really interesting, and useful
It isn't complicated in terms of the physics, if it's a subject that appeals to you then just do some research on Scheimpflug and all will be revealed - this one is a starting point but is a bit basic - https://en.wikipedia.org/wiki/Scheimpflug_principle
The links at the bottom of the page are useful.
But, if you're the practical type who doesn't like equations, just experiment, all you need is a black cloth, the lens wide open and a bright light. And, when you've done that, set everything back to their starting positions and repeat, this time using the rear standard movements.
You really understand it now? Good. Now start again, using both standards both together and in opposition, it now gets really interesting, and useful

- Messages
- 4,963
- Name
- Graham
- Edit My Images
- No
Practice, and understanding what is happening when you tilt or swing the front or/and the rear standards of the camera to the "plane" of focus and the shape of the "area" of focus.Well how do you get everything in focus, rock in the foreground to sweeping mountain range? it must be possible there are lots pictures that are incredibly sharp everywhere.
It really isn't easy.
I have no idea if this video is any good, but watching someone actually using tilt and swing might kick-start getting the hang of it. His videos tend to be useful, but I haven't watched this one.
EDIT @Ian Grant has watched this and isn't impressed "I watched the Video, while preparing my lunch, rambling, not ideal for learning, to many different tangents."
Last edited:
OP
- Messages
- 4,331
- Name
- Wayne
- Edit My Images
- No
I dont really "get" the experiment Garry, sorryIt doesn't and can't increase or decrease the dof, all that tilt or swing of the front standard can do is to shift the plane of sharp focus.
It isn't complicated in terms of the physics, if it's a subject that appeals to you then just do some research on Scheimpflug and all will be revealed - this one is a starting point but is a bit basic - https://en.wikipedia.org/wiki/Scheimpflug_principle
The links at the bottom of the page are useful.
But, if you're the practical type who doesn't like equations, just experiment, all you need is a black cloth, the lens wide open and a bright light. And, when you've done that, set everything back to their starting positions and repeat, this time using the rear standard movements.
You really understand it now? Good. Now start again, using both standards both together and in opposition, it now gets really interesting, and useful
- Messages
- 12,531
- Edit My Images
- No
A much simpler solution is to just stick with smaller film or sensor formats, which use shorter focal lengths, which in turn give greater depth of field for a given stop. 

StephenM
I know a Blithering Idiot
- Messages
- 5,756
- Name
- Stephen
- Edit My Images
- Yes

Using the view camera : Simmons, Steve : Free Download, Borrow, and Streaming : Internet Archive
Includes index
archive.org
Garry Edwards
Moderator
- Messages
- 13,688
- Name
- Garry Edwards
- Edit My Images
- No
OK. The frustrating thing here is that, if we were together with a monorail camera and a suitable subject you'd completely get it after about 5 minutes
So, let's just cover the absolute basics. You say that you have a monorail camera, and if you do then it will have shift up, shift down, shift left, shift right, tilt up, tilt down, swing right and swing front on the front standard (where the lens goes), and all of these movements will be on the rear standard (where the film goes) too.
Non-monorail cameras are likely to have less movements, technical cameras are a step down and field cameras are two steps down.
And then do both together, for really incredible results. Everyone will say that you used AI, but you'll know better Does this help?
So, let's just cover the absolute basics. You say that you have a monorail camera, and if you do then it will have shift up, shift down, shift left, shift right, tilt up, tilt down, swing right and swing front on the front standard (where the lens goes), and all of these movements will be on the rear standard (where the film goes) too.
Non-monorail cameras are likely to have less movements, technical cameras are a step down and field cameras are two steps down.
- Start off with both cameras set to their default positions, i.e. everything dead square, just like any other camera, and completely forget about all of the movements on the rear standard.
- Turning now to the front standard, forget about the shift movements. Leave them in the default positions, they're incredibly useful but not relevant to this "experiment" because all that they do is to move the image left, right, up or down, and that isn't what we want to do here
- That leaves us with just the tilt movements, you can swing the lens to the left or the right on one control, and you can tilt the lens up or down with the other control. They do the same thing, but to keep it simple we're going to start with just the up/down tilt.
- You need a subject that's easier if fairly small, and that has some depth and a clear, basic shape. A cornflake packet is ideal.
- For this purpose, the camera will need to be at a bit of an angle, pointing down. Well, it doesn't need to be at all, that's what falling front is for, but we're keeping it simple.
- Focus about halfway into the subject. The bit you're focused on will be sharp, just like any other camera, and the nearer and further parts will be blurred, as you would expect. If possible, stick a ruler on top of the subject, going from front to back - not essential but it will give you good data that doesn't rely on your own judgement.
- Now tilt the lens downwards, try different amounts of tilt until it's perfectly sharp, front to back. Depending on various things, you may need to adjust the camera height, but that doesn't matter, and you may need to re-focus, depending on your camera model.
- You've now nailed it, you have exactly the same dof as before but you've tilted the plane of sharp focus so that the bit that matters in this shot, is perfectly sharp, front to back. Something else will be out of focus but the out-of-focus bit will either be out of shot or can be corrected with a different movement.
- In practical (but not in theoretical terms) you've got sharp focus front to back, but you can also achieve the opposite effect, so now you tilt the lens upwards instead of downwards, and you can, if you wish, have just a tiny part of the cornflake packet in sharp focus.
- That's it, job done. Repeat the experiment with the swing movements, both of which will increase or decrease the plane of sharp focus left to right instead of front to back, and of course you can (and eventually will) learn to combine both tilt and swing, for pretty incredible results. And, of course, you can and should also use drop front, to square up the image and avoid perspective distortion, or to increase it, and every one of these movements can be combined, and often are.
And then do both together, for really incredible results. Everyone will say that you used AI, but you'll know better
Does this help?
StephenM
I know a Blithering Idiot
- Messages
- 5,756
- Name
- Stephen
- Edit My Images
- Yes
And post 2667 in this thread

Woodsy submitted a new resource:
Large Format photography group - From "zero to hero!" - Large Format photography group - From "zero to hero!"
Large Format photography group - From "zero to hero!" - Large Format photography group - From "zero to hero!"
Hi All,
So I figured in light of everyone else having their specific owners group, us LF shooters could have one as well! I didn't have in mind a group for specific camera makes, as that would be ridiculous. Instead, I imagined this to be a place for ALL makes and sizes of LF camera, including their adaptation down to roll film formats, and general discussion surrounding LF cameras and their uses.
Crucially also, I had...
- Woodsy
- Replies: 2,829
- Forum: Talk Film & Conventional
sk66
Advertiser
- Messages
- 9,865
- Name
- Steven
- Edit My Images
- Yes
Really small f-stops...Well how do you get everything in focus, rock in the foreground to sweeping mountain range? it must be possible there are lots pictures that are incredibly sharp everywhere.
Garry Edwards
Moderator
- Messages
- 13,688
- Name
- Garry Edwards
- Edit My Images
- No
A combination of tilt front, tilt rear and really small f stopsReally small f-stops...
OP
- Messages
- 4,331
- Name
- Wayne
- Edit My Images
- No
And post 2667 in this thread
Woodsy submitted a new resource:
Large Format photography group - From "zero to hero!" - Large Format photography group - From "zero to hero!"
Hi All,
So I figured in light of everyone else having their specific owners group, us LF shooters could have one as well! I didn't have in mind a group for specific camera makes, as that would be ridiculous. Instead, I imagined this to be a place for ALL makes and sizes of LF camera, including their adaptation down to roll film formats, and general discussion surrounding LF cameras and their uses.
Crucially also, I had...
- Woodsy
- Replies: 2,829
- Forum: Talk Film & Conventional
Thanks Garry, will have a table top test with that !OK. The frustrating thing here is that, if we were together with a monorail camera and a suitable subject you'd completely get it after about 5 minutes
So, let's just cover the absolute basics. You say that you have a monorail camera, and if you do then it will have shift up, shift down, shift left, shift right, tilt up, tilt down, swing right and swing front on the front standard (where the lens goes), and all of these movements will be on the rear standard (where the film goes) too.
Non-monorail cameras are likely to have less movements, technical cameras are a step down and field cameras are two steps down.
Just to complicate things, once you've mastered the front standard movements, repeat the process with the front standard in the "normal" settings and make the adjustments to the rear standard. The tilt and swing on the rear standard will also change the shape of the subject
- Start off with both cameras set to their default positions, i.e. everything dead square, just like any other camera, and completely forget about all of the movements on the rear standard.
- Turning now to the front standard, forget about the shift movements. Leave them in the default positions, they're incredibly useful but not relevant to this "experiment" because all that they do is to move the image left, right, up or down, and that isn't what we want to do here
- That leaves us with just the tilt movements, you can swing the lens to the left or the right on one control, and you can tilt the lens up or down with the other control. They do the same thing, but to keep it simple we're going to start with just the up/down tilt.
- You need a subject that's easier if fairly small, and that has some depth and a clear, basic shape. A cornflake packet is ideal.
- For this purpose, the camera will need to be at a bit of an angle, pointing down. Well, it doesn't need to be at all, that's what falling front is for, but we're keeping it simple.
- Focus about halfway into the subject. The bit you're focused on will be sharp, just like any other camera, and the nearer and further parts will be blurred, as you would expect. If possible, stick a ruler on top of the subject, going from front to back - not essential but it will give you good data that doesn't rely on your own judgement.
- Now tilt the lens downwards, try different amounts of tilt until it's perfectly sharp, front to back. Depending on various things, you may need to adjust the camera height, but that doesn't matter, and you may need to re-focus, depending on your camera model.
- You've now nailed it, you have exactly the same dof as before but you've tilted the plane of sharp focus so that the bit that matters in this shot, is perfectly sharp, front to back. Something else will be out of focus but the out-of-focus bit will either be out of shot or can be corrected with a different movement.
- In practical (but not in theoretical terms) you've got sharp focus front to back, but you can also achieve the opposite effect, so now you tilt the lens upwards instead of downwards, and you can, if you wish, have just a tiny part of the cornflake packet in sharp focus.
- That's it, job done. Repeat the experiment with the swing movements, both of which will increase or decrease the plane of sharp focus left to right instead of front to back, and of course you can (and eventually will) learn to combine both tilt and swing, for pretty incredible results. And, of course, you can and should also use drop front, to square up the image and avoid perspective distortion, or to increase it, and every one of these movements can be combined, and often are.
And then do both together, for really incredible results. Everyone will say that you used AI, but you'll know better

- Messages
- 9,148
- Name
- Nige
- Edit My Images
- No
It's also worth considering the aperture you're using to compose, which will usually be wide open to make the image on the focusing screen easy to see.
You may find that, even with the use of camera movements, some of the scene still isn't in focus, but when you stop the lens down to take the picture, the added DOF it provides will make it all sharp.
You may find that, even with the use of camera movements, some of the scene still isn't in focus, but when you stop the lens down to take the picture, the added DOF it provides will make it all sharp.
OP
- Messages
- 4,331
- Name
- Wayne
- Edit My Images
- No
That s exactly what I did Nigel, focus at widest aperture. What would you recommend to aim for - front or back ?It's also worth considering the aperture you're using to compose, which will usually be wide open to make the image on the focusing screen easy to see.
You may find that, even with the use of camera movements, some of the scene still isn't in focus, but when you stop the lens down to take the picture, the added DOF it provides will make it all sharp.
- Messages
- 9,148
- Name
- Nige
- Edit My Images
- No
In terms of where in the scene I focus?That s exactly what I did Nigel, focus at widest aperture. What would you recommend to aim for - front or back ?
I tend to focus on whatever is in the middle of the frame and then tilt to get foreground and background in focus.
My main issue is trying to do this one-handed while also looking at the focus screen with a loupe at the same time. In warm weather my glasses also steam up under the dark cloth, which makes the whole experience even better. Lol.
- Messages
- 4,963
- Name
- Graham
- Edit My Images
- No
This depends on how the lens panel tilts. Some tilt at the base, some from the centre, and some are asymmetric.That s exactly what I did Nigel, focus at widest aperture. What would you recommend to aim for - front or back ?
So you need to visualise how the plane of focus will shift as you tilt the lens and at what point within that plane of focus is best to initially focus.
But it's an iterative process of jumping between tweaking the focus and tweaking the tilt. You need to experiment until everything falls into place. Including stopping down to see how things change with changing depth of field and opening up again to tweak the tilt and point of focus.

- Messages
- 1,020
- Name
- Keith
- Edit My Images
- Yes
Just to throw an advanced spanner in the works - Very few cameras rotate their lens boards and backs around the centre of the image or lens' nodal point the last does not even need to be within the physical construction of the lens.
Get your head under a dark cloth and critically observe what happens when you apply movement.
The View Camera Technique by Stroebel was required reading when I was at college, that and taking hundreds of table top pack shots of 1L fruit juice tetra packs.
Get your head under a dark cloth and critically observe what happens when you apply movement.
The View Camera Technique by Stroebel was required reading when I was at college, that and taking hundreds of table top pack shots of 1L fruit juice tetra packs.

- Messages
- 260
- Name
- Ian Grant
- Edit My Images
- No
To learn how to use tilt, or swing, it is far easier to begin by visually focussing and adjusting using more extreme situations. Maybe the camera set 45º to a wall or looking down across a table 2 or 3 feet in front of you. I've shown many people how to use movements over the years, and it's very quick, once you can handle extremes you realise how little tilt (or swing) is usually needed.
Sometimes you may also need to adjust rise/fall (or shift) to keep inside the lens image circle. Also LF lenses are optimised to be used at f22, so if you can stop well down,
An example, using a 150mm f4.5 CZJ Tessar on a Crown Graphic
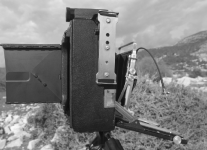

That's about 6-8ft to Infinity, at f22. It's about half a mile to the slight mound in the distance. I think this was Fomapan 200.
Because of the way DOF works ideally you focus a third of the way in.
Ian
Sometimes you may also need to adjust rise/fall (or shift) to keep inside the lens image circle. Also LF lenses are optimised to be used at f22, so if you can stop well down,
An example, using a 150mm f4.5 CZJ Tessar on a Crown Graphic
That's about 6-8ft to Infinity, at f22. It's about half a mile to the slight mound in the distance. I think this was Fomapan 200.
In terms of where in the scene I focus?
I tend to focus on whatever is in the middle of the frame and then tilt to get foreground and background in focus.
My main issue is trying to do this one-handed while also looking at the focus screen with a loupe at the same time. In warm weather my glasses also steam up under the dark cloth, which makes the whole experience even better. Lol.
Because of the way DOF works ideally you focus a third of the way in.
Ian
Last edited:
Garry Edwards
Moderator
- Messages
- 13,688
- Name
- Garry Edwards
- Edit My Images
- No
Yes, don't overthink it, just do it and learn as you go, as I suggested in my first post.
There are just a couple of things that I'm fairly adequate at, clay pigeon shooting and pool, which (surprisingly) are very similar in terms of process and skills - both rely very heavily on physics. Now, I'm the nerdy type who enjoys physics, but I get beaten time and time again by people who can't even spell the word, they just spend a lot of time practicing, and learning from their mistakes
There are just a couple of things that I'm fairly adequate at, clay pigeon shooting and pool, which (surprisingly) are very similar in terms of process and skills - both rely very heavily on physics. Now, I'm the nerdy type who enjoys physics, but I get beaten time and time again by people who can't even spell the word, they just spend a lot of time practicing, and learning from their mistakes
- Messages
- 260
- Name
- Ian Grant
- Edit My Images
- No
If the OP is using the camera he bought in January, I can understand the problems  The focus screen will be very, very, dim, hard to use, that is easily sorted out, an extra 2 stops brighter.
Also, Wayne, what lens & shutter are you using?
Ian
The focus screen will be very, very, dim, hard to use, that is easily sorted out, an extra 2 stops brighter.Also, Wayne, what lens & shutter are you using?
Ian
OP
- Messages
- 4,331
- Name
- Wayne
- Edit My Images
- No
My camera Is a calumet, everything revolves around the middle, of the board. whether its the middle of the image I suppose is where you point it ?Just to throw an advanced spanner in the works - Very few cameras rotate their lens boards and backs around the centre of the image or lens' nodal point the last does not even need to be within the physical construction of the lens.
Get your head under a dark cloth and critically observe what happens when you apply movement.
The View Camera Technique by Stroebel was required reading when I was at college, that and taking hundreds of table top pack shots of 1L fruit juice tetra packs.
Not trying to be clever Keith, just wondering if I have missed something, do they not all work like that?
OP
- Messages
- 4,331
- Name
- Wayne
- Edit My Images
- No
Yes, don't overthink it, just do it and learn as you go, as I suggested in my first post.
There are just a couple of things that I'm fairly adequate at, clay pigeon shooting and pool, which (surprisingly) are very similar in terms of process and skills - both rely very heavily on physics. Now, I'm the nerdy type who enjoys physics, but I get beaten time and time again by people who can't even spell the word, they just spend a lot of time practicing, and learning from their mistakes
Flipping heck Garry, it sounds like there is hope for me after all, glad I did not give up now.
OP
- Messages
- 4,331
- Name
- Wayne
- Edit My Images
- No
If the OP is using the camera he bought in January, I can understand the problems
Also, Wayne, what lens & shutter are you using?
Ian
Yes same camera, I hope that there is a better viewing screen available, also the loop I bought is too big to get into the corners, should have bought the horseman.
Lens is symmar 150 f5.6, which I have fitted into a copal1 shutter and home made board, All that without any light leaks, Yaaaaaaay.
- Messages
- 260
- Name
- Ian Grant
- Edit My Images
- No
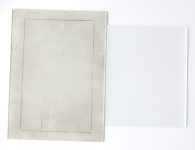
I bought a large storage box in March with 4 LF cameras, plate holders, & more, the screen on the left was in a Half Plate camera, now restored, that's a new 5x4 screen on the right. The left-hand screen now matches the new screen in terms of brightness, etc, the camera is now restored.
The Symmar's are excellent lenses, I have two.
Ian
- Messages
- 260
- Name
- Ian Grant
- Edit My Images
- No
Practice, and understanding what is happening when you tilt or swing the front or/and the rear standards of the camera to the "plane" of focus and the shape of the "area" of focus.
It really isn't easy.
I have no idea if this video is any good, but watching someone actually using tilt and swing might kick-start getting the hang of it. His videos tend to be useful, but I haven't watched this one.
View: https://www.youtube.com/watch?v=SEo-zXOzEBQ
I watched the Video, while preparing my lunch, rambling, not ideal for learning, to many different tangents.
Actually using movements really is easy. I didn't learn with a camera, rather earlier by correcting verticals with a Durst M601 enlarger, where both the head and lens stage can be rotated, and there's a touch of shift as well for the lens stage.
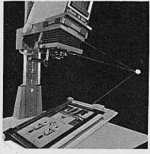
Because you are projecting the principle is very easy to see and then understand. So when I began using a LF camera 3 years later using movements was just common sense.
Ian
OP
- Messages
- 4,331
- Name
- Wayne
- Edit My Images
- No
View attachment 483390
I bought a large storage box in March with 4 LF cameras, plate holders, & more, the screen on the left was in a Half Plate camera, now restored, that's a new 5x4 screen on the right. The left-hand screen now matches the new screen in terms of brightness, etc, the camera is now restored.
The Symmar's are excellent lenses, I have two.
Ian
Did you clean it up or make a new one Ian ?
- Messages
- 260
- Name
- Ian Grant
- Edit My Images
- No
Did you clean it up or make a new one Ian ?
I re-finished it, so rather more than a clean. There are no scratches, or marks, on the back, so it's effectively identical to a brand-new screen.
Ian
- Messages
- 4,963
- Name
- Graham
- Edit My Images
- No
OK. I'll add your comment to my post about the videoI watched the Video, while preparing my lunch, rambling, not ideal for learning, to many different tangents.
Actually using movements really is easy. I didn't learn with a camera, rather earlier by correcting verticals with a Durst M601 enlarger, where both the head and lens stage can be rotated, and there's a touch of shift as well for the lens stage.
View attachment 483394
Because you are projecting the principle is very easy to see and then understand. So when I began using a LF camera 3 years later using movements was just common sense.
Ian
I think we may need to disagree about using movements as being easy. As a professional industrial photographer and hobby landscape photographer, I had a lot of practice with large format cameras (mainly Sinar, Linhof and MPP) and I found getting movement to give me the results I wanted to be far from easy.
The principle is easy, the practice isn't, at least it wasn’t for me.
- Messages
- 260
- Name
- Ian Grant
- Edit My Images
- No
OK. I'll add your comment to my post about the video
I think we may need to disagree about using movements as being easy. As a professional industrial photographer and hobby landscape photographer, I had a lot of practice with large format cameras (mainly Sinar, Linhof and MPP) and I found getting movement to give me the results I wanted to be far from easy.
The principle is easy, the practice isn't, at least it wasn’t for me.
I don't disagree, I began using LF for work just short of 50 years ago with a De Vere, Sinar, Cambo and later for landscapes a Wista 45DX. Since then MPP MicoTechnicals, Graflex Speed, Crown, & Super Graphics as well. These days I restore LF cameras.
Yes there are occasions where experience is needed getting the balance of movements, and use of lens DOF is a fine balance, and that only comes with professional experience. But then that's very rarely going to be an issue for most LF shooters on Forums like this.
As you have used MPPs you will remember how dismally dim their focus screens are, Graflex screens were equally as bad. I think Sinar screens are Acid Etched.
Why mention screens, when I began using my Wista 45DX in 1987, I was amazed at how easy it was to focus, almost no need for a dark cloth, and that also made using movements so much easier. I moved abroad in late 2006, I was shooting in archaeological sites where tripods were banned without a permit (a hassle to get). I bought a Crown Graphic to shoot 5x4 hand-held, but the screen was poor. Then one day I put it on a tripod alongside my Wista 45DX, the Crown had anf4.5 1550mm lens, the Wista a 150mm f5.6 lens. Measuring with a Spotmeter over 3 stops différance, off axis, that matched visual comparisons stopping the Wista's lens down.
After that I bought a new Graflex screen from the US as well as a Fresnel that never arrived. Somewhere in between I began making Focus screens, I anciently reground the US screen finer & brighter. Acid etched screen are the finest (think grain) but also much lower in contrast.
Over the last 18-19 years I must have made & sold well over 1,000 new 5x4 focus screens for MPP 5x4 cameras, and even at the centre they are 2 stops brighter than the originals. That make a huge difference in practice.
Ian
Last edited:
- Messages
- 4,963
- Name
- Graham
- Edit My Images
- No
My "not easy" comment included all the issues in getting movements right, including the issues you mention with screens making it difficult to see what you are doing. I fully understand why you mention screens.I don't disagree, I began using LF for work just short of 50 years ago with a De Vere, Sinar, Cambo and later for landscapes a Wista 45DX. Since then MPP MicoTechnicals, Graflex Speed, Crown, & Super Graphics as well. These days I restore LF cameras.
Yes there are occasions where experience is needed getting the balance of movements, and use of lens DOF is a fine balance, and that only comes with professional experience. But then that's very rarely going to be an issue for most LF shooters on Forums like this.
As you have used MPPs you will remember how dismally dim their focus screens are, Graflex screens were equally as bad. I think Sinar screens are Acid Etched.
Why mention screens, when I began using my Wista 45DX in 1987, I was amazed at how easy it was to focus, almost no need for a dark cloth, and that also made using movements so much easier. I moved abroad in late 2006, I was shooting in archaeological sites where tripods were banned without a permit (a hassle to get). I bought a Crown Graphic to shoot 5x4 hand-held, but the screen was poor. The one day I put it on a tripod alongside my Wista 45DX. the Crown had an f4.5 1550mm lens, the Wista a 150mm f5.6 lens. Measuring with a Spotmeter over 3 stops différance, off axis, that matched visual comparisons stopping the Wista's lens down.
After that I bought a new Graflex screen from the US as well as a Fresnel that never arrived. Somewhere in between I began making Focus screens, I anciently reground the US screen finer & brighter. Acid etched screen are the finest (think grain) but also much lower in contrast.
Over the last 18-19 years I must have made & sold well over 1,000 5x4 focus screens for MPP 5x4 cameras, and even at the centre they are 2 stops brighter than the originals. That make a huge difference in practice.
Ian
I think we are just emphasising two different ends of the same thing. Concepts easy: practise, not so easy.
Even with movements you are still using a setup with a small amount of D of F compared to formats most new users are likely to be used to.: possibly not realising how much you still need to rely on stopping down. Tilting the lens can easily give vignetting issues, and you may need to use both back and front tilt to get what you want. As you shift the plane of focus to get back-to-front focus, it's all too easy to put vertical objects out of focus. And the issue you raise about focussing screens; a lot of the time you can't really see, all that well, what is actually happening. I could probably add to this list, if I put more time into it, but it's about 40 years since I used a camera with movements. But every time I get involved in a discussion like this, I get all nostalgic about doing some "proper" photography. I still have an MPP squirreled away.
I just feel there is rather a lot for a new user, even with simple subjects to take into account, and you need to spend a lot of time practising. I think it was you who suggested practicing with simple subject (sides of a building) and I think this is a good idea.
- Messages
- 1,020
- Name
- Keith
- Edit My Images
- Yes
Indeed not all tilt around the centre of the lens board, but my comment re the nodal point not been at the lens board means that even those that appear to do so don't in real life. I don't know your Calumet but I imagine that if you apply a left / right shift you will throw things even further off. It's a thing you will get used to.My camera Is a calumet, everything revolves around the middle, of the board. whether its the middle of the image I suppose is where you point it ?
Not trying to be clever Keith, just wondering if I have missed something, do they not all work like that?
sk66
Advertiser
- Messages
- 9,865
- Name
- Steven
- Edit My Images
- Yes
In terms of image height, the depth of field along a plane will be equally divided 50/50 around the point of focus; before any tilt is applied. As it is tilted the depth becomes height (wedge shaped; increasing beyond the point of focus, decreasing short of it), and what was image height becomes depth. So when using a lot of tilt there isn't really a point front/back that is necessarily best.That s exactly what I did Nigel, focus at widest aperture. What would you recommend to aim for - front or back ?
Also keep in mind that there is only ever one very thin plane that is maximally/critically sharp; everything else is a compromise ("acceptably sharp").
Last edited:
OP
- Messages
- 4,331
- Name
- Wayne
- Edit My Images
- No
In terms of image height, the depth of field along a plane will be equally divided 50/50 around the point of focus; before any tilt is applied. As it is tilted the depth becomes height (wedge shaped; increasing beyond the point of focus, decreasing short of it), and what was image height becomes depth. So when using a lot of tilt there isn't really a point front/back that is necessarily best.
Also keep in mind that there is only ever one very thin plane that is maximally/critically sharp; everything else is a compromise ("acceptably sharp").
Thanks Steve, I am suffering from information overload, there is so much quality advice here I cannot take it all in so having a break for the rest of the evening and then will read it all again.

Garry Edwards
Moderator
- Messages
- 13,688
- Name
- Garry Edwards
- Edit My Images
- No
There's some great advice and info in this thread.
Personally, I know far less about this subject than most of the people who've posted here - a lifetime of commercial experience, but monorail cameras have only ever been a tool for me, I've never had any subjective interest in them.
I've used a few different makes, but have only actually owned two. My first was a Horseman, which did everything I wanted it to, and I got used to its little ways, and then I picked up a Sinar P2 at a bargain price, this was very different with its yaw-free movements, much easier and faster to use but with the same image quality.
My general advice to the OP - Scheimpflug is very simple as a principle, very complicated if you let it be, just learn the principles, experiment and go from there.
Personally, I know far less about this subject than most of the people who've posted here - a lifetime of commercial experience, but monorail cameras have only ever been a tool for me, I've never had any subjective interest in them.
I've used a few different makes, but have only actually owned two. My first was a Horseman, which did everything I wanted it to, and I got used to its little ways, and then I picked up a Sinar P2 at a bargain price, this was very different with its yaw-free movements, much easier and faster to use but with the same image quality.
My general advice to the OP - Scheimpflug is very simple as a principle, very complicated if you let it be, just learn the principles, experiment and go from there.

woof woof
I like a nice Chianti
- Messages
- 44,133
- Name
- Alan
- Edit My Images
- No
A much simpler solution is to just stick with smaller film or sensor formats, which use shorter focal lengths, which in turn give greater depth of field for a given stop.
You don't necessarily need a smaller format. For eg to get the depth you want with MFT and a 25mm lens you might choose f10 which gives you an aperture of 2.5mm. With a 50mm lens on FF to get an aperture of 2.5mm you'll need f20. With the FF option you'll need a lens capable of stopping down to the required aperture, some 50mm's might only go to f16.
- Messages
- 4,963
- Name
- Graham
- Edit My Images
- No
The asymmetric and geared movements on the P2 were a joy to use, and the sinar shutter, noisy and clunky as it was, plus the "probe" spotmeter transformed my 5x4 (and 7x5) experience.There's some great advice and info in this thread.
Personally, I know far less about this subject than most of the people who've posted here - a lifetime of commercial experience, but monorail cameras have only ever been a tool for me, I've never had any subjective interest in them.
I've used a few different makes, but have only actually owned two. My first was a Horseman, which did everything I wanted it to, and I got used to its little ways, and then I picked up a Sinar P2 at a bargain price, this was very different with its yaw-free movements, much easier and faster to use but with the same image quality.
My general advice to the OP - Scheimpflug is very simple as a principle, very complicated if you let it be, just learn the principles, experiment and go from there.
However, in spite of it making things easier, it was also the only camera I've ever been on a training course for. I think it might have come bundled with the purchase.
Others later copied the yaw-free principle. I can't remember whether they worked exactly the same as the Sinar, but I can remember the options of what you could buy opened up a bit.
sk66
Advertiser
- Messages
- 9,865
- Name
- Steven
- Edit My Images
- Yes
I rather dislike tilt/swing; but all of my experience with it has been with 35mm.Personally, I know far less about this subject than most of the people who've posted here - a lifetime of commercial experience, but monorail cameras have only ever been a tool for me, I've never had any subjective interest in them.