Forced air film drier and film drying cabinet

Messages
551
Edit My Images
Yes
I struggle finding somewhere dust free to dry my newly developed film. I've been "advised" not to dry them in the shower :( . I came across this idea https://philipus.com/project-film-dryer-ver-20

Looks good to me but then I realised I had a more powerful fan already that supplies air to my shed based darkroom. So I've used the principles of that design but built my own version:
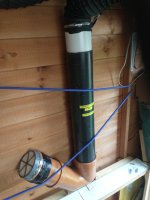
IMG_20230303_145739686.jpg

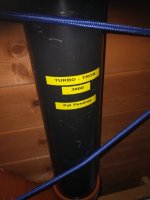
The brown angled part , called a gully trap (£21) has another brown piece (connector £4.50). The black upright (700mm long) is a piece of unused soil pipe I already had. All that pipe is 110mm diameter. The bungee cord is just to stop it toppling over.

Air is sucked from the top black end.
IMG_20230303_145755503_HDR.jpg

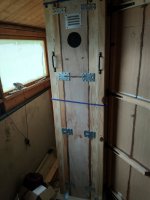
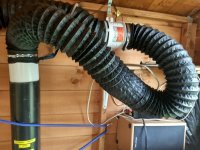
The black flexi pipe is usually connected to a vent to pull outside air into the the darkroom. By pure luck the 4" white vent pipe fits snugly inside the black soil pipe. The white pipe also easily fits back into the vent when using the darkroom. In the top centre of the picture is the 12v 4a fan (white) that's connected to a variable speed controller.
IMG_20230303_145820289.jpg

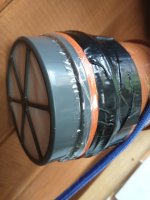
To filter the air 2 vacuum cleaner filters have been used. The grey one is the vac pre motor filter, the second orange one that is just visible between the grey casing and the black tape is the vac post motor filter - apparently a HEPA filter (£7 for the pair). The tape is only to hold it on but I doubt is airtight. However in use the suction force visibly pulls both filters together and onto the connection piece. The filters have rubber like edges which as they are compressed by suction I'm fairly sure are then airtight.

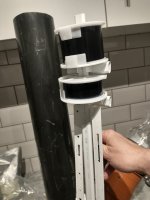
Great, it works and pulls a fair amount of filtered air through. Onto holding the films inside the black soil pipe. 20mm conduit (2m long) and clips have been bought (£3.70).
IMG_20230303_143525996.jpg

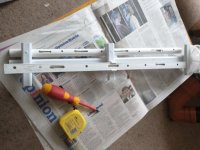
The bits with the holes in hold 16mm film strips.
IMG_20230303_143556466.jpg

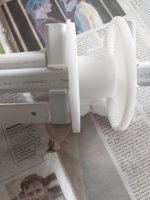
4 inch lengths of conduit as film reel supports and spacers to stop the film touching the inside of the soil pipe.
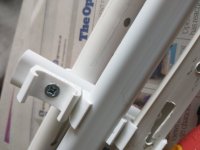
IMG_20230303_143610113.jpg

Clips held in place by a screw, no glue required.
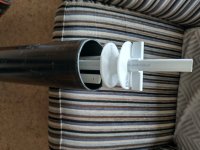
IMG_20230303_143647989_HDR.jpg

Going into the contraption. I've only got 4 reels. Without the 16mm elements they easily fit in even if doing 120.

I was hoping to give it a run with freshly dev'd film tonight but that won't happen now. Will probably be Sun or Mon so will report back with the results.

It might not work but I've enjoyed building it :)
 
Last edited:
I look forward to hearing of your results using it.
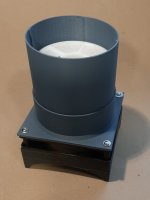
I tried making one using a 3D printer, a funnel and filter holder sandwiching a 12v 100mm fan.
It works much better than expected but as the film is on the reel, there is some residual water held between the spiral and the film, so needs extra time to help dry these parts, even though the exposed film dries cleanly and quickly. The total loss of dust/fibres has been a step change in my output.

Drier.jpg
EDIT: it has a "J-cloth" filter in the base.
 
Last edited:
I struggle finding somewhere dust free to dry my newly developed film. I've been "advised" not to dry them in the shower :( . I came across this idea https://philipus.com/project-film-dryer-ver-20

Looks good to me but then I realised I had a more powerful fan already that supplies air to my shed based darkroom. So I've used the principles of that design but built my own version:

View attachment 382950

The brown angled part , called a gully trap (£21) has another brown piece (connector £4.50). The black upright (700mm long) is a piece of unused soil pipe I already had. All that pipe is 110mm diameter. The bungee cord is just to stop it toppling over.

Air is sucked from the top black end.

View attachment 382951

The black flexi pipe is usually connected to a vent to pull outside air into the the darkroom. By pure luck the 4" white vent pipe fits snugly inside the black soil pipe. The white pipe also easily fits back into the vent when using the darkroom. In the top centre of the picture is the 12v 4a fan (white) that's connected to a variable speed controller.

View attachment 382954

To filter the air 2 vacuum cleaner filters have been used. The grey one is the vac pre motor filter, the second orange one that is just visible between the grey casing and the black tape is the vac post motor filter - apparently a HEPA filter (£7 for the pair). The tape is only to hold it on but I doubt is airtight. However in use the suction force visibly pulls both filters together and onto the connection piece. The filters have rubber like edges which as they are compressed by suction I'm fairly sure are then airtight.

Great, it works and pulls a fair amount of filtered air through. Onto holding the films inside the black soil pipe. 20mm conduit (2m long) and clips have been bought (£3.70).

View attachment 382963

The bits with the holes in hold 16mm film strips.

View attachment 382962

4 inch lengths of conduit as film reel supports and spacers to stop the film touching the inside of the soil pipe.

View attachment 382964

Clips held in place by a screw, no glue required.

View attachment 382965

Going into the contraption. I've only got 4 reels. Without the 16mm elements they easily fit in even if doing 120.

I was hoping to give it a run with freshly dev'd film tonight but that won't happen now. Will probably be Sun or Mon so will report back with the results.

It might not work but I've enjoyed building it :)
Looks like it could be quite effective .

Can you produce similar to accommodate felines ?……That would remedy 99% of my dust and crud issues ! :ROFLMAO:
 
The total loss of dust/fibres has been a step change in my output.

View attachment 382969
That's what I'm hoping for @Cluster . Your device looks significantly more professional than mine!!

I did wonder about the water in the grooves of the reels but I'm assuming there will be some trial and error finding the optimum drying duration. I'm also going to try some scrap 35mm film as well to get an idea of timings - to keep opening the device every few minutes to check somewhat defeats the object.
 
It has potential to be a useful space saver for those that have been "advised" not to use a bathroom.(y)
So, its gonna depend on the film to a certain extent and bear in mind I don't remember ever drying film still on the spool but, what are we like for springy curl given that it isn't dried hung and weighted ?
I mean, they are going to be inserted in to some kind of carrier be it scan or enlarger, which will flatten things out a bit, but still I foresee the occasional battle of wills, man v spring..o_O
 
I don't remember ever drying film still on the spool
On those rare occasions when I still use film, I use a commercial Silvertronic on-the-reel dryer. They come up every so often on ebay and such. I use Patterson reels: both they and the film dry completely in 15 - 20 minutes. The pressure is quite high, about the same as a fan heater on full power and the film comes off the reel with a manageable curvature for both 35mm and 120.

Silvertronic film dryer Ixus 70 IMG_4342.JPG
 
I'd heard about drain-pipe dryers, but I couldn't work out how one would get a film safely into a drain pipe long enough to hold over 5 feet of film!!!!!

Isn't really going to work for me as I've only the one Rondinax tank, and these days seem to be doing double-dev sessions. :(
 
Still moisture in the reel grooves at 20 mins. Off to make a cuppa whilst it has another 10 mins. Sure the 16mm strips will be bone dry tho.
 
Failure! After 40 mins reel grooves still wet and main part of film not totally dry. I dropped the 120 film on the floor and it got covered in dust :(

All films re-washed in dilute wetting agent and now drying conventionally in the... shower!!

Will think it through on the morrow but off to bed now.
 
Ouch re the 120!

Is there any heating or is it just ambient temperature air that goes through? Could be that 1.2°C is just too cold for quick drying? Any idea what the relative humidity was?
 
Could be that 1.2°C is just too cold for quick drying? Any idea what the relative humidity was?
That sounds like the problem.

My guess is that you're running up against condensation. As much water is coming out of the air as the flow is evaporating. I think you'll need the air temperature to be above 10 degrees and preferably around 20 degrees.
 
Success or not, well done you for 'having a go'. I am sure that you will be able to iron the bugs out of the drier and enjoy your creation.
 
In the past I remember many darkrooms utilised commercial drying cabinets for film. Personally I used to naturally dry film hanging from hooks under shelving at the end of my darkroom without dust issues. If I needed to dry film quickly to produce a print for publishing I used to use what I believed to be an alcohol based solution called drysonal in the tank, then shake the spool and carefully squeegee the film, hang for a very short time, cut into strips and print.

I see drysonal is still available, but not in the smaller bottles I remember. https://www.profilmdirect.co.uk/tetenal-drysonal-5-litre-rapid-drying-agent-for-films-4945-p.asp
 
Well negs now safely sleeved. Major damage limited to one of the 12 120 images. Analysis of issues and possible causes and responses to comments to follow this evening.
 
So, as @AndrewFlannigan and @Flighter say I also think the low temperature and condensation are causing problems - they certainly aren't helping.

In addition I think I may be using too much filter material and this is severely reducing airflow. The fan is rated at 235 CFM and I know what that feels like when it's blowing into the darkroom - fierce! The exhaust airflow when using the dryer doesn't feel that strong.
EDIT: it has a "J-cloth" filter in the base.

I think I will either try @Cluster idea (maybe with a bit of cooker hood filter material too) or try and thin down the current vac filters.

Next try with the Turbo -Tron will also be when the ambient temperature is higher and using wetted scrap film. Not tonight mind it's even colder and snowing!

All in all I've enjoyed the experimentation so far and will persevere.
 
A car airbox shouldn't be expensive (from a breaker's yard) and a filter should last a long time. High flow too (a 2 litre car will be sucking in 1000 or so litres per minute at just over tickover)
 
Indeed. The advantage of a personal scrappy visit is that you can check that the output hose from the airbox is a close enough match to the bottom of the dryer tube.
 
Thanks everyone, some good ideas there.

Which reminds me I have an unused air filter from my Perodua Nippa - I loved that car. The last destination I drove it too in Oct 2020 (digi pic, apols)...
IMG-20200930-WA0000.jpg
 
Well the forced air dryer is awaiting attention to sort out a more free flowing filter.

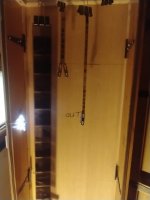
In the meantime I've built a heated drying cabinet. Behold the beauty that is "The Coffin":
IMG_20230510_184930679_HDR.jpg

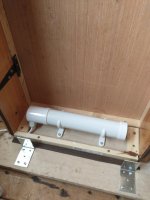
40 watt tube heater
rsz_11img_20230510_185018544.jpg

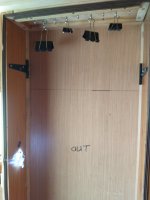
Film hangers plus tiny battery lights:
IMG_20230510_185753654.jpg

Wet negs just prior to lid going on (120, 16mm and Minox)
IMG_20230510_203253214.jpg

View through the porthole:
IMG_20230510_203514013_HDR.jpg

The top and bottom aren't fixed and can be removed with the sides hinged to fold in. It is made to take a 36exp 36mm film and should be good for print drying too.

I think I enjoy the creating of "stuff" nearly as much as the actual photography :)
 
In the day I always used large film drying cabinets. The had controlled low temperature heaters and filters with positive pressure fans in the cabinet there was very little air movement in the cabinet but enough to dry the film evenly. A dozen or so films would be bone dry in half an hour.
 
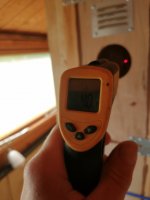
IMG_20230611_142307106_HDR.jpg

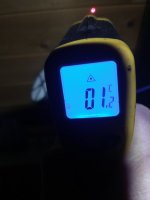
Not sure if the numbers are legible but the reading inside the drying cabinet is 40.1°c. I don't need to put the cabinet tube heater on :)

I don't think it will take long to dry the 120, 35mm 36 exp and Minox film in there! Mind, I did load the dev tanks in the darkroom half of the shed at 7.30am to escape the heat.
 
Hot!

Hot up here too, it's one of the rare days in Scotland where the problem is cooling down the developer rather than warming it up!

In the (really) old days, before even my time, there were "tropical" variants of chemicals and cameras...
 
In the (really) old days, before even my time, there were "tropical" variants of chemicals and cameras...

Deving today was the first time I'd ever had chems come out of the tank warmer than when they went in. They had a cool bath before being used on the next film.

I did fleetingly wonder that there was/is something available for parts of the world where temperatures are always hot. Thanks to @StephenM I know there once was.
 
If you'd like me to see what I can dig out, let me know. As always, the Internet Archive is your friend, and I'd start by consulting the Ilford Manual of Photography, Clerc's Photography theory and practice in that order before going into the various chemical formularies. The major variation I can recall was adding a hardener. The big pitfall to avoid is to not process if the temperature is high enough to separate the emulsion from the base.
 
Well the heat has meant for the 1st time ever I've dev'd and sleeved film in a day (7 hours to be precise). I was going to start scanning but at 9pm why spoil a good film day. Plus the 120 Pan F is a bit curly so it can spend 24 hours under a large pile of books.

Also my first time using Pan F, from a quick view of the negs it looks like a very fine film.
 
Last edited:
Try here as a starting point


Edit to add:

I have the 1961 version (ten years after this one, I think) bought new in a Blackpool bookshop in 1965. I was awaiting my O level results at the time...
Developing at 35°c is impressive! There was me slightly concerned that my ID-11 had crept up to 22°c after 9mins. Thanks for taking the time @StephenM to locate that.

Hope you got the O levels you wanted, it would be another 5 years until I was born...
 
I was disappointed by a low grade in Latin, and did worse than I expected in physics. Two years later I apparently failed German O level. That German was the only exam I failed is a small consolation I suppose.
 
Back
Top