
Steep
Nutcrack Rapids
- Messages
- 16,636
- Name
- Hugh
- Edit My Images
- Yes
A few weeks back I bought an Epson 1400 A3+ printer and apart from it being the bees knees the first thing I noticed was how quickly the ink was going down, at the rate it was going I think 12 to 15 A3 photos would empty one or more carts. A set of six genuine Epson carts would cost well over £60 to buy, holding not a lot of ink in each. Reading on the forums here I knew some folk had continuous ink supply systems installed on their printers and I decided to check one out. The one I chose came from CityInk Express (calm down that's city ink, not city Link ") ) and cost me just under £49 including vat and delivery (oddly enough by City Link, my how I laughed ).
) and cost me just under £49 including vat and delivery (oddly enough by City Link, my how I laughed ).
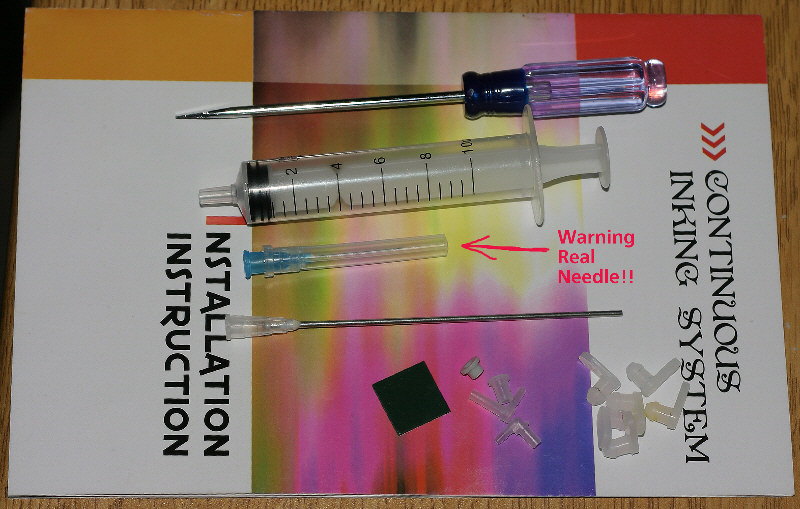
It consists of... a block of 6 ink bottles, each holding 100ml, attached by 6 long thin pipes to a block of 6 'cartridges'. There's a plastic bag with 6 air filters, screwdriver, syringe, long needle, short needle (this one is a real needle sharp point etc.), some spare sticky pads and adaptors. The extra bits are obviously to be used to refilling though that's not mentioned anywhere in the instructions, the whole lot comes well packaged in polystyrene and boxed twice.
Installing
First things first, have a mans glance at the instructions, glance again, think jings crivvens! and sit down to read them properly which is not easy, the English is good but the instructions are complicated insofar as they refer to pictures which are far too small to see. Once I'd decided to go ahead and get the ciss installed however I found that doing it was actually far easier in the main than reading about it. The instructions make a meal of things which are really simple to do. for example removing the ink cartridge cover took me all of 30 seconds but is covered by nine seperate (tiny) photographs in the manual, maybe I was just lucky. You can see in the photos below how the system fits and where the bits go, the ink tubes were set to just the right length for my printer and in the end I only had one and a half problems. I didn't seat the cartridge block properly (it's harder than just fitting one single cart) and the printer didn't recognise it so I took it out and refitted it, after I'd refitted it all was well but I didn't sort the tubes out and they got caught up on my first print (moral, check and double check)
Testing
Once the printer had done it's cleaning/loading cycle I did a nozzle check and an alignment check, both spot on. I had printed a full page A3 photograph with the Epson carts before swapping them over so I re printed the same image again exactly as before to see if I could tell any difference between them. There is so little to choose really, the ciss print has slightly lighter shades of brown but quality seems to be spot on, easily as good as the genuine inks.
I'm very happy with the set up so far but will update this in a week or so after I've run a few more prints through it.
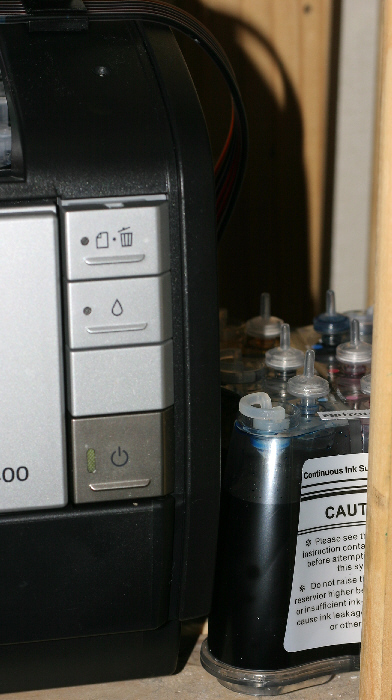
The ink bottles sitting to the right of the printer, they reckon it's important to keep them on a level with the printer itself. You can see the pointy air filters I fitted to the tops of the bottles.
The cartridges installed, the green pcb sticking up is the Ink reset button, used to tell the printer the ink carts are full if it thinks they are empty.
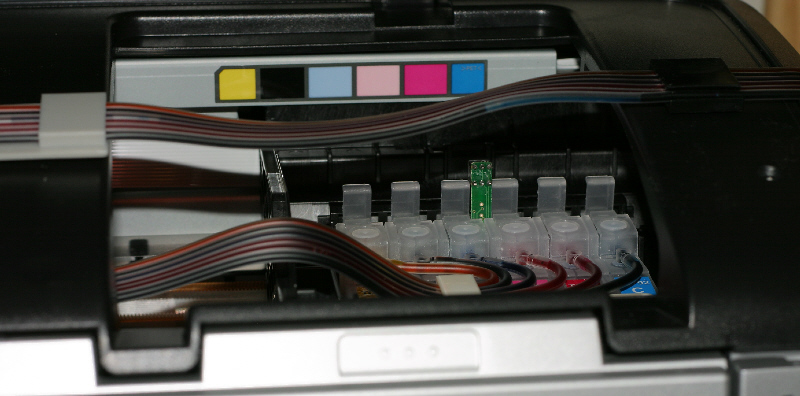
The pipes leading across the printer, with the plastic support in place, it fits with some of the sticky pads mentioned above

The instruction book and bag of bits, the stoppers bottom right were replaced by the air filters above.
) and cost me just under £49 including vat and delivery (oddly enough by City Link, my how I laughed ).It consists of... a block of 6 ink bottles, each holding 100ml, attached by 6 long thin pipes to a block of 6 'cartridges'. There's a plastic bag with 6 air filters, screwdriver, syringe, long needle, short needle (this one is a real needle sharp point etc.), some spare sticky pads and adaptors. The extra bits are obviously to be used to refilling though that's not mentioned anywhere in the instructions, the whole lot comes well packaged in polystyrene and boxed twice.
Installing
First things first, have a mans glance at the instructions, glance again, think jings crivvens! and sit down to read them properly which is not easy, the English is good but the instructions are complicated insofar as they refer to pictures which are far too small to see. Once I'd decided to go ahead and get the ciss installed however I found that doing it was actually far easier in the main than reading about it. The instructions make a meal of things which are really simple to do. for example removing the ink cartridge cover took me all of 30 seconds but is covered by nine seperate (tiny) photographs in the manual, maybe I was just lucky. You can see in the photos below how the system fits and where the bits go, the ink tubes were set to just the right length for my printer and in the end I only had one and a half problems. I didn't seat the cartridge block properly (it's harder than just fitting one single cart) and the printer didn't recognise it so I took it out and refitted it, after I'd refitted it all was well but I didn't sort the tubes out and they got caught up on my first print (moral, check and double check)
Testing
Once the printer had done it's cleaning/loading cycle I did a nozzle check and an alignment check, both spot on. I had printed a full page A3 photograph with the Epson carts before swapping them over so I re printed the same image again exactly as before to see if I could tell any difference between them. There is so little to choose really, the ciss print has slightly lighter shades of brown but quality seems to be spot on, easily as good as the genuine inks.
I'm very happy with the set up so far but will update this in a week or so after I've run a few more prints through it.
The ink bottles sitting to the right of the printer, they reckon it's important to keep them on a level with the printer itself. You can see the pointy air filters I fitted to the tops of the bottles.
The cartridges installed, the green pcb sticking up is the Ink reset button, used to tell the printer the ink carts are full if it thinks they are empty.
The pipes leading across the printer, with the plastic support in place, it fits with some of the sticky pads mentioned above
The instruction book and bag of bits, the stoppers bottom right were replaced by the air filters above.