oh, one other thing, ive been spending quite a lot of time on skateperception looking and flash settings and what have you. How do you set up your flashes? power wise i mean.
this one looks pretty good
THIS IS THE CORRECT METHOD... EVERYONE, LEARN IT!!!
To under expose the ambient light, you simply set your camera to a HIGHER f/number than what your light meter (or your on-camera meter) is telling you!
Okay, so here's a little guide for those of you with a flash meter. We'll use iso100, we'll also be underexposing ambiet by ONE stop and be measuring INCIDENT light (I've been using a £90 ****** little meter made by Polaris that does all the basics, I've had it for about year and a half and I've many many photos published!):
Rock up on the set
Take your light meter and measure the ambient light (if it's daytime... Let's assume you get a reading of f/8.0 @ 1/250sec
Place your main flash in a position that will best light your subject/skater
Walk to where the subject/skater will be when you want to take the picture (halfway down a rail, halfway up a stair set etc), hold the light meter up to where the skater will be and pop the flash with the meter pointing towards the flash (making sure you're still set to 1/250sec).
If the meter reads anything other than f/11 (because f/11 is one f/stop difference from f/8.0), you'll need to adjust your flash power; if it reads any number ABOVE f/11 then you will need to REDUCE the power of the flash because if you were to set your camera's aperture to f/11, your flash light (and hence your subject/skater) will be OVEREXPOSED. Similarly, if it reads anything BELOW f/11, you'll need to INCREASE the power of the flash because if you were to set your camera's aperture to f/11, your flash light (And hence your subject/skater) will be UNDEREXPOSED.
Once your have adjusted your flash power to a certain power that gives a read out on the meter of f/11, you then know you have a properly exposed mainlight which will hence properly expose your subject/skater, also, you will have your ambient light nicely UNDEREXPOSED to make your subject/skater pop out of the picture (the subject/skater will be brighter (but correctly exposed) than everything else in the photo and thus draw the viewers eyes).
You can now setup a rimlight... This is usually placed off to the side of the subject/skater and set one or two stops BRIGHTER than the mainlight that you just set up as to create a more dynamic and three-dimetional looking image.
Set the second flash (the rimlight) up so that it points to a spot on the side, or back of where the skater will be... Follow steps 3,4 and 5 except replace f/11 with f/16 (or f/22) as we want to OVEREXPOSE this flash.
Now that you have set all this up, you must return to your camera and input the details you just metered:
Set the shutter speed to 1/250sec (still using iso100 film or setting digicam to iso100), set the aperture on the lens to f/11; just to clarify: this will mean that the skater will be perfectly exposed by the mainlight (the first flash you setup), overexposed just a little on the side by the rimlight (as it's set to f/16 or f/22) and the ambient will be nicely underexposed by one stop (as it was metered at f/8.0 @ 1/250sec). Now you can shoot your photo... The distance between the camera and the subject will make absolutely no difference at all to the exposure, as the flashes remain in a fixed spot! You can now go ahead and shoot a nicely exposed photo... 3rd, 4th, 5th, 6th etc etc flashes area generally used to light up large spots or create extra dynamic effects on the subject/skater (such as softening harsh shadows that become present when using flashes)! These are usually exposed depending on what they're being used for e.g. If to light a large set, will usually be at the same exposure of the mainlight, or if used to soften shadows will usually be a couple spots underexposed of the mainlight etc etc.
Now, to explain a few things:
INCIDENT METERING is when you take a meter reading of light falling onto a subject; you will take your light meter with the little white semi-circle (lumisphere) ON (or if it's a slideable one, make sure it's covering the little hole where the light sensor is)! You then make sure the white semi-circle is pointing towards where the flash or light is coming from. The other type of metering is REFLECTIVE METERING, this is where the meter is placed where the camera is going to be shooting from with the lumisphere OFF/not covering the light sensor and you point it towards to the subject that is being photographed and take a reading. You will find yourself mostly using incident metering (in fact, I've rarely metered reflective).
People have been talking about flashes having apertures etc etc. They do NOT have apertures! What is written on a flash as an f/number is simply as a reference to what f/number you should be setting your CAMERA to!!! So when people say "I set my second flashes f/number to f/16", that means that they changed the power of the flash, or the distance to subject so that their METER gives a reading of f/16 which denotes the f/number (aperture) that you should set the CAMERA to in order to get perfect exposure for that flash! FLASHES DON'T HAVE APERTURES!
Distance from flash to subject makes a difference! Example: If you're trying to get a reading of f/22 from a flash, but are only getting f/11 at full power, you should (if you can) move your flash closer to the subject/skater, this will make the light on the skater brighter! You might then be able to get a reading of f/22! You can also use, if your flash has the ability, the flashes zoom facility (usually just a little pull out lens on the front which focuses the flash to certain focal lengths), however, you will lose flash spread e.g. If you zoom the flash head right in, you might only get light falling on the subject/skaters face and chest, but maybe no the rest of his body, which will look wrong!
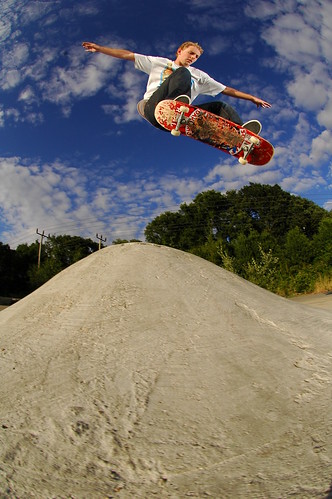
Finally... Another reason for under exposing ambient light is that nice blue skies that are one or two stops under exposed can look a very nice deep blue! Also, clouds tend to look a lot clearer and pop more!
Anyway, that's it! Long winded, but I thought I'd explain everything concisly!
is this method along the lines that you use cherryrig?
I just order a flash meter aswell so as soon as that comes, im all set to go out and shoot


 but it does work well though