
and the site receives a small commission

You are using an out of date browser. It may not display this or other websites correctly.
You should upgrade or use an alternative browser.
You should upgrade or use an alternative browser.
Lockdown 3 project, 3D printing a 4x5 camera.
- Thread starter dmb
- Start date

OP
- Messages
- 2,435
- Edit My Images
- No
This is taking more time, effort and filament than I'd hoped. Part 1 had one failed print before I got a good one. Part 2 (second part of ground glass holder) had 2 failed prints. Guess what, part 3, the rear frame came in with 3 failed prints so far. Think I've tweaked the hardware and software settings to give something useable this time. Sipping a glass of red wine while waiting for dinner to cook keeping an eye on progress. Estimate for this print is 8 hours so may be late to bed, better warn the missus.
- Messages
- 376
- Edit My Images
- Yes
Fascinating project but.... stupid question, why wouldn't you just get in some sheet plastic and cut it to shape?
OP
- Messages
- 2,435
- Edit My Images
- No
If I had a CNC router or laser cutter possibly. There are lots of holes to make for screws and hex nuts , slots to cut and to quite tight tolerances. If I wasn't so cack-handed at woodwork I would love to follow the instructions in this 1918 volume I've had for over 40 years.Fascinating project but.... stupid question, why wouldn't you just get in some sheet plastic and cut it to shape?

- Messages
- 376
- Edit My Images
- Yes
OOOOOoooh, I'd love a copy of that!
- Messages
- 10,055
- Name
- Steve
- Edit My Images
- No
This is taking more time, effort and filament than I'd hoped. Part 1 had one failed print before I got a good one. Part 2 (second part of ground glass holder) had 2 failed prints. Guess what, part 3, the rear frame came in with 3 failed prints so far. Think I've tweaked the hardware and software settings to give something useable this time. Sipping a glass of red wine while waiting for dinner to cook keeping an eye on progress. Estimate for this print is 8 hours so may be late to bed, better warn the missus.
Yeah, I feel your pain on the ‘fun’ of 3D printing when nothing seems to go right [emoji6]
Good luck with the project though [emoji1303]
OP
- Messages
- 2,435
- Edit My Images
- No
OOOOOoooh, I'd love a copy of that!
This has similar articles and instructions. https://archive.org/details/photographiccame00hasluoft - the bellows part in mine and this one may be useful. Archive.org has hundreds of books and magazines on early photography.
- Messages
- 376
- Edit My Images
- Yes
Yhankyou!This has similar articles and instructions. https://archive.org/details/photographiccame00hasluoft - the bellows part in mine and this one may be useful. Archive.org has hundreds of books and magazines on early photography.
OP
- Messages
- 2,435
- Edit My Images
- No
Part 3 - rear frame done
File: Frame-Back-10degrees_h.gcode
Uploaded: 2021-01-10 16:36:17
User: dmb
Filament (Tool 0): 37.75m
Approx. Total Print Time: 6.5 hours
Print Time: 06:17:54
Print Time Left: -
Printed: 2.4MB / 2.4MB
Current Height: 37.3 / 26.9mm
Layer: 112 / 112
Tomorrow, with luck, the rotating back - and if the new roll of filament arrives on Tuesday then will press on with the standards and the parts I'm re-designing for sliders and focussing.
- Messages
- 1,316
- Name
- Simon
- Edit My Images
- Yes
Out of interest, roughly what's the cost of the filament roll required for a project like this?
OP
- Messages
- 2,435
- Edit My Images
- No
With waste from failed prints and supports that have to be removed I've estimated about a kilogramme. Depending on quality and supplier a kilo reel costs between £15 to £25.Out of interest, roughly what's the cost of the filament roll required for a project like this?

Nod
Tootles
- Messages
- 45,540
- Name
- Nod (UK)
- Edit My Images
- Yes
With waste from failed prints and supports that have to be removed I've estimated about a kilogramme. Depending on quality and supplier a kilo reel costs between £15 to £25.
With regard to the waste, does anyone make an extruder so waste/failed prints can be reformed into filament? Not sure if it would be a practical proposition but got to better than throwing waste away.
- Messages
- 104,465
- Name
- The other Chris
- Edit My Images
- Yes
Interesting, I would have guessed a lot more and probably cheaper in material costs than buying materials to fabricate something similarWith waste from failed prints and supports that have to be removed I've estimated about a kilogramme. Depending on quality and supplier a kilo reel costs between £15 to £25.
OP
- Messages
- 2,435
- Edit My Images
- No
With regard to the waste, does anyone make an extruder so waste/failed prints can be reformed into filament? Not sure if it would be a practical proposition but got to better than throwing waste away.
There are such devices but would only be worthwhile with large amounts of waste and that would need to be carefully sorted by material and colour. This project is using PLA (poly lactic acid) this consists of renewable raw materials (made from fermented starch extracted from crops such as corn, potatoes or sugar cane)and is biodegradable in industrial composting plants. I use other plastics for other projects that require more strength and heat resistance (ABS), chemical restistance (PETG) and flexibility (TPU) - of those only PETG can go into our local plastics recycling bins.
OP
- Messages
- 2,435
- Edit My Images
- No
Interesting, I would have guessed a lot more and probably cheaper in material costs than buying materials to fabricate something similar
There is a trade off between infill density, speed of printing and amount of filament used and strength. Some parts only have 10% infill behind the solid walls, those however are not 100% lightproof front to back but have other parts infront and behind.
- Messages
- 1,316
- Name
- Simon
- Edit My Images
- Yes
Thanks - that's really not bad at all. I've yet to dip my toe in the 3D printing revolution, but keep wondering about it. I'd been looking at one of the DaVinci models but they would be too small for this project. Yours looks like an Ender-3 - is that right?With waste from failed prints and supports that have to be removed I've estimated about a kilogramme. Depending on quality and supplier a kilo reel costs between £15 to £25.
- Messages
- 10,055
- Name
- Steve
- Edit My Images
- No


There are a few hours of printing time here too [emoji3] (I’m not showing the failed/development prints!)
I’m currently running woodfill on one printer, and matte black on the other.

It’s always exciting as your part nears completion, especially when you’re developing something new.
OP
- Messages
- 2,435
- Edit My Images
- No
Progress so far.
Quite a lot of fettling and making fasteners fit. Had overlooked this was a USA design so of course all the bolts, screws, nuts and washers and holes for them were supposed to be in (what makes me smile) imperial sizes rather than metric, except for the 8mm bars that will form the frame. Those are recycled from old computer printers. There will be one component in the units of my youth, the 1/4" nut for the tripod mount.
Now looking at designing simplified sliders and focus mechanism. Mrs B has found me some black twill from her sewing room that will be the basis for bellows.
- Messages
- 10,055
- Name
- Steve
- Edit My Images
- No
Progress so far.
Quite a lot of fettling and making fasteners fit. Had overlooked this was a USA design so of course all the bolts, screws, nuts and washers and holes for them were supposed to be in (what makes me smile) imperial sizes rather than metric, except for the 8mm bars that will form the frame. Those are recycled from old computer printers. There will be one component in the units of my youth, the 1/4" nut for the tripod mount.
Now looking at designing simplified sliders and focus mechanism. Mrs B has found me some black twill from her sewing room that will be the basis for bellows.View attachment 305395
I can’t tell from the photo, but what orientation was that white front U-frame printed in? If it was printed the way it’s mounted now, be careful of layer de-lamination [emoji1303]
OP
- Messages
- 2,435
- Edit My Images
- No
Printed flat, so long layers and gyroid infill with infill trapping between layers. Supports to hold up the slots. Just taken a break from redesign of sliders, fine focus mechanism and tripod mount after FreeCAD software threw a wobbly when asked to produce a regular hexagon, something that it had no problems with earlier this week, just sits there sulking. So may have to fire up OpenSCAD and do it programmatically, but after a generous snifter of whiskey may leave it to tomorrow.I can’t tell from the photo, but what orientation was that white front U-frame printed in? If it was printed the way it’s mounted now, be careful of layer de-lamination [emoji1303]
- Messages
- 10,055
- Name
- Steve
- Edit My Images
- No
Printed flat, so long layers and gyroid infill with infill trapping between layers. Supports to hold up the slots. Just taken a break from redesign of sliders, fine focus mechanism and tripod mount after FreeCAD software threw a wobbly when asked to produce a regular hexagon, something that it had no problems with earlier this week, just sits there sulking. So may have to fire up OpenSCAD and do it programmatically, but after a generous snifter of whiskey may leave it to tomorrow.
I thought it would probably be printed the right way, just didn’t want you to find out the hard way after it snaps on first use

It’s a good idea to take a step back from designs too. I think we all reach the point sometimes where it’s just not working! I actually woke up at 1:30am this morning with an idea for a new fully printed clamshell design wet plate plate holder, and had to draw it up while it was in my head, which went down well with my wife next to me in bed
Last edited:
OP
- Messages
- 2,435
- Edit My Images
- No
Ten days in and getting there. Sliding mounts on the bars are a total re-design from the original and took a couple of prototypes. Still some improvements to the mechanics I can see.

Just the small matter of making bellows (GULP) and possibly a recessed lens panel. At the moment my only lens to hand is a Ross 5in Wide Angle Express f4 from WW2 and infinity focus is just out of reach :banghead:. One option would be to go for a vertical rather then canted rear standard.
I'm being told it is time for me to make dinner.
Just the small matter of making bellows
(GULP) and possibly a recessed lens panel. At the moment my only lens to hand is a Ross 5in Wide Angle Express f4 from WW2 and infinity focus is just out of reach :banghead:. One option would be to go for a vertical rather then canted rear standard.I'm being told it is time for me to make dinner.
Last edited:


OP
- Messages
- 2,435
- Edit My Images
- No
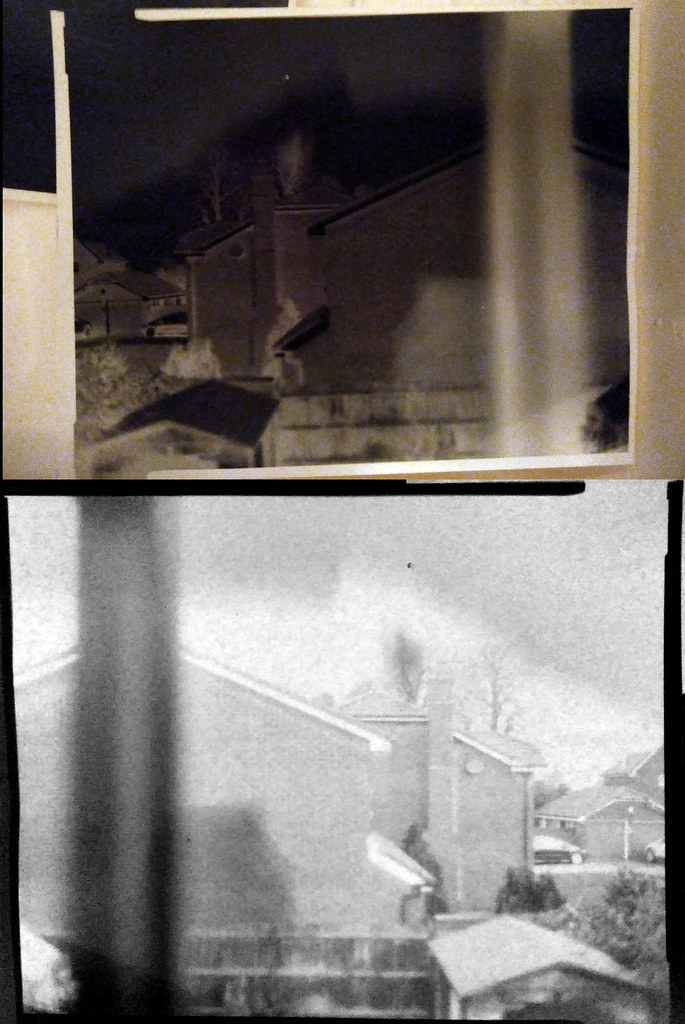
Made something that looked a little like bellows, covered it all with changing bag just in case and exposed some paper,
shot1_4x5
by D M Bloor, on Flickr
Snapped while still washing with my phone - so hoping will look better whan dried and scanned.
Guessed exposure at 10 seconds at f/4 onto old Ilfrobrom.
Metering scene with Pentax Spotmeter afterwards suggests effective ISO speed as 3 - based on brick wall being mid grey.
Positive version inverted and tweaked, a little, in Photoshop.
Nod
Tootles
- Messages
- 45,540
- Name
- Nod (UK)
- Edit My Images
- Yes
I'm being told it is time for me to make dinner.
Have you got the files for printing a bacon sarnie with extra bacon, please...
OP
- Messages
- 2,435
- Edit My Images
- No
Have you got the files for printing a bacon sarnie with extra bacon, please...
I'm sure my son (aka MegaGeek) has plans - at moment the only thing that looks edible is my flexible TPU filament. It resembles and has the consistency of liquorice laces. It is fun trying to push that stuff through 10 inches of tubing and then through 0.4mm nozzle ! :banghead:
Asha
Blithering Idiot
- Messages
- 11,274
- Name
- Asha
- Edit My Images
- Yes
I think I'll stick with butchers' bacon for a while!
3D bacon will probably make your sarnies last longer
- Messages
- 10,055
- Name
- Steve
- Edit My Images
- No
(and possibly how much Steve would charge him for a set!)
Let me think....no
Bellows are probably the worst (well, mind numbing!) part about building my cameras. So far I've built around 160 sets, and have another 50-60 to build, so I reckon that's enough for me
OP
- Messages
- 2,435
- Edit My Images
- No
Let me think....no
Bellows are probably the worst (well, mind numbing!) part about building my cameras. So far I've built around 160 sets, and have another 50-60 to build, so I reckon that's enough for me
I'm still putting plasters on the cuts on my fingers I got building my first set of bellows.
Nod
Tootles
- Messages
- 45,540
- Name
- Nod (UK)
- Edit My Images
- Yes
There was supposed to be a smiley after the reference to Steve!
Did you (Steve) look to see if anyone was selling pre-made bellows? I would guess that someone does (at a cost) and that as a one off expense, it might be worth it to dmb.
Did you (Steve) look to see if anyone was selling pre-made bellows? I would guess that someone does (at a cost) and that as a one off expense, it might be worth it to dmb.
StephenM
I know a Blithering Idiot
- Messages
- 4,960
- Name
- Stephen
- Edit My Images
- Yes
- Messages
- 10,055
- Name
- Steve
- Edit My Images
- No
There was supposed to be a smiley after the reference to Steve!
Did you (Steve) look to see if anyone was selling pre-made bellows? I would guess that someone does (at a cost) and that as a one off expense, it might be worth it to dmb.
Custom bellows were the first people I contacted when I ran the original Kickstarter campaign. Unfortunately, their per-bellows cost, even for 150 sets, was just way too much for me to consider (around £100 per set). Whilst their final quality would be great, I couldn't justify the cost unfortunately, hence me going the other route and designing/assembling my own.
- Messages
- 10,055
- Name
- Steve
- Edit My Images
- No
I'm still putting plasters on the cuts on my fingers I got building my first set of bellows.
I laser cut all of my skins/ribs, so would likely lose the whole finger if I got it in the way
(to be fair, I do manage to continually cut myself with everything else though!)Nod
Tootles
- Messages
- 45,540
- Name
- Nod (UK)
- Edit My Images
- Yes
Custom bellows were the first people I contacted when I ran the original Kickstarter campaign. Unfortunately, their per-bellows cost, even for 150 sets, was just way too much for me to consider (around £100 per set). Whilst their final quality would be great, I couldn't justify the cost unfortunately, hence me going the other route and designing/assembling my own.
I can see that making bellows is... time consuming! So I'm not too surprised that they're not a cheap product. Whether the end result is worth the cost is up to dmb.
Steve, have you considered a butcher's glove (chain mail)? Might save a finger, or at least its cost in band-aids!
OP
- Messages
- 2,435
- Edit My Images
- No
Have been building gravity operated guillotine shutter to use on the shutterless Ross lens now I have some X-Ray film. Have calculated slot dimensions to give me a range of shutter speeds and just taken delivery of some phototransistors to build a circuit I can hook up to an Arduino and my PC to double check calculations.
In the mean time I dusted off an old project so I could test the film speed of the X-Ray film in different lights and developers.
Meet old faithful, a 1910 or so, 9x12cm, C P Goerz plate/roll camera (only have the plate back and holders and nobody makes 9cm wide roll film). I fixed the stuck shutter a year or so ago, uses pneumatic delay. The speeds from 1/250 down to 1/25 are close, below that they run a bit fast so 1/10 is nearer 1/20 and so on (these measured using a microphone and PC recording software, not an option for the drop shutter). Made some quick and dirty black card and acetate film sheaths to hold the film in the place the plate would go.


First test neg dev'd and drying. Will need to replace some of the velvet light seals where the plate holder goes in as there is a small light leak.
In the mean time I dusted off an old project so I could test the film speed of the X-Ray film in different lights and developers.
Meet old faithful, a 1910 or so, 9x12cm, C P Goerz plate/roll camera (only have the plate back and holders and nobody makes 9cm wide roll film). I fixed the stuck shutter a year or so ago, uses pneumatic delay. The speeds from 1/250 down to 1/25 are close, below that they run a bit fast so 1/10 is nearer 1/20 and so on (these measured using a microphone and PC recording software, not an option for the drop shutter). Made some quick and dirty black card and acetate film sheaths to hold the film in the place the plate would go.
First test neg dev'd and drying. Will need to replace some of the velvet light seals where the plate holder goes in as there is a small light leak.