m4/3 - dealing with noise?

Messages
312
Name
Mark
Edit My Images
Yes
So, I had the chance to use my Olympus EM1 Mk2 + 40-150 f/2.8 lens for the first time this weekend at an event that mostly took place after sunset, oval racing track under floodlights, poor lighting conditions. I knew when I bought the camera that noise was going to be the achilles heel of the m4/3 format, and figured I didn't mind as 95% of my photos are taken during the day.

However I'd still like to produce some useful pictures if I can, so a 2-pronged question :

1. What can I do, other than what I am doing, to mitigate the affect of noise?

2. Advice on dealing with noise in PP?

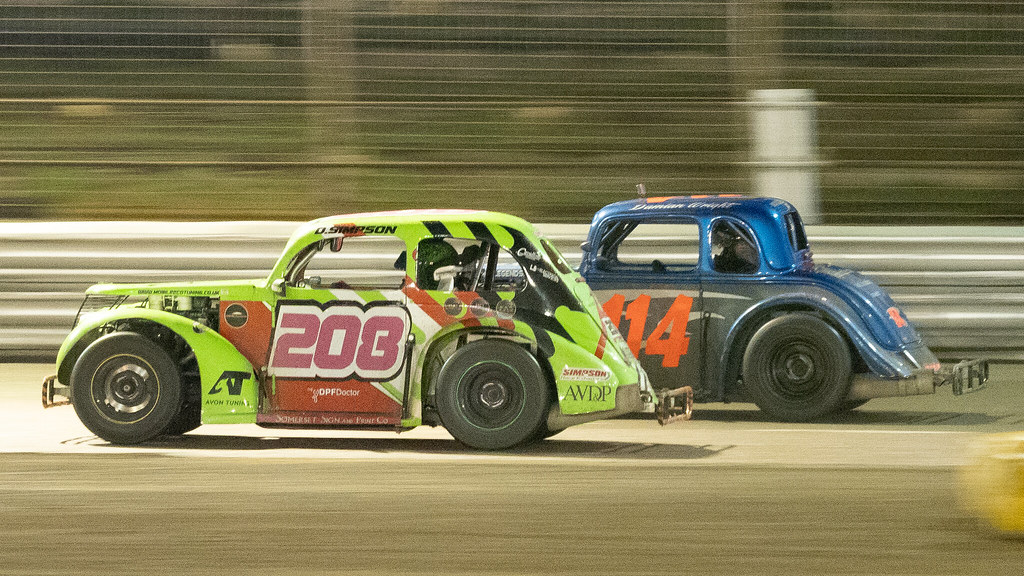
Here's an example image :-


Shutter priority mode, 1/80th of a second, aperture f/3.2 (not sure why it didn't select f/2.8 which the lens is capable of, but it's only 1/3rd of a stop), ISO 6400.

I know I could've gone lower on the shutter, but 1/80th gives a decent amount of motion blur without having to throw too many away due to poor panning skills. In this example, during a day race, I would've had my 1.4x TC fitted (as the above image has been cropped more than I'd usually like), but that would've meant f/4 and ISO 12800(-ish) at this shutter speed.

I don't suppose there's much I can do, other than practise practise practise at lower shutter speeds, but if anyone uses a m4/3 for low light sports and has any tips, they'd be greatly appreciated!

The main question I have is how to handle this in PP.

I use Lightroom CC (the new cloud version because it suits my workflow and I don't need the bells and whistles of the full desktop version). I know I can slide the noise reduction slider over to the right, but is there a process I should be following, I find adjusting exposure, sharpening, clarity or anything else I might want to do to the image only adds more noise. Any tips for handling noise in PP also gratefully received!
 
Last edited:
First thing, are you working on jpgs or raw files? The noise looks like the result of over sharpening to me. Meaning, if this is a SOOC jpeg it's probably already been sharpened and adding more will exaggerate any noise already there. Working on a raw file gives much more control over the end result. However, as you've already stated, m4/3 cameras are not the best at high ISO. I have the EM1 Mk1 and rarely go above ISO 1000.
 
@juggler mainly for posting on social media, so not hugely important, I would mostly just like to produce better images if I can, but I have had friends request some printed copies recently, and have produced some A2 sized prints already, but they were from day time images captured at base ISO with pretty much zero noise. I wouldn't want to attempt to print anything I took this weekend at anything beyond A4, and probably not even that!

@angelpaaul I only shoot RAW and that's the thing I'm struggling with, sharpening adds (even more) noise, but not sharpening means, well, "less sharp" images. Do I sharpen first (in LR) then reduce noise, or the other way round? I can't work out a sequence of steps that gives me better results than what I'm already getting, and I'm guessing that's either because a) I'm already doing the best that can be done, or b) my knowledge is lacking, hence the question!
 
I sometimes do sharpening and noise reduction at the same time in Adobe Raw. It depends on what I'm doing with that particular shot. There are better ways of doing it but this is the quickest method for me. As a rule, sharpening is the last thing to do.

Any chance of sending me a raw file to play with?
 
I don't know what order LR applies noise reduction and sharpening in.

If I use something else to do the job then I reduce noise first, then sharpen a little bit.
Then at the end of any photoshoppery I might do some selective sharpening on salient features.
If there are large graduated areas of colour then I'll actually add some noise at this point.

.. and then I'll sharpen again as I resize the final output.


would mostly just like to produce better images if I can,

Lighting & composition are way more important than noise & sharpening. Admittedly, you've got a tough job on your hands. Can you get closer to the track?
.. you can tell I've never shot motorsport ..
 
There'll be many and varied methods put up here of how to reduce noise and sharpen. Try them all and pick which suits you best. It's a mine field out there!!
 
Any chance of sending me a raw file to play with?

I'll dig out the one above when I get home, I picked that one because it was ISO 6400, the highest I captured (I guess because that's the upper limit I'd set for auto-ISO).

Can you get closer to the track?

Nope, I'm at the fence already, and at 150mm, the extent of my lens, but this is shooting across the track from the other side so as to get the inside view of the cars. I also shoot the outside view at the 40mm short end of the lens as well. It also depends on the track, this is about the biggest we go to, others are smaller and I don't need so much reach.
 
So far I have been impressed with the way DxO PhotoLab handles the noise and sharpening of my EM1.2 files.......this is far as I have more to PP using it but compared to LR that is what prompted me to buy PL.
 
Try boosting contrast and then balancing that against exposure/highlights/shadows - that can often make noise less noticeable. DxO offers advanced noise reduction tools with their elite versions of software, but that may not be needed.
 
I'm also interested in learning more about noise reduction and shoot m4/3rds so will be keeping an eye on your thread too.
The only advice I've read about sharpening is it's the last thing you do as you export from Lightroom.

I have the free Nik tools which are supposed to be good, but frankly I only look at noise reduction as a last resort and my attempts are seldom hit and mostly miss.

As above that image looks OK to me at this size anyway.
 
Downloaded the trial version of DxO Photolab Elite last night, looks horrible, the program and the results it produces. I used it with the RAW file of the image I posted above and couldn't make it into anything I liked, at all.

I guess I just need to approach this in a more methodical way, try and work out what steps to take, and in which order (and perhaps write them down so I know what I've already tried) until I come up with a process that works. Trouble is I'm lazy, and figured asking here would be quicker! :D
 
One thing to try may be blowing it up in something like gigapixel - then reducing it back down again. It's only a theory, but gigapixel may reduce the noise overall when making the image bigger as part of it's interpolation process - which when the image is reduced back down again may look cleaner.

Alternatively make it a feature, create a B&W version of it.
 
There isn't any magic formula, it's a case of balancing sharpening and noise reduction until you get an image you're happy with. Looking at that image on a 23" 1080p monitor I can't see too much noise anyway.

Are you using the masking slider in conjunction with sharpening? Using that makes a huge difference to visible noise created by sharpening. If you hold down the Alt key while dragging the Masking slider , the image will go to black and white, with white showing where sharpening is being applied. Add more masking until you can't see any sharpening being applied to the image noise. I only discovered this a few months ago and it makes a big difference to the final image.
 
I've used Neat Image for years now and find it gives excellent results as long as you get a good series of "profiles" of your camera for every ISO.

EDIT I will say though for 6400 ISO the noise levels are very low on that subject.
.
 
Last edited:
One thing to try may be blowing it up in something like gigapixel - then reducing it back down again. It's only a theory, but gigapixel may reduce the noise overall when making the image bigger as part of it's interpolation process - which when the image is reduced back down again may look cleaner.

Alternatively make it a feature, create a B&W version of it.

I find that the Noise reduction in Gigapixel sometimes gives a kind of "shingling" effect which is why I reduce the noise in my photos using Neat Image then apply Gigapixel without NR.

Topaz also warn against using strong NR in Gigapixel since it may give VERY unusual effects if HAL (my name for the AI) is unsure what the final result should be.
.
.
 
I'll probably be the odd one out here. I like the noise on m4/3 cameras, especially on the older 12MP sensors.
An Olympus e-p3 shot at ISO3200 at night and converted to B&W gives some nice chunky noise that reminds me of Delta/TMax 3200 film
 
Here's the original image, or a part of it, as shot :-


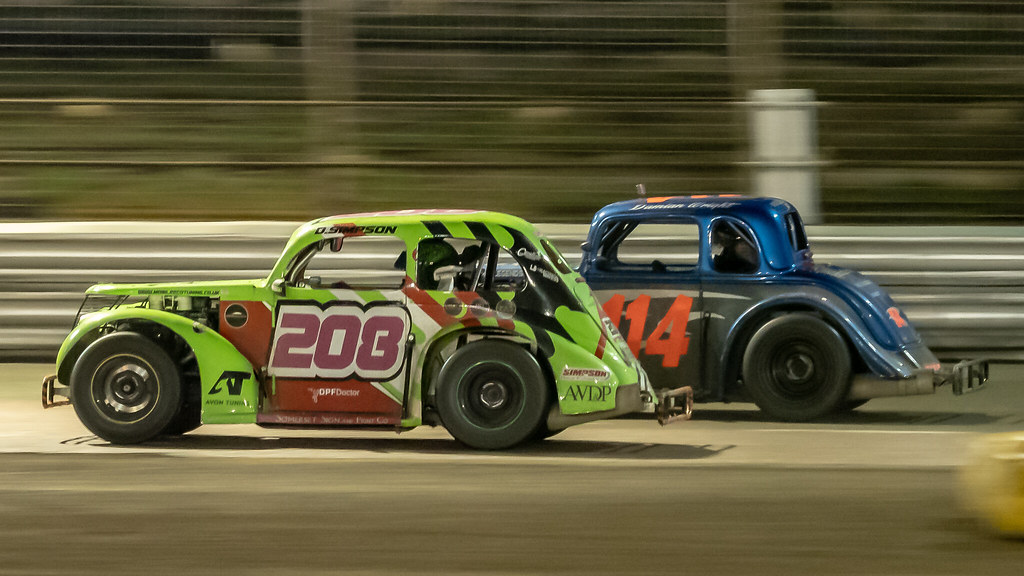
And here's the same after some PP :-


Obviously you can get rid of a lot of the noise by whacking that slider way over to the right, but then it all becomes a bit "waxy" (as someone above mentioned).

Don't know if I'm expecting too much here, I know this isn't where my camera excels, and the processed image is "good enough" for my immediate use ... I'm just one of those people who believes if stuff can be improved I want to improve it, I don't like settling for "good enough" ...
 
Downloaded the trial version of DxO Photolab Elite last night, looks horrible, the program and the results it produces. I used it with the RAW file of the image I posted above and couldn't make it into anything I liked, at all.

It just needs learning - controls don't do the same things as Lightroom, so it takes a while to adapt.
 
Are you using the masking slider in conjunction with sharpening? Using that makes a huge difference to visible noise created by sharpening. If you hold down the Alt key while dragging the Masking slider , the image will go to black and white, with white showing where sharpening is being applied. Add more masking until you can't see any sharpening being applied to the image noise. I only discovered this a few months ago and it makes a big difference to the final image.

Ah, this does indeed make a significant difference! I think in this particular shot there's too much motion blur + I'm too far away (I've found there's no substitute for reach when it comes to m4/3), but on other images where I've been closer to the cars it makes a lot of difference, thanks, great tip! :D
 
Ah, this does indeed make a significant difference! I think in this particular shot there's too much motion blur + I'm too far away (I've found there's no substitute for reach when it comes to m4/3), but on other images where I've been closer to the cars it makes a lot of difference, thanks, great tip! :D

When I read about it earlier this year it was a proper lightbulb moment! You can actually go quite far with your sharpening if you mask off most of the image, especially if you've shot at low ISO to begin with. But even with high ISO stuff you can have Lightroom only sharpen the bits you want and leave the noise. Plus I like seeing the image in black & white and seeing exactly where the sharpening is being applied.
 
Back
Top